I’m sure you’re wondering, what exactly is a Modern Retro Console (MRC)? An MRC is a computer built using modern components that has the look and feel of a computer built decades prior. The MRC may also incorporate other components from past computers such as Joystick adapters, floppy drives or other similar components to give it a more genuine Retro look.
So, what are some of the advantages of building an MRC you might ask?
- Easy access to all of your favorite Retro Computers in a convenient dedicated unit
- Expanded to include new resources such as CD-ROM drives, floppy drives, Retro-style joysticks and more
- It can be used to emulate multiple computers and operating systems within a single build (Examples: C64, PET, VIC-20, TI-99/4A, Windows 95, etc.)
- Designed to use the latest Raspberry Pi 4, should a new Pi version be released the console should be up-gradable (Though, may be unnecessary)
- An Authentic “Retro” look and feel using modern components!
This page has been setup to demonstrate how you can build your own Modern Retro-Computer using off-the-shelf components.
Table of Contents
Components Used
The following are the hardware components I used for my build.
- Vilros Raspberry Pi 4 Complete Desktop Kit with Keyboard and Touchpad Hub Case (2GB) – This kit includes just about everything you’ll need, including the Raspberry Pi 4. If you’re on a budget, just getting this one unit will allow you to follow with most project ideas on this page.
- Nice2MiTu 3.5″ USB External Floppy Disk Drive Portable 1.44 MB FDD USB – If you really want to take your MRC up a notch, adding a floppy drive is an inexpensive and interesting way to do it. Providing the ability to read/write those old floppy disks you have stored in a shoebox in the closet 🙂
- Maxell 3.5 HD 1.44MB Pre-Formatted MF2HD 10-Pack – If you don’t already have any 3.5″ floppy disks or not so sure your late 80’s/early 90’s disks are reliable, you may want to consider picking up a box of new floppy disks.
- Joysticks / Controllers – If you want to use RetroPie, you’re going to want a set of wired or wireless controllers. There are many available to choose from. If you plan on emulating N64 or Dreamcast, you’ll need an analog controller.
Other Options
If you only want a single type of console that has a finite set of games pre-installed or has limited expandability options, you may also consider some of these single-purpose consoles:
- The C64 Maxi Micro Computer – Essentially a modern version of the classic Commodore 64.
- Playstatioin Classic Console – Includes 20 classic games pre-installed.
- The C64 Mini Console – Includes a joystick and 64 games pre-installed.
Getting Started
For my build, I chose to install Twister OS. It seemed like a really good fit for how I wanted to use the Raspberry Pi. I wanted easy access to a graphical user interface, a command-line interface, RetroPie and the ability to launch any other applications easily. Sure, I could have used RetroPie exclusively, but in doing so it would be more cumbersome to setup other operating system such as Windows 95 or OS/2, etc. Twister OS comes with RetroPie and DOSBOX pre-installed, so this was my starting point for my build as it has everything I needed. What you chose to use is totally up to you, but these were my reasons.
Below I’ll show you both, you decide which one or if any are a good fit for your build. You could also install PiOS from scratch, install RetroPie manually, etc. if you prefer. Totally up to you!
Twister OS
If you would like to learn how to install Twister OS, what it looks like and more, please see this video:
RetroPie 4.6
If you prefer to only run RetroPie and don’t plan on installing any other older operating systems like Windows 3.11/9x, OS/2 Warp, etc. and aren’t concerned about having access to a Desktop environment, then installing RetroPie may make more sense for you. Below you’ll find a video to help with installing RetroPie 4.6. I also have a dedicated page on RetroPie Setup, tips and much more information available here. Keep in mind, if you install Twister OS (above), this step is not necessary as RetroPie is pre-installed on Twister OS.
Building the Console
This section will describe the basic steps for setting up the Vilros Raspberry Pi 4 Complete Desktop Kit.
Assembly Steps
- Apply the 4 heat sinks to the Raspberry Pi 4.
- Attach the the Raspberry Pi 4 to the Holder Panel using the 3 included screws.
- Flip the keyboard over (upside down), remove the battery cover and install 2 AAA batteries. Then re-install the battery cover.
- Remove the wireless keyboard dongle and insert it into a USB port on the Raspberry Pi (recommend the USB 2.0 port – black port).
- Install the black fan wire to pin 14 on the Raspberry Pi 4. The red wire goes to Pin 1.
- You may, alternatively, install the HDMI cable inside the case.
- Attach the Holder Panel to the bottom of the case and install all 6 screws.
- Remove the small cover on the bottom of the case to insert your microSD card running the OS (i.e. Twister OS, RetroPie, PiOS, etc.)
- Plug in the USB-C Power adapter
- Attach the microHDMI cable to the console and the other standard HDMI male connector to the TV/Monitor you will be using.
- Flip the power switch on the power adapter to turn on the unit.
- Your new console should now boot and you should see a signal on your TV/Monitor!
Taking the hardware further
Now that your console has been assembled, you may want to use some additional hardware to improve your Retro Experience! Devices like floppy drives, CD-ROM drives, Joysticks/Adapters, etc. Below are a few tips to help with this.
- 3.5″ Floppy Drive – In my opinion, this is one of the cooler accessories to add to your MRC! It’s very easy to use as well. Simply connect the USB cable to your Raspberry Pi 4 and the floppy drive will come to life. Of course, you’ll need to install a 3.5″ floppy disk into the drive to use it, once installed the drive may be used just like you would a USB stick.
- Joysticks/Controllers – You can use whatever type of controller you want to use, wired or wireless. If it’s USB, simply plug it in to an available USB port and it’s ready for configuration in RetroPie. If it’s bluetooth, you can set it up using the icon in the lower-right in Twister OS.
Retro Computer Setup
This section assumes that you installed Twister OS or PiOS as the main operating system for your MRC. If you installed RetroPie-only, some steps may not be as helpful. The following will provide guidance on how to setup each console listed and may reference existing documentation rather than repeating it here.
The following also assumes you have copied over any needed disk images, roms, etc. to the associated emulator sub folders under /home/pi/RetroPie/roms/[emulator sub-folder]. If you will be using a floppy drive, the path will be /media/pi/disk to the contents of the floppy. Also, the floppy disk should be formatted as FAT for easier operation.
Common Questions
The following are a list of questions and answers I’ve received so far in the video comments:
- Can I run the [insert your console name here] in RetroPie? Answer: Most likely, see this link (Official RetroPie Documentation) and look on the left-hand bar for the emulator you’re interested in running for more details.
- The Touch-pad isn’t Retro -is it? Answer: Depending on the emulator/games you may want to run, it could be. The first touch-pad was invented by George E. Gerpheide in 1988. Apple Computer was the first company to license the use of a touch-pad in the Powerbook line from 1994. So, it can be considered retro (source here).
AMIGA Setup
- Launch RetroPie
- Select the RetroPie tab
- Select RetroPie Setup
- Go to Manage optional packages
- Select amiberry and install from binary
- Select back/exit
- Copy your kickXX.rom images to the /pi/RetroPie/BIOS folder (should be named kick12.rom, kick13.rom, kick20.rom and kick30.rom)
- Copy your roms/disk images, etc. to the /pi/RetroPie/roms/amiga sub folder (or floppy drive /media/pi/disk)
- Restart Emulation Station
- The Amiga emulator should now appear as an option
TI-99/4A Setup
What appears below are my quick setup instructions. See the helpful links for the official documentation.
Helpful Links
- For the official documentation on setting up the ti99sim, please visit this page.
- TI-99/Sim – The author of TI-99/Sim
Quick Setup
- Launch RetroPie
- Select the RetroPie tab
- Select RetroPie Setup
- Go to Manage experimental packages
- Select ti99sim and install from binary
- Select back/exit
- Copy the following roms into the BIOS /pi/RetroPie/bios location: spchrom.bin, spchrom.dat, TI-994A.ctg (case-sensitive) & ti-994a.dat (Search the internet for the bios files for the TI-99/4A, I can’t provide links here)
- Copy your cartridge files with a .ctg extension to the /pi/RetroPi/ROMS/ti99 share/folder.
- Restart Emulation Station, you should now see the TI-99/4A as an available system.
Create a TI Floppy Disk Image
The following information was kindly offered by David G. It’s not fully working at the present time, however providing my notes as they exist currently.
- Create a file named maketidisk.sh and copy the following contents:
#!/bin/bash
cd /opt/retropie/emulators/ti99sim
echo Enter a valid TI Disk Name
read -p "Disk Name : " dsk_name
./disk --create=90K /media/pi/disk/$dsk_name
read $Key
- Open a shell and type : sudo su
- Navigate to the directory where the above file was saved (i.e. cd ~/retro/ti99/scripts). May need to right-click the filename, select properties and set the permissions to allow executing.
- Now type : ./maketidisk.sh
- Enter a filename and press enter
- The disk file will be created on the floppy disk, assuming the path to your disk is /media/pi/disk
More Coming
More systems will be added with helpful steps in the future. If you have any recommendations or help that you want to provide, feel free to e-mail me at jon [at] wagnerstechtalk.com or comment in the video above.
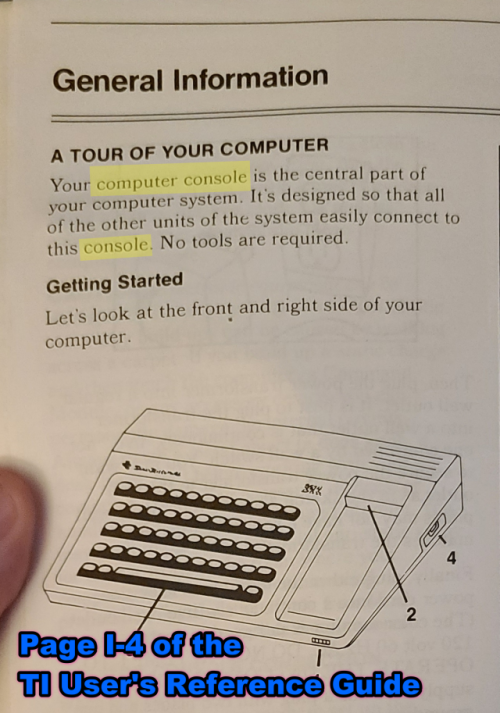
Computer or Console?
I’ve received a few comments stating this is not a console but a computer. That’s correct by today’s terminology, yes of course it’s a computer. But back in 1983 it was also called a computer console or simply console. Today, a console typically refers to a gaming system (Xbox, PSx, SNES, etc.) Please see this image taken from the Texas Instruments TI-99/4A User’s Reference Guide (page I-4, page I-1 as well) where it was referred to as a computer console. So, what terminology is correct? Either 🙂