
Last Update: 6/4/2023
I was asked by CAFAGO , if they had any products I was interested in reviewing. This was around the same time I was watching a CoolToy video on the Powkiddy A12 (awesome video, definitely go check out his review)! I thought –heck yeah let’s check it out!
On the Powkiddy A12, games, game names (file names), artwork, etc. are primarily in Chinese. When I think about new video ideas, I look for ways to add value. Enhance it, add helpful tips, design something new or try to do things that no one else is likely to spend the time doing. This was done for the RG-350 tips page, OpenCADE and others.
In the video above, I start out with the unboxing and review of the unit, but the real focus is to demonstrate how to build your own custom game list. I wanted to improve this little machine which had tremendous potential but is not as easy as it should be to use. After proving it can be done, next I want to show others how they can do it too.
Once I confirmed the same thing that other YouTuber’s had mentioned, it was time to get to work. Many praised the hardware, but unfortunately it fell flat when they show you the game listing is all in Chinese. What appears below will allow you to make your own game list with your own games, optionally add box-art and do it all literally in seconds!
Linking to this page: of course, including my friends and fellow YouTuber’s! You’re more than welcome to link to any of the information you find on this page.
How-To link to a specific heading on this page: go to the Table of Contents and click a section to reference from there. Copy the URL in the address-bar and paste in your video description/post/blog. This will direct a user to a specific section below, very easily!
Table of Contents
Where to buy
- CAFAGO – Awesome price! They shipped this unit promptly for review and with no pre-conditions.
- Powkiddy A13 (newer model) – The Powkiddy A13 is a newer model that features a folding design. Otherwise, the internals are the the same basic specifications.
Emulators
The Powkiddy A12 includes the following emulators :
- CPS – Capcom
- FBA – Final Burn Alpha
- FC – Famicom / NES
- GB – Game Boy
- GBA – Game Boy Advance
- GBC – Game Boy Color
- GG – Game Gear
- MD – Mega Drive
- NEOGEO
- PS – Playstation
- SFC – Super Famicom / SNES
Recommended videos
The following videos will provide you with more information on the Powkiddy A12. These videos are from channels I follow and recommend :
- Powkiddy A12 Unboxing, Gameplay, Adding ROMs and Thoughts [ Retr0rob ] – Excellent video which covers the unboxing, Games, more about the game strings xml file and game-play.
- Powkiddy A12 Review – Mini Arcade! [ COOLTOY ] – Great video that goes into more details about the buttons, HDMI Connectivity and game-play.
Accessories
- Powkiddy A12 with the Arcade Bartop Easy Sticker and buttons Modding (how-to apply video) by Sakura Retromodding (buy here)
Technical Specifications
The following are the specifications for the Powkiddy A12
- 9 inch (1024x600px) Display (LCD)
- CPU is a quad-core ARM Cortex-A7 @1.3Ghz
- RAM is 512MB of DDR3
- 32GB TF Card is included (Games are mostly in Chinese) / Expandable to a 64GB card officially. Unofficially, I’m using a 128GB card
- 2400+ built-in games
- .WAV/.MP3 for music playback
- .MP4 for movies/video
- JPG / BMP / PNG for photo viewing
- Single Speaker @3 Watts (provides nice bass)
- 4000mAh lithium battery
- Arcade joystick and buttons
- HDMI Output (works during my brief testing)
- x2 USB 2.0 ports for connecting an external controller
- 3.5mm Headphone/external speaker jack
Similar devices
The information on this page may also be useful for other Powkiddy devices. However, the A12 is the only unit I own. Therefore, I can’t be 100% certain that similar devices can utilize the code you find below. However, I have a hunch they may work. Examples of systems that may potentially benefit from this information:
- Powkiddy X2 – If you own one of these units and can confirm the instructions on this page helped you, please let me know in any video comment. I will update this statement as confirmed. At this point, it’s unconfirmed.
- Others? Please comment in a video and let me know.
Backup your A12 microSD
This is the absolute first thing you should do! Before reading anything else and especially prior to performing any activities on this page. You want to make sure if things go wrong, and they might, that you can always revert back to the shape the unit is in right now.
How to backup your microSD
- Eject the microSD/TF card from the back of the Powkiddy A12 (it’s spring-loaded)
- Insert the microSD card into a microSD Sleeve/USB reader and into your computer.
- Download and install Win32 Disk Imager.
- Create a folder structure on your computer of C:\PKA12 (or similar)
- Click the folder icon and set the location and filename where the backup image file will be created (file name which will contain your current firmware image, example: C:\PKA12\originalPKA12.img)
- Make sure the correct Device is selected for your microSD card, which you just inserted.
- Click the Read button to read the microSD contents and save it to the originalPKA12.img file.
- Once the read is complete and successful, you’ll have an exact image of your original microSD card which can be restored. You might even want to copy this file to another location as a 2nd backup (NAS, Server, external hard drive, etc.)
- At this point, if you only want a backup of it, you can re-install the microSD card back into your Powkiddy A12. If you want to re-image the microSD card to a new card, see he following section.
Restore your A12 microSD to a new one
After making a backup (see above), I highly recommend you restore the image to a new microSD card if you intend to set it up with your own custom games, artwork and game listing. You want to start with the image that came from the factory. It’s quite possible that there may be a game or two, while even in Chinese, you may want to play in the future that doesn’t exist in your own collection. Additionally, it’s entirely possible that a mistake will be made that will be irreversible. Therefore, working from a backup image makes the most sense to me. Below are the steps to restore your prior backup image:
Restore from Backup Image
- Insert the card into a microSD Sleeve/USB Adapter and into your computer.
- Open Win32 Disk Imager.
- Select the image file you created in the previous section by clicking the browse icon and select the location of your original backup image (example: C:\PKA12\originalPKA12.img)
- Verify that the correct Device is selected (should be your new microSD card)
- Click the Write button.
- The microSD card will be re-imaged with your original backup.
- Remove the microSD card from your computer and install into the Powkiddy A12.
- Power on the unit, the restore is complete!
Helpful Tips
The following are some tips that you may find helpful.
| Question | Solution |
| When I select the History icon, nothing shows up. How can I fix this? | Power off the A12 and remove the microSD card. Install it into your computer. Navigate to the \settings\retroarch sub folder and rename the content_history.lpl file with a .ori extension. Now, re-insert into the A12. You should now see the history of games played. |
| After inserting the microSD card, no games, video or any other content are playable. | Make sure there is a system.tmp file in the root of the microSD card. If there isn’t create one/save it with no contents. Then re-insert into the PKA12 and it should work fine. |
| When playing a video, how do you rewind/fast-forward? | Doesn’t look like you can, I’ve not found a way yet. If you know an answer, please let me know! |
| While the unit has rubber feet, it still slides around – why? | The rubber feet have a plastic material covering them. Simply peel the plastic off and it will stick much better to the surface. |
| The display is stretched when playing a game, can this be fixed? | Yes, go into the Settings –> Display option. Select the Equal proportion option to checked. This should maintain the original aspect used by the game. |
| I created a custom NEOGEO list, but when I launch the game it says unsupported, why? | You likely didn’t copy the neogeo.zip in the games sub-folder, this file is needed to run neogeo games. Copy this file to the game sub-directory and it should run. |
Building your Custom Game List
The following instructions will walk you through how to create your own custom game list for your Powkiddy A12. Before doing so, I can’t stress how important it is that you have created a backup of your A12 microSD first (instructions here). In-fact, after making a backup copy re-image that backup to a new microSD before performing any of these steps. Why? Not because I don’t think it won’t go smoothly, but because you will likely want to be able to play the unit the way you received it at some point or if it does get corrupted you can easily revert back.
Things you’ll need
- PC / Laptop / Raspberry Pi – You’re going to need a computer of some kind to run the code needed to convert your existing game list (i.e. NES, SNES, etc.) to a format that can run on the Powkiddy A12. I used a combination of a Laptop and a Raspberry Pi for my testing.
- Python (v3.8.5 is what I used) – Python is a cross-platform language that until yesterday, I had never used before. I have found it very easy to learn, don’t worry you won’t need to learn how to program in Python but you will want to tweak some settings to let it know where your files are. Pretty easy stuff, I’ll step you through it below.
- Powkiddy A12 – I know, pretty obvious but you won’t believe the number of comments I would get if I didn’t mention it here.
- An extra microSD card – I recommend getting an extra microSD card rather than modifying your existing microSD card. Now the official documentation states it supports up to a 64GB microSD card. However, I’m using a Samsung 128GB card and it’s working just fine. What you decide to use is up to you.
Prerequisites
Before you begin, please install python and the libraries mentioned below.
- If you don’t have Python3 already installed, please see this article. It goes into more detail for various operating systems.
- This code below needs to be run using Python v3.7 (or higher).
- If you’re running Windows, go to the Microsoft Store and click the search bar and type “python” and install v3.8. You may also download and install Python + IDLE from here which comes with a nice IDE. However, make sure you click the checkbox “Add Python 3.8 to PATH” once the installation has completed – Very Important!
- If you’re running this from a Raspberry Pi, python is installed for you but when you type ‘python’ at the terminal prompt, use ‘python3‘ instead. You may also want to install IDLE (great way to edit/run the code below) on the Raspberry Pi using this command: sudo apt install python3 idle3
- IMPORTANT: After installing Python, there are a few additional packages that you’ll need to install before you can run the code below. Open a command-window/terminal and enter the commands below one at a time (see the Command to run column for the commands and run each to install them):
| Library Name | Used for | Command to run |
| Pillow | Converting .jpg files to .png (needed by the A12) | pip install pillow |
| Pathlib | Needed for getting file path information | pip install pathlib |
- Finally you’ll need to download the code below, it also includes a no_art.png file which you can replace with something else, if you want. It just shows a default image if the artwork can’t be found for your game.
- Create a sub-folder somewhere on your computer, perhaps called ‘pka12’ and copy these files in that directory.
Getting the Artwork
This step is optional, but if you want artwork to show on your generated game-list, it will be necessary. These instructions will guide you through how to do this using RetroPie on a Raspberry Pi 4. You can also use Emulation Station running on a PC, however many are likely already familiar with RetroPie so starting with that. If you are new to RetroPie, I recommend reading/watching this page If you’d like to see instructions+video on using Emulation Station on the PC, please comment on the video and let me know you’re interested and I’ll add it to my to-do list.
RetroPie Box-Art Scraping
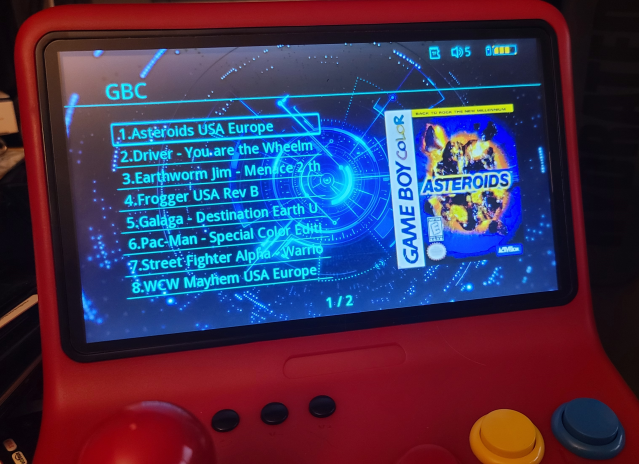
First, you’ll need a collection of games (roms) that you want to install on the Powkiddy A12. In the following examples, we’ll assume you want to install some Game Boy Color (GBC) games. Doing so will also go along nicely with the installation video above. You’ll also want to curate your list, the Powkiddy A12 can display 8 games per page. As you might expect, the more games you have the longer it will take for you to page through to find it. Just a little tip to keep in mind.
Below, we’ll assume you have games but no artwork. I used RetroPie + Emulation Station on a Raspberry Pi to quickly generate the artwork for my games (more on RetroPie gaming here). The following are some basic instructions to get you started:
- Copy your games to the Raspberry Pi in the \RetroPie\roms sub folder.
- Scrape the roms for the Game Boy Color, see this for step-by-step instructions.
- Next, copy the artwork from \opt\retropie\configs\all\emulationstation\downloaded_images\gbc to a sub folder on your computer that has the genGamelist.py file installed. You could generate all of this on the Raspberry Pi itself or on the PC, wherever you’re most comfortable.
- See the next step for Running the code!
Running the code
*NOTE – This tool will not alter/rename your original roms/artwork, but it will make a copy of them and rename them to a new directory in the folder where the program is run. It will use a name that will display fine on the Powkiddy A12. Make sure you have enough disk space before running this tool. Just something I wanted to clarify.

.zip
The following are the basic steps to run the above code:
- Download and extract the above archive.
- Create a folder, name it whatever you like (i.e. PKA12) and copy the two files from the archive in the folder.
- Open the getnGameList.py file in a text editor such as Python IDLE, Notepad++ or simply notepad.
- Edit lines under the IMPORTANT heading: sGamePath and sImageFilePath to point to the location of the games/images that you want converted (your roms). You can also change the bCreateDefaultImageFiles to False if you prefer not to use any box-art, don’t have it yet, not sure yet how to generate it or simply want to generate your game listing (it will create a file called game_strings_en.xml ). Set it to True if you’ve scraped the artwork for your games and want to use them on the Powkiddy A12. There are some other options in the genGamelist.py file, so do check them out but I recommend only changing the 3 mention above at this point. I tried to add enough comments to let you know what’s going on the code. This will make it easier for you to expand on what’s there if you need/want to. Important: Make sure that only your game files and or image files exist in these two sub folders. Any extra folders that do not have a file extension (a file that does not have a “.” dot something will cause an error and the process will stop).
- Once your edits have been made, save the file.
- There are a couple of ways you can run the code. If you have IDLE installed, you can load up the genGamelist.py in there, make the edits mentioned above, then click the menu option Run –> Run Module (or press F5 on the keyboard).
- You can also open a command prompt/terminal window, change the directory to the location where the genGamelist.py file resides and enter the following command: python genGamelist.py
- After it’s run, you’ll notice it created one or two folders in the same directory where the genGamelist.py was run. These folders are ConvertedGameNames and GameImages. Also, you’ll notice a file that was created called game_strings_en.xml. All of these artifacts will now need to be copied to the microSD card on your Powkiddy A12. Please see the next section.
Copying the Files to the Powkiddy A12
This section assumes you’ve already generated the files/artifacts mentioned above. If so, you’re now ready to copy them to your PKA12! These instructions will assume you’re copying files for the Game Boy Color (i.e. “GBC”) emulator. However, it works identically regardless of the emulator. Here’s how:
- Remove the microSD card from the Powkiddy A12 and insert it into your computer.
- Navigate to the location where you ran the genGamelist.py file. In the directory, navigate to the sub folder that was created by the program called \ConvertedGameNames. Copy all files from that folder to the microSD sub folder of \game\GBC (delete any previous files in this folder from the PKA12 microSD before copying your new files).
- Next, copy the game_strings_en.xml file generated by the genGamelist.py file to the microSD card to the \settings\res\GBC\string sub-folder (this is the file that describes how to show your games in the Game menu on the PKA12).
- Finally, let’s copy over the box-art. Copy the contents of the \GameImages to the \settings\res\GBC\pic sub-folder on the microSD card (delete any previous files in this folder from the PKA12 microSD before copying your new files) .
- That’s it! Now just remove the microSD card from your computer, install it in the Powkiddy A12 and power it on.
- Select the Game tile, move the stick to the right and select GBC – Welcome to your new Game List – IN ENGLISH and with YOUR games!
Re-Run the Program
To re-run the program for a different emulator/system, this is what I recommend:
- Delete the \ConvertedGameNames and \GameImages sub folders. *NOTE – To avoid any possibility of accidental deletion, I don’t do that for you in the program.
- You can leave the game_strings_en.xml file as-is, the next time you run the genGamelist.py, it will overwrite it 🙂
Troubleshooting
The following are will help should you run into any issues running the code above:
- I get an error that some library wasn’t found, why? Answer: See the Prerequisites section (above). The table there identifies two libraries which will need to be installed using “pip”. Once each command is run, it will download the libraries needed. Do this for each command. Once done re-run the program.
- I’m getting an error of iFileExtensionIndex=game.rindex(‘.’) ValueError: substring not found, why? Answer: You have a file in one of the sub-directories that does not have a file extension (i.e. a “.” at the end of the filename). Make sure that all files in the sGamePath and sImageFilePath have a file extension and no “other” files. Files such as game saves, .txt files, .info, etc. should not be there. They must purely be the roms or artwork, nothing else.
- I’m getting an error NameError: name ‘FileExistsError’ is not defined, why? Answer: Make sure you are running Python 3.8, also make sure that you installed the libraries mentioned in the Prerequisites section (above).
- It’s stating it can’t find my games, why? Answer: Make sure you’ve entered the path correctly to the location of your games and artwork in the program itself. Look under the “IMPORTANT” comment and change sGamePath and sImageFilePath to reflect the path to the source files. Use a forward-slash (“/”) instead of a back-slash(“\”) when separating folder names.
- I don’t have any artwork, can I just run the program against my games only? Answer: Yes, set the bCreateDefaultImageFiles to False, save and re-run. This will ignore the code to look for the artwork.
Example Generated Output
The following is an example output generated by this code. Keep in mind, I’ve stripped out 97 pages of games so that I can fit the general structure easily below.
<?xml version="1.0"?>
<strings_resources>
<icon_para game_list_total=782></icon_para>
  <icon_page1>
    <icon0_para  name="1.Super Baseball USA" game_path="Super Baseball USA.zip"></icon0_para>
    <icon1_para  name="2.Ninjas Kick Back USA" game_path="Ninjas Kick Back USA.zip"></icon1_para>
    <icon2_para  name="3.7th Saga The USA" game_path="7th Saga The USA.zip"></icon2_para>
    <icon3_para  name="4.ASP - Air Strike Patrol USA" game_path="ASP - Air Strike Patrol USA.zip"></icon3_para>
    <icon4_para  name="5.Aaahh Real Monsters USA" game_path="Aaahh Real Monsters USA.zip"></icon4_para>
    <icon5_para  name="6.ABC Monday Night Football USA" game_path="ABC Monday Night Football USA.zip"></icon5_para>
    <icon6_para  name="7.ACME Animation Factory USA" game_path="ACME Animation Factory USA.zip"></icon6_para>
    <icon7_para  name="8.ActRaiser USA" game_path="ActRaiser USA.zip"></icon7_para>
  </icon_page1>
  <icon_page2>

	.. many more pages repeated here

  </icon_page98>
</strings_resources>
Video Conversion
You can also convert videos to play smoothly on the Powkiddy A12. I’ve converted a few videos from my own collection and below are the steps to do the same:
Convert Video
- Download the version of HandBrake for your computer here.
- Install & launch HandBrake.
- Drag/drop a video file or select Open a single video file for the video you want to convert from.
- From the top menu, select Presets –> Devices –> Android 720p30
- At the bottom, click the Browse button for the Save As prompt.
- Browse to the location where you want to save the converted video for the Powkiddy A12. Make sure the file name you provide ends in .mp4 and click the Save button.
- Click the green Start Encode button at the top.
- Once the file has been encoded, copy the file to your Powkiddy A12 microSD card in the \video sub-folder..
- Then, re-insert the microSD card into the Powkiddy A12 once the file has been copied.
- That’s it!
HDMI Output
With the Powkiddy A12, there is an HDMI output and surprisingly not only does it work, but it works quite well!
- Simply plug in a standard HDMI cable to the port on the back of the Powkiddy A12. Connect the other end to your TV/Monitor.
- Turn on the TV/Monitor and select the correct HDMI Input.
- Power on your Powkiddy A12.
- You should now be able to play games using a different TV/Monitor!
Installing ROMs
First, please don’t ask me or anyone where to get ROMs. We can’t, or shouldn’t answer you. It’s not an appropriate topic for discussion. There are places where you can download legal ROMs for installation to your PKA12.
Change Log
- 2023-06-14 – Minor updates.
- 2021-08-10 – Minor edits.