Robotics: How-to Build your own Robot
If you have ever wanted to assemble your own Robot, teach it new tricks but not sure where to start – you’ve found the right spot. On this page, I’ll show you how you can easily get started with the DFRobot Maqueen Plus robot. Don’t worry, you won’t have to learn any complicated programming and you’ll find some examples below to get you going. Literally anyone should be able to take this information and get started having fun and exploring robotics in a matter of minutes!
If you would like to see more examples or perhaps an advanced video, please comment in the video to let me know! Hope you enjoy the content on this page. –Jon
Code Share: If you’ve created a really cool example program and you’d like to share it on this page, please e-mail your JavaScript code in the body of the e-mail to jon [at] wagnerstechtalk.com. Do not send it as an attachment, any e-mail received with an attachment will get deleted.
Table of Contents
Introduction
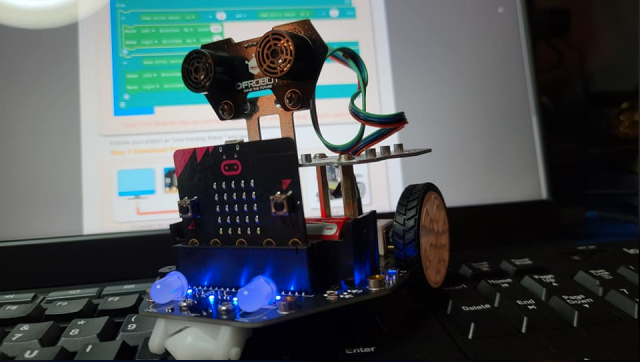
The Maqueen Plus robot has a number of sensors built-in. These sensors allow it to react to things in it’s environment. For example, there are sensors that can be used to allow the robot to follow a line. These sensors detect if a line exists and adjust the movement accordingly. The robot has motors which allow it to move forward, backward, left, right and stop. There are LEDs that can be turned on when certain things happen, expansion ports for adding more, infrared sensors (like what is in your TV remote), ultrasonic sensors (for detecting distance to an obstacle) and much, much more. It’s fully expandable and an excellent platform to get your feet wet in robotics and just have a lot of fun!
Additional Resources
- Great Tutorial on the Maqueen plus in PDF format
- Maqueen Plus Website – the creators of the Maqueen Plus / DFRobot’s wbesite
- Makecode website – A great programming environment for the Maqueen Plus using drag and drop components.
- DFRobot Tutorials – A large collection of tutorials for the Maqueen Plus to help you get started
Where to get a Maqueen Plus
Before you can follow along the steps on this page, you’ll first need a a Maqueen Plus robot and micro:bit. The micro:bit is a small single-board computer (SBC) which you will use to program the robot to perform various functions. You will also need a special kind of battery, the 18650. The robot won’t work with AA or AAA batteries, if you don’t already have these type of batteries and charger you’ll find a recommendation below to help.
Here are some links on where you can find what you need:
- DFROBOT Maqueen Plus Micro:bit Smart Robot ( Amazon or DFRobot )
- micro:bit board ( Amazon )
- EBL Smart Rapid Battery Charger for 18650 batteries ( Amazon )
- 18650 Rechargeable Battery/3.7V 3000Mah Lithium Battery ( Amazon )
Programming the micro:bit
Programming the Maqueen is really very easy. Aside from the stuff mentioned above, you’re going to need a computer (PC, Laptop, Raspberry Pi) as well as a microUSB cable connected to the computer. To program your robot, there are a number of languages you can use but the easiest was to use the micro:bit web development interface from micro:bit. The interface allows you to drop code blocks onto a canvas to program the robot. This makes it very easy for non-programmers to begin doing some pretty cool things quickly. You can also switch between JavaScript or Python, if you prefer.
Let’s step through the basics on how to get started:
- Open a browser window and visit makecode.microbit.org
- Under My Projects, click the “+” to create a new project.
- Give the project a name such as “My test”.
- In the upper-right, click the gear (settings) icon and select Extensions.
- Type “maqueen”‘ and press enter.
- You should see two extensions, one for maqueen and one for DFRobot-Maqueenplus. Select DFRobot-Maqueenplus. This will add all the extension code to allow you to easily program the robot.
- For specific code examples, please see blow.
- To download the code to the micro:bit (your robot’s brain), simply connect the microUSB cable to the micro:bit and the other end into your computer.
- Click the “…” beside the Download button to pair your device (select your micro:bit ).
- Click the Download button to download the code to the micro:bit .
- Unplug the micro:bit from your computer and insert it into the slot on the Maqueen Robot (LED’s should be facing forward).
- Flip the power switch on and something exciting should happen!
TIP: In the makecode editor, you can toggle between Blocks, JavaScript and Python. Program your robot in an interface/language that is easiest for you.

Example Code
This section contains various samples which I’ve either found, modified or created for you to try out. At the present time, the number of examples is limited but in the next couple days/weeks, you should see several more appear as I learn more about this awesome little robot.
Measure Distance in Inches
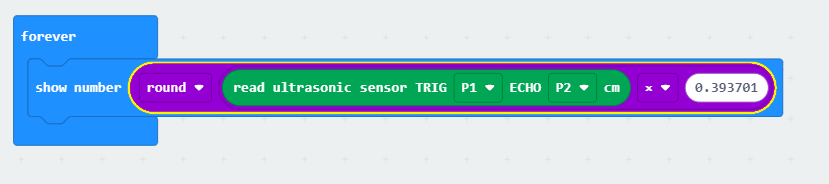
In this example, we’ll create a simple distance measuring application. Instead of displaying the distance in cm on the micro:bit, we’ll instead convert cm to inches and round the value to the nearest whole number. This would be very useful when creating a program to check the distance to the next obstacle and then turn the robot until there is no obstacle in it’s path.
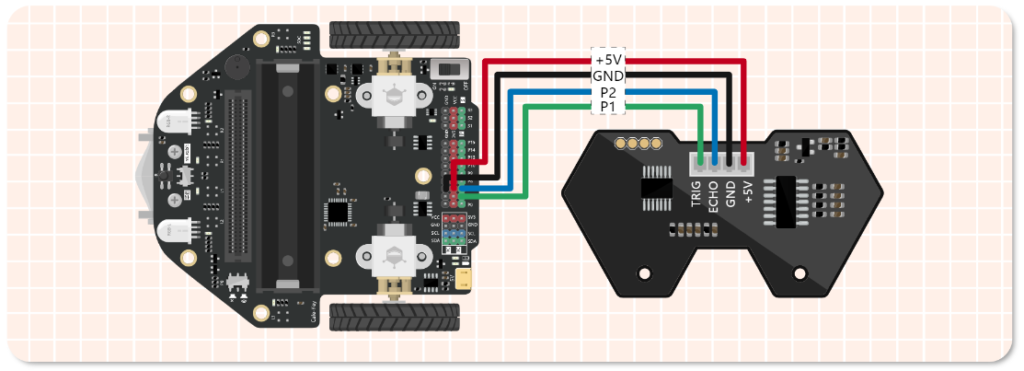
You’ll first need to make sure you have the Ultrasonic sensor wired up to your Maqueen. Below is the wiring diagram for it. The Ultrasonic sensor is used for determining the distance from the sensor to some object, if detected. We’ll use the code in this section to see what the distance reported by the sensor is, in inches.
Block Code
JavaScript code Example
After following the steps for Programming the micro:bit (above), select the JavaScript button and copy/paste the following code:
basic.forever(function () {
    basic.showNumber(Math.round(DFRobotMaqueenPlus.ultraSonic(PIN.P1, PIN.P2) * 0.393701))
})
Obstacle Avoidance
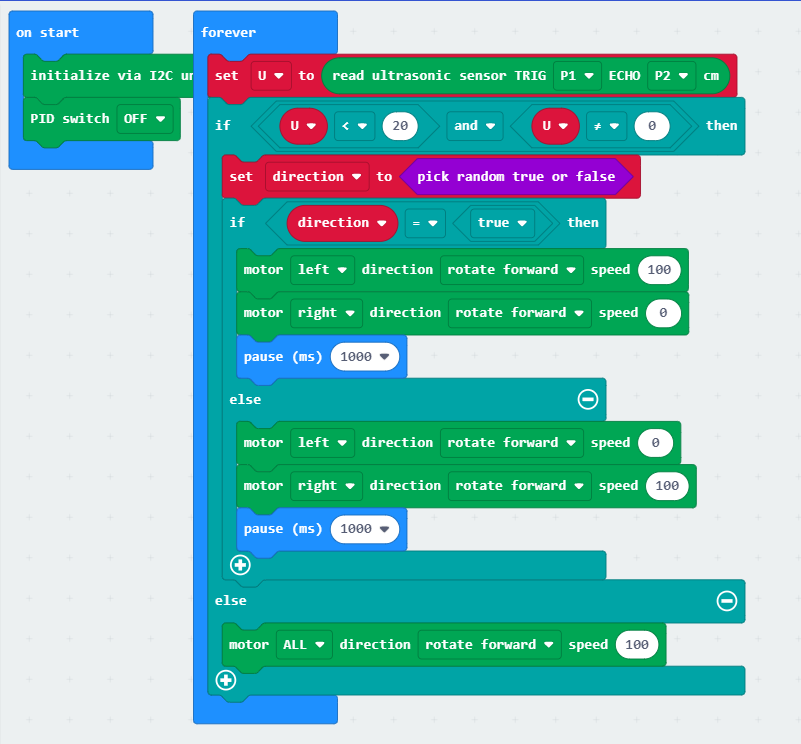
Here’s a cool program to try with your Maqueen, obstacle avoidance! This program will check the Ultrasonic sensor to determine if there is an obstacle in it’s path, if so it will pick a random direction and move accordingly. This code could definitely use some improvements, so tinker and make it better!
You’ll first need to make sure you have the Ultrasonic sensor wired up to your Maqueen. Below is the wiring diagram for it. The Ultrasonic sensor is used for determining the distance from the sensor to some object, if detected.
Block Code
JavaScript code Example
After following the steps for Programming the micro:bit (above), select the JavaScript button and copy/paste the following code:
let direction = false
let U = 0
DFRobotMaqueenPlus.I2CInit()
DFRobotMaqueenPlus.PID(PID.OFF)
basic.forever(function () {
    U = DFRobotMaqueenPlus.ultraSonic(PIN.P1, PIN.P2)
    if (U < 20 && U != 0) {
        direction = Math.randomBoolean()
        if (direction == true) {
            DFRobotMaqueenPlus.mototRun(Motors.M1, Dir.CW, 100)
            DFRobotMaqueenPlus.mototRun(Motors.M2, Dir.CW, 0)
            basic.pause(1000)
        } else {
            DFRobotMaqueenPlus.mototRun(Motors.M1, Dir.CW, 0)
            DFRobotMaqueenPlus.mototRun(Motors.M2, Dir.CW, 100)
            basic.pause(1000)
        }
    } else {
        DFRobotMaqueenPlus.mototRun(Motors.ALL, Dir.CW, 100)
    }
})
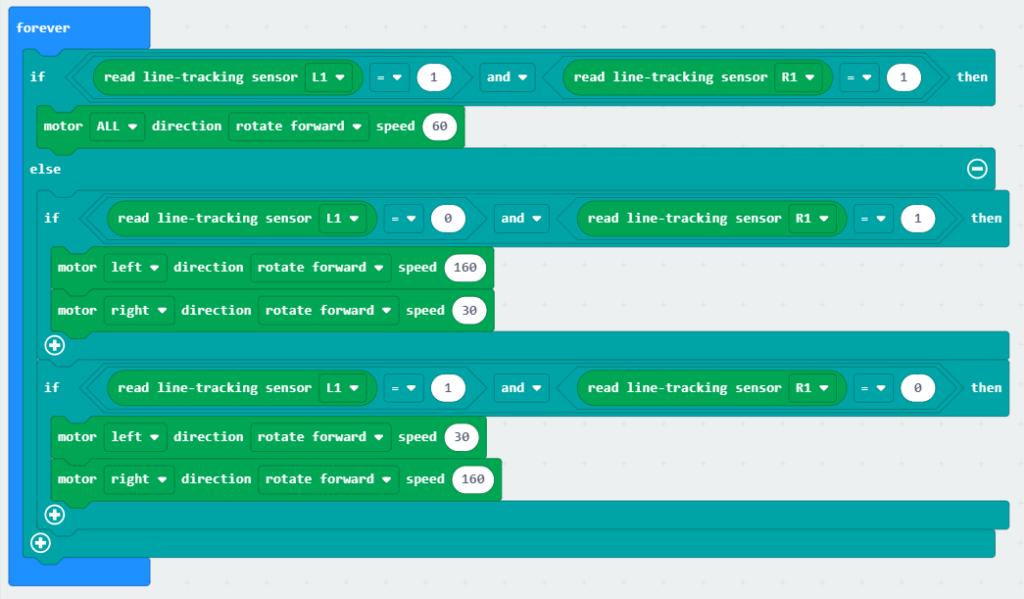
Line Tracing
If you want to teach your Maqueen to follow a black line, for example to follow the lines on the circle using the poster that was included in the kit, this should help. Your Maqueen came with a poster and on the poster you’ll see a large circle once unfolded. You can use the following code to download it to the micro:bit, then power-on your Maqueen to watch it follow the circle. This is a fun example to help you get started with your robot and inspire new ideas and improvements to the code!
Block Code
JavaScript code Example
After following the steps for Programming the micro:bit (above), select the JavaScript button and copy/paste the following code:
basic.forever(function () {
    if (DFRobotMaqueenPlus.readPatrol(Patrol.L1) == 1 && DFRobotMaqueenPlus.readPatrol(Patrol.R1) == 1) {
        DFRobotMaqueenPlus.mototRun(Motors.ALL, Dir.CW, 60)
    } else {
        if (DFRobotMaqueenPlus.readPatrol(Patrol.L1) == 0 && DFRobotMaqueenPlus.readPatrol(Patrol.R1) == 1) {
            DFRobotMaqueenPlus.mototRun(Motors.M1, Dir.CW, 160)
            DFRobotMaqueenPlus.mototRun(Motors.M2, Dir.CW, 30)
        }
        if (DFRobotMaqueenPlus.readPatrol(Patrol.L1) == 1 && DFRobotMaqueenPlus.readPatrol(Patrol.R1) == 0) {
            DFRobotMaqueenPlus.mototRun(Motors.M1, Dir.CW, 30)
            DFRobotMaqueenPlus.mototRun(Motors.M2, Dir.CW, 160)
        }
    }
})