ALP Deluxe Haptics Upgrade Kit by BuyStuffArcades
Last Update: 7/26/2022
*NOTE: This is a 3rd party mod kit not endorsed by AtGames and installing it may void your warranty. They made every effort to make it both as safe and as easy to install as possible. Any modifications made to your Legends Pinball machine are done so entirely AT YOUR OWN RISK.

My friends over at BuyStuffArcades.com asked if I was interested in checking out their ALP Deluxe Haptics Upgrade Kit. I was already familiar with BuyStuffArcades which makes many awesome gaming accessories, including custom ALP Backboxes. What you’ll find below is a 3rd party kit that is not certified by AtGames –just to be clear.
I had been asked, more than a few times, if this was something I’d look into by viewers. Up until now, there wasn’t an off-the-shelf kit for the ALP that someone could buy (or if there was I wasn’t aware of it). I’ve had no prior experience with upgrading the haptics before receiving this kit and went into it without any idea of what to expect. After installing this kit, there is an AMAZING difference!
This ALP Haptics Kit does not require a 7.1 Sound card in order to function. As a result, it is not designed to give full SSF effects, but rather a very close substitute, especially with VPX. It is, however, possible to upgrade further to full SSF with additional addons. Please contact BuyStuffArcades for more details.
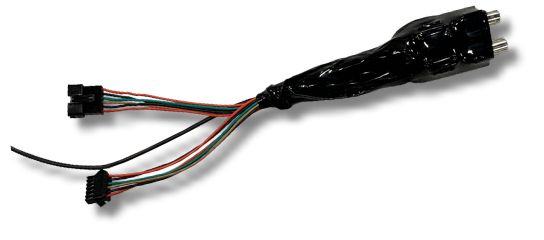
The magic with their ALP Haptics kit is in the special wiring harness they include to fit perfectly between your existing ALP and the Backbox speaker connection. This harness safely extracts the audio and forwards it to the the amp, bass shaker and exciters at the front of the machine.
There is one aspect I need to make you aware of. After installing this kit, the exciters will activate the internal accelerometer (even on low settings) when used with any native Legends Pinball Tables. This will mean you’ll likely need to disable (in software) the accelerometer used for cabinet nudging. Otherwise, they will kick-in and you’ll be tilting the ball regularly. There may be other options in the future, but if you’re fine with using the nudge buttons, you’ll definitely hear and feel the difference with this kit!
Also below is information on setting up the kit for use with Visual Pinball X (VPX) such that the haptics are independent from the music. This provides a very realistic and immersive pinball experience. Additionally, sections below also discuss Zen Pinball FX3 and Future Pinball as well.
I hope you find this guide and video helpful! As always, I appreciate you watching and your support. If you have any questions not already addressed in the video or this guide, please leave a comment in the above video and I’ll try to answer it or reach out to BuyStuffArcades to find out for you if I don’t know the answer. Existing Q&A can be found here. Let’s get started!
-Jon
How-To link to a specific section on this page: go to the Table of Contents (below) and click a section to reference. Copy the URL from the address-bar of your browser and paste in your video description/post/blog. This will direct a viewer to a specific section in any of the guides you find here.
Table of Contents
Where to Buy?
The kit shown on this guide may be purchased directly from BuyStuffArcades.com from the link below. There are additional options, however this guide focuses only on the Deluxe version of the kit:
- ALP Deluxe Haptics Upgrade Kit ($179 USD, includes shipping within North America) – The ALP Deluxe Haptics Upgrade Kit includes additional accessories to enhance using the haptics with your PC. Namely: A two-input audio switch, ground loop isolator and 10 foot audio cable. A simple click of the button and your haptics will switch between build in ALP sounds and your dedicated PC sounds. This is especially useful for VPX tables.
- ALP Standard Haptics Upgrade Kit ($159 USD, includes shipping within North America) – This kit does not allow for the VPX effects separation. It is primarily for those who prefer to play the ALP Tables only.
- ALP Wiring Harness Only ($49 USD, includes shipping within North America) – If you prefer to purchase only the wiring harness and add your own equipment, the harness may be purchased separately.
Tools Needed
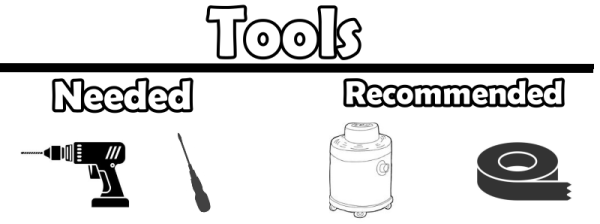
In addition to the kit from BuyStuffArcades and of course an AtGames Legends Pinball machine, you’ll need the following tools:
- Power Drill and 1-1/4″ drill bit (a hole will need to be drilled in the bottom of the cabinet).
- Phillips head screw driver (with Philips head attachment for the drill)
- Recommended: vacuum with hose / shop vac
- Recommended: electrical tape
- Recommended: Glass cleaner and paper towels
- Recommended: 100pcs Adhesive Cable clips – Used these clips to secure the wires under the Pinball Cabinet and shown in the video above for reference.
Deluxe Kit Components
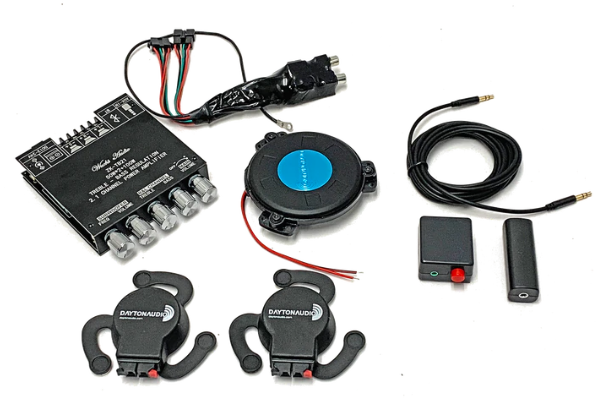
The following is a list of components that were provided with the Deluxe kit:
- Pair of Dayton exciters
- 24″ speaker wires (for Dayton exciter)
- Mini bass shaker
- 18″ wire and connector (for bass shaker)
- TB21 amp
- Amp mount blocks and x2 screws
- AC adapter with extension cable (for amp)
- Impedance converter with ALP connectors and grounding wire
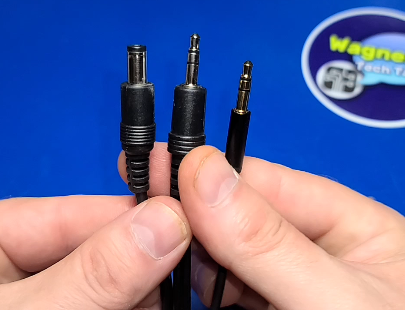
- RCA to 3.5mm cable
- 3.5mm to 3.5 mm cable (6′ long)
- 3.5mm to 3.5mm short (6″ long)
- Audio Switch
- Ground Isolation module (to go between the PC audio output and the amp/ALP)
Q&A
If you have any questions about this kit that you would like to see answered, please comment in the video above. If I don’t know the answer, I’ll ask BuyStuffArcades and add the question and answer in this section for everyone’s benefit.
- Q: I am (or not) hearing sound coming from the ALP after installing this kit, why? The amp included in the kit does include a bluetooth radio. It’s possible that someone has connected to the amp ( WZ-BT5.0) from another device. If so, disconnect any other connected bluetooth devices from the amp.
- Q: Where do I hook up the Ground Loop Isolator? Also, what input does the computer audio cable go into on my computer? A: The ground loop isolator goes between your PC and the audio cable that runs directly into the audio switch. It is usually easiest to plug it in at the PC end, but it can be located anywhere in between. The most common audio port to use on your PC is usually the green speaker port, located at either the back or front of your PC. Some PCs have two such ports and they can either be independent or linked together.
- Q: (asked of BSA and added their response): What is the difference between solenoids and your haptics kit? A: The ALP Haptics upgrade kit is a significant improvement over the built in haptics for both ALP tables and OTG. The results, especially on VPX tables, are outstanding.
Solenoids are a totally different experience – they are wired directly to the flipper buttons so they go off every time you hit the buttons, whether playing a table or not. They also do not have a volume control. They will give the best €œthump€ but that is the only sound they make. You don€™t get any ball rolling and bumper effects, for example, that you do with SSF.
Some people do both, which is probably the ultimate experience, as long as you wire a switch to turn the solenoids off when you don€™t want to wake up the whole house. But if it was one or the other, I (Buy Stuff Arcades) would go with SSF first every time.
- Q: The 3.5 mm cable next to the red audio switch, where does it go to? Also where does the 2 in the back lead to? A: The 90 degree connector goes from the front of the A/B switch to the back of the amp (AUX input). There is a long 3.5mm audio cable that connects from the PC directly (and the included ground-loop isolator adapter) to the back of the A/B switch (for VPX, FP, FX3, etc.). The other 3.5mm cable goes to their custom wiring harness/adapter that has two RCA female jacks on the end inside the backbox and the 3.5mm connection to the other side of the A/B switch (it doesn’t matter which cable is plugged into either of the two female 3.5mm jacks). The small A/B switch simply toggles between the two, nothing more. The 3rd cable is the power extension cable to the amp.
- Q: After setting the Audio Options in VPX, do these changes apply to all tables? A: Yes, this setting is global for all VPX tables and when launched by a front-end.
- Q: Doesn’t all sound come out of left channel only (AtGames design)? A: Whatever stereo sounds are programmed, the haptics kit will now represent. The built in haptics are just a mono channel.
- Q: Do you have steps I can print while installing the kit? A: You can print-preview this page and set the start of the print at this section.
Pinball Setup
This ALP Haptics Kit does not require a 7.1 Sound card in order to function. As a result, it is not designed to give full SSF effects, but rather a very close substitute, especially with VPX. It is, however, possible to upgrade further to full SSF with additional addons. Please contact BuyStuffArcades for further details.
In the sections below, we’ll take a look at any customizations that may be helpful for the various pinball packages.
ALP Built-In Tables

While the audio sounds substantially better with this kit and the amp, it results in the ball reacting to all audio effects & music through the amplifier. There are two options mentioned below. The first uses the amp + haptics, the second does not. There may be other options in the future, so please check back for the latest information.
Option 1: Turn Accelerometer Off
You may want to turn the accelerometer off. Otherwise, the audio from the exciters will cause the pinball to bounce and will tilt the game. For this reason, I recommend the following:
- Load a pinball table (i.e. Arkanoid used in this example).
- Press the AtGames/Menu button.
- Select the Settings option.
- Move to the right until you see Toggle Haptics. Press the Select button until the the Haptic Strength (global) is set for Low/Medium.
- Move to the right to select Toggle Accelerometer Sensitivity and set this option to Zero.
- Press the Rewind/Back button and the AtGames/Menu button to exit the settings.
Option 2: Don’t use the AMP
You can also choose to use the accelerometer along with the backbox speakers and not use the amp.
- Turn the power off to the amp.
- Load a pinball table (i.e. Arkanoid used in this example).
- Press the AtGames/Menu button.
- Select the Settings option.
- Move to the right until you see Toggle Haptics. Press the Select button until the the Haptic Strength (global) is set for Low/Medium.
- Move to the right to select Toggle Accelerometer Sensitivity and set this option to Low, Medium or High.
- Press the Rewind/Back button and the AtGames/Menu button to exit the settings.
- *Note – if the speakers are noticeably quiet, power off the ALP and back on.
Visual Pinball X
Below are some suggestions for an enhanced experience with Visual Pinball X (VPX). If you’re not already familiar with VPX or how to set it up, you may want to check out the ALP PinUP Popper Baller Installer Guide (discusses installation of the Popper front-end, VPX & Future Pinball). If you are new to connecting a PC to your Legends Pinball entirely, I’d recommend starting with the Legends Pinball Mod Series: Season 1 Guide.
At this point we’ll assume that you already have your PC connected to your ALP, installed VPX and need some tips/recommendations on how to improve the experience with your new ALP Deluxe Haptics Upgrade Kit.
Option 1: Haptic Effects
The following steps will assist you in maximizing your experience with the haptics. It will separate the audio from the Sound Effects (haptics) from the Music Playback. That is, the sounds for the flippers, bumpers, etc. will come through the amplifier to the bass shaker and Dayton exciters. The music for the table will play through the ALP speakers. This is my personal favorite way to play VPX and the immersion is very impressive! Keep in mind, this is not the only way to set it up, there is an Option 2.
- Be sure that the 3.5mm audio cable from the PC is connected to the amp from your kit. The included isolation adapter should be between the PC and the 3.5mm extension cable to minimize any interference. Also, ensure your Audio A/B switch is set for the PC Audio connection (i.e. if you are switching from the ALP Native games to the PC, press it once – it just toggles between the two).
- On the PC, launch Visual Pinball X manually and select File †’ Open and load a .vpx table to test. It should look something like the following.
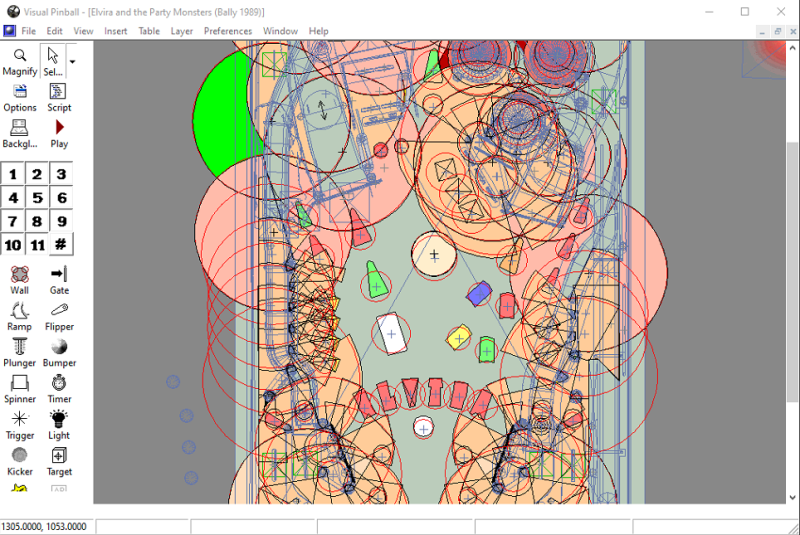
- From the top menu, select Preferences †’ Audio Options…
- You should see the Audio Options dialog shown below.
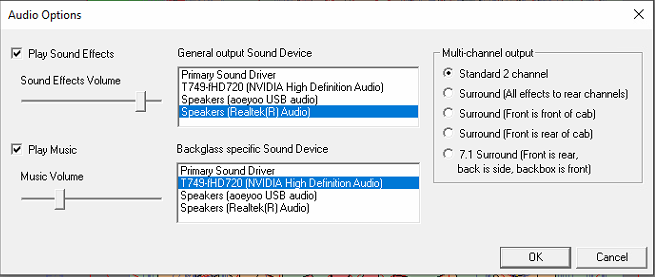
- For the General output Sound Device section, this option should be set for your 3.5mm audio jack going to your amp. It’s typically identified as “Speakers (…)”.
- For the Backglass specific Sound Device section, set this for the HDMI Output signal to your ALP. This will typically be your graphics card (NVIDIA in my case).
- You can adjust the volume levels for the Play Sound Effects and Play Music volume as-needed by adjusting the sliders on the left for each.
- Click OK on the dialog and press the Play button to test the sounds. Adjust as-needed for your preference. Keep in mind, you may need to adjust the treble, bass and volume levels on the amp as well as the volume on the ALP itself to suit your preferences.
- If you are using PinUP Popper as your front-end, after making the above change you’ll be all set there when playing VPX tables through the interface.
- Have fun!
Option 2: Amp Only
If you prefer the audio for the music as well as the sound effects to all play through the amplifier, you can set the Play Sound Effects and Play Music to the HDMI output device mentioned above. Using this method, it will still sound good, but as the master volume is adjusted on the amp/ALP it will adjust both music and effects. There will not be any true separation with this option.
*NOTE: With the above settings, the backbox sound is feeding the haptics and therefore needs to be up to a certain volume level. The custom harness includes resistors which keep the backbox speakers at slightly lower levels to force more sound to the haptics.
Pinball FX3
Within Pinball FX3, there are options for setting the Sound Effects and Music levels, however it does not provide the ability to select a specific output audio device. All audio will travel through both the backbox and the haptics in this case (similar to Option 2 above for VPX).
- Press the Audio A/B switch to switch to the audio signal to the HDMI interface (if not already set).
- Within Options †’ Audio, adjust the following options according to your preference:
- SFX Volume
- Physics Volume
- Music Volume
- Adjust the treble, bass and volume levels on the amp as well as the volume on the ALP itself to suit your preferences.
- Have fun!
Future Pinball
Within Future Pinball, it does not provide the ability to select a specific output audio device to separate the Sound effects/Music channels unless you implement PinEvent V2 (please see this section for more information). All audio will travel through both the backbox and the haptics in this case (similar to Option 2 above for VPX).
- Press the Audio A/B switch to switch to the audio signal to the HDMI interface (if not already set).
- Adjust the treble, bass and volume levels on the amp as well as the volume on the ALP itself to suit your preferences.
- Have fun!
PinEvent V2 Guide
Terry Red informed me that it is possible to add separation for all feedback / mechanical / ball rolling sounds in Future Pinball using his own FP releases only. See here for his detailed guide and videos on PinEvent V2.
*NOTE: I’ve not personally tried this solution, however Terry has created extensive documentation and videos on this subject.
Additional Guides
While not required to use this kit, if you need additional information on setting up or modding your Legends Pinball, the guides below will assist.
If you’re not already familiar with how to get started with Pinball FX3, Visual Pinball X (VPX) or Future Pinball (FP), click on one of the images below to go directly to the respective guide for each.


Installation Preparation
This section will describe some of the preparation needed before we move on to installing the components in the Legends Pinball machine. I consider these smaller steps/sub-assemblies that you’ll want to prepare away from the cabinet itself.
Dayton Exciters
There isn’t much prep here, but it does make it a little easier to take care of these steps at a bench/table rather than at the machine.
- Locate both sets of speaker wires for the Dayton exciters. You may want to use a pair of clippers/scissors to cut the middle about 1/4 inch. Then twist each black and red wire tightly.
- On each exciter, press down on the black/red terminal and insert each colored wire into their respective location.
- Repeat the above for both exciters and wires.
AMP Assembly
The amp will arrive in it’s own box. It does not come fully assembled, the following will assist with that.
- On the back of the AMP board insert one of the gold screws through the back and screw in the gold standoffs. Repeat this for all four screws+standoffs.
- Position the top plate such that the notch in the middle provides access to the screw terminals (with the markings visible) and install the four small black screws to secure it in place.
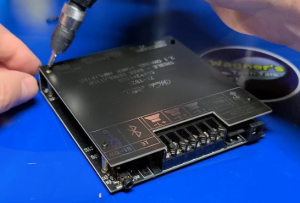
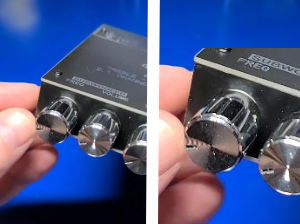
- Install the back plate into the four gold screw holes with the x4 small black screws.
- Facing the front of the amp, turn all knobs counter-clockwise and then install each of the 5 plastic knobs in an orientation similar to the following image. The notch should be oriented near the 8 o’clock position.
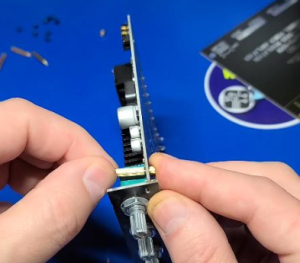
Bass Shaker
The bass shaker speaker will also be in it’s own box and will contain mounting hardware, a mount and the bass shaker itself. The following will assist with this subassembly:
- Place the mount on the desk and align the holes for the bass shaker over the mount.
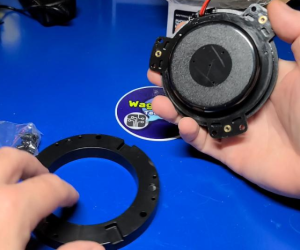
- Using the x6 smaller screws, secure the shaker to the mount (a larger philips head screwdriver may work best here).
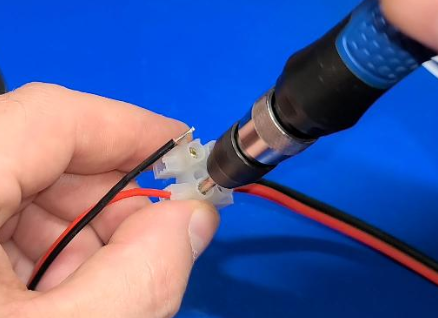
- Within the wiring package, locate the connector with the two screw terminals. Using a small Philips head screwdriver, loosen the two screws. Then insert the red+black wires in the same orientation as the connector and tighten the two screw terminals.
ALP Assembly
*NOTE: The instructions that follow are how I installed the ALP Deluxe Haptics Upgrade Kit into my Legends Pinball. This is not to say it’s the best or only way to install it. If you prefer not to drill a hole in the bottom of the cabinet, you should be able to acquire longer speaker cables and mount the amp towards the back of the machine and the bass shaker inside the cabinet. What follows is one installation example that worked well for me.
In this section, we’ll assemble the BuyStuff Arcade ALP Deluxe Haptics Upgrade Kit to the AtGames Legends Pinball (ALP). If you haven’t already done so, please complete the steps within the Preparation section before proceeding here.
- Power off the ALP and disconnect the power cable at the back of the machine.
- Remove the 13 screws on the top rails of the Legends Pinball (x5 on each side, x3 on the front). Remove the front lock-down bar first, then set all x3 bars away from the machine.
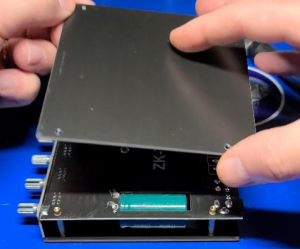
- If your ALP has four screws holding the (arcade) control panel to the frame of the ALP, remove them and set them in a safe place for later re-installation.
- Disconnect the red+black haptic cable from the panel. If you are using the Arcade Control Panel (ACP), also unplug the USB cable and set the panel off to the side. If using the standard control panel, disconnect the remaining cable and set the panel away from the machine.
- Inside the cabinet, you’ll find a bracket with two screws holding in a ribbon cable, USB and haptic cable. Remove the right-most screw. Then, gently slide the cables to the far-right of the cabinet. The reason for this, we will be drilling a hole in the cabinet and don’t want these cables in the way when we do.
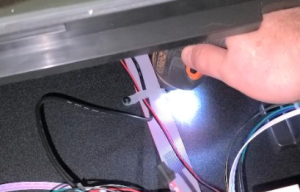
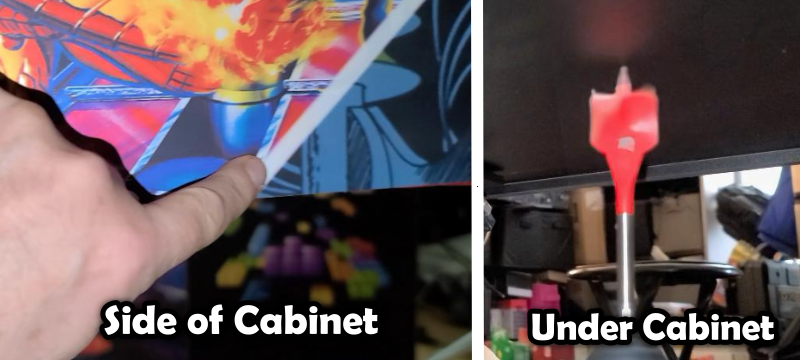
- Using a 1-1/4″ drill bit, locate the line shown below in the cabinet artwork to use as a guide. Then underneath the cabinet locate the approximate center from the guide line and drill the 1-1/4″ hole. (CAUTION: Make sure all cables are out of the way before drilling)
- Using a vacuum/shop-vac, remove any debris from the inside of the cabinet after drilling.
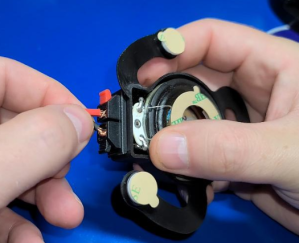
- Position the Dayton exciters near the flipper buttons on each side of the cabinet. Remove the protective backing, then affix the exciters close to the buttons as shown below.
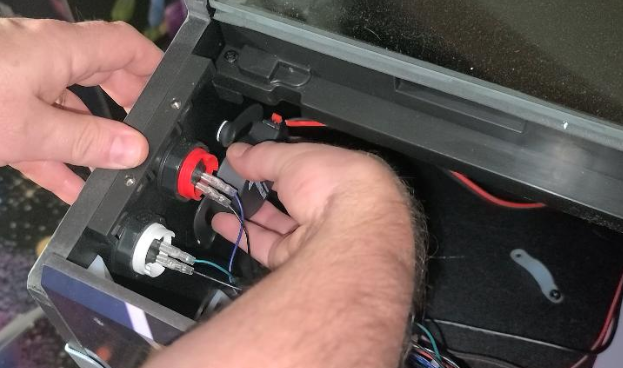
- Feed the wires for the left/right exciters through the hole in the cabinet.
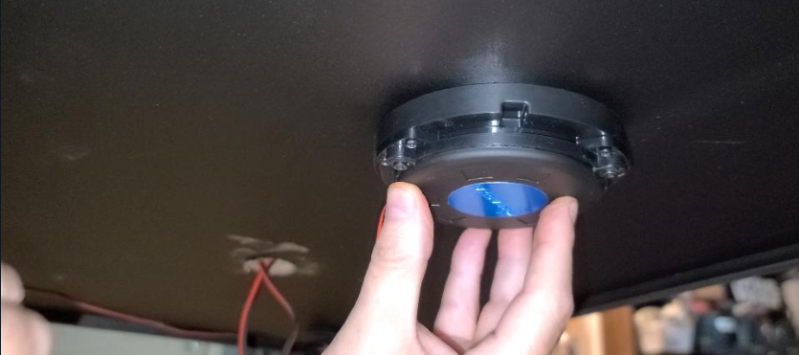
- Under the cabinet, position the Bass shaker near the middle of the cabinet (middle being front-back and left-right) and secure with the x3 larger black screws as shown below.
- Take the power extension cable (male end), audio cable and 3.5mm PC Speaker cables and wrap a piece of electrical tape about 4″ below the connectors. This will make it a little easier when feeding them through the back of the cabinet.
- Remove both panels at the back of the ALP.
- Slide the 3 cables mentioned previously down the right-side of the back of the cabinet and then pull them up towards the front. Then place the cables through the hole in the cabinet.
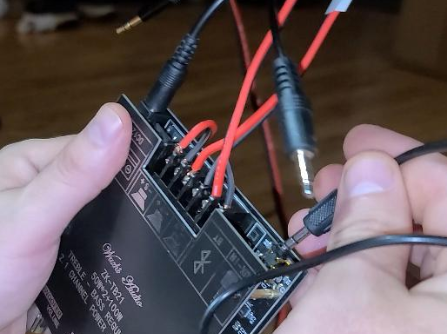
- Loosen all 6 screw terminals on the back of the amp.
- Tightly twist each of the ends of the Bass shaker wires and x2 Dayton speaker wires.
- Starting with the Bass shaker, screw the black wire to the “S” negative (-) terminal and the red wire to the positive (+). Make sure they are fully tightened by a gentle tug to make sure they are secure.
- For right Dayton exciter wire, connect the red wire to the positive (+) terminal and the black wire to the negative (-) terminals on the amp. Repeat for the left exciter wire.
- Plug in the power extension cable into the power input on the back of the amp (*Note – If there is a plug in terminal for the power, you can remove it as it’s not needed). We’ll plug in the extender cable directly to the amp.
- Looking at the short 3.5mm audio cable plug in the straight end into the right-back of the amp and the 90 degree end into the small audio A/B switch.
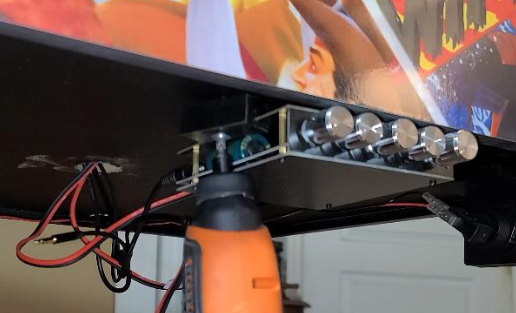
- Partially screw in each of the mounting screws for the resin spacers/brackets for the amp (only the tip of the screw visible on the opposite side). Then slide each edge over the top panel of the amp.
- Make sure the amp is position such that it slightly overlaps the edge of the ALP cabinet. Then, secure the x2 screw+mounts under the cabinet as shown below.
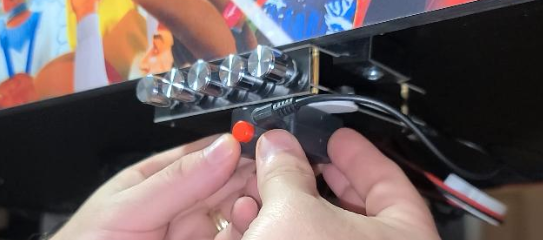
- For the A/B audio switch, plug in the line for the x2 3.5mm audio jacks (one for the PC audio cable, the other for the ALP audio cable).
- If your audio switch included double sided tape, remove it and secure it to either the cabinet or below the amp (I chose below the amp for easy access).
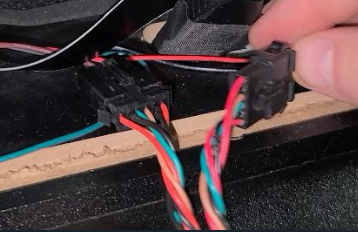
- Within the ALP backbox, disconnect the audio connector and install the custom audio connectors from the wiring harness between the two backbox audio connectors as shown below.
- Connect the red+white RCA audio cables to the custom audio wiring harness input terminals.
- On the bottom of the ALP cabinet, you’ll see a larger silver box. This is the power supply for the ALP. Remove the far-right screw, use that screw to secure the grounding terminal of the audio adapter back into the power supply screw hole. This will provide proper ground/shielding for the audio connector.
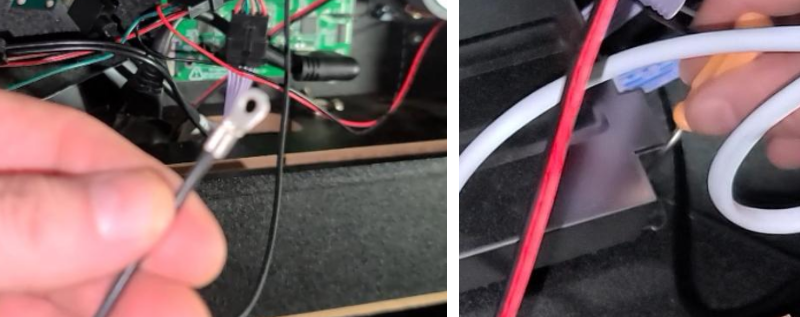
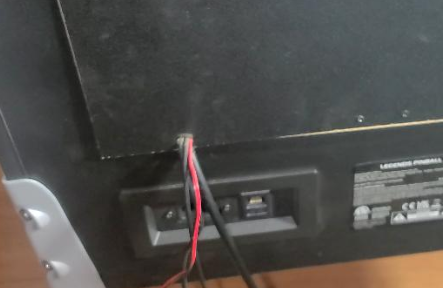
- Route the PC audio cable through a hole in the lower-back of the ALP. In my cabinet, I drilled a small notch for the VIBS HDMI cable, VIBS switch button and the 3.5mm audio cable to easily fit through the lower-left of the back panel (see below).
- Attach the top panel to the ALP backbox.
- Plug in the power cable to the amp.
- Re-install the control panel, do not plug in the haptic wire (red+black wire). It’s unnecessary at this point, however do plug in the USB cable into the Arcade Control Panel or connection for the OG Control Panel.
- Completely clean the main ALP Playfield with some Windex or equivalent glass cleaner.
- If your control panel had four screws, re-install them.
- Re-install the two sidebars using the x10 screws you removed earlier in this section.
- Install the front lockdown bar and the x3 screws from earlier.
- I used several clips (mentioned here) to secure the wires under the cabinet and keep them from dangling.
- Plug in the power to the ALP.
- Flip the power switch ON, at the front of the ALP.
- Rotate the right-most amp knob to turn on the amp.
- Remember the small switch box may need to be toggled to switch from OTG/ALP inputs.
- Load up a game and have fun!
Troubleshooting
The following are some helpful points should you encounter any issues with the installation:
- The ball just bounces around when I turn on the amp, how can I fix this? See Built-In Tables.
- I’m trying OTG or native Pinball Tables and not hearing a difference, why? Remember the small A/B switchbox you installed, that may need to be pressed to switch to the correct 3.5mm input line (audio from the ALP or the audio from the PC).
Change Log
- 2022-07-26 – Added additional info. in Q&A section.
- 2022-06-09 – Added video; Added PinEvent V2 section based on information from Terry Red.
- 2022-06-04 – Add VPX Section; Added FX3 Section; Added Future Pinball section.
- 2022-05-30 – Initial draft.
- 2022-05-13 €“ Start to this guide.