Legends Pinball 4K OTG PC Setup Guide


The AtGames Legends Pinball 4K series of machines include the 4KP and FX Legends 4K. Each machine supports a feature commonly referred to as OTG or On The Go. This allows you to connect a PC (or other similar powerful device) to your Legends Pinball 4K (ALP4K) machine using the controls found on the ALP4K (plunger, flippers, nudge, front buttons, etc.) On the back of the machine, you’ll find 3 HDMI inputs, those inputs support providing a video signal to the 3 displays on the ALP4K including: playfield display, backglass display and the DMD display (Dot Matrix, or smaller display). You will also need an OTG cable which is basically a USB-A (male) to USB-A (male) cable to connect between the ALP4K and the connected device (i.e. PC, etc.) This is why we commonly just refer to this type of configuration simply as OTG.
One of the first questions you may have is, what is the minimum PC configuration I can use for OTG? There is no quick and easy answer to this question. When dealing with a minimal configuration, it may be that it works fine initially. Then a Windows or Graphics driver update is released which impacts the performance. The minimum configuration may no longer be adequate. It’s for that reason, I tend to focus on the mid-high end range PC’s for OTG setup on the ALP4K.
In the sections below, we’ll discuss everything you’ll need to connect a PC to your ALP4K. However, it’s not possible to identify every possible configuration of PC, Graphics card, CPU, etc. that will run well. For that reason, the links provided below are from members of the community that have kindly verified that their configuration worked well. Keep in mind, those recommendations may change over time as new information becomes available and can’t be guaranteed that you’ll experience the same level of performance with the same hardware. Some performance optimization may be required on your part and noted below, where known.
Now that we know what OTG mode is and a little bit about the setup, let’s dig a bit deeper into the subject.
-Jon
How-To link to a specific section on this Guide: go to the Table of Contents (below) and click a section to reference. Copy the URL from the address-bar of your browser and paste in your video description/post/blog. This will direct a viewer to a specific section in any of the guides you find on this site.
Table of Contents
Getting Started
Getting started with OTG on the ALP4K may appear overwhelming at first. It’s really not so bad, as long as you take it in small steps. You’ll, of course, first need a PC (or similar device). Perhaps you’re already a PC-pro or have built your own in the past. If that’s the case, you may find this section helpful. If you’ve never built your own PC and would prefer recommendations provided by community members that have identified what machines work best for them, this section should help. If you’re interested in what I personally used for my ALP4K, you can find all the details here.
If you already have a PC identified and want to skip over all of the PC discussions and get straight to how to make the connections, please see here (then, see the Connections section for connecting everything up). If you want a Quick Start/walk-through, please see the following section.
Quick Start
If you are already familiar with the basics of what is needed to set up OTG, this section will quickly step you through the process. Each of the links below will take you to details for each step:
- If you already have a PC for OTG, continue to step 2. If you don’t have a PC and need help identifying one, see here. If you have a PC, but need the cables/adapters, see here.
- Make the Connections – Connect the HDMI/Display Port – HDMI cables (x3) and USB-A to USB-A OTG cable between the PC and the ALP4K.
- Switch to OTG – Press the Channel button (top-right corner of the playfield, near the volume buttons) to switch to OTG.
- Configure all 3 displays in Windows – the playfield at 3840×2160, the backglass and DMD at 1920×1080. Each display, should also be perfectly lined up at the top from left-to-right with the following in mind:
- Arrangement: Playfield – Backglass – DMD
- Each display set to Landscape mode.
- Each display scaled to 100%.
- Each display should be set to 60Hz.
- Map the ALP4K buttons – You can map the buttons individually within each pinball application, or use a tool like Xpadder which will work with any pinball application and avoid time-consuming configuration.
- Hide the Taskbar – Hide the taskbar from all displays except the main playfield display.
- Keep the PC from going to sleep – If you want to keep your PC running all the time, rather than going to sleep, you can adjust those settings.
- Solenoids in OTG – You may want the solenoids to fire while playing in OTG and this section describes how.
- SSF Setup – If you have the optional Surround Sound Feedback (SSF Kit) installed in your ALP4K, this will assist with the Windows 11 setup.
Hardware
Below we’ll cover some of the key hardware requirements for the PC for use with the Legends Pinball 4K. We’ll list some pre-built PC options as well as some key components, if you prefer to build your own. While building our own PC is beyond the scope of this guide, I highly recommend checking out Ultimate Tech Hub and specifically this video if you decide to go that route. I’ve known Mike for a few years and met him in-person in 2023. He is a talented content creator and the right person to follow when it comes to building a custom PC.
Below we’ll discuss some things you’ll need, provide some pre-built PC options and hardware recommendations if you decide on the DIY route.
The Basics
There are some basic components that you will need to connect any PC to the Legends Pinball 4K, regardless of the selected PC. Those items include:
| Component | Required | Quantity Needed | Description |
|---|---|---|---|
| OTG Cable (USB-A male to USB-A male) | Yes | x1 | This cable is used to allow the controls on the ALP4K to function as an Xbox-style controller on the connected PC. If you have installed the SSF (surround sound feedback) kit into your machine, or had it installed at the factory, this cable also carries the audio data to the PC. |
| 4K HDMI Cable (male to male) | Yes | x3 *NOTE: assuming your graphics card has 3 HDMI output ports. If one HDMI and x2 Display Ports, one HDMI cable is needed and x2 DisplayPort to HDMI Adapters (see next item) |
You will need x3 HDMI cables that support 4K video signals. Most do these days if purchased new. You’ll need one for the playfield, the backglass and the DMD. |
| DisplayPort to HDMI cable | Maybe | x2 *NOTE: If your PC has x1 HDMI and x2 DisplayPorts, you’ll need x2 of these. |
This adapter converts the DisplayPort output from various graphics cards to HDMI output (needed by the ALP4K). |
| Docking Station (dual HDMI) | Maybe | x1 *NOTE: This is only needed if you’re using a laptop or a desktop PC that does not have a total of 3 HDMI / DisplayPort connections. |
I picked up a few of these Baseus Laptop Docking Stations, they work decently but are USB-C (there are similar adapters if your computer doesn’t have a USB-C port). If your PC/Laptop doesn’t have a USB-C port, this docking station won’t work for you. During testing with a laptop, I actually used the HDMI output for the backglass and DMD over USB to a separate adapter that I’ve used for a few years (no longer available). |
| Surge Protector / UPS | No | x1 | This is an optional item, however I prefer to make sure that both the PC and the ALP 4K are well protected from power surges. Both are expensive pieces of equipment with sensitive electronics. Consider a surge protector at a very minimum to protect your investment. A UPS or Uninterruptible Power Supply is simply a battery backup should the main power cut off, it provides a way for the PC to shutdown safely. |
PC Requirements
In the sections below, we’ll discuss the PC I chose for use with the ALP4K and provide community recommendations also. You may find that the recommendations from the community are less expensive than the option I chose. My choice was biased on the ability to create future content on my YouTube channel for the ALP4K (and potential future content), less time required to build my own PC (as a result, create this guide faster than it would take if I built my own), having a bumper-to-bumper warranty, among other factors. Before considering any purchase, keep in mind this bias. You can also just skip over My PC Choice.
My PC Choice
*NOTE – Stock of the CyberPowerPC Gamer Xtreme VR Gaming PC seems to sell quick, if unavailable, check back later.
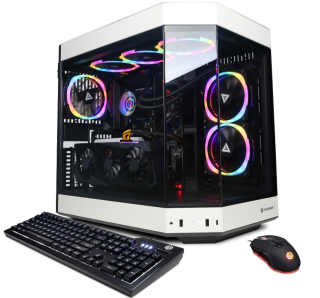

Below is some information for the PC I am using and why I chose it. I’m not saying this is the best option for everyone, you can certainly find a cheaper machine that will likely run all your favorite pinball tables just fine. I went with this machine for the following reasons:
- CPU: The Intel Core i9-13900KF is perhaps one of the most powerful available at the time of this writing. It includes 24 cores (8 P-cores +16 E-cores) and 32 threads, liquid cooled and with a clock speed up to 5.8 GHz unlocked. The CPU alone is priced over $500 (as of 2/13/2024).
- Graphics Card: The Graphics card is an NVIDIA GeForce RTX 4070 12GB Video Card and can easily handle 4K @ 60fps, which is what is needed for fluid game play on the ALP 4K. It also includes x1 HDMI (for the playfield) and x2 Display ports (for the backglass and DMD). This card alone is priced over $500 (as of 2/13/2024)
- RAM: The machine includes 16GB DDR5 RAM (dual channel). While not exactly a super-strong point, 16GB should be plenty for pinball gaming. It can always be upgraded in the future, should it become necessary.
- Storage: The machine includes a 1TB PCIe Gen4 NVMe SSD with Windows 11 Home 64-bit pre-installed. Again, not exactly a strong-point, however it can be upgraded internally or externally, should it be necessary.
- Other: There are a number of additional features that made this a compelling option. Including:
- Hyte Y60 Gaming Case (~$200 USD)
- x6 USB 3.1 ports
- x2 USB 2.0 ports
- x1 RJ-45 Ethernet port
- Gaming Keyboard and mouse (included)
- Tempered glass side case panel
- Custom RGB case lighting
- 1 year parts & labor warranty, free lifetime tech support
- The fans are relatively quiet, I don’t hardly hear that the PC is running and blends in well with the background noise.
When you add up all the components that are included with this pre-built PC, the price of the machine is reasonable. It’s priced just between $1,699-$1,900 (as of 2/17/2024). Buying each component individually may price out slightly cheaper, however warranty and tech support may be unavailable and you’ll be on your own putting it all together. I prefer to have a single point of contact, should any issues arise with the machine. The reviews on Amazon are excellent, and I concur with most of them.
Performance
To help identify any machine, especially one costing over $1k, it’s a good idea to do your own research. In this section, I’ll provide some performance test results for the machine I chose:
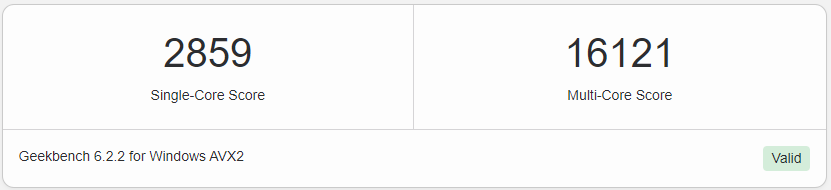
Geekbench CPU Benchmark
The Single-Core and Multi-Core Geekbench 6.2.2 results were:
| CPU Information | |
|---|---|
| Name | Intel Core i9-13900KF |
| Topology | 1 Processor, 24 Cores, 32 Threads |
| Identifier | Genuine Intel Family 6 Model 183 Stepping 1 |
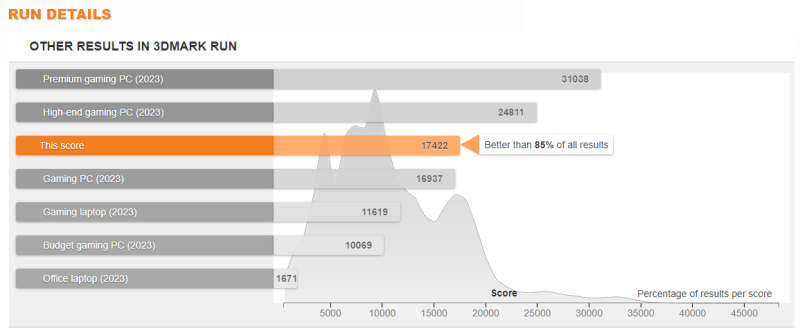
3D Mark Benchmark

Pre-Built PC Options
In this section we’ll identify various options that others within the community have indicated worked well for them. Keep in mind, those mentioned below may have come from various locations including from this reddit post and Facebook. I can’t verify what is stated below and your mileage may vary but each came recommended:
| Manufacturer | Estimated Price | Applications Tried | Notes | Owner |
|---|---|---|---|---|
| Dell XPS 8930 (from ebay) Upgraded GPU to AMD RX 6750 XT |
~$670 USD | Pinball FX, VPX & Future Pinball | Recommended. Tips: • One tip to folks who have reversed ssf audio channels: Reboot your PC while in OTG mode. This fixes the audio for me every time. |
chuckrock_18 (via Reddit) |
| Acer predator Helios 300 Gaming Laptop • i7@2.6hz, 16GB RAM • GeForce RTX 3060 with 2GB mem |
~$1,200 (older generation) | Pinball FX & M | Recommended – mostly. Points: • Some tearing because I had to turn vsync off. • Tearing only seen in zoom animations. • No tearing in the actual gameplay on the playfield. • Laptop is no longer produced, older generation • OTG was not initially seen, sound issues going off and on which is still ongoing, have to change audio from auto to HDMI 1…every single time I turn on the machine for OTG. • FX and M are running very well, I’m extremely happy with OTG. Min to no lag/latency which I think update also helped, will try VPX sometime this week. |
Fernando P. (via Facebook) |
DIY PC Options
Instead of purchasing a pre-built option, as mentioned above, you can also build your own PC. That is, you can buy each of the components needed individually such as the power supply, case, CPU, Graphics Card, RAM, Storage, cooling solution, cables, etc. and assemble it yourself. Many prefer this option as it allows them to know exactly what components went into the machine, what compromises were made and make it easier to know what is needed to upgrade the machine later down the road. The following are responses that I received from this reddit post.
| Components | Estimated Price | Applications Tried | Notes | Owner |
|---|---|---|---|---|
| • MSI PRO-B550M-VC-WIFI Mainboard • Ryzen 5 5600G • Intel Arc 750 • 32GB DDR5 RAM • 1TB NVME SSD |
~$700 | Pinball FX, Pinball M, VPX, Future Pinball *NOTE: with Future Pinball, the ball does not roll smoothly |
• Recommended. • Cheap, but gets the job done (recommended). • Audio into the table is quirky. 4KP will always default to HDMI Automatic on a cold boot. IF you have two HDMI outputs, you will need to specify both on your computer and on the table which to use. |
SuperRob (via Reddit) |
| • i5-12600K • RTX 3070 • 32GB RAM • 2TB NVME • and a bunch of other old components into this case: JONSBO D31 MESH SC |
~$650 | VPX, Future Pinball | • Recommended. Yes, it’s probably a little bit of overkill for pinball alone. Nice thing about this case is that the built-in screen can display topper graphics or maybe instruction cards. • Since more than half of the components were repurposed from old PCs, hard to estimate. I spent about $650 on new components, but that doesn’t include the cost of a GPU, PSU, RAM, and other parts. • After setting audio up as 7.1 in Windows, SSF left & right channels are reversed — but not on 4KP standalone, so I know they’re hooked up correctly. • Issues with flipper responsiveness/stickiness in VPX at first (solved with powered USB hub, going PC -> powered hub -> OTG Cable -> 4KP). • Screens changed order on me on first reboot after setting them up, but have stayed consistent since (I always start the 4KP first, go to HDMI Settings, then turn on the PC and hit “Start” on the 4KP as soon as all three HDMI read as green). • Accelerometer nudge doesn’t work in Windows. • Arcade Control Panel is not detected in Windows. |
ascendr (via Reddit) |
| • Motherboard: MSI PRO B650M-A WiFi ProSeries • CPU:AMD Ryzen„ 5 7600X 6-Core • Video: Card: RX 7800 XT • 32GB RAM |
~$1,300 / $1,800 CAD | Pinball FX, VPX, Future Pinball | • Recommended. However, make sure the playfield display is set to 60Hz (not 59Hz) to avoid audio distortion (updated comment 3/1/2024 after resolved). • Video performance, lag are excellent in 4K, and 1080p on the back glass and DMD. • Stereo audio was fine but 7.1 is flakey |
Steve W. (via Facebook) |
Connections
This section will cover all of the connections you’ll need to make between your PC and the ALP4K machine. If you don’t currently have a PC for your ALP4K, please see here for some ideas. If you don’t already have the cables you need (or unsure), see here.
PC Connections
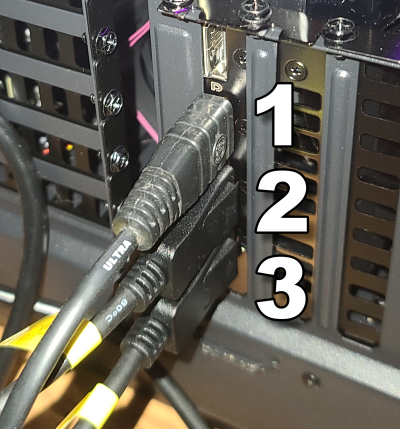
There are four connections you’ll make to your PC or laptop, these are:
- Main HDMI connection to the Playfield.
- Backglass connection (Display Port shown here and requires a Display Port to HDMI Adapter).
- DMD connection (Display Port shown here and requires a Display Port to HDMI Adapter).
- USB OTG connection – while not shown, the cable is connected to a USB 2.0 port. This will get connected to the USB 2.0 port (identified as USB-1) on the back of the ALP4K.
ALP 4K Connections
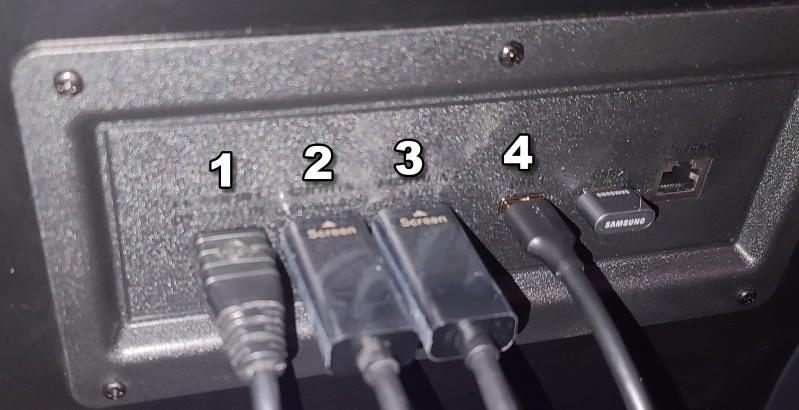
There are four connections that will need to be made to the back of the Legends Pinball 4K machine, these are:
- Main Playfield display – This should be connected to HDMI on the primary graphics card on your PC.
- Backglass display – This connection should go to one of the HDMI or Display Ports available on your PC (or laptop).
- DMD display – This connection should go to one of the HDMI or Display Ports available on your PC (or laptop).
- OTG Cable (USB-A to USB-A) – This connection provides support for allowing the ALP4K controls to work with the PC as well as SSF. This port is the USB 2.0 port on the back of the ALP4K, do not use the USB 3.0 (blue) port for OTG.
Software Configuration
In the following sections we’ll discuss various software aspects that you may find helpful. It is assumed that you have a PC and all hardware already connected to your PC, if not, please see here. It is also assumed your are running Windows 11 (not Windows 10), installation / configuration of Windows 11 is beyond the scope of this guide, with the exception of a few tips that you’ll find helpful as it relates to playing pinball.
- NOTE – If you prefer to use a PC located in a more comfortable area of your home to connect remotely to the ALP4K for configuration, you may want to check out the Remote Connection section. Once I have the displays setup properly, I find this method very convenient.
Switching to OTG
After you’ve made all the connections between the ALP4K and your PC, you can now switch to the PC over OTG. This section assumes you have already provided all necessary Connections between the PC and the ALP4k. If not, please see here.
- If you are currently in a game, exit the game (press the Menu button, select Exit and press the Play/Start button). For more details on the buttons, please see here.
- Press the Channel button on the top-right panel of the machine (next to the volume buttons). Alternatively, you can also navigate into Settings and select HDMI Settings. However, pressing the Channel button is faster/easier.
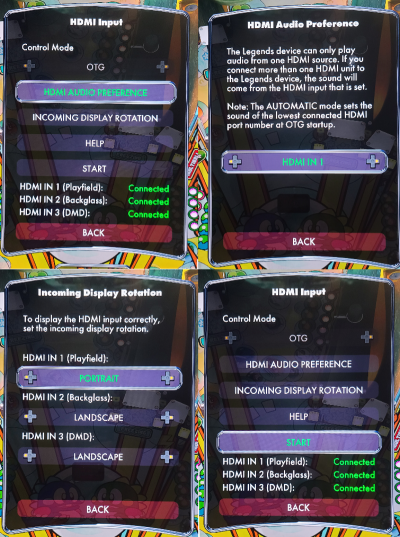
- There are a few options available prior to switching to OTG mode. These are:
- First, make sure the Control Mode is set for OTG. *NOTE: At the present time, this option can’t be changed and is greyed out, this is normal. In the future, additional Control Modes may be available such as APL (Arcade Play Link).
- Select HDMI AUDIO PREFERENCES. Typically, HDMI IN 1 will carry the audio signal for the primary display (your playfield display). For that reason, I suggest selecting HDMI IN 1.
- For INCOMING DISPLAY ROTATION, there is typically no change needed unless these settings were modified at some earlier point. Make sure, the following are set:
- HDMI IN 1 (Playfield) = PORTRAIT
- HDMI IN 2 (Backglass) = LANDSCAPE
- HDMI IN 3 (DMD) = LANDSCAPE
- Move down to the START button and press the Play/Start button.
- The ALP4K displays will then switch to the PC and show all 3 displays connected to your PC.
Windows Display Configuration
For the following setup procedure, you’ll want to plug in a USB Keyboard and mouse into your PC. Alternatively, if you have another main computer that you prefer to use for the setup, you can use TeamViewer to remotely connect to it for a more comfortable setup experience (my personal preference).
Display Setup
Before proceeding, make sure that you have three HDMI ports available on your PC (or x2 DisplayPort to HDMI Adapters). If you don’t, the Hardware section which has a recommendations that you may need. To setup all 3 displays, please see the following:
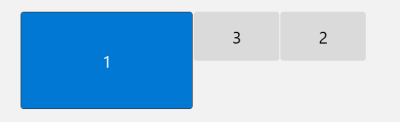
(Numbers don’t matter, orientation left – right does matter)
- Right-click on the Desktop and select Display Settings.
- Make sure Extend desktop to this display is selected.
- Position the displays left-right :
- Position the Playfield Display (main display) to the far-left.
- The Backglass display to the right of the Playfield.
- DMD to the right of the Backglass display.
- *NOTE – If you’re using a laptop, position that display to the far-right of the DMD display. The numbers for each display do not matter, it’s their positioning that does matter. Make sure that all displays are lined up perfectly across the top of each (as shown in the image to the right). You should see the Playfield, Backglass and DMD in that order (again, laptop display should be at the far-right, if you’re using a laptop).
- Playfield should be set as the Primary display by checking Make this my main display.
- Playfield Display should be set to 3840×2160.
- All 3 displays should have the Display orientation set to Landscape Mode.
- All 3 displays should be scaled at 100%. Keep in mind, Windows may scale one (or both displays) to 150%. If so, you’ll need to change this setting to 100% for the following settings to work properly. Simply click each display and verify any needed changes.
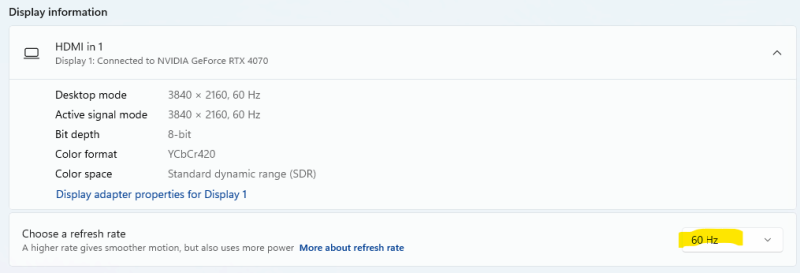
- All 3 displays should be set to 60Hz, Windows may default them to 30Hz which will in-fact impact performance:
- Select Advanced display.
- From the drop-down, Choose a refresh rate, set it for 60Hz.
- Both the Backglass and DMD displays should be set to 1920—1080
- That concludes the Display Setup.
Improve Latency with NVIDIA GPUs
This tip came in from Rene D. and seems to improve flipper latency and should work for most all NVIDIA GPUs:
- On the lower-right of the taskbar, open the NVIDIA Control Panel.
- Select Display – Change resolution and under the 4k, x2k, 3840 x 2160 option set the Refresh rate to 59Hz (down from 60Hz, the default). Then, click the Apply button.
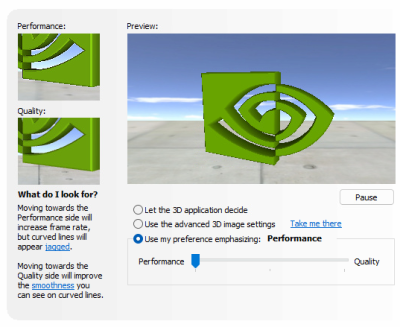
- Under 3D Settings – Adjust image settings with preview, select the Use my preference emphasizing option and drag the slider from Quality to Performance (far-left) to reduce flipper latency. However, if you see screen tearing, you may instead want to set it to Balanced (middle). Then, click the Apply button.
- Under 3D Settings – Manage 3D settings – set Low Latency Mode from the default of Off to Ultra. Then, click the Apply button.
- Exit the NVIDIA Control Panel.
Button Mapping
There are a number of ways to map the buttons on the Legends Pinball 4K to the pinball application. There are dedicated applications, such as XPadder, JoyToKey, etc. that allow a general-purpose button mapping that will typically work with any pinball applications. Additionally, depending on the pinball application (i.e. Pinball FX/M, Visual Pinball X, Future Pinball, etc.) there are methods provided to map the buttons directly within each application. While not difficult to do, it’s often easier to have a single application for performing this basic function.
Whichever method you choose is up to you. Some have indicated button latency is improved by mapping directly within the pinball application, while others prefer a single application to handle button mapping. From an ease-of-supportability standpoint, I prefer the later. The reason for that is, a single profile can be provided, document how to set it up and now you can use that same tool for all of your favorite pinball applications. I realize some disagree with this approach, however, imagine you receive e-mails/comments daily about why the buttons aren’t working in a new version of VPX, Steam, FX/M, Future Pinball, etc. This is what I mean regarding supportability, it’s easier for me and the end-user.
From what I understand, regardless if you map the buttons using a button mapping tool or directly within the pinball application, performance should be the same with Xpadder. Xpadder uses the same underlying API calls used by the pinball applications (from what I understand) and the installation/setup is documented below. While this is my recommended approach, do what you’re most comfortable with and what works best for you.
XPadder
Below we’ll discuss how to install, setup and configure the Xpadder profile. This profile will work with or without the Arcade Control Panel (ACP) option. However, for those buttons that are exclusive to the ACP, they will of course be unavailable. Xpadder is $10 USD and not free software. I purchased my copy to support the developer of this excellent application.
Setup Xpadder
Below we’ll discuss how to install Xpadder and setup the profile for use with the Legends Pinball 4K.
- Link to Xpadder here. Select your Language and Country.
- Enter your e-mail address and click the Go button to receive a link via e-mail.
- Make sure you have connected an OTG cable (USB-A to USB-A) from the PC to the USB 2.0 port (black) on the back of the Legends Pinball 4K machine.
- From the link you received from Xpadder, click the Download button. *NOTE – do not share the link with anyone. It appears to be tied to your e-mail account.
- Create a subfolder (i.e. C:\xpadder) and copy the Xpadder.exe into that folder.
- Launch the Xpadder.exe installer and follow the prompts.
- Click Start button 5 times.
- Click the Program Location button.
- Click the Do not Associate button.
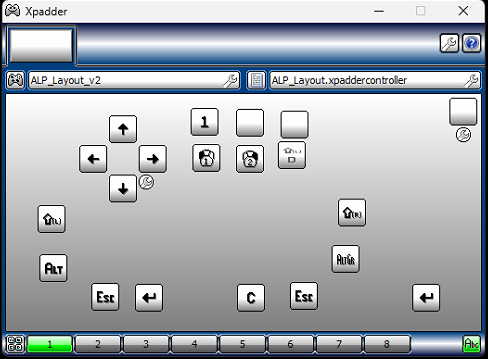
- Xpadder will start, click the Xpadder taskbar icon to bring up the user interface.
- Download the ALP_Layout_v2a.zip (Xpadder profile) for the Legends Pinball.
- Extract the ALP_Layout.zip and copy the two files ALP_Layout.xpaddercontroller.xpadderprofile & ALP_Layout_v#.xpaddercontroller to the subfolder you created (i.e. /xpadder).
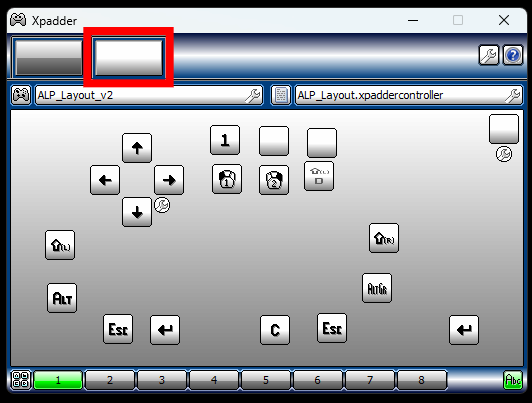
- In the image below, you’ll see two tabs at the top (highlighted in red below). Each tab represents a controller that was found connected to your PC. You may see one or more tabs. Only one is the ALP4K controller. To identify which one is the ALP4K controller:
- Click the small controller icon in the upper-left.
- Select Properties.
- Press the left/right flipper buttons. If you see the buttons light up, when pressed, you have selected the correct controller and can continue below. If not, click the other tab(s) and repeat.
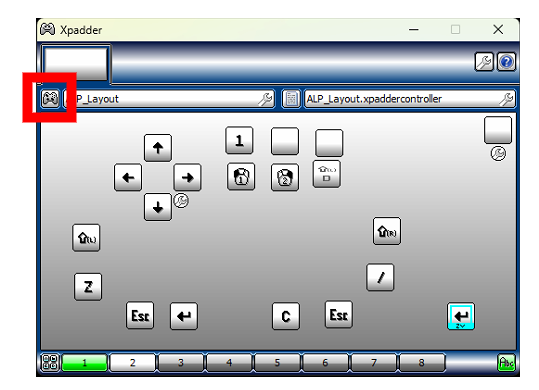
- Click the small controller icon in the upper-left (see image below) and click Open.
- Browse to the location where you copied the ALP_Layout_v#.xpaddercontroller file, select it and click the Open button. Then click the OK button, if prompted.
- You’ll now see an empty controller layout. In the upper-right, click in the (Untitled profile) field and select [All].
- Browse to /xpadder and select ALP_Layout.xpaddercontroller.xpadderprofile and click the Open button. The empty buttons will now populate with images indicating their function.
- You may also want to create a shortcut for Xpadder. Right-right click on the shortcut, select Properties, then Advanced and set it to Run as administrator (optional).
- In the upper-right of the Xpadder UI, there is a wrench icon. If you click that, under Options you can have Xpadder Start with Windows by clicking the checkbox. Once done, click the OK button.
- It’s a good idea to test the buttons and make sure all the buttons are responding, see here for instructions.
- You can now minimize Xpadder, your buttons for the ALP4K should now be mapped.
- If you have any difficulties getting Xpadder working or want to make sure it’s working properly, please see here.
Xpadder Troubleshooting
After you install Xpadder and load the profile as documented here, make sure all the buttons are responding. Here’s how:
- Leave all other applications closed except Xpadder.
- Make sure that the OTG cable (USB-A to USB-A) is connected from your PC to the USB 2.0 port on the back of the ALP4K (the black port).
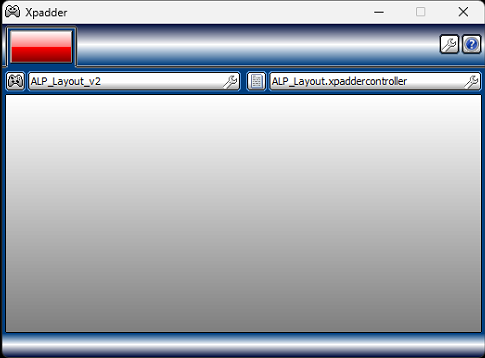
- If there is a connection problem, Xpadder will show a red square in the upper-left. See the image below for an example. If you’re seeing this, the ALP4K controls aren’t being recognized.
- In the red area below, if you see more than one rectangle in this area and your pinball buttons aren’t working, try clicking it and assigning the layout and profile there. I did encounter on another device that two were showing up, the pinball buttons weren’t working because I needed to make the assignment to the proper rectangle which is your physical game controller (the emulated xbox 360 controller on the pinball machine).
- Once any connectivity issues have been resolved, Xpadder should now look like the following:
- Now, press each of the buttons on the ALP4K individually and make sure Xpadder recognizes each of them. That is, press the left/right flipper, nudge, plunger, front-facing buttons etc. They should turn green when pressed.
Right Flipper Issue
I’ve received a handful of reports that the right-flipper may act twitchy, while all other buttons are fine. If you encounter this issue, here’s some things you can do:
- To change a button mapping, right-flipper is €œTwitchy€, not working or you don’t like how it was assigned, click the button with the left mouse button. You’ll then see a virtual keyboard appear like the one below:
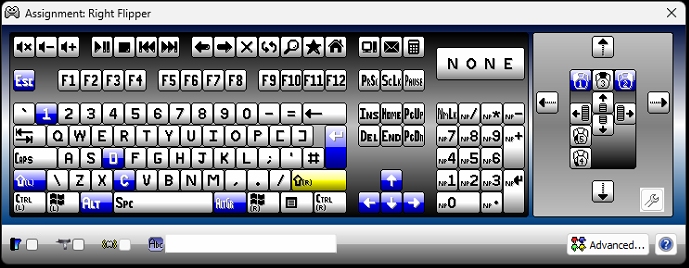
- Click the associated button on the keyboard layout that you want to map to the physical ALP4K button to (i.e. right-Shift, right-Ctrl), etc. That’s it, the button will be mapped. From the Xpadder UI, make sure the button you’ve assigned is being recognized properly when pressed by pressing the button on the ALP4K.
- If any changes were made, click the controller icon in the upper-left of the main UI and save the profile to a new name.
- Using the above information, re-map the right flipper to the right-Ctrl button (if you mapped it above).
- In Pinball FX or M, go into Settings – Controls – Keyboard and assign the Right Flipper to the right-Ctrl button by first clicking on Right Flipper then pressing the right flipper on the ALP4K.
- Then ESC out of the settings and try a table, this should resolve the right-flipper issue. Keep in mind, if you’re using any other pinball applications such as FX3, VPX, etc. with Xpadder, similar changes will be needed.
Control Panel Layout
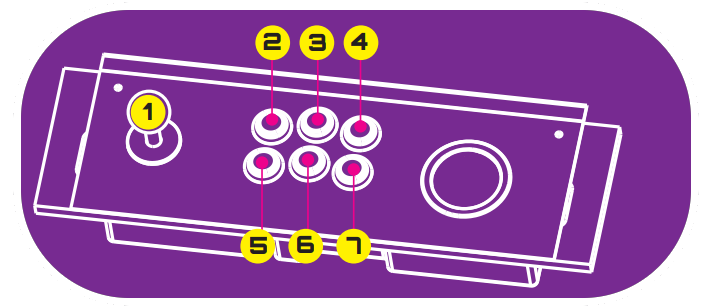
- Joystick – navigates up/down/left/right.
- 1-Player Start – Starts a 1 player game (in VPX/FP).
- Not mapped – Left this button available so you can map as you wish. Just load up the profile, click the button and map to any key you want.
- Not mapped – Left this button available so you can map as you wish. Just load up the profile, click the button and map to any key you want.
- Left Mouse click – Emulates the left mouse button being clicked, use trackball as a mouse.
- Right Mouse click – Emulates the right mouse button being clicked, use trackball as a mouse.
- Insert a Credit – inserts a credit for those tables that need them, some may require more than one.
- Forward Nudge (not shown above) – Selects any option, or press+hold to launch a ball. Press this button on a selected table to start the game.
- Rewind (not shown above) – goes back or exits a table, game or selection.
- Play Button (not shown above) – Will change the view on a currently loaded table (same as pressing €˜C’ on the keyboard).
- AtGames/Menu (not shown above) – If on the HOME tab, it will enter the Settings menu.
- Flipper Left/Right buttons (not shown above) – will operate the flippers left/right (red button).
- Left/Right Nudge buttons (not shown above) – will nudge the table left/right (white button).
- Plunger – Pull back and release to launch a ball.
Sticky Keys
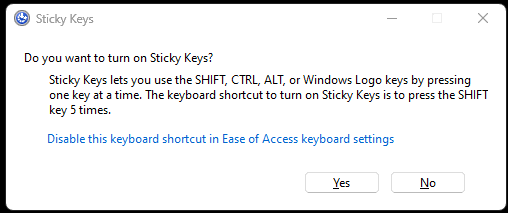
If you get a popup or Sticky Keys dialog (may occur when holding down the flipper buttons in Pinball FX3), here’s how to stop it from popping up:
- Click the link for Disable this keyboard shortcut in the dialog. You’ll then see a new window appear.
- Uncheck/turn off the Sticky keys switch.
- Click the main Sticky keys option, then:
- Uncheck/turn off – Keyboard shortcut for Sticky keys
- Uncheck/turn off – Turn off Sticky keys when two keys are pressed at the same time
- Uncheck/turn off – Play a sound when shortcut keys are pressed and released
- Close out of the Accessibility settings.
Hide Backglass Taskbar
You won’t need the taskbar on the backglass nor DMD display, for that reason I recommend the following:
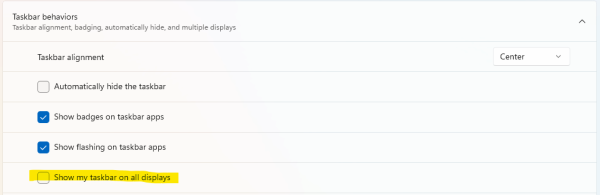
- Right-click on the Taskbar and select Taskbar Settings.
- In Windows 11, scroll down until you see Taskbar behaviors and expand that section. Uncheck Show my taskbar on all displays.
Keep PC Running
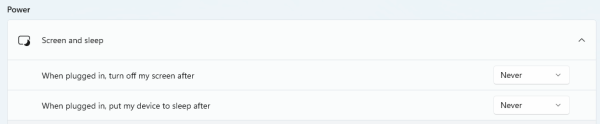
You can adjust your PC’s settings to turn off the screen or put the PC to sleep after a certain period of time or leave it on continuously. The later is what we’ll do below:
- Press the Windows Logo key + X
- Click Power Options
- There you can set when the screen turns off or when the PC goes to sleep. I set mine to Never for all options (Screen & Sleep). Do keep in mind, this may increase your monthly power bill as the PC will run continuously.
Solenoids Firing in OTG
The defaults for the machine are to have the solenoids fire while navigating the left/right options using the flippers. However, you may have turned this option off during navigation as it can be distracting. Here’s how to enable them for OTG:
- Select Settings → Haptic Feedback.
- Using the D-pad, set the first option from Disable (OFF) to Enable (ON).
- Now, while using the flippers in OTG, the solenoids will fire. *NOTE – When not in OTG mode, you may wish to turn them off to avoid them firing when navigating the ALP4K.
Accelerometer Setup
This doesn’t appear to be working properly in OTG (it does work for stock tables). There will be a future update to support it in Windows and will defer documenting this section until then.
Windows 11 SSF Support Setup
Surround Sound Feedback (or SSF) is an optional component that can be added to the Legends Pinball 4K. The setup discussed below is only applicable if you have this kit installed, either at the factory or you installed it yourself. Keep in mind, while this will assist with the setup, not all pinball applications running on a PC take advantage of it.
The following steps will assist you in setting up SSF on your ALP4K machine:
- Be sure the SSF Kit has already installed, if not please see here.
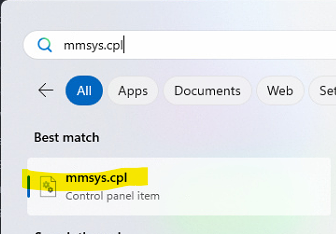
- Click the Windows icon on the taskbar.
- Type mmsys.cpl and click the icon. It should look like the following image:
- HDMI in 1 should be your main/playfield display, click HDMI in 1 and click the Configure button.
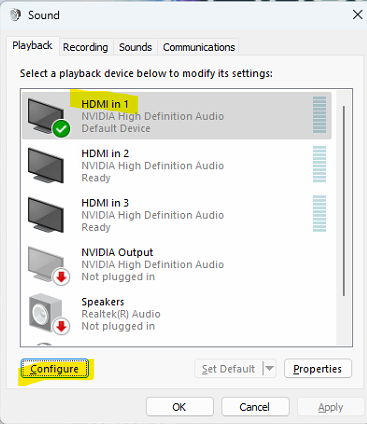
- Under Audio channels, select 7.1 Surround.
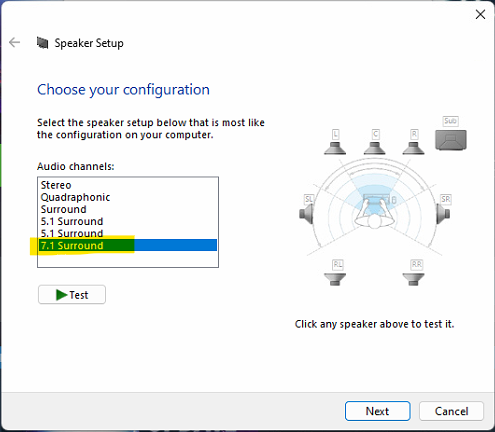
- Click the Test button to test the audio. If prompted that the Device in Use, just click Yes.
- Click the Stop button to end the test if everything sounded correct.
- Click the Next button.
- Make sure all Optional speakers are checked, including: Center, Subwoofer, Side pair and Rear pair.
- Click the Next button.
- Make sure all Full-range speakers are checked, including: Front left and right and Surround speakers.
- Click the Next button.
- Click the Finish button.
- Click the OK button to close out of the Sound settings.
- That’s it, SSF is now configured and available within Windows.
Remote Connection
If you have more than one computer on your network, you may want to remotely configure your Legends Pinball 4K. For instance if you have a PC dedicated for the Legends Pinball 4K and another in a more comfortable location, you don’t have to stay hunched over the ALP4K during configuration. One tool that I prefer to use is TeamViewer. TeamViewer is free for personal use and allows you to easily swap between the 3 displays on the ALP4K machine.
Basic Setup Steps:
- Download TeamViewer and select the option TeamViewer Full Client (install to both the 4KP and your other PC).
- Create an account with TeamViewer.
- Then perform the following on each PC:
- Click Sign In and create an account by selecting Sign Up.
- Enter the credentials you wish to use and follow the instructions to activate your account.
- Repeat the same on the PC you will be using with your ALP4K.
- On the source PC (machine which will connect to the ALP4K), enter the Partner Id.
- You will now be able to connect to your ALP4K and can view both screens at the same time (side-by-side) by clicking the View option (at the top) and select the 4-square monitor option.
Pinball Game Setup
In the following sections, we’ll setup and configure both Pinball FX and Pinball M. You can install either, or both, the steps are mostly the same with a few differences for the location of copying the backglass artwork.
Pinball FX/M

Prerequisites
Be sure the following have been done prior to installation:
- Make all needed cable connections between the PC and the ALP4K, for details see here.
- You’ve Switched to OTG on the ALP4K.
- You’ve configured all 3 displays in Windows.
- If you prefer to use a single application for button mapping, this section describes that. If you’ll be using Steam Button Mapping, you’ll do that after the installation (beyond the scope of this guide).
Install Steam Client
- To install the Steam client, visit here.
- Click the Install Steam button.
- Once the SteamSetup.exe has been downloaded, click installer from your browser window and select Open.
- Click the Next button on the Welcome to Steam Setup dialog.
- Select your preferred Language and click the Next button.
- The Destination folder defaults to C:\Program Files (x86)\Steam\ , if you need to change this you can click the Browse button. Otherwise, click the Install button.
- The Steam client install will begin. Once done, you’ll see a checkbox to Run Steam. Leave it checked and click the Finish button.
- Additional updates for the Steam Client will begin downloading/installing, just be patient until it has completed.
- You will then be prompted to Sign in with your Account Name. If you have an existing Steam Account, enter your account name and password and click the Sign in button. If you don’t have a Steam Account, you can create a free account by clicking the Create a Free Account link to the right of Don’t have a Steam account? *NOTE – if you have Steam Guard setup (I recommend it), check your associated e-mail account for the 5-digit code to login.
- The Steam client install is now complete, see the next section for installing Pinball FX.
Install Pinball FX/M from Steam
- Launch the Steam Client.
- Click the Store tab at the top.
- In the Search field (upper-right) type Pinball FX or Pinball M.
- Select it from the list and click the INSTALL button.
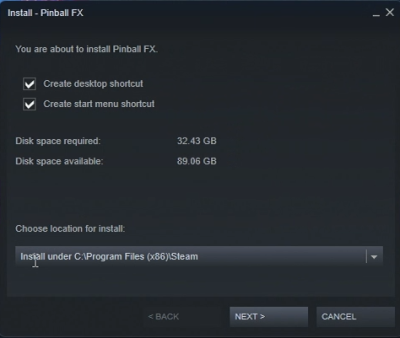
- During the installation, you’ll see two checkboxes at the top (Create desktop shortcut & Create start menu shortcut), leave both checked. Towards the bottom, you’ll see a selection for Choose location for install. If you have a second drive with more storage capacity, click the drop-down and select the other drive (i.e. Create new Steam library on drive D:). Otherwise, go with the default and click the NEXT > button.
- Review the license agreement and click I AGREE.
- The installer will then begin. The installation may take several minutes, be patient.
- Once the installer has completed, you can click the large green PLAY button to start Pinball FX or use the shortcut on the Desktop.
- That completes the basic installation. If you want to use Pinball FX in cabinet mode, please see the following section.
Backglass Image Setup
Pinball FX and M do not include any pre-made backglass images. Therefore, you’ll have to download and copy them to the appropriate folder on your PC. The following will assist with those steps:
- If Pinball FX is running, close it.
- Download the backglass artwork from here (for Pinball FX) or here (for Pinball M) using your favorite browser. These links are to the LaunchBox community forums and provide backglass images for most all of the tables. *NOTE-You will need to create an account to download them.
- Click the Download this file button.
- Click the Download button beside Cabinet.zip.
- Launch File Explorer and unzip the Cabinet.zip archive from your Downloads folder (if you don’t have 7-zip installed, you can find it here).
- Pinball FX: Depnding on where you installed Pinball FX, there may be two possible locations on where to copy the backglass images. Copy the backglass images to:
- [install drive letter]:\Program Files (x86)\Steam\steamapps\common\Pinball FX\PinballFX\Mods\Cabinet OR
- [install drive letter]:\SteamLibrary\steamapps\common\Pinball FX\PinballFX\Mods\Cabinet
- Pinball M: for Pinball M, copy the .png backglass images to:
- [install drive letter]:\Program Files (x86)\Steam\steamapps\common\Pinball M\PinballM\Mods\Cabinet OR
- [install drive letter]:\SteamLibrary\steamapps\common\Pinball M\PinballM\Mods\Cabinet
- Once all backglass images have been copied, you can now launch Pinball FX or Pinball M.
Enable Cabinet Mode
The following is how to enable cabinet mode in Pinball FX or M:
- Launch Pinball FX/M.
- Using a connected keyboard, press ESC to enter the OPTIONS menu.
- Select SETTINGS and then the VIDEO tab.
- Then set Video settings as indicated here.
- Press ESC once the above configuration has been made, your main Playfield display should be oriented properly at this point.
- Select CABINET SUPPORT.
- Click the ACTIVATE button. Cabinet mode will now be activated! *NOTE – there is no longer a need to contact Zen Studios to activate cabinet mode for Pinball FX.
- Configure the Backglass and DMD Settings as indicated.
- Press ESC twice to exit the Options dialog.
- Navigate to the Tables tab and have fun!
Settings
The following settings are what I used for both Pinball FX and M. As both utilize the same engine, the settings are the same for both. From the main/home screen in either application, configure the following settings as indicated:
Main Playfield
| Setting Option | Setting Label | Setting Value |
|---|---|---|
| Video – Basic | Windows Mode | Full Screen |
| Video – Basic | Orientation | 270° |
| Video – Basic | Resolution | 3840—2160 |
| Video – Basic | Vertical Sync | On (*NOTE – Try it on/and off to see what works best for your PC configuration. I didn’t notice any difference either way but it may reduce flipper lag on some PCs/GPUs) |
| Video – Basic | Raytracing | Off (depending on your GPU, you may be able to turn this on. RTX 4070 plays smoothly with this setting on and looks great) |
| Video – Advanced | Upscaler Method | Nvidia DLSS (PC/NVIDIA) AMD FSR (AMD GPUs) |
| Video – Advanced | Render Scale | 100% |
| Video – Advanced | Antialiasing Method | Temporal (PC/NVIDIA) FXAA (AMD GPUs) |
| Video – Advanced | Frame Limit | 60 |
| Video – Advanced | Shadow Quality / Post-Process Quality | High (PC/NVIDIA) Low (AMD GPUs) |
| Video – Advanced | Motion Blur Amount / Motion Blur Quality | Off (AMD GPUs) |
Backglass Window
| Setting Option | Setting Label | Setting Value |
|---|---|---|
| Backglass Window | Backglass Window | Enabled |
| Window Size | Width | 1920 |
| Window Size | Height | 1090 |
| Window Position | Horizontal Position | 3840 |
| Window Position | Vertical Position | 0 |
DotMatrix Window
| Setting Option | Setting Label | Setting Value |
|---|---|---|
| Dotmatrix Window | Dotmatrix Window | Windowed |
| Window Size | Width | 1920 |
| Window Size | Height | 1080 |
| Window Position | Horizontal Position | 5760 |
| Window Position | Vertical Position | 0 |
Exit Pinball FX/M
Below is how to exit Pinball FX or Pinball M:
- Navigate to the Home Tab (if you’re not, press the left/right flipper or left/right shift keys).
- Press ESC on the keyboard (or the Rewind button) and select EXIT GAME.
- When prompted with Are you sure?, select YES.
- Pinball FX/M will now close/exit.
VPX
Coming soon – Will be added at a later time.
Future Pinball
Coming soon – Will be added at a later time.
Pinball FX3 Setup
TampaTec is a veteran when it comes to excellent tech tutorials and guides on most every tech topic! In the video below, he demonstrates how to setup your PC to run Pinball FX3 on the Legends Pinball 4KP. He also covers a 2-screen and 3-screen setup of FX3 in HD. Be sure to subscribe to TampaTec’s YouTube channel for the latest tutorials, mods and much more! *NOTE: If you use Steam Button mapping, you’ll want to close Xpadder or you will get double-presses.
Pinball FX3 4K Playfield
Playfield settings for FX3 in 4K are below and assume the PC has been configured with a 4K playfield. If you need a written guide on FX3 installation/setup, you can find the ALP HD guide here. However, use either Steam button mapping, as TampaTec explains in his video above or Xpadder which also works with FX3. However, not both –pick only one method.
| Setting Option | Setting Label | Setting Value |
|---|---|---|
| Options – Video | Screen Resolution | 3840×2160 *NOTE – First time setting to this, FX3 exited. If it happens to you, try a 2nd time and it should work. |
| Options – Video | Display mode | Full Screen |
| Options – Video | Vsync | Off (I prefer On to avoid screen tearing, depends on your GPU, try both) |
| Window Position | Horizontal Position | 5760 |
Cabinet Settings
DMD and Backglass settings for Pinball FX3 in 4K.
| Setting Option | Setting Value |
|---|---|
| Orientation | 270 Degrees |
| Dot matrix repositioning | On |
| Dot matrix horizontal position | 5760 |
| Dot matrix vertical position | 0 |
| Dot matrix horizontal size | 1920 |
| Dot matrix vertical size | 1080 |
| Backglass repositioning | On |
| Backglass horizontal position | 3840 |
| Backglass vertical position | 0 |
| Backglass horizontal size | 1920 |
| Backglass vertical size | 1090 |
Where to go from here?
Congratulations, you have your PC and ALP4K all connected. The next step is to install and configure the pinball software you want to use. The options below should help with that:
- Pinball M / FX – This guide will assist you with setting up Pinball FX or Pinball M (mature) to your ALP4K.
- Visual Pinball X (VPX) and Future Pinball (FP) – Coming soon, via the excellent work from NailBuster (Baller Installer).
Troubleshooting
- I’m having an issue not mentioned below, where can I get additional assistance? Answer: If you are having trouble with your Legends Pinball 4K machine that isn’t discussed in this section, please reach out to AtGames customer support which may be found here. If you prefer to ask questions to the community, you can find additional links in the Resources section of the guide.
- I have a high-end PC connected to the ALP 4K, however at times the flippers won’t react to the button presses periodically. 95% of the time it’s great, but sometimes it will seem to not respond, how do I fix this? Answer: Two viewers that encountered this issue stated: Using a powered USB hub seems to remedy this issue. PC to hub to ALP4K. No more micro stutters. Credit to Bryan G. and danfink8670 for this tip! If you need a hub, the Atolla Aluminum 5-Port USB 3.0 Hub should work well for you.
- I’ve installed the Arcade Control Panel (ACP) and it’s not being recognized over OTG, why? Answer: At present, there is an issue with this that AtGames is working on. The ACP works fine natively, but isn’t detected in Windows when in OTG. There should be an update to correct this soon.
- When I plug the USB/OTG cable in, it doesn’t show up as an HID Interface device on my PC, why? Answer: Most OTG issues are the result of a USB cable that is incompatible. I use the UGREEN USB to USB Cable (on Amazon) with all my AtGames devices and haven’t had an issue with it. While not yet verified with the ALP4K, there have been reported issues with Insignia branded USB cables.
- How can I test if the buttons are responding within Windows? Answer:
- Press Win+Q and type €œUSB game controllers€ and select the one of the controllers from the list (you may see one or two HID Interface devices, try each individually, if more than one).
- If the ALP4K controls are being recognized, you’ll see HID Interface listed under Installed Game Controllers.
- Select HID Interface and click the Properties button.
- When you press buttons on the Legends Pinball, the corresponding button should turn red while pressed. If so, your Legends Pinball is connected to your PC and working normally.
- I’m getting some severe audio distortion with SSF/7.1 surround sound, is there a fix? Answer: Steve W. indicated he had this problem and that it was resolved by setting the playfield display from 59.95Hz to 60Hz. If you encounter this issue, give it a try and see if it corrects the problem.
- I’m seeing some flipper lag in OTG, how can I improve this? Answer: If your PC is using an NVIDIA GPU, try setting the 3D Settings to Performance (see here for details). Keep in mind, this may introduce screen tearing during transitions as a side-effect. Also, if you have Raytracing enabled you can turn this off to improve performance further.
Change Log
- 2024-04-01 – Did some re-arranging, moved the Xpadder button mapping section back where it was. Further testing needed for the built-in button mapping.
- 2024-03-28 – Added a note regarding the new firmware update and issues with VPX.
- 2024-03-26 – XPadder or JoyToKey is no longer needed, as of firmware v6.0.11 (March 26th), for more see here.
- 2024-03-06 – Added a Troubleshooting option for improving latency and a powered hub option for #2.
- 2024-03-03 – Added FX3 4K settings.
- 2024-03-01 – Added OTG PC Setup Video.
- 2024-02-23 – Added video demonstrating the CyberPowerPC.
- 2024-02-20 – Making this guide public. Added Button Layout section.
- 2024-02-18 – Added a new section, Improve Latency with NVIDIA GPUs. Updated The Basics section with a Docking Station option, if the laptop/PC doesn’t have a total of 3 HDMI ports. Some proofreading and minor changes throughout.
- 2024-02-17 – Updated Pre-Built PC Options and DIY PC Options sections with feedback received. Various other changes and shifting stuff around.
- 2024-02-16 – Added Windows 11 SSF Support Setup.
- 2024-02-14 – 2024-02-15 – Start to this guide.
Archived
Built-in Button Mapping
*NOTE – I’m hearing that the method mentioned in this section may not work with VPX. As you may know, I’ve not begun testing VPX/FP yet (I was waiting for the Arcade Control Panel support in the firmware to begin, which was just released). If you’re running VPX/FP or wish to continue using Xpadder, leave the OTG Controller Type set as GamePad (then see here for details on that setup). However, if you plan to use only Pinball FX, M or FX3 the Keyboard Type 1 option has some benefits, specifically when used with the Arcade Control Panel: 1) Ability to use the trackball as the mouse 2) A to left/double-click 3) B to right-click .
As of firmware v6.0.11, this firmware version introduced a new button mapping option and greatly simplifies using OTG. If you have the Arcade Control Panel connected, you can use the trackball as a mouse and the A button to click (or double mouse click), B to right-click. See the Arcade Control Panel layout section below for more details. *NOTE – I’ve tested with Pinball M, FX and FX3 only so far (Please let me know how VPX/FP works for you in a video comment).
Here’s how to set it up:
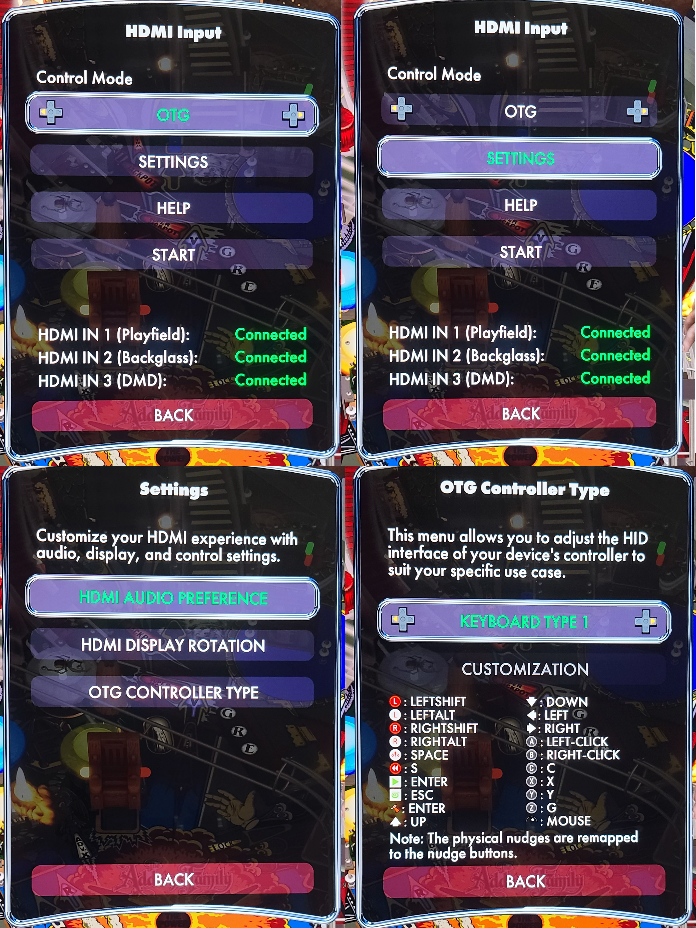
- Press the Channel button on the top-right of the back panel (near the volume buttons).
- Make sure the Control Mode of OTG is selected.
- Move down to Settings.
- Select OTG Controller Type.
- Select Keyboard Type 1.
- Press the Rewind button to go back.
- Select the Start option, then press the green Start button on the front of the machine to start OTG Mode.
- If you have XPadder running on your PC, close it.
- XPadder, right-click the icon on the taskbar and select Close
Button Layout
| Reference | Control | Description |
|---|---|---|
| 1 | Joystick/D-Pad | Navigate up/down/left/right |
| 2 | 1 Player Start | Start a 1-player game (VPX/FP) |
| 3 | Not mapped | |
| 4 | Not mapped | |
| 5 | Left Mouse Click (double-press to double-click) |
Emulates the left mouse button being clicked, use trackball as a mouse. |
| 6 | Right Mouse Click | Emulates the right mouse button being clicked, use trackball as a mouse. |
| 7 | Insert a Credit | Inserts a credit for those tables that need them, some may require more than one. |
| 8 | Forward Nudge a table | Nudges the table forward |
| 9 | Rewind button (not shown above) |
Not mapped |
| 10 | Play Button (not shown above) |
Starts/Selects an option, press+hold to launch a ball. |
| 11 | AtGames/Menu (not shown above) |
Enter the Settings menu or Go Back (mapped to ESC). |
| 12 | Flipper Left/Right buttons (not shown above) |
Operate the flippers left/right (red button). |
| 13 | Left/Right Nudge buttons (not shown above) |
Nudge the table left/right (white button). |
| 14 | Plunger (not shown above) |
Pull back and release to launch a ball. |