Powkiddy X18S Guide
Last Update: 1/10/2022
My goal with this guide is to help you get the most out of your investment (or to determine if it’s worthy of it). Powkiddy didn’t pre-install much for us, so we need to know how to set it up ourselves to take advantage of this pretty impressive Retro Gaming handheld. The stuff that is installed will have you scratching your head, unless you can read Chinese. Above you will find a video review on this product, with details explained below. If there is more you want to see added to this guide, please comment in the above video and let me know.
I just recently received my Powkiddy X18S (PK X18S as it will be referred to below). It arrived on 10/15/2021 and just getting started. I have been awaiting this day for quite sometime and eager to learn as much as I can about it. As I learn, I will be documenting below with real-time updates. I appreciate any feedback, tips, what you would like to see, etc. (comment on the video please for a faster response).
This guide will see more content. I have created one video on this device here, there may be more based on what you want to see. I welcome any comments/suggestions or subscribe to the WTT channel (always appreciated). If you don’t see the information you’re looking for on this guide – I may not know the answer (yet) but I’ll try to find the answer.
How-To link to a specific section on this page: go to the Table of Contents (below) and click a section to reference. Copy the URL from the address-bar of your browser and paste in your video description/post/blog. This will direct a viewer to a specific section in any of the guides you find here.
Content Creators: If you are a content creator and use this information in your video, please kindly let your viewers know where you received the information. A lot of time and research is being spent on this, I appreciate your support. I’m delaying my own review to build this guide.
Table of Contents
Resources
Below are resources for the Powkiddy X18s (more will be added as identified):
Availability
From what I’ve been told, availability may be an issue. For example, an order placed on 10/15 indicated it would be shipped Air Mail in 12-20 days. So you may experience 2-4 weeks lead time before the unit ships. From the time I ordered my unit, it took about 12 business days in transit to arrive at my front door. All-in-all, you can expect at least a month to receive your unit (or longer).
X18S Reviews
Always best to get multiple opinions before considering an X18S. Below are some YouTube videos you may find helpful:
- The Next Generation Of Android Gaming & Emulation In Your Hand?🤔 X18S [ETA Prime]
- The FIRST Affordable Next-Gen Handheld (PowKiddy X18S Review) [Retro Game Corps]
- Powkiddy X18s – The Android 11 Gaming Beast ? 🤔 [ Wicked Gamer & Collector ]
- We Finally have a Powerful Clamshell Handheld! – Powkiddy x18s First Look [ Taki Udon ]
- Powkiddy X18S Setup Guide & Review with Game Play ““ Impressive Device! [ Wagner’s TechTalk ]
Specifications
The following are the hardware specifications for the Powkiddy X18s.
- Operating System: Android 11
- CPU: T618 (8-core 64-bit Dual-core ARM A CortexTM-A75 processor, up to 2.0GHz SIX–core ARM A CortexTM-A55 processor, up to 2.0GHz)
- LCD: 5.5 inch(720*1280)IPS MIPI Interface (touchscreen)
- Battery: 5000mAh
- GPU: Mali G52
- RAM: 4GB
- ROM: 64GB
- TF card: Maximum support up to 512GB
- Wi-Fi: IEEE 802.11 ac/ab/g/n 2.4G/5G dual mode
- Bluetooth: BT 5.0
- HDMI: Mini HDMI with only one display output. When HDMI is output, the console displays a black screen
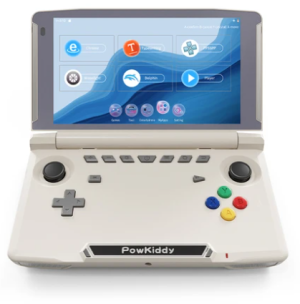
Initial Impressions
My initial experience with the device is: the UI needs some work, I will be investigating ways to improve it. The device has a few apps. which are in Chinese and I’m unable to make out what they do (and seem a bit sketchy and were deleted). The manual is not very clear, hence this guide. There are no games pre-installed (which I respect), though with the Google Play Store that should be a cinch to fix, right? Oh wait… there is no Google Play Store on the firmware that was shipped on my unit (read below, there is a fix/update).
The D-pad right-direction seems to stick at times and the analog sticks are very sensitive, may take some getting used to. Keep in mind, at this point I’ve not installed any games/emulators, just an initial observation. There is no L3/R3 button combination on the sticks themselves (they don’t press down). The Touch screen and display look/operate nicely. However, I did notice on Powkiddy’s blog that there is a new firmware update available (as of today). So, before I get carried away with the initial impressions I’ll start with the firmware update (below). I will come back to this after the firmware update has been performed, installed some games and test the performance. After all, this aspect is the most anticipated!
Update after Installing some Games (this is on-going and subject to change), below are some additional comments after my initial impressions above:
- I am liking this machine more as I learn how to do more with it. Not getting too carried away, there are some issues. But overall, a nice device. Certainly the best performance of any Retro Handheld I own to-date.
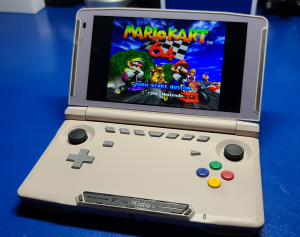
- Dreamcast performance is the best I’ve seen yet on any Retro Handheld. N64 is great also (so far)!
- The build quality seems decent, d-pad could be better (not liking the d-pad). But after playing a few games that utilize it, I can deal with it.
- Speakers sound good.
- No issues with regards to the display and touch-screen.
- Battery life seems great so far.
- Display can rotate in 3 positions, closed, ~105 degrees and 140 degrees.
Accessories
Below are some accessories to consider for your PK X18S. The ones listed with bold links I’ve ordered to try out, once I do and they work out I’ll notate below (or remove them, if they don’t).
- MicroSD Card – You’ll want to add a microSD card to your PK X18S. The size and capacity you get would depend on the type of games you want to play. With the powerful CPU provided by this device, you’ll likely want a pretty beefy microSD card as many Dreamcast, PSP, GameCube, etc. games are quite large. For that reason, I would recommend the following :
- SAMSUNG ELECTRONICS EVO Select 256GB
- SAMSUNG EVO Select 512GB up to 100MB/s
- SAMSUNG EVO Select + Adapter 512GB – more expensive but up to 130MB/s (30MB/s faster). I have one of these on order to replace my current Gigastone 128GB card. It has arrived but I’ve not yet switched to it.
- Screen Protector, Compatible with Powkiddy X18S (3-Pack) – I have a set on order, will update how they work out. May be mid-November before it arrives.
- JBL Endurance RUN – Wired Sport In-Ear Headphones – These headphones sound very good on the PK X18S. There is some decent bass, which I like.
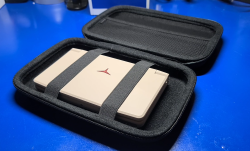
- Portable Hard Shell Protective Pouch Storage Bag – Designed to carry a GPS, this case is a little wider than the X18S but I think I’ll keep it. It was the closest I could find.
*NOTE: If you’ve found an accessory that you like, please comment in the video above and let me know. Very happy to check out better solutions.
Firmware Update
*NOTE – Security is a valid concern when using your google account. You can opt. to use a secondary account. At a minimum, use 2-factor authentication to keep your account access limited to those devices you authorize.
First, you’ll likely want to update to the latest firmware provided by Powkiddy. If you decide not to, you may not have the Google Play Store which is a huge omission (IMO). Also, if you re-install an updated version of the firmware EVERYTHING you had previously setup will be gone. It will be just like you setup a new device, so use caution when determining when to update.
Below is how I applied the update (latest firmware released and I’ve personally installed was on 10/25/2021. Just noticed a new FW update on 11/15/2021 which I may try soon) :
- The official firmware update instructions may be found on Powkiddy’s website here.
- Download the firmware from the first link that you see on that page (drive.google.com…).
- Copy the update.zip file to a microSD card (no need to extract, copy to the root of the card). If you don’t already have a microSD card see here for some recommendations. *NOTE: Make sure the file on the microSD card is named update.zip and not update (1).zip (or anything similar) or it will not detect the update file.
- The microSD card I used was formatted as exFAT at the factory, I left it as-is. It can be read fine on a PC and is a bit more resilient against file corruption than FAT32.
- Insert the microSD with the update.zip file into the microSD slot on the Powkiddy X18s.
- On the Powkiddy X18s, navigate to the Settings icon. Using the touch screen swipe right-left until you see Advanced (tap that icon).
- Scroll all the way down until you see About Game devies (Yes, that’s the spelling on the screen – not my typo) and tap the icon.
- Select the option Local software update.
- Read the dialog, then tap OK.
- You’ll then see a dialog that states Please choose the path of Update Package. SD update should be the only selection, press OK.
- You’ll then see The update package file is ready to be installed. Simply tap OK again.
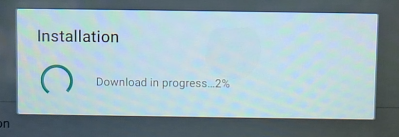
- You’ll then see the progress indicator above as the update firmware is copied to the Powkiddy X18s. It will then show the installation is in progress. Once complete, you’ll see System update installed successfully. Do you want to reboot immediately? Tap OK to reboot.
- The device will reboot and you’ll see the Powkiddy logo. You’ll then see Erasing. Once done, you’ll see a blue screen stating Hi There (as shown below):

- Tap the yellow Start button.
- When you see Connect to mobile network, simply tap Skip.
- Select your WiFi SSID and enter the WiFi password (*NOTE – It will show both 2.4GHz and 5Ghz networks).
- It will then state Getting your tablet ready… just be patient.
- When it asks to Copy apps & data, tap Next. Then select Don’t copy (lower-left).
- Login with your Google account information and tap the Next button.
- Tap Accept on the terms (after reading, of course).
- You can either enter a PIN or tap Skip (I chose Skip, for now).
- Then at Anything else?, just tap No thanks.
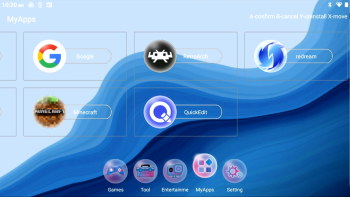
- Now if you select MyApps, you’ll see the Google Play Store. The fun begins!
Post-Firmware Installation notes
After installing the latest Firmware update(above), remove the microSD card from the X18S and insert it into your computer. You’ll notice several sub folders that were created, example below:
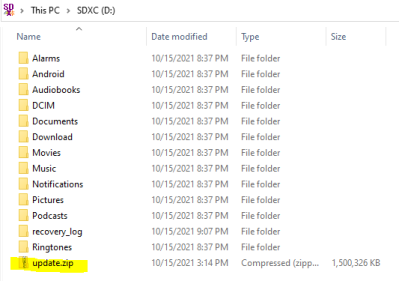
We’ll leave the folder structure intact, however you can remove the update.zip file as the update has already been applied and is no longer necessary.
Copy Games
There are no games included with the PK X18S, so it’s up to you to install them. You have access to the Google Play Store, so there are tons of games you can download and install to your PK X18S.
My preference is to install not only native android games but emulators that will allow running classic retro consoles and arcade games. What you decide to install is totally up to you. To do that, I opted to copy several roms and bios files from my Super Console X Stick to get started quickly. Keep in mind, I can’t tell you where to get roms (see why here). Below are some basic steps after you’ve downloaded the games you want to add to your microSD card:
- Create a subfolder off the root of the microSD card called /Games/roms.
- Create (or copy) the subfolders containing the type of games you wish to install to the microSD card (i.e. bios, dreamcast, n64, neogeo, etc.)
- Copy the associated games into their appropriately named sub folders.
- Once done, safely eject the microSD card from your computer and re-insert it into the PK X18S.
General Operation
The following are some general tips regarding things I’ve learned about the device.
- HDMI Output – You’ll need a miniHDMI to HDMI cable. One is not included with the X18S and one I had on-hand didn’t work. However, getting HDMI Output to work is simply a matter of plugging the miniHDMI cable into the X18S, the other to your TV/Monitor and turning on the X18S.
- Battery – The battery re-charges pretty quickly, even while performing intensive searches for games. The battery life, thus far, seems very good. Still testing, but not concerned at this point.
- The “G” button – Pressing the “G” button will allow you to adjust the mapping for those games that provide an on-screen overlay. You can drag/drop various buttons to their respective locations to perform inputs on the device that aren’t already mapped to the game you want to play. So far, seems to work rather well.
- The Home Button – This will take you out of any application that you’re currently using. Keep in mind, the application will still be running in the background.
- + / – – Your volume controls.
- Task Switcher – The button which looks like a ladder is used to switch to another app. or close any running applications by swiping the window up.
Emulator Testing
The following is a table of the emulators I’ve been adding/testing. Keep in mind, I’m picking specific games to test that I’m familiar with (no particular order). As I test performance and find issues, the Notes column will get updated:
| Emulator / Core | Application | Notes |
| Stella | RetroArch | The Atari 2600 was my first gaming console, only fitting to start here. As expected, Runs Great. |
| NES / Famicom (FCEUmm) | RetroArch | Runs great |
| SNES / SFC (Snesx9x) | RetroArch | Runs great, played a handful of games. |
| Nintendo 64 (MuplenPlus – Next GLES3) | RetroArch | Runs great |
| Sony PlayStation Portable (PPSSPP) | RetroArch | Runs great; Especially using the stand-alone PPSSPP emulator (Even God of War plays quite decently with minor sound issues) |
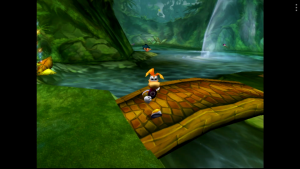
| Dreamcast | Redream | Excellent performance with the handful of games I’ve tried. |
| GameCube | Dolphin | The good news is, it runs. However, with Super Mario SunShine I’m seeing between 21-30fps with some minor audio distortions. Still playable and there may be some optimizations that can be made. |
Emulators
Powkiddy has left it up to us to add those emulators we wish to install to the device. Fortunately, with access to the Google Play store it’s an easy process. Below are some emulators I have installed and work well.
RetroArch
RetroArch is an application which supports a vast library of emulators. These emulators are called Cores within RetroArch (each downloaded separately within RetroArch). In fact, if you set it up you’ll be able to play the vast majority of the Retro Systems available. It is a bit confusing if you’re new to it, but very powerful once you get a hang of it.
Getting Retroarch to load games from the microSD, rather than the internal 64GB storage, proved to be a bit challenging. This was important in that we want to minimize the amount of internal storage on the PK18S we use for our games. We have a microSD slot and should make good use of it. I did, finally figure out how to load games from the microSD and it’s documented below. Without these steps, what you may find after installing RetroArch is that you’re unable to browse to the microSD card location where you copied your games. The following will assist with this.
Prerequisites
Below are some things I setup on the microSD from the PC before inserting it into the X18S.
- I copied all games I wanted to try out using my PC. I created a subfolder off the root called “/Games”. In that subfolder, I created another called “roms”.
- Within the “roms” sub folder, I copied various games in directories such as /Games/roms/gb, /Games/roms/nes, etc.
- I also placed all the BIOS files I expect to need in /Games/roms/BIOS.
Path Setup
- First, Download RetroArch from the Google Play Store on your X18S (*Note – If you don’t see the Google Play Store, please see here to update the firmware).
- For this step, I also downloaded an application called QuickEdit. This is needed as we will need to make a change to the retroarch.cfg to allow it to find the microSD card.
- Launch RetroArch and then move down to Quit RetroArch, this should create the default retroarch.cfg file (need to verify this).
- Now launch QuickEdit.
- In the upper-right, tap the FILE icon and tap Open.
- Select disk, notice at the top the path is /storage/0194-00A0 (the bold area will be different on your device). Write down what you see for the name of the microSD card. Keep in mind, it is case-sensitive and make sure you write it down correctly. Otherwise, the following steps will not work.
- Tap the /storage subfolder at the top heading.
- Using the QuickEdit browser, navigate to /storage/emulated/0/Android/data/com.retroarch/files/retroarch.cfg (you may be asked to provide access, allow it).
- Scroll a ways down until you find the text rgui_browser_directory = “default”. Change the path using the following format: “/storage/[your SD card id here]/[sub folder/path for your games”. For example, I created a subfolder at the root of the microSD called “Games” and a sub folder under Games called “roms” on my microSD card, the path is /Games/roms. Therefore as an example, my line reads (note you’ll replace the bold area below with the number you wrote down above and adjust the path to your roms):
rgui_browser_directory = “/storage/0194-00A0/Games/roms” - After making the above change, save the file (File → Save).
- You can now exit QuickEdit.
- At this point, launch RetroArch and you will now be able to move to the Scan Directory option and scan the sub folder(s) for your games.
RetroArch Setup
After the Path Setup is performed, below are some additional tips to help you customize your RetroArch setup. This is not an exhaustive list of customizations, just a few things I think may be helpful as it relates to the X18S.
Change the UI
To change the interface, I recommend doing the following:
- Select Settings.
- Select User Interface.
- Select Menu and change it to xmb
- Back out, then navigate to Quit RetroArch.
- When you re-start RetroArch you’ll now have an interface that looks similar to the following image.
Adding Cores
Cores are essentially the emulators that allow you to play the games. You need to install the core to be able to play the games that you’ve installed to your microSD card. Below are some basics:
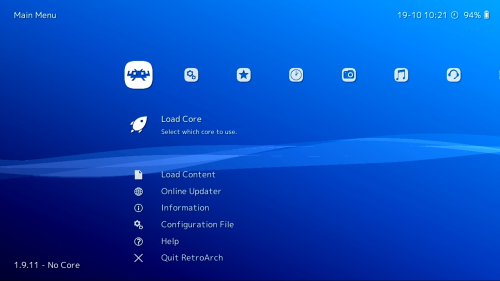
- From the Main Menu, select Load Core.
- Scroll down until you see Download a Core.
- Select the core you wish to download ( i.e. Sony – PlayStation Portable PPSSPP ).
- Then, navigate to the far-right until you see the Plus Sign (+) and select Scan Directory.
- Navigate to the directory you wish to scan (i.e. /Games/roms/psp) and select <Scan This Directory>.
- The scan may take some time depending on the size and number of roms/games to scan. Let it finish.
- Once complete, backup to the main menu, scroll to the right and you’ll see an icon representing the core/device/console that was just scanned. Select it and browse/Run the game you’ve selected.
Button Bindings
You’ll likely want to map all the buttons available on the X18S. This step can be a bit tricky if you’re not familiar with all the buttons (you only have a few seconds to bind each button). If you find the default mappings aren’t sufficient, here’s how:
- Navigate to Settings → Input.
- Scroll down until you see Port 1 Controls.
- Move down until you see Set All Controls.
*NOTE: keep in mind, once you tap this, you will need to press + hold each button when prompted. Including the analog stick, pay attention when it says left stick up/down/left/right, etc. - In Hotkeys → Hotkey Enable, I bound this to the SE (Select) button.
- In Hotkeys → Close Content, I bound this to the X button. This way, while in-game you can press SELECT+X to exit a game in RetroArch.
- When done, go to the Main Menu (far left) → Configuration File → Save Current Configuration.
Hide Control Overlay
The button overlay was getting annoying, here’s how to turn that off.
- Navigate to Settings → On-Screen Display → On-Screen Overlay.
- Toggle Display Overlay to the Off (left) position.
Exit a Game
- Under Settings → Input move down to Hotkeys.
- Scroll down to Hotkey Enable, select it and map it to the SE button (select).
- Move down to the Close Content setting and map that to the X button.
- When done, go to the Main Menu (far left) → Configuration File → Save Current Configuration.
- Now, to exit a game and return to the RetroArch menu, you can press SELECT+X to back out.
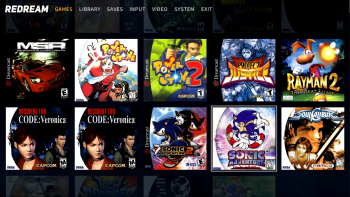
Redream (Dreamcast)
Redream (Dreamcast) on the X18S runs well, very well! In fact, it’s the best performance I’ve ever seen for Dreamcast on a handheld device thus far. Install it from the Google Play Store. There is a premium version and a free version (I’m currently using the free version, but may upgrade). After installing, below are some steps to help you get up and running.
Setup
- Download Redream from the Google Play Store (*Note – If you don’t see the Google Play Store, please see here to update the firmware).
- Got to the MyApps icon (bottom), launch redream.
- Select the bottom option, Continue with LITE mode.
- Tap Go To Library.
- Tap Add Directory.
- Select the path to your roms (i.e. disk → roms → dreamcast), tap the blue button USE THIS FOLDER.
- Tap ALLOW to allow access to files.
- Select the GAMES tab at the top, you should see a list of games.
Configure Buttons
- Tap on the top tab INPUT.
- Tap on Port A.
- Tap on a button to re-map, press A, then tap the button you want to map for the function (i.e. Left trigger to L1, Right Trigger to R1)
Launch a game
- Tap the GAMES tab (top)
- Tap on the game you want to play.

Dolphin (GameCube/Wii)
This section will go over the use of the Dolphin Emulator. This emulator will be useful for playing GameCube and Wii games on your X18S.
Setup
- Download the Dolphin Emulator from the Google Play Store (*Note – If you don’t see the Google Play Store, please see here to update the firmware).
- Make sure you’ve copied your games to the microSD card (assuming a path of /Games/roms/gamecube for the following).
- Upon launching, Allow Dolphin Emulator to access files.
- Click the + sign in the lower-right
- Tap the 3 line icon in the upper-left and select disk.
- Navigate to the microSD location where your games are stored (i.e. /disk/Games/roms/gamecube) and tap the blue USE THIS FOLDER button. If you have each Gamecube game in it’s own sub folder, you’ll need to add each individually.
- Press Allow yet again.
- The game should now be added!
Control Overlays
You can press the “G” hardware button to bring up the button overlays. Simply drag the buttons to each of the corresponding images. When done, press the Save/Hide button. Now when you play the game, the virtual game buttons will be associated with the hardware buttons on the X18S.
PPSSPP
The PPSSPP emulator can be used within RetroArch or as a stand-alone download from the Google Play store. While using the RetroArch core, God of War did not play well. However, using the standalone PPSSPP emulator it runs quite well with only minor audio distortions. Game Play was quite smooth, I was impressed. I’ll add more here.
Settings
When you launch PPSSPP, below are some settings that will improve the performance:
- Download the PPSSPP Emulator from the Google Play Store (*Note – If you don’t see the Google Play Store, please see here to update the firmware).
- Select the Settings option on the right.
- For Backend, change this setting to Vulkan.
- For Chains of Olympus, I didn’t see a need for Auto frameskip so left that unchecked.
- For the Rendering resolution, I had this set for 2x PSP.
Front Ends
Below are Front Ends that have been tested, at least partially, and are working on my machine.
DIG
Got it working on the X18S. You’ll need to go into the emulator and select the proper core/emulator by going to Manage System, change the top selection to the appropriate core. If using RetroArch, make sure the core has already been downloaded within RetroArch. I may be adding more here, if needed. Comment in the video above on what you would like to see added.
Streaming
In addition to installing native Android applications, running emulators, etc. you can also run various streaming services on the X18S. In the sections below, we’ll take a look at some that run well.
Google Stadia

Google Stadia
If you have a Google Stadia account, you can use it to stream games to your X18S. Below are a few steps to get you started.
- Open the Chrome browser on the X18S.
- Enter stadia.google.com in the address bar.
- When prompted (the first time), enter the authentication information for your google account.
- Use the left analog stick to navigate the menus. Tap See all under Your library to see a list of all games available to play.
- Select a game you want to play by tapping it on the touch screen.
- To back out of a game, press the undo button (far right grey hardware button at the top).
Native Android Games
There are of course thousands, if not hundreds of thousands of games available on the Google Play Store that you can download and play on your X18S. As I try some of them, I’ll add my experiences below. At present, I’ve only tried a handful.
- Zen Pinball – My first experience playing this game was on an XBox 360. There are a number of tables I’ve bought over the years which have been played on various devices. Played very well on the X18S, L1/R1 are used for the flippers and a blast to play on this device.
- Minecraft – Not a game I’m interested in personally, but did download and install it for my son to try out. He said it played fine using the X18s sticks and buttons.
Troubleshooting
- HDMI Output not working – Try a different miniHDMI to HDMI cable. I had this issue and a new cable fixed the problem.
- X18S Not able to update – Make sure the microSD card you’re using has a single partition. That is, if you insert it into your computer and see more than one drive letter associated with the SD card then you have more than one partition and the update won’t work. If there is more than one partition, backup any stuff you may have copied to it then use the SDCard formatter tool to erase the SD card. Once formatted, copy the update.zip file back to the root and retry the update. Should work well for you this time.
- Google Play isn’t available – Same, please see here.
- Unable to browse to my microSD in RetroArch – Please see here.
- Game performance is not good – for the best performance, press the task button (right of the power button) and close out of any applications that aren’t needed (swipe up). This will stop the other applications from running in the background and improve performance.
- DIG Front End Hangs when launching a game – You’ll need to go into the emulator and select the proper core by going to Manage System, change the top selection to the appropriate core. If using RetroArch, make sure the core has already been downloaded within RetroArch.
Change Log
- 2022-1-10 – Minor edits.
- 2021-10-31 – Minor cleanup after initial guide/review video. Added additional X18S video reviews that were recently released.
- 2021-10-24 – Added PK X18S Setup Guide & Review video.
- 2021-10-18 – 2021-10-21 – Added RetroArch setup, Dolphin, Google Stadia, start to PPSSPP (much to add) and more.
- 2021-10-15- 2021-10-17 ““ Start of this guide.