PC Retro Gaming
Last Update:4/29/2024
On this page, you’ll find information about Retro-Gaming on a PC, laptop or retro gaming handheld. Below we’ll look at options for a modern PC as well as re-purposing an older computer as a Retro Gaming station.
Table of Contents
EmuDeck for Windows
EmuDeck makes it easy to emulate games on your Windows desktop, laptop or handheld PC! EmuDeck is a tool which will download and install various emulators and configure them for us. While the installation is easy, this video will help you get up and running quickly.
Helpful Links
Kamrui AMR5 Mini Gaming PC
the Kamrui AMR5 Mini Gaming PC that includes an AMD Ryzen 7 5800U CPU with 8 cores, 16 threads. This mini PC is ideal for Retro Gaming, some PC gaming and can be used for virtual pinball, sort of. Let’s discuss it in this video.
More information
- Kamrui AMR5 MiniPC [ Amazon ]
RetroStation Deck: 4TB Steam Deck & PC Retro Gaming Hard Drive
Explosion of fun has released the RetroStation Deck 4TB hard disk drive. This drive includes over 31k games from systems such as Xbox, Wii/Wii U, PS2, PS3 and the Switch. In this video we’ll unbox it, set it up and play some games! A full game list may be found here (Excel Spreadsheet).
More Information
- Link to the 4TB RetroStation Deck Drive – Link to the explosion of fun website and product page for this drive.
- Batocera PC Retro Gaming Guide – more about how to enter the PC BIOS, setup and customization of Batocera.
JMachen Hyper Base RB2 External 2TB Retro Gaming Hard Drive
This PC External 2TB Retro Gaming Hard Drive has 100k GAMES! The JMachen Hyper Base RB2 External 2TB Retro Gaming Hard Drive has 105 emulators that can play PS2, Wii, Dreamcast Saturn and many more via RetroBat. You simply plug it into your PC/Laptop, and launch the RetroBat executable/shortcut. Game List
The drive may be found on:
External 2TB Retro Gaming Hard Drive
If you have a PC running Windows 8.1 – 11 (64 bit) and was manufactured after 2008 (a more recent gaming PC will allow playing higher-end emulators such as xbox, PS2/PS3, etc.), you may find the RetroStation PC4U 2TB External Retro Gaming hard drive to be an easy and convenient way to get started retro gaming on your existing PC. In the video above, we’ll check it out.
*NOTE – I noticed you can bypass the login by running \emulationstation\emulationstation.exe directly. Of the games I tried, this worked fine and I wasn’t prompted to login.
Products shown
PC Suggestion
If you need a PC, the one below has very good reviews and should play these games easily. The PC shown in this video is no longer available.
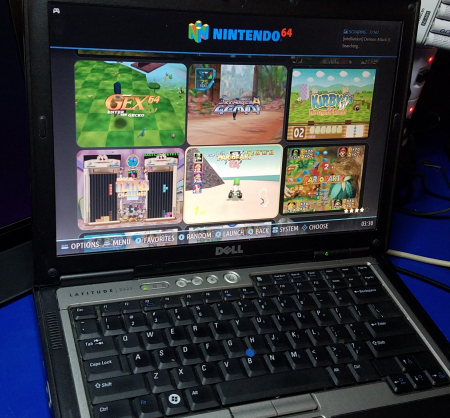
Running Batocera on an old Laptop
I consider any laptop over 10 years old to be an old laptop. Your interpretation of old may be different from mine, however let’s assume 10 years is the cut-off for being an old system. I received a used laptop a couple of years ago where the user wanted the drive wiped, then I could use it for whatever I wanted or get rid of it. I decided to hold on to it and used it for one of my early videos on ReactOS. After not having used that machine in quite sometime and recently creating a video on Batocera for the Raspberry Pi 4 Model B, I thought I’d give it a try on that old laptop.
The results were impressive! I was able to run everything up to n64. A PC/Laptop newer than 14 years old could probably perform much better and perhaps even run Dreamcast. Alternatively, you may be interested in this video that shows Batocera 5.26 being run on a Raspberry Pi 4 Model B (and running Dreamcast).
Laptop for Testing

(Released in 2006)
The laptop I tested was a Dell D620 from 2006! To change the boot sequence on a Dell, you press F12 when powering-on or rebooting to change it to boot from USB (F2 to enter the BIOS and change the boot sequence, move USB to the top). Different manufacturers will use different function keys to enter the BIOS or change the boot sequence, so you’ll need to search for yours if it’s not a Dell or F12 doesn’t work for you. Pressing the F12 key and selecting USB as the boot drive allowed the laptop to boot off of a Batocera USB boot image. Here are the specs for the laptop as it shipped from Dell:
- Intel Core Duo T2400 1.83GHz
- 1GB 533MHz DDR2 RAM (2 x 512MB config)
- 80GB 5400RPM HD
- 14.1-inch WXGA screen
- Integrated graphics (Intel Media Accelerator 950)
- 24X CDRW / DVD Combo
Windows XP Pro- Dell Wireless 1490 802.11 a/g and built-in Bluetooth
Helpful Links
- Download the latest Batocera (all platforms)
- Batocera Wiki – lots of information on Batocera may be found here
- Batocera on the Raspberry Pi 4 – my page/video on setting up Batocera on the Raspberry Pi 4
Batocera 5.26 Notes
Below are some notes that you may find helpful regarding the Batocera 5.26 installation on this older laptop:
- During my testing, I was able to run all systems up to and including n64 just fine. Dreamcast would attempt to launch, but return back to the menu. No systems beyond n64 would run on this 14 year-old laptop.
- While filming the video above, I started with the current release of Batocera 5.26. Then, 5.27 was released and I attempted an upgrade. Once the upgrade was completed and I rebooted the system, Batocera would no-longer boot fully. However, I was able to use PuTTY to remote-connect and issue commands to revert back to 5.26. After reverting back to 5.26, everything worked just fine without any data loss. See comment in the next section from the Batocera developer.
- I only used this one Dell D620 laptop for testing, newer laptops may have no issues at all with current/future versions.
Install Batocera
You’ll first need to create a boot image of Batocera. We’ll assume here that you will be using a USB stick. Depending on the age of your laptop, below are a few different links you may want to use to download the image. In my case, the laptop above was 14 years old at the time and Batocera 5.26 worked fine. However, some changes were made in 5.27 while filming which wouldn’t allow this machine to boot fully without halting at the “Booting Batocera Linux...” prompt (though, I could still remote-access the machine via PuTTY). This wasn’t actually due to a bug, but rather the following reason, from the developer:
“For the GPU issue, in fact it is not really a bug. In 5.27 we upgraded our way to handle the GPU to simplify maintenance as general-Linux distributions are doing as well. We use xwayland, the counterpart is that GPU’s older than 14 years old are no longer supported in Batocera 5.27. It is possible to configure a fallback for old systems to support older hardware. We are deciding if we do it or not. We want to keep things easy. So, a “fix” version will not be available immediately. It is currently not prioritized, but it is in the hand of one of the Batocera members to determine how to proceed.” – Some edits were made for clarity (WTT)
If you run into this problem on more recent builds, the best bet is to revert back to Batocera 5.26. For this, see the section below to Revert to Batocera 5.26.
If you’re not having an issue booting and your laptop is newer than 2006, the following instructions may work fine for you. What follows is essentially what I did for v5.26 and worked fine.
WARNING: It is assumed that you’ll be using a hard-drive inside the laptop/PC. If this the case, be warned that these steps will TOTALLY ERASE everything on that drive. If there is anything important on it, back it up first. When you’re done, you will have Batocera installed and nothing else will be on that drive.
- Download the version of Batocera you wish to install from here. If you are installing to an old PC/Laptop be sure to select either x86 or x86_64 depending on if the processor for your computer is x86 (32-bit) or 64-bit CPU’s. If you are installing to a Raspberry Pi 4, instead please see this.
- After downloading the image, use Balena Etcher to burn the image to your USB stick (in my case, I used a microSD -> USB stick which works the same). You don’t need to extract the download to image it, simply select the image from etcher, select your USB Stick and click the Flash button.
- Plug the USB Stick into an available port on your PC/Laptop press the power button to turn it on. Make sure you know which function key will enter the Boot/BIOS menu (on my Dell Laptop, it was F12).
- Press the appropriate key to enter the boot menu and set USB as the boot drive.
- Batocera will now boot from the USB Stick.
- If Batocera will not boot, chances are the machine you’re using is around the same age as mine. In that case, instead of using the latest version of Batocera, use the version 5.26 instead (x64 Download / x86 Download).
- Upon boot, you’ll see a blue screen when the USB drive is being resized. It should continue normally after that.
- Once booted, you can now install to the PC/Laptop hard disk.
Hard Disk Installation
- Plug in your controller and map the buttons (Hold a button, then follow the on-screen instructions).
- Press START on your controller.
- Move down to SYSTEM SETTINGS.
- Move down until you see INSTALL BATOCERA ON A NEW DISK.
- Select the Target Device (select your hard drive)
- Select the Architecture (i.e. X86 or X86_64 depending on the processor in your PC/Laptop)
- Flip the toggle switch at the prompt Are you Sure?
- Press A on INSTALL.
- The image will be downloaded, then installed. Once installation is complete, restart Batocera for the changes to take effect.
- That’s it, Batocera has been installed on the hard drive on your PC/Laptop!
Revert to Batocera 5.26
This section assumed Batocera 5.27 (or higher) was installed and you are unable to boot Batocera. If you have this issue, here’s how you can correct it (or what worked for me):
- If your PC/Laptop is not connected to the network via WiFi, then plug in an Ethernet cable connected to the same network as your primary computer (I’m assuming you’re using an old computer for Batocera, see warning above if not).
- Install and launch PuTTy using a Hostname of batocera. The login is root, password is linux.
- At the prompt, enter the following command (copy from here, right-click will paste into PuTTy):
batocera-upgrade https://batocera.org/upgrades/x86_64/stable/last/archives/20200527- Once the above command is run, it will download the 5.26 image and update your installation. Then type reboot to reboot the machine.
- Your PC/Laptop should now boot normally.
Change Log
- 2024-04-29 – Added EmuDeck for Windows.
- 2023-05-05 – Added the RetroStation 4TB Deck HDD.
- 2022-05-12 – Updates to support the 2TB drive option.
- 2021-08-07 – Minor updates.