EmuDeck Steam Deck Setup Guide (v2.1)
Last Update: 7/10/2025
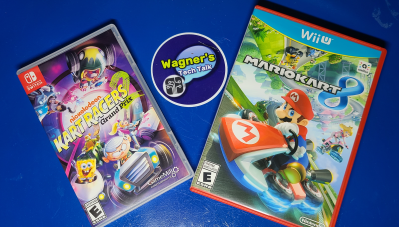
If you want to be able to run retro games from various systems on your Steam Deck, EmuDeck will make the process much easier!
So what is EmuDeck? EmuDeck is a tool (more precisely, a script) that you can download/install which greatly simplifies the installation of 160 emulators and supporting utilities to your Steam Deck. It also pre-configures all the controls, aspect ratio settings, etc. so really there is very little configuration required on your part to get up and running. That said, many will prefer to have step-by-step instructions, additional tips, assistance with a few stubborn features and commentary.
Below you’ll find additional information to help guide you through the process. This guide will continue to be enhanced, so please check back from time-to-time. Huge thank you to the EmuDeck developers that made this process very easy!
If you find the below helpful, I appreciate your support by subscribing to my YouTube channel. It helps grow the content you find here -now including, EmuDeck v2.1 on the Steam Deck!
–Jon
ps. There is much more Steam Deck-related information on the main Steam Deck Guide.
How-To link to a specific section on this Guide: go to the Table of Contents (below) and click a section to reference. Copy the URL from the address-bar of your browser and paste in your video description/post/blog. This will direct a viewer to a specific section in any of the guides you find on this site.
Table of Contents
Q&A

This section will help answer some of the common questions you may have about this guide/process:
- What is EmuDeck? EmuDeck is a tool (more precisely, a script) that you can download/install which greatly simplifies the installation of 160 emulators and supporting utilities to your Steam Deck. It also pre-configures all the controls, aspect ratio settings, etc or allows you to do so very easily. There is very little configuration required on your part to get up and running.
- How easy is it to install EmuDeck? I recommend having a microSD installed and properly prepared (if you’ve not done that already, please see here). You can install EmuDeck to the internal SSD, but space is precious there and microSD’s are relatively cheap and a good fit for emulation. Using the steps below, you’ll be able to install EmuDeck fairly quickly (typically ~20-30min), but dependent on the number of games you add (I recommend, being picky –at least initially).
- What kind of microSD card should I get? For best performance you’ll want to consider a U3 A2 card. A2 represents the Application Performance Class and a class of 2 will provide better performance over A1 cards. A U3 card provides faster write speeds over that of U1 cards, 30MB/s vs 10MB/s. I went with the Lexar 1TB microSD for use on the Steam Deck while in SteamOS, but pick a capacity right for your needs. Other great brands include: Samsung, SanDisk and Gigastone.
- I’m trying to play game abc on emulator xyz and it’s not working, what should I do? There are 160 emulators installed with EmuDeck. Please see here for links to emulator-specific information. While this guide will assist with the installation, setup and a handful of emulator-specific tips, these type of questions will receive the most efficient assistance on the EmuDeck Discord here. You may already find an answer there by searching previous posts also.
- I went through these steps and having issues, where can I go for help? Please see the Common Issues section. As I receive feedback and issues arise, I add them to this section to help the next person. There is a good chance your issues has already been discussed. If not, comment in the video and I’ll help as best I can.
- You don’t show where to download games and BIOS files, why? Please read this section carefully. I can’t provide direct links to copyrighted material, but you may find some helpful tips, if you read closely.
- I’m completely new to the Steam Deck, where should I start? A more general Steam Deck guide may be found here. It covers a bit of information that will be helpful for new Steam Deck owners, including: Resources, how-to’s, Tips and accessories. After taking a look around and getting more familiar with your Steam Deck, you’ll find a link on that page to bring you back here –when you’re ready.
- What if I don’t have a PC, can I still use EmuDeck? Yes, in the above video you see where/how to launch the Firefox web browser while in Desktop Mode. Using that, you can download the games you own. Then, using the Dolphin File Manager, you can copy any BIOS/ROMs to the locations mentioned in this guide/video.
- Can I simply insert the microSD card from the Steam Deck, into my Windows PC and copy games? If you try to read a microSD card formatted on the Steam Deck within Windows, the SD will be formatted as ext4. Ext4 partitions are not natively readable by Windows. To read the microSD card directly within Windows you’ll need a 3rd-party utility, such as :
- Paragon Software Linux File Systems for Windows
- Disk Genius (30% Off Disk Genius Pro code: DG30-YUTE-STPR ) – My preference
- When using a USB stick to transfer files to the Steam Deck, how should the stick be formatted? If the USB Stick is formatted as FAT32 (limited to a maximum 4GB file size) or exFat (larger file sizes), you should be able to transfer easily between Windows and the SD. For 3 different methods of copying files, please see this section. Upon inserting the USB stick, a popup will appear to mount the drive, be sure to mount it.

EmuDeck Resources
Below are a number of links/resources that you may find useful related to EmuDeck.
- EmuDeck on Github – lots of great information including emulators supported, Hotkeys, emulator file type support (+BIOS) and more.
- EmuDeck on Discord [where to go for Emulator-specific assistance and questions not answered here]- Learn more from the EmuDeck community on the EmuDeck Discord and get answers to emulator-specific questions.
- EmuDeck Github Wiki – Additional information from the developers of EmuDeck may be found here.
- EmuDeck – The main EmuDeck website. If you enjoy emulation and want to play Retro Games on the Steam Deck EmuDeck has you covered.
- SteamGridDB – Great place for locating missing artwork when using the Steam ROM Manager.
- Steam Rom Manager on Github – More details and of course source code for the Steam Rom Manager may be found here.
- EmuDeck (Reddit) – You can find a dedicated subreddit for EmuDeck at this link.
- Steam Deck Thread (Reddit) – Original Steam Deck subreddit thread announcing this guide.
Other Resources
- Main Steam Deck Guide – This is the main Steam Deck guide which covers general Steam Deck topics, including: Accessories, Quick How-To’s, Steam Deck Tips, running Windows from a microSD, Dock Options (as shown in the above video) and how to connect the Steam Deck to other devices.
Steam Deck Accessories
The following accessories were shown or mentioned in the above video:
- USB-A to USB-C Adapter – If you just want a quick easy way to copy files from a USB Stick to your Steam Dock, this may work for you.
- USB Stick (32GB) – If you’ll be copying a lot of games, you may want to pick one up that is a larger size. However, these are fast and work well but only 32GB.
- Park Sung Dock – available from Amazon.
- Official Steam Deck Docking Station (not shown) – while not shown in this video, some may also prefer this dock. I found the file transfer performance to be better with the Park Sung Dock (see here for more on that).
- Lexar 1TB microSD – I went with this card for installing SteamOS & Emulated games and it’s been working out very well. For more on storage expansion, see here.
- Foldable Keyboard, iClever BK08 Bluetooth Keyboard – This is a handy keyboard and trackpad to have for use with Desktop Mode and Windows on the Steam Deck. Instead of breaking out my wired USB keyboard and mouse I can easily put this in my pocket. It also allows pairing to 3 different devices so you can easily use it with your phone, tablet, etc. also.
There is much more to explore on the main Steam Deck guide including these Steam Deck Accessories that I think you’ll enjoy. If you’re curious why I didn’t show the Official Steam Deck dock in the above video, here’s why.
Guides you may also Enjoy
After you install EmuDeck, check back here for some additional Steam Deck guides that you may also enjoy checking out.
Run Windows from microSD
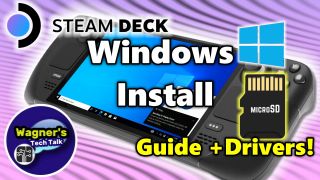
See: Run Windows from microSD Guide
You can install Windows 10/11 to a microSD with full driver support easily using this guide. It will step you through creating a Windows ISO file, Creating the Windows MicroSD image, copying/installing the drivers, tips and more.
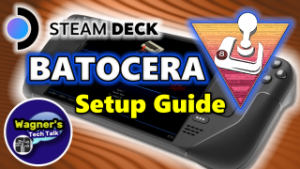
Steam Deck Batocera Emulation Guide
See: Steam Deck Batocera Guide – Batocera is a popular retro gaming operating system that is available for a number of different devices / platforms and works great on the Steam Deck! This guide will step you through the installation, setup, copying bios/roms, UI/Themes and much more.
nreal /Xreal Air Augmented Reality Glasses

See: nreal Air AR Glasses Guide
The nreal Air Augmented Reality (AR) glasses are an excellent companion for the Steam Deck. The glasses project a 130″ virtual display when used with the Steam Deck allowing you to essentially bring a large-screen TV with you, wherever you go!
In this guide (and video), we’ll discuss how to use them with the Steam Deck as well as demonstrate some actual game-play examples. This is something few videos do, mainly because it’s not easy.
Updating EmuDeck
If you’ve never installed EmuDeck before, you can skip this section entirely. If you’re upgrading from EmuDeck v1, the steps below will walk you through the uninstall process. Leave your bios and rom files as they are, the folder structure hasn’t changed in v2. Below is what was done before installing EmuDeck v2:
- Enter Desktop mode on your Steam Deck.
- Double click the Uninstall EmuDeck icon from the Desktop.
- When prompted Do you really want to uninstall EmuDeck? , select Nope, I want to uninstall EmuDeck.
- Next you’ll want to remove all the Steam Rom Manager entries. To do that, click the Launch SRM button.
- Click on the Settings option on the left side-bar.
- Click the button on the right that states Remove all added app entries.
- When you see the toast message, Entries have been removed, in the lower-right you can now close out of Steam Rom Manager.
- You’ll now see a dialog stating This will delete EmuDeck… Just click the OK button without selecting any of the options.
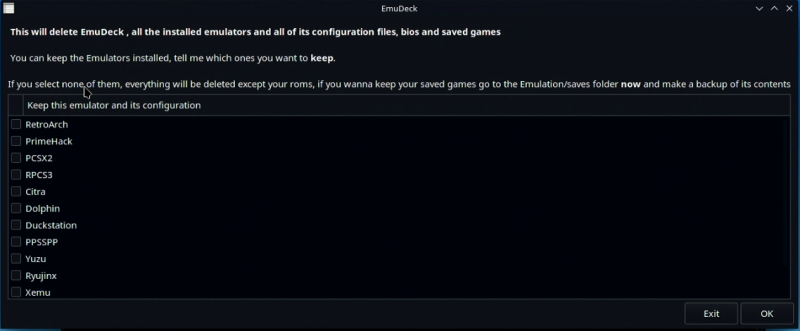
- EmuDeck will begin to uninstall.
- Once you see the Done! dialog, click the OK button.
- EmuDeck is now uninstalled.

Installation
Video: See how
In the section below, we will install EmuDeck to the Steam Deck.

- First, enter Desktop mode on your Steam Deck.
- [Optional Tip] Launch the Firefox browser if you want to browse to this guide ( https://wagnerstechtalk.com/sd-emudeck ) so that the links/steps below will be available to you on the Steam Deck during setup.
- I recommend adjusting the Power Savings (while on AC) to 30-160 min. to allow copying your bios/rom files and the Steam Rom Manager to download the artwork without shutting off after 5 min.
- If you will be installing EmuDeck to your microSD card (recommended), you’ll need to have already formatted it within SteamUI. If you have already done this when initially setting up your Steam Deck, you’re good (don’t do it a 2nd time).
- Browse to the EmuDeck website.
- Then, select the download option for SteamOS (*NOTE – Additional operating systems are also supported).
- Click the Download Installer button, then click OK when prompted to Copy the installer to your desktop and then execute it by double clicking it.
- From the Top-right of the browser, click the down arrow and then Show all downloads.
- Drag and drop the file Emudeck.desktop.download to your Desktop and select Move Here.
- Double click on the Emudeck.desktop icon on your Desktop and click the Continue button. The installer will begin and you’ll be prompted to select which method of installation you prefer, Easy mode or Custom Mode.
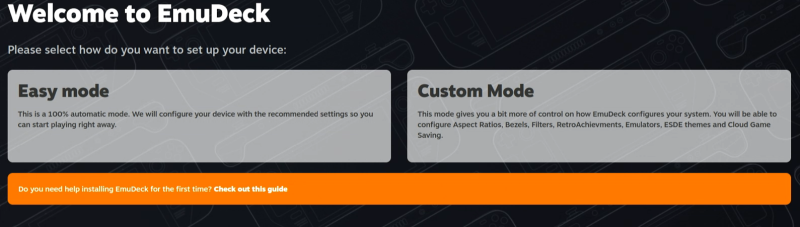
- While you can certainly select Easy mode and accept the default installation settings, the EmuDeck team has greatly improved the installation process with the Custom Mode option. We’ll use the Custom Mode option which will step you through the setup and is very easy to do. There won’t be anything complicated or advanced to be concerned about while using this option.
- Select Custom Mode and click the Continue button in the lower-right of the window.
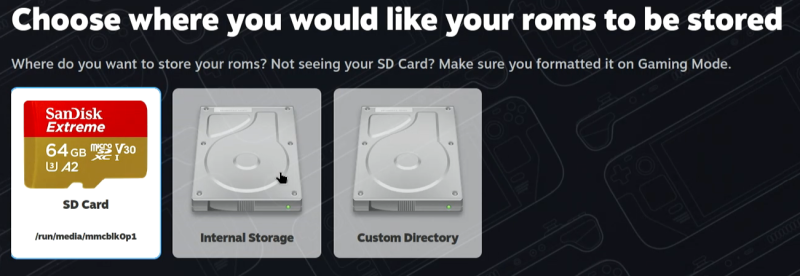
- You’ll now be asked where you would like your roms (games) to be stored. The internal storage of the Steam Deck is precious, I’d recommend installing to the SD card. If you don’t already have a microSD card installed in your Steam Deck, see the Q&A Section above stating What kind of microSD card should I get?
- After making your selection (recommended: SD Card), click the Next button.
- At the time of this writing, there were two options available for Devices, Steam Deck or Anbernic Win600. For this guide, we’ll assume you will be installing to the Steam Deck so select that option and click the Continue button.
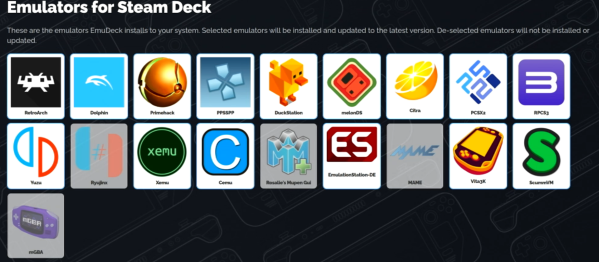
- You’ll now be prompted to select which emulators you wish to install. You can toggle on (white tile) or off (grey tile) each of the emulators you want to install. If you’re unsure of what each emulator is used for, you can leave it at the defaults. However, if you enjoy playing classic Arcade games from the 70’s-early 2000’s, you may want to check MAME (Multiple Arcade Machine Emulator). It is not selected by default and happens to be one of my most-used emulators. Totally up to your preference but wanted to make you aware of it. See the EmuDeck GitHub wiki for additional explanations (right sidebar) if you would like more information.
- After making your Emulator selections, click the Continue button.
- If you have previously installed EmuDeck and want to retain the original configuration, you can uncheck any of the emulators. However, I recommend going with the default to overwrite them. Once done, click the Continue button.
- RetroAchievements is an option available in those emulators that use RetroArch and awards you with achievements as you progress within a game. This step is optional, you can click Skip or enter your Retro Achievements Username and Password, if you have one (or create one at this time).
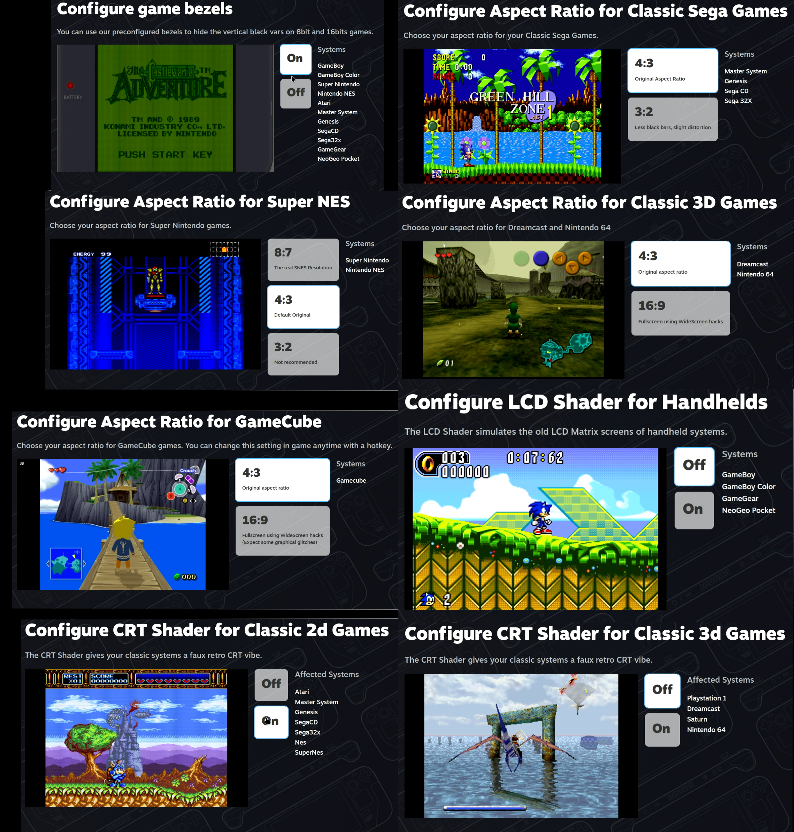
- In the next several steps, you’ll be able to setup various systems according to your own personal preference. This allows you to easily tailor your gaming experience the way you want (default in bold):
- Configure Auto Save (On / Off)
- Configure ReroAchievements (Username & Password required, click here to create an account)
- Configure Game Bezels on 8/16-bit games (On / Off)
- Configure Aspect Ratio for Classic Sega Games (4:3 / 3:2)
- Configure Aspect Ratio for Super NES (8:7 / 4:3 / 3:2)
- Configure Aspect Ratio for Classic 3D Games (4:3 / 16:9)
- Configure Aspect Ratio for GameCube (4:3 / 16:9)
- Configure LCD Shader for Handhelds (Off / On)
- Configure CRT Shader for Classic 2D Games (Off / On)
- Configure CRT Shader for Classic 3D Games (Off / On)
- EmulationStation DE Theme (Epic Noir / RBSimple / Modern)
Below is a consolidated look at each of the above options. Remember, you can come back to these settings later if you decide you want to adjust them.
- Now that all the settings have been made, click the Finish button. All emulators will then be downloaded, installed and configured for you based on your selections. This greatly simplifies have to do all of this manually. It accomplishes in a matter of minutes which could take several hours without EmuDeck.
- Once the Installation is Complete, click the Exit button. In the next section, we’ll discuss BIOS and ROMs!
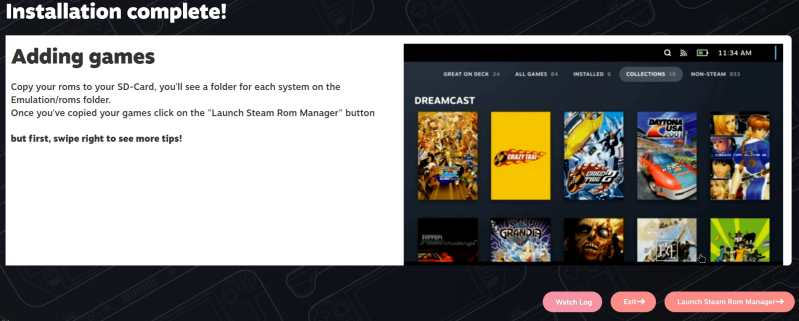
BIOS and ROMs
There are two types files typically needed to play many of the games with an emulator, these are:
- BIOS File(s) – BIOS Stands for Basic Input/Output System. A BIOS is the firmware used to provide runtime services for a given operating system/console and to perform hardware initialization during the boot process. For example, this is the code within a gaming console that tells it how to be a Playstation, Dreamcast or any other system.
- ROMs – ROM stands for Read-Only Memory and is the game or program dumped to a file. These may have originated from classic cartridges, CD/DVD’s, etc. Essentially, it is the game-specific code.
Due to the fact that both BIOS (system firmware or system files) and ROMs (the games themselves) are copyrighted material, I’m unable to provide direct links to any such files. Sharing roms on the internet for others to download is certainly illegal. You will never see download links for roms, rom sites or romsets on this website. It is up to you to backup your own games, or locate backups of games that you personally own. If you’re unsure what I mean, you can read a bit more about my take on the subject here. I can say, that both BIOS and some games can be found organized in archived packs. Using your favorite search engine, you may be able to find something by searching “bios archive” or “[game/system] pack archive” or something similar using some of these terms.
Another option, if you are unable to locate bios+rom files, is to purchase a hard drive that already has all the files on the drive. You can then transfer what you want (just the bios+rom files) from the hard drive to the Steam Deck. Again, being selective about what you transfer. There are a few options mentioned here. I personally tried this approach with the Retrostation 4TB drive and it worked out well. I’m not necessarily recommending this option, just that it is an option.
Once you’ve found what you’re looking for and have downloaded/extracted those files, they are likely on your primary computer and not on your Steam Deck. If that’s the case, below are a few tips to help you copy them to your Steam Deck. I’ll cover three different methods below, USB Transfer Wizard, copying from a USB connected drive and from a NAS.
I recommend not copying everything you downloaded to your Steam Deck. You’ll likely want a nice curated list of games that you love to play, not a full rom dump of every SNES, NES, Sega Saturn, PlayStation, etc. game ever created. Why? Primarily, because for each system you’ve downloaded you’ll want to select the appropriate artwork, etc. which can be time consuming. You can also uncheck the parser for a specific emulator if you intend to load up a complete romset and access those games through Emulation Station rather than having them all accessible within Steam.
EmuDeck will go out to the internet and attempt to download artwork for you, but in some cases it won’t be able to find it or find artwork that you don’t prefer. Concentrate only on those games you really want to play on the Steam Deck. You can always come back and add more later!
USB Transfer Wizard
Video: See how
The USB Transfer Wizard is new in EmuDeck 2.1 and provides the ability to easily transfer roms and bios files from a connected USB drive (SSD, USB Stick, etc.). Below are the basic steps to assist.
- From the main EmuDeck screen, locate the tile Quick Actions → USB Transfer Wizard and click the Add more games button.
- Insert a USB-C adapter and/or USB-C SSD/Stick to the top port of the Steam Deck (see here for suggestions).
- You should see a popup stating Disks & Devices, select the Mount and Open option next to USB DISK (or similar). DO NOT select primary as that is your microSD card. If Dolphin File Manager loads, close that window.
- Click the Tile on the screen that states USB Drive.
- In the dialog, select the USB Disk and click the OK button.
- Click the button Create EmuDeck folders on USB Drive. The folders will then be created for you on the USB Stick for BIOS and ROMs (and all needed subdirectories).
- Click the OK button to close out of the dialog.
- In the lower right, click the icon for Most Recent Device or Disks & Devices and select Safely remove to the right of your USB DISK.
- Remove the USB Stick from the Steam Deck (and the adapter if you don’t have a USB-C port) and install it into your PC. Copy your BIOS/ROM files to their respective folders on the USB DISK.
- Safely eject the USB Disk from the PC by clicking the icon in the lower-right of the taskbar.
- Re-insert the USB stick into the Steam Deck.
- Click the button Copy your ROMs & BIOS to your Steam Deck.
- All files will then be transferred to your Steam Deck’s microSD or internal SSD (depends on where you installed EmuDeck).
- You can again safely remove your USB Disk from the Steam Deck and re-run Steam Rom Manager to update your game library.
Copy from a USB Connected Drive
Video: See how
If you’ve copied your BIOS and Games to an external storage device such as a USB thumb drive, external SSD/HDD then you can connect that device to your Steam Deck and copy the files to the appropriate sub folders on your Steam Deck. The Steam Deck only has a single USB-C port, not a USB-A port. However, you can use a Dock like this one, which has 3 USB-A ports or use a USB-C to USB-A adapter.
- Assuming you installed EmuDeck to the microSD, open the Dolphin File Manager (icon on the left-side on the taskbar) and under Removable Devices, you should see primary. This is your microSD card installed at the bottom of the Steam Deck.
- Click on primary, you should see a subfolder called Emulation. Double-clicking on Emulation will then show five folders as shown below.

- The bios sub folder is where you will copy all of your BIOS files that you downloaded earlier.
*NOTE: Most will typically download a collection/archive of BIOS files. You will typically extract the archive, select the contents of the extracted folder and copy them as-is into the /Emulation/bios sub folder on the Steam Deck.
- The roms subfolder will contain the games. Under the roms subfolder, you’ll find a number of additional subfolders organized by the game system/emulator (160 as of the time of this writing).
- Open a separate instance of the Dolphin File Manager (right-click the icon to open a new instance) and navigate to this drive under Removable Devices.
- You will copy the game roms (contents) from your external storage device (USB Thumb drive, SSD/HDD, etc.) into the corresponding folders. Locate the bios/roms and copy them to the /Emulation/roms/[system name] and /Emulation/bios sub folders on the primary microSD card installed in the Steam Deck.
Copy from a NAS
Using a NAS (or Network Attached Storage) device can be very handy for setting up games on a new device.
- Assuming you installed EmuDeck to the microSD, open the Dolphin File Manager (icon on the left-side on the taskbar) and under Removable Devices, you should see primary. This is your microSD card installed at the bottom of the Steam Deck.
- Click on primary, you should see a subfolder called Emulation. Double-clicking on Emulation will then show five folders as shown below.

- The bios sub folder is where you will copy all of your BIOS files that you downloaded earlier.
*NOTE: Most will typically download a collection/archive of BIOS files. You will typically extract the archive, select the contents of the extracted folder and copy them as-is into the /Emulation/bios sub folder on the Steam Deck.
- The roms subfolder will contain the games. Under the roms subfolder, you’ll find a number of additional subfolders organized by the game system/emulator (160 as of the time of this writing).
- Open a separate instance of the Dolphin File Manager (right-click the icon to open a new instance) and navigate to this drive under Removable Devices.
- You will copy the game roms from your external storage device (USB Thumb drive, SSD/HDD, etc.) into the appropriate folder within the roms subfolder.
- At the top address bar, enter smb:// [your NAS IP address]. You should be prompted to authenticate with an account name and password.
- After authenticating, locate the bios/roms and copy them to the appropriate /Emulation/roms/[system name] and /Emulation/bios sub folders on the primary microSD card installed in the Steam Deck.
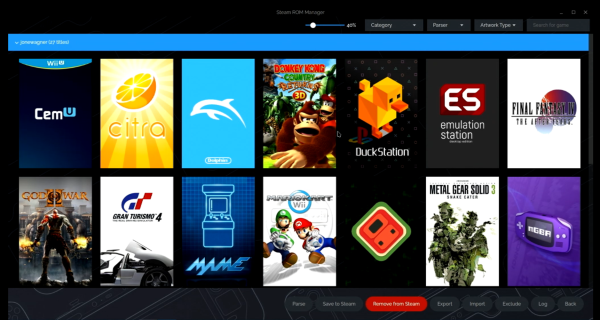
Steam ROM Manager
Video: See how
*NOTE: If you later add any additional games, re-run this tool so they will show up in the Steam Deck Collections tab. Your artwork assignments from any prior session should be preserved.
The Steam ROM Manager is a tool that is installed by the main EmuDeck installer. Steam ROM Manager allows you to easily Generate a list of games that then becomes available in the Steam Collections tab. It is also used for downloading and managing the artwork associated with each game. Below are the steps on how to use the Steam ROM Manager to perform these actions:
- Launch EmuDeck.
- Under Tools & Stuff, click the Launch button.
- In the upper-left, click Preview.
- When prompted, click Yes.
- At the top, you can click the Toggle Parsers option to enable all parsers or switch it off and individually enable each emulator you want visible in the Steam Library. I recommend at a minimum, checking EmulationStationDE and Emulators, then each parser for the games you want available in your Steam Library.
- Once all selections are made, click the Preview button. Steam ROM Manager will then download the artwork for all the selected parsers. This may take some time depending on the number of games selected.
- You will then see various tiles appear and the Steam Rom Manager will begin to search/download artwork for your games.
- Wait until all URL’s are retrieved (upper-left)
- See the Adjusting Artwork section for more details on the type of artwork available for your games.
- Once all artwork has been adjusted, click the Save to Steam button.
- Make sure that you see Done adding/removing entries toast message in the upper-right.
- You may now close out of the Steam ROM Manager application or click Back.
- From the Desktop icon, click the Return to Gaming Mode icon.
- You may now navigate to Library → Collections, select a system and launch your games!
Adjusting Artwork
Video: See how
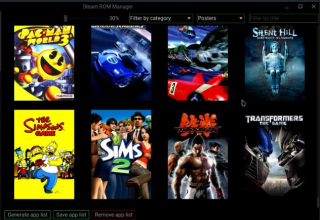
There are two different types of artwork types that you will want to have assigned within Steam Rom Manager. They may be found by clicking the drop-down in the upper right and they are Banners and Posters.
- Banners– are the banner images that appear when you select a game or in the most recently played game list.
- Posters – are the images which appear when navigating your game list.
Changing Found Artwork
You may find that some of the chosen artwork isn’t ideal for the game. Below is how to change the found artwork to something more appropriate:
- In the upper-right of each image, you may see a 1/n text and two arrows overlaid on top of the image.
- Click the left/right arrows to select the appropriate image you want displayed for the game.
- That’s it!
Artwork Not available
In some cases, your rom files may not be named in a way that the Steam Rom Manager is able to locate the artwork. In those cases, you can download images from SteamGridDB.
- Enter the name of the game, from SteamGridDB and press Enter.
- Below you’ll find images matching the game you searched for.
- Right-click the image and select Save Image As to save it to the Steam Deck.
- Then click the small image in the lower-left of the empty image in Steam Rom Manager. Then, navigate to the downloaded artwork, select it and click Open.
- Now the artwork will be assigned.
Other Adjustments
If you need to rename a game after having generated/saved your game list, you can do so within Desktop Mode. Here’s how:
- Enter Desktop Mode.
- Launch Steam, if it’s not already running.
- On the left panel, navigate to the game you want to change. Right-click and select Properties.
- Under Shortcut, you can rename the game. You can also click the tile to the left of the game name to add Poster artwork.
- Close out of the Properties dialog and right-click the background above the game name and select Set Custom Background to change the grid artwork.
- There are additional options under the Manage option if you want to hide the game, etc.
Quick Actions

Below are the options that are available under the Quick actions section:
- USB Transfer Wizard – Customize bezels, shaders, aspect ratio, auto save and more.
- Quick Settings – Allows adjusting prior settings you made during the initial install, including Bezels, Aspect Ratios and Shaders.
- Manage Emulators – Manage and update your Emulators and configurations.
- EmuDeck Store – Download free non-commercial homebrew games.
Tools & Stuff
Video: See how
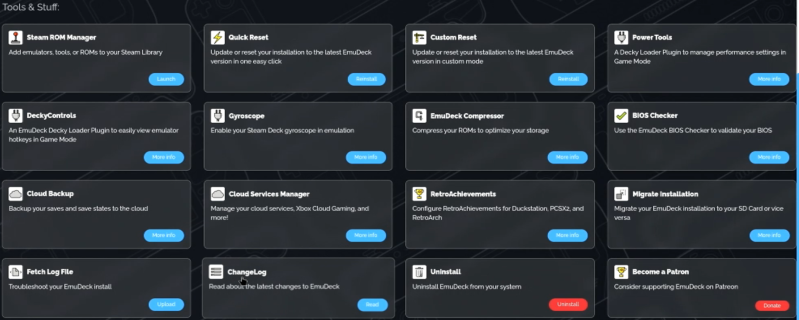
EmuDeck now has a handy button on the main interface called Tools & Stuff. The tools here are very useful for managing the emulators on your Deck as well as improving how well they perform. Below we’ll take a look at each.
- SteamRomManager – The SteamRomManager (or SRM), will allow parsing all the emulators and generating artwork for the games you’ve copied to your machine. You can customize each of the grid/poster images for those games. For more on Steam Rom Manager, please see here.
- Quick Reset – Update or reset your installation to the laest EmuDeck version by clicking Reinstall.
- Custom Reset – Update or reset your installation to the latest EmuDeck version in custom mode.
- PowerTools – PowerTools is a plugin that is available on the Quick Access (“…”) button on the right side of the device. Select the option that looks like a plug and you’ll see the PowerTools listed there, if installed. In order to install this plugin, you’ll need to set a Sudo password. The UI within EmuDeck makes this easy, just remember your password!
- DeckyControls – An EmuDeck Decky Loader Plugin to easily view emulator hotkeys within Game Mode.
- Gyroscope– This is a plugin that allows you to use the Steam Deck Gyroscope within the Cemu emulator for Wii U games.
- EmuDeck Compressor – This script will search through your roms and compress them (up to 70%) from their original size. This will reduce the amount of space that they take up on your Steam Deck.
- BIOS Checker – If you’re having issues loading some games, this tool will make it easy to check if one of the emulators are missing BIOS files. Not all systems require a Bios and there are some that aren’t being checked by this tool.
- Cloud Backup(Currently Beta) – Allows you to backup your game saves to the cloud. This feature will be handy in the future for sharing the game saves across multiple devices (i.e. Steam Deck and Win600).
- Cloud Services Manager – Manage your cloud services, Xbox Cloug Gaming, and more.
- Retro Achievements – Configure RetroAchivements for Duckstation, PCSX2 and RetroArch.
- Migrate Installation – Migrate your EmuDeck installation to your SD Card or vice-versa.
- Fetch Log File – Troubleshoot your EmuDeck install.
- ChangeLog – Read about the latest changes to EmuDeck.
- Uninstall– If you no longer wish to have EmuDeck installed on your Steam Deck, you can use this option to remove it. Keep in mind, your games/bios files will remain and will need to be deleted manually using the Dolphin File Manager.
- Become a Patron – Consider supporting EmuDeck on Patreon.
Usage Tips
Now that you have EmuDeck installed, below are a few usage tips to make things a little easier.

- Exit a Game (Recommended) – Press SELECT + START at the same exact time to Exit a game (in most cases).
- Exit a Game (Forced) – For some games/emulators, you may need to press the Steam button and select Exit game to exit the game if the above method doesn’t work. Also, I have noticed in some cases this method doesn’t always work either.
- Enter RetroArch Menu – Many of the emulators/cores utilize RetroArch. To enter the RetroArch menu press L3 + R3 (push in on both Joysticks).
- Insert Arcade Credit – In an Arcade game, press SELECT to insert a credit.
- Start Arcade Game – In an Arcade game, press START to start a 1 player game.
Emulator Details and Docs
The great folks that created EmuDeck have provided an excellent reference for all of your emulator questions. In the table below, you’ll see what systems are emulated and the associated configuration, launch info, HotKeys, File Formats and Tips&Tricks for each. I want to express a huge thanks to the EmuDeck team for providing this valuable reference.
Clear App Entries
In the case where you’ve added a bunch of roms to your Steam Deck and later decide to start fresh, you can. To do that, perform the following:
- Open Steam ROM Manager.
- Select the Settings option on the left panel.
- Under General settings (at the right), click the Remove (all added app entries).
- This will remove the app entries/configuration from your Steam Deck. At this point, you can add/remove your roms from the Steam Deck, then re-run the Steam ROM Manager to re-build the list of games.
MAME Aspect Ratio

One of the reasons why I was interested in installing EmuDeck was to play classic arcade games like Galaga, Ms. Pac-Man, Asteroids, 1943, etc. However, EmuDeck doesn’t properly configure the MAME 2003+ aspect ratio out of the box (NOTE: actually it does in the current EmuDeck v2, leaving this here as a reference for those still on v1). Below are some steps that should help you fix this issue, if you encounter the same.
- Start up an Arcade Game that looks similar to the image above (vertical arcade game or similar resolution).
- Press the L3+R3 buttons (push to the two Joystick buttons down at the same time) to enter the RetroArch configuration.
- Press B to go back and select Settings → Video → Scaling → Aspect Ratio. By default, it’s likely set for 1:1 PAR (8:7 DAR).
- Change the setting to Core provided and press A.
- Press B a few times to get back to the Main Menu, select Main Menu → Quick Menu → Overrides and press A.
- Here you can choose how to override, if you want it to save for all games loaded from the directory you can choose Save Content Directory Overrides (what I used). For the current game only, select Save Game Overrides. Then, press A.
- Press B a few times until you get to the Quick Menu, press A on Quick Menu and select Resume.
- Now when you exit the game and come back in, the aspect ratio will be correct for the game!
Emulation Station
After EmuDeck has been installed, you will also find that Emulation Station was also installed. Many users are familiar with Emulation Station as it is used by many popular distributions on various devices such as RetroPie, Batocera and many other builds. For that reason, it makes sense to include it on the Steam Deck. Having it provides an alternative way of accessing all your games within a single interface. Which one you prefer to use is totally up to you.
Below is how to launch it:
- Press the Steam button and select Library.
- Navigate to the COLLECTIONS category.
- Locate the EMULATION tile, press A.
- Locate the Emulation Station tile and press A.
- Press the Play button.
- Emulation Station will now start up!
Usage Tips
Here are some usage tips for Emulation Station that you may find helpful. If you’ve used Emulation Station on other devices, such as a Raspberry Pi, Retro Gaming handheld or similar device, it operates similarly on the Steam Deck.
- Exit Emulation Station – Press the Start button, move down to QUIT EMULATIONSTATION and press A.
- Scrape Artwork – The artwork that was downloaded by the Steam ROM Manager isn’t available in Emulation Station. To scrape artwork:
- Press the START button.
- Select SCRAPER.
- Under SCRAPE THESE SYSTEMS, place a check mark beside each of the systems you wish to scrape (recommended: select just a few if you have a large list, also may want to see the Energy Saving section to prevent the Steam Deck from sleeping during this process).
- Select the BACK option.
- Press START. The image scraping will then begin.
- Once done, you’ll see a dialog indicating n GAMES SUCCESSFULLY SRAPED.
- Locate a game in a large list – Select the emulator, then press the Select button. For the JUMP TO.. option, select the first letter of the name of the game you are looking for. You will now see those games that begin with the selected letter.
Common Issues
Based on the feedback I’ve received, here are the most common issues that others have encountered:
- Problem I have isn’t listed below, now what? Answer: Visit the EmuDeck discord here. You’ll find far more answers to issues/questions there. However, please see below for the most common issues that others have mentioned in the video comments.
- Games aren’t being picked up by Steam ROM Manager?
- Answer 1: Could be the save hadn’t completed by the time you exited Steam Rom Manager, please follow along here and you should be good. Make sure to check the Event log and that you see Done adding/removing entries.
- Answer 2: Make sure the games aren’t in their own subdirectories. Steam Rom Manager may be happy with some cores zipped and others not. Saturn cores seem to work best zipped or as .chd files within the Saturn subfolder. Tip: R. Cooke
- I don’t see any parsers when opening Steam Rom Manager, did I do something wrong? Likely not, try uninstalling EmuDeck and then re-installing it. This has resolved the issue at least once.
- Where can I find the BIOS and ROM files? I can’t provide links, please don’t ask. However, read this section carefully for recommendations.
- After clicking preview no games coming out in the list? Answer: You likely didn’t click the Generate app list button. Please follow along closely here.
- How do I enter [name of emulator] through EmuDec? Answer: Enter Desktop Mode, then Steam → Games → [name of emulator].
- I selected the option to install to the microSD but nothing happens, why? Answer: When you first installed the microSD in your Steam Deck, make sure that you formatted it on the Steam Deck. If you haven’t, see here. If you already have, NO NEED to do it again.
- How do I Save/Load Game States? Answer: See the Hotkeys section on the EmuDeck GitHub (Select+R1=Save/Select+L1 Load).
- When I click Download app, it downloads as a text document -Why? Answer: The installer is a script (text file) that is run. Right-click on the Install EmuDeck icon and select properties. Under the Permissions tab, click the checkbox besides Is executable and click the OK button. Re-try the installer. Not sure how to right-click, see the Steam Deck Reference.
Change Log
- 2025-07-10 – Minor updates
- 2023-11-17 – Additional edits to support the new Download option.
- 2023-08-22 – Changed the Q&A section to numbers instead of bullet points.
- 2023-08-13 – Updated the Q&A section with “Can I simply insert the microSD card from the Steam Deck, into my Windows PC and copy games?” and “When using a USB stick to transfer files to the Steam Deck, how should the stick be formatted?”
- 2023-08-03 – Updated the Q&A section with a common question lately regarding “What if I don’t have a PC?” (see last point).
- 2023-07-09 – A link to the USB-A to USB-C adapter was incorrect and updated.
- 2023-06-02 – Minor corrections.
- 2023-05-19 – 2023-05-27 – Start to the updated guide.