Raspberry Pi 5 Guide
Last Update: 4/10/2026

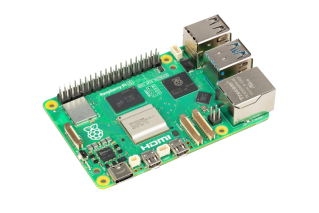
On September 28, 2023, the Raspberry Pi Foundation officially announced the release of their latest single-board computer, the Raspberry Pi 5. Initially, the 4GB model launched at $60 USD, while the 8GB version was priced at $80 USD. Since then, a 16GB model has also been introduced, offering even more headroom for demanding applications.
I didn’t hesitate to place an order, and my unit arrived in early November. Having developed an extensive library of Raspberry Pi 4 content over the years (examples here), I fully expect to continue that momentum with the Raspberry Pi 5.
As of now, the Raspberry Pi 5 supports a growing number of operating systems including Raspberry Pi OS, Ubuntu, Batocera, Recalbox, and others with performance gains and expanded hardware compatibility making it even more versatile. Support for retro gaming, desktop use, and development environments is improving rapidly, and I’ll continue to cover these developments in this guide and on the YouTube channel.
In the following sections, we’ll explore what’s currently possible with the Raspberry Pi 5 and what you can look forward to in the near future!
– Jon
How-To link to a specific section on this Guide: go to the Table of Contents (below) and click a section to reference. Copy the URL from the address-bar of your browser and paste in your video description/post/blog. This will direct a viewer to a specific section in any of the guides you find on this site.
Table of Contents
Helpful Resources

Below are links and resources that will be helpful for learning more about the Raspberry Pi 5:
- Raspberry Pi Imager [ Software Download Page ] – The Raspberry Pi Imager has been updated with support for the Raspberry Pi 5. I recommend using this application to image an operating system (such as PiOS Desktop) to your microSD or SSD.
- Raspberry Pi News – News and updates from the Raspberry Pi foundation.
- Raspberry Pi Hardware – Hardware information for the Raspberry Pi 5 and other Pi models.
- Raspberry Pi Subreddit – A great resource on Reddit for asking questions for finding answers regarding the Raspberry Pi.
- Raspberry Pi Projects Hub Subreddit – Another great resource on Reddit for the Raspberry Pi.
Q&A

Below are some common questions and answers that you may find helpful.
- Can I install Windows 10/11 on the Raspberry Pi 5? Yes! For more details, please see the Raspberry Pi 5 Running Windows Guide.
- What Retro Gaming Platforms are available for the Pi 5? Please see here for options such as Batocera and Recalbox.
- How can I create a microSD/SSD/USB image with Raspberry Pi Desktop for my Pi 5? Please see here.
- I have an previously used microSD card and want to erase everything that’s on it with an empty FAT32 partition, how do I do it? Please see here.
- Which should I get, a 4GB or 8GB Pi 5? It depends on how you want to use the Pi 5. For Retro Gaming, a 4GB Pi 5 will be just fine. If you plan to use the Pi5 as a desktop computer, in that case 8GB may be preferred. If you’re not sure what you need to get, the CanaKit provides much of what you’ll need to get started (minus a USB keyboard+mouse, display and perhaps a gaming controller if you’ll be using it for that).
Specifications
Below are the key features of the Raspberry Pi 5:
| Feature | Details |
|---|---|
| CPU | • Quad Arm Cortex-A76 @ 2.4GHz • Cryptographic Extension support (AES on hardware) • 512KB per-core L2 caches • 2MB L3 cache |
| GPU | VideoCore VII graphics, with OpenGL-ES 3.1, Vulkan 1.2 |
| 4/8GB RAM | LPDDR4X-4267 SDRAM |
| Display Ports (micro HDMI) | • Dual 4kp60 HDMI display output with HDR support • 4kp60 HEVC decoder |
| PCIe Port (PCI express) | Raspberry Pi connector for PCIe (1 x 2.0 port, additional HAT required) |
| WiFi | 802.11ac dual-band Wi-Fi |
| Bluetooth | Bluetooth 5.0 (with BLE support) |
| LAN Connection | Gigabit Ethernet |
| USB Ports | • 2x USB 3.0 (capable of simultaneous full throughput) • 2x USB 2.0 |
| PoE | PoE support (additional HAT required) |
| Dual 4-lane MIPI CSI/DSI transceivers | Dual 4-lane MIPI CSI/DSI transceivers, supporting: – 2x display; or – 2x camera; or – 1x display + 1x camera |
| GPIO | Raspberry Pi 40-pin GPIO header |
| Other | Fan connector; Real Time Clock (RTC); Power button |
Feature Breakdown
The Raspberry Pi 5 maintains the smaller credit card-sized form factor as prior models, with much improved performance. That is, the Pi 5 is 2-3 times faster than the Pi 4! The Pi 5 also sports more interfaces, faster bandwidth and the ability to support devices such as SSDs, M.2 and NVMe drives.
- Faster Processor – The Raspberry Pi 5 features and ARM Cortex-A76 quad core CPU making the Pi 5 2-3 times faster than the Pi 4 (the previous generation Pi). The A76 is clocked at 2.5Ghz but can be overclocked up to 3.3Ghz. However, this is something we’ll have to experiment with in a future video.
- Faster RAM – The RAM used with the Pi 5 is LPDDR4X-4267 SDRAM which is again much faster than the RAM on the Pi 4 and offers increased bandwidth.
- Faster USB 3.0 Ports – The USB 3.0 ports on the Pi 5 are also faster and support simultaneous 5Gbps operation.
- Faster MicroSD – The microSD port on the back of the Pi 5 is also faster and allows using UHS-1 microSD cards.
- PCIe (PCI Express) Port – A new port was added to the Pi 5, the inclusion of PCI Express 2.0 x1. The PCIe port on the Pi 5 has a maximum supported bandwidth of 500MBps. However, the USB 3.0 ports may be ideal for connecting external storage devices as those ports support 5Gbps/625MBps.
- Display / Camera Ports – There are two Display/Camera ports on the Pi 5. That is, each port can function as either a Display or a Camera port allowing you to connect two additional displays, two cameras or one display and one camera. The ports are two-lane MIPI DSI display/camera ports and each have a bandwidth of up to 1.5Gbps and is backward compatible with earlier Pi cameras.
- No 3.5mm Audio Jack – The 3.5mm Audio Jack has been removed on the Pi5. However, you can use Bluetooth speakers or perhaps a USB Audio connector that includes a 3.5mm jack (something I’ll test at a later time).
- Real-Time Clock – The Pi 5 has a built-in Real Time clock, however for the time to be retained when powered off, it will be necessary to add an external battery.
- Power Button – The Pi 5 now includes a power button, this is a great feature that was missing in all prior generations of Pi’s.
Where to Buy a Pi
Below are locations that sell the Raspberry Pi 5. If you prefer a more complete Pi 5 kit, please see here:
- Raspberry Pi 5 16GB Model [ Amazon ] – The Pi 5 single board computer (SBC) may be purchased from any of these locations. These links are for the 16GB model.
- Raspberry Pi 5 8GB Model [ Amazon ] – The Pi 5 single board computer (SBC) may be purchased from any of these locations. These links are for the 8GB model.
- Raspberry Pi 5 4GB Model [ Amazon ] – The Pi 5 single board computer (SBC) may be purchased from any of these locations. These links are for the 4GB model.
Accessories

Below are some accessories that you may want to consider when purchasing a Raspberry Pi 5 (*NOTE – not all accessories are available on Amazon and will be updated here once they are):
Official
- Raspbery Pi 5 Power Supply [ Amazon | CanaKit ] – The power supply for the Raspberry Pi 5 is 27 watts and recommended for use with the Raspberry Pi 5.
- Raspberry Pi Active Cooler [ Amazon] – Without proper cooling, during intensive CPU operations the Pi will get hot and may enter what is called thermal throttling. That is when the Pi slows down to prevent the device from overheating. The Official RPi Active Cooler provides both passive (heatsinks with thermal tape) and active cooling (fan) to keep the Pi running smoothly.
- Raspberry Pi Case for Raspberry Pi 5 [ GeeekPi Metal Case | Argon NEO 5 Case | Official Pi 5 case] – While a case isn’t required to use the Raspberry Pi 5, it is a good idea to get one to keep it protected.
- Raspberry Pi Keyboard and Mouse [ Amazon ] – You can use any keyboard and mouse that you may already have available. However, this is the one sold by the Raspberry Pi foundation and one I often use when working with the Pi. The mouse can be plugged directly into the keyboard which means the keyboard and mouse will only use a single USB port on the Pi 5.
General
- UGREEN Micro HDMI to HDMI Cable [ Amazon ] – you’ll need at least one, two if you want to connect two separate displays to your Pi 4. You’ll connect the first micro HDMI end to the port nearest the USB-C power input. Then 2nd, to the right of that (optional).
- UGREEN Memory Card Reader [ Amazon ] – I’ve purchased two of these earlier this year and they work great. Keep in mind, there is no storage on this stick, you’ll need to add a microSD or SD card to the adapter. However, it will easily allow you to transfer files between most any device with USB-A/USB-C ports.
- MicroSD Cards [ Gigastone-256GB | Gigastone 5-Pack 128GB | Lexar 1TB] – You’re likely going to need a microSD card for your Raspberry Pi 5. I’ve selected a few here that I’ve used in the past that I recommend.
- 10 Slot Micro SD Case/Holder [ Amazon ] – I’ve purchased about 4 of these so far. They are very handy for keeping your microSD cards organized when working with multiple cards. I use them with the Pi 5, Steam Deck and for various other projects.
Network OS Installer Guide – No other computer needed
Learn how to install an operating system directly to your Raspberry Pi 5 without the need for a separate computer using the Network OS Installer! Discover how the built-in firmware simplifies the process, allowing you to set up Pi OS Desktop and even install custom operating systems like Batocera.
3rd Party
Complete Pi 5 Kits
If you prefer to pickup a single kit that has everything you need, including the Raspberry Pi 5, you might consider getting a kit. Below are the kits I’ve had an opportunity to use and have worked very well:
CanaKit Raspberry Pi 5 Starter Kit
In the video below, we’ll setup the CanaKit Raspberry Pi 5 8GB Starter Kit [Turbine Black Edition]! We’ll setup the kit from unboxing to PiOS Desktop.
- CanaKit Raspberry Pi 5 8GB Starter Kit [ 16GB Amazon | 8GB Amazon | 4GB Amazon ] – Available in 4GB/8GB options, this kit includes everything you’ll need to get started with the Raspberry Pi 5. The kit includes:
- Raspberry Pi 5
- Samsung EVO+ 128GB MicroSD card with Pi OS pre-installed
- CanaKit Turbine Case (black) for the Pi 5
- CanaKit MEGA Heat Sink for the Pi 5
- CanaKit Low-Noise Fan
- USB-C PD Power Supply (45W)
- Two Micro HDMI to HDMI cables (ea. 6-foot)
- USB-A to microSD card reader
Pironman 5 PRO MAX
In this video, we take a deep dive into the Pironman 5 PRO MAX case for the Raspberry Pi 5, one of the most feature-packed Raspberry Pi cases available today and priced around $146 USD. From unboxing and full step-by-step assembly to software setup and performance testing, this guide walks you through everything you need to build your own powerful Raspberry Pi 5 system.
🔗 PRODUCT LINKS [Amazon]
- Pironman 5 PRO MAX Case
- Raspberry Pi 5
- USB-C Power Supply
- Keyboard+mouse (any will work)
📚 RELATED GUIDES
- Pironman Software Install
- OpenClaw on a Pi 5
- OpenClaw on a Pi 5 [Video]
- Sunfounder OpenClaw Install Tutorial
Pironman 5 Mini
The Pironman 5 Mini case is like a mini gaming PC rig for your Pi 5! It’s smaller than other Pironman 5 models, easier to assemble and a lower price. It includes a single NVMe M.2 SSD (or Hailo-8l M.2 AI Accelerator), RGB lighting effects, Cooler + RGB Fan, Safe Shutdown and much more. In this video, we’ll unbox it, fully assemble it, install Pi Desktop, install the Pironman software and configure it. Pironman 5 Mini Software Setup.
Helpful Links
- Pironman 5-Mini [Amazon]
- Pironman 5-Mini [Sunfounder Website]
- Lexar SSD NM610 Pro NVMe Drive [Amazon]
- Raspberry Pi 5 4GB RAM
- Raspberry Pi 5 8GB RAM
- Raspberry Pi 5 16GB RAM
- Official 27W USB-C Power Supply
- Gigastone 5-pack microSD cards
- Official Pi Keyboard and Mouse (White)
- Beikell SD Card Reader
Pironman 5 MAX PC Case
The Pironman 5 MAX case is like a mini gaming PC rig for your Pi 5! It has a lot of great features, including: DUAL NVMe M.2 SSD support (NAS RAID 0/1 Hailo-8l M.2 AI Accelerator), RGB lighting effects, OLED Status display, PWM Tower Cooler, Safe Shutdown and much more. The Pironman software has a great web-based interface for monitoring various Pi5 metrics and customizations.
Items shown
- Pironman 5 MAX (Black / DUAL NVMe)
- Lexar SSD NM610 Pro NVMe Drive
- Hailo-8 M.2 AI Accelerator Module
- Raspberry Pi 5 4GB RAM
- Raspberry Pi 5 8GB RAM
- Raspberry Pi 5 16GB RAM
- Official 27W USB-C Power Supply
- Gigastone 5-pack microSD cards
- Official Pi Keyboard and Mouse (White)
- Beikell SD Card Reader (may show unavailable)
Pironman 5 Gaming PC Case
The Pironman 5 case is like a mini gaming PC rig for your Pi 5! It has a lot of great features, including: RGB lighting effects, NVMe Adapter, OLED Status display and much more. The Pironman software has a great web-based interface for monitoring various Pi5 metrics and customizations. In this video, we’ll unbox it, assemble it, install Pi Desktop, install the Pironman software and configure it. See Pironman 5 Guide for the Pironman Guide (Sunfounder Website).
Items shown
- Pironman 5 Case
- Samsung 256GB NVMe Drive
- SD Card Reader
- Raspberry Pi 5 8GB RAM
- Official 27W USB-C Power Supply
- Gigastone 5-pack microSD cards
MarsKit Raspberry Pi 5 Starter Kit
In this video, we’ll setup the MarsKit Raspberry Pi 5 4GB Starter Kit! We’ll setup the kit from unboxing, Assembly and Setup of PiOS Desktop using the included 64GB microSD with PiOS pre-installed.
- MarsKit Raspberry Pi 5 4GB Starter Kit [ 4GB Amazon ]
- MarsKit Raspberry Pi 5 Ultimate Starter Kit 8GB/128GB microSD Edition [ 8GB Amazon ]
RetroFlag Dream Case
The RetroFlag Dream Case transforms your Raspberry Pi 5 into a stunning miniature Sega Dreamcast with authentic design details like a functional disc tray that opens to reveal microSD storage, safe shutdown, etc. In this complete setup guide, I’ll walk you through the entire assembly process from unboxing to gaming.
🔗 PRODUCT LINKS
- RetroFlag Dream Case [Amazon]
📚 RELATED GUIDES
Raspberry Pi 500 Desktop Kit
Setting up the Raspberry Pi 500 Desktop Kit is a cinch and a decent little computer but could have been much better. In this video, we’ll unbox it, set it up, install Pi OS Desktop and run it through its paces.
Items Shown
- Pi 500 Desktop Kit [ Amazon ]
- RETROFLAG NES Cartridge Style 2.5-Inch SATA to USB 3.0 External Hard Drive Enclosure (there are cheaper options but I used this one)
AI and LLMs
OpenClaw on a Raspberry Pi 5
Discover the power of OpenClaw on a Raspberry Pi 5 as we go through the full installation process, showcasing how this open-source AI Agent platform can revolutionize automation and messaging. From setting up secure tasks to automating workflows, unleash the potential of AI agents on your own device and dive into a world of endless possibilities with OpenClaw today!
Guide Links
Product Links
- Raspberry Pi 5
- Active Cooler (not needed for Pironman cases)
- USB-C Power Supply
- Keyboard+:mouse (any will work)
- Pironman 5 NVMe M.2 SSD
- Pironman 5-MAX (dual NVMe)
- CanaKit case (cheaper)
Raspberry Pi 5 AI HAT+2 Setup
In this video, we’ll dive into setting up the Raspberry Pi 5 AI HAT+2, covering everything from hardware installation to running local AI models. Learn how to unleash the power of AI on your Pi 5 with step-by-step guidance and a custom application for seamless AI requests and performance insights.
Helpful Links
Products Shown
- Raspberry Pi 5
- Active Cooler
- AI HAT+ 2
- Micro SD Card
- USB-C Power Supply (for Pi 5)
- Keyboard and Mouse
- Pi 5 Case (CanaKit Turbine Case)
- Height Extender (for CanaKit case)
AI & Large Language Models (LLMs) on the Pi 5
Today, we’ll install a handful of LLMs such as DeepSeek R1 (distilled) 1.1b/7b as well as TinyLlama on a Raspberry Pi 5. We’ll briefly discuss what an LLM is, how to get setup and some examples. You’ll find the companion written guide which includes all examples from the video here.
Ubo Pod Personal Assistant
The Ubo Pod is a beautifully designed, open-source device that lets developers and creators build voice and vision-enabled AI experiences with ease. Powered by a Raspberry Pi 5 and a polished SDK, it bridges the gap between prototypes and consumer-ready products. In this video, we walk through setup, features, and the endless possibilities you can create with Ubo Pod.
🔗 PRODUCT LINKS
Setup n8n on a Pi 5
Install and run n8n, a powerful workflow automation tool, on a Raspberry Pi 5 for a fully self-hosted, cost-effective local installation. In this step-by-step tutorial, I’ll walk you through the hardware setup, installation, and configuration—perfect for personal projects or learning automation without ongoing subscription fees.
See the dedicated guide!
Windows 11 on a Pi 5
This guide will step you through getting Windows 11 Setup on your Raspberry Pi 5 from beginning to end. We’ll also cover options for getting the network and audio working. A full written guide may be found here along with all items shown in this video.
PoE+ NVMe HAT
The GeeekPi P33 M.2 NVMe PoE+ HAT allows you to power the Raspberry Pi 5 from a single ethernet cable and install an M.2 NVMe SSD to the HAT. In this video, we’ll also install the GeeekPi Aluminum Case.
Products shown in this video
- GeeekPi P33 M.2 NVME M-Key PoE+ Hat
- GeeekPi Aluminum Case
- Silicon Power 512GB NVMe M.2 SSD
- 24 Port Full Gigabit PoE Switch
- 52Pi website
- GeeekPi website
M.2 HAT+ NVMe
Here we’ll setup the official Raspberry Pi M.2 HAT+ and NVMe SSD to a Pi5 into the CanaKit Case. The speed difference between using a microSD and NVMe SSD is very impressive, let’s talk about it!
Helpful Links
- CanaKit Raspberry Pi 5 Desktop PC with NVMe (Assembled – no accessories below necessary)
- CanaKit Raspberry Pi 5 Starter Kit (Black)
- CanaKit Turbine Case Height Extender
- Raspberry Pi 5 Active Cooler
- CanaKit M.2 NVMe SSD
- M.2 HAT+
CrowPi 3
The CrowPi 3 is a powerful STEM & AI learning kit designed for use with the Raspberry Pi 5. It features a built-in display, sensors, and interfaces for Arduino, Micro:bit, and Pico, making it an all-in-one platform for DIY electronics and development.
Helpful Links
- CrowPi 3 Product Link [Kickstarter]
Raspberry Pi Sense HAT
Discover the Raspberry Pi Sense HAT and how it can add powerful sensors and an LED matrix display to your Pi projects. In this video, I’ll walk you through installation, setup, and several fun example programs using the gyroscope, accelerometer, magnetometer, joystick, and more. We’ll explore how to display scrolling text, track tilt, read barometric pressure, and create interactive projects—all from the Pi. Whether you’re new to Sense HAT or just looking for ideas, this video will get you up and running fast.
- Raspberry Pi Sense HAT
- Official Documentation [Pi Foundation]
- All Examples in this video
Raspberry Pi 5 Laptop
The CrowView Note turns most any device into a laptop! In this video, we’ll Setup the Crow View Note with a Raspberry Pi 5, Samsung Galaxy S21, Steam Deck, ROG Ally and an Amazon Fire TV stick.
Where to find a CrowView Note
Items shown
- USB C to USB C 3.2 Cable 3.3FT
- Phone Stand
- Samsung Galaxy S21 5G, US Version, 128GB, Phantom Gray – Unlocked (Renewed)
- Amazon Fire TV Stick 4K Max
- Hdmi Adapters Kit (7 Adapters)
Raspberry Pi Connect
Raspberry Pi Connect allows you to easily remotely connect to your Raspberry Pi 4, Pi 5 or Pi 400. In this video, we’ll talk about how to set it up and remotely connect to our Pi 5.
Helpful Links
Boot Multiple OSes with PINN
Installing PINN to an M.2 SSD on a Raspberry Pi 5 allows you to boot into multiple operating systems easily. Using an SSD improves the overall speed and reliability of the Pi 5 and in this video we’ll go through the setup process.
Items Shown
- Kingston NVMe 1TB M.2 SSD
- Pironman 5 Case
- Gigastone 5-pack microSD cards
- Official 27W USB-C Power Supply
- Raspberry Pi 5 8GB RAM
- Beikell SD Card Reader
Pi-Apps
Pi-Apps is a free, open-source application installer that simplifies installing various applications on a Raspberry Pi 5 with a one-click process. In this video, we’ll demonstrate how to use Pi-Apps to install AI language models, run Windows applications via WINE, play games like Doom 3 and Minecraft, and even set up a Windows 11 ARM virtual machine.
Retro Gaming Emulation
As the Raspberry Pi 5 is still relatively new, there are a handful of retro gaming options available for the Pi 5. In the sections below, we’ll check them out as they become available.
Batocera
Batocera makes it easy to play retro games on your Raspberry Pi 5! In this video, we’ll fully set it up on a Pi 5, including: writing the image, configuration and light gun setup. While the installation is relatively easy, this video will save hours of time by consolidating common questions in one. Download Batocera from here.
Products Shown
- CanaKit Raspberry Pi 5 Starter Kit
- Xbox 360 Wired Controller
- Official Pi Keyboard & Mouse
- GRS Sinden Target Pro
- AtGames Legends Ultimate Arcade
- Gigastone 128GB Micro SD Card
- SD Card Reader
- amgur microSD to SD Adapter – Many microSD cards include this adapter
- Sinden Lightgun
- AimTrak Light Gun
Recalbox
This video guide will step you through the installation of recalbox on your Raspberrry Pi 5. We’ll cover the entire setup from beginning to end, including writing the image to the microSD card, how to copy your games & BIOS files, scraping artwork, some advanced setup and more.
Helpful Links
- Raspberry Pi Imager – Tool used for writing the recalbox image to the Raspberry Pi 5.
- Disk Genius – Utility for allowing a Windows PC to read-write the exFat partition. Coupon code for 30% off the Pro version: DG30-YUTE-STPR
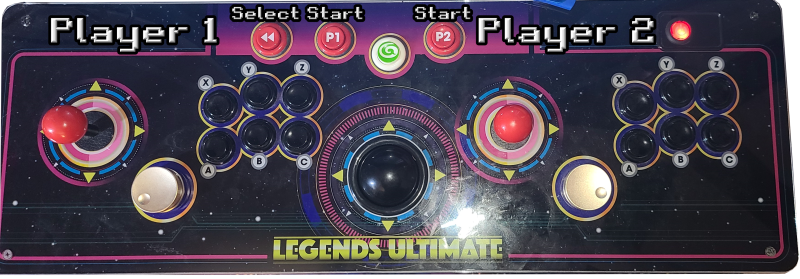
Recalbox with Legends Ultimate (Arcade)
You can use the Raspberry Pi 5 running recalbox on the AtGames Legends Ultimate and it works well. In the section below, we’ll map the buttons for Player 1 & 2. I did test that the trackball and spinner was working in MAME, Player 1&2 on various consoles (SNES, Atari 2600, etc.) Below we’ll discuss what is needed and how to set it up.
*NOTE – You can swap A/B during mapping if you prefer A=A and B=B.
Items needed
- You’ll need a Raspberry Pi 5 (I used the CanaKit Pi 5 Starter Kit, it included the power supply, microHDMI to HDMI cable, heatsink, fan, etc.) with recalbox and your games installed as discussed here. A 4GB Pi 5 is plenty of RAM for use with recalbox, you don’t need an 8GB Pi. Also, the Pi 5 is cheaper and much smaller than most mini-PC’s though typically not as powerful. Depending on the type of games you want to play on your ALU, the Pi 5 may be a good option for expanding your game library.
- You’ll need an AtGames Legends Ultimate Arcade or (future) Legends Ultimate 4KP.
- You’ll need a microHDMI to HDMI cable (the CanaKit includes two).
- You’ll need a USB-A to USB-A cable (male to male, also referred to as OTG) to go between the Pi5 USB 2.0 port and the Legends Ultimate Arcade machine.
- I’d also recommend not having another controller connected and using a USB keyboard for the initial setup. The reason for this is because a controller physically connected to the Pi will typically be recognized as Player 1 and make the button mapping unnecessarily confusing.
Attach Cables
- Turn on the power to the Legends Ultimate, if it isn’t already powered on.
- Make sure the Pi 5 is powered off. Otherwise, the sound may not work without restarting the Pi5.
- Plug in one end of the USB-A (male) cable into the Pi 5 and a USB keyboard.
- Plug in the standard HDMI end into the Legends Ultimate and the microHDMI end into the port nearest the power on the Pi 5.
- Power on the Pi5.
- Proceed to the next section.
Configure Recalbox
- On the Legends Ultimate, navigate to Settings and select the OTG Mode tile.
- Press the Channel button on the top panel of the Legends Ultimate.
- Using a keyboard connected to the Pi 5:
- Press ENTER to bring up the Main Menu.
- Highlight CONROLLER SETTINGS and press A (on the keyboard)
- Player 2 Controls – from the controls on the right-hand side:
- Press and hold the A button until the controls are recognized
- Press UP / DOWN / LEFT / RIGHT on the joystick.
- Press the Joystick down to skip over JOYSTICK 1UP/1LEFT/2UP/2LEFT.
- Press the A/B/X/Y buttons.
- Press the P2 button for START.
- Using the keyboard, press the down arrow to skip over the SELECT button mapping (we’ll use the left Player-1controls for the select button later).
- Press Z for L1 and C for R1.
- Using the joystick, skip over all remaining buttons. Move the joystick to the right on HOTKEY to select OK.
- Press the B button, then the A button to go back.
- Using a keyboard connected to the Pi 5:
- Press ENTER to bring up the Main Menu.
- Highlight CONROLLER SETTINGS and press A (on the keyboard)
- Player 1 Controls – from the controls on the left-hand side:
- Press and hold the A button until the controls are recognized
- Press UP / DOWN / LEFT / RIGHT on the joystick.
- Press the Joystick down to skip over JOYSTICK 1UP/1LEFT/2UP/2LEFT.
- Press the A/B/X/Y buttons.
- Press the P1 button for START.
- Press the Rewind button (<<) button for SELECT.
- Press Z for L1 and C for R1.
- Using the joystick, skip over all remaining buttons until you reach the HOTKEY button.
- Press the Rewind button (<<) button for HOTKEY.
- Press B on OK and A to back out (twice).
- All buttons should now be mapped and ready, you can disconnect the keyboard.
Below is a reference of how the buttons were mapped:
| Function | Button(s) |
|---|---|
| Bring up the Main Menu in Recalbox | Press P1/P2 Start |
| Navigate the menu | Joystick 1/2 |
| Select an option / game | B (from either side) |
| Go back (Menu) | A (from either side) |
| Exit a game | Rewind button (<<) + P1 |
| Insert a credit (Arcade) | Rewind button (<<) |
| Start a 1/2 player game | P1/P2 |
| In-game buttons/controls | Joystick 1&2, A/B/X/Y/Z/C, trackball & spinner |
Using the Raspberry Pi 5
This section will contain different ways you can use the Raspberry Pi 5. Individual videos and guides will be created and referenced below to assist you in exploring new ways of using the Pi 5. At this point, the list is small but will grow over time so please check back for the latest or subscribe to the channel.
- Raspberry Pi 5 Setup: Getting Started Guide (Step By Step) [ Video ] – In this video, we’ll unbox the Pi 5 and various accessories, setup the Pi 5 hardware and install PiOS 64-bit. We’ll also discuss additional operating systems that are available.
- Ubuntu Desktop for the Raspberry Pi 5 – Setup Guide (Step By Step) [ Video ] – In this video, we’ll expand on what we learned from the video above and install Ubuntu Desktop on our Raspberry Pi 5. After installation, we’ll take a brief look around to help you get started with it’s many features and provide a few tips for further exploration.
- CanaKit Raspberry Pi 5 8GB Starter Kit [Turbine] – Setup Guide [ Video ] – In this video, we’ll setup the CanaKit Raspberry Pi 5 8GB Starter Kit [Turbine Black Edition]! We’ll setup the kit from unboxing to setting up PiOS Desktop.
Touch Screens
SunFounder 10.1″ Touch Screen
In this video we’ll check out the SunFounder 10.1″ Touch Screen for the Raspberry Pi 5. We’ll unbox it, assemble and put it through its paces.
- Product Link [Amazon]
- Product Details + Tutorials [SunFounder]
CrowVision 11.6″ Touch Screen
The CrowVision by Elecrow is an 11.6″ Touch Display panel that can be used with most any single-board computer, such as various Raspberry Pi models, LattePanda, Beaglebone, Jetson Nano and more! This kit is great for use in your own custom projects. In this video, we’ll use the CrowVision with the Raspberry Pi 5, Pi 4 and a Windows 11 PC.
Twister OS
I’ll walk you through installing Twister OS v3 on a Raspberry Pi 5, from downloading the image to exploring its powerful features like ThemeTwister, Wine, and Pi-Apps. Whether you want a desktop that looks like Windows, macOS, or something uniquely your own, Twister OS delivers a versatile and fun experience for your Pi.
Product Links
Pi Desktop

Raspberry Pi Desktop is the official operating system supported by the Raspberry Pi foundation and was developed in 2012. It is a variant of the Debian Linux distribution and designed for the Raspberry Pi family of single-board computers, or SBC’s. This section provides information that you may find helpful.
Quick How-To’s
Below are various quick how-to mini-tutorials that will assist you with specific Raspberry Pi Desktop activities:
Update from Terminal
To update the installed software (operating system and applications), please see the following:

- Click the Terminal icon in the upper-left (see image to the right).
- Copy/paste the following command into the terminal (press enter once done):
| sudo apt update |
- After the above command completes, enter the following to perform a full-upgrade (press enter once done):
| sudo apt full-upgrade |
- Once the upgrade completes, you can type ‘sudo reboot’ to reboot the Pi or follow these steps to shutdown/restart.
Add Software
Video: See How
You can easily download and install additional applications within PiOS Desktop, below are some quick steps to help get you started:
- Click the Raspberry Icon.
- Select Preferences → Recommended Software.
- Click the checkbox beside the software you’d like to download (i.e. Office → LibreOffice or Programming → Visual Studio Code). Repeat for any software you wish to download.
- Click the Apply button. If prompted to enter your password, use the password you assigned when you first setup your Pi 5.
- The selected software application(s) will now be downloaded and installed to your Raspberry Pi 5!
Change Screen Resolution
Video: See How
When PiOS Desktop first starts up, the display resolution is 720p. However, you can change it to 1080p (HD), or 4k (UHD) with the following steps:
- Click the Raspberry Icon.
- Select Preferences → Screen Configuration.
- Within the Screen Layout Editor application, select the menu option Layout → Screens → HDMI-A-2 (or other display) → Resolution → the resolution you prefer (i.e. 1920×1080 or HD).
- Click the Apply button.
- That’s it!
Safely Shutdown the Pi 5
There are 3 different ways you might typically safely shutdown the Pi, please see below:
Method 1
- Double-press the power button on the Pi 5.
- The Pi 5 will shutdown.
Method 2
- Press the power button once on the Pi 5.
- Click the Shutdown button.
- The Pi 5 will shutdown.
Method 3
- Click the Raspberry icon.
- Select Logout.
- Select Shutdown.
- The Pi 5 will shutdown.
Force Shutdown (Unsafe Method)
A forced shutdown is not recommended. This won’t properly close any open files before powering off and may lead to file corruption. That said, here’s how:
- Press and hold the power button for ~10 seconds.
- The Pi 5 will power off.
Stress Test
Video: See How
This section will show you how to perform a simple stress test to check that your fan will come on. This is the same test that was performed in the above video.
- Open a terminal by clicking the icon on the taskbar.
- Issue the following command to download stress:
| sudo apt-get install stress |
- Within the same terminal window, issue the following command to run stress and report temperature readings to the terminal window:
| while true; do vcgencmd measure_clock arm; vcgencmd measure_temp; sleep 10; done& stress -c 4 -t 900s |
Helpful Terminal Commands
Video: See How
Below are commands that you can enter into the terminal:
- Open a Terminal window using the icon on the taskbar.
- Enter the command(s) from the table below and press ENTER to perform the function.
| Function to Perform | Command in Terminal | Description |
|---|---|---|
| Install Gimp (Photo Editor) | sudo apt install gimp | • Installs the Gimp photo editor. • Follow the prompts during installation. • Once installed, click the Raspberry Pi icon, select Graphics and launch GNU Image Manipulation Program. |
| Install Pi Raspberry Pi Imager | sudo apt install rpi-imager | Installs the Pi Imager utility which will allow you to download and write images directly to external media (microSD, USB stick, SSD, etc.) |
| Reboot the Pi 5 | sudo reboot | Reboots the Pi |
Accessibility
- On-Screen virtual keyboard for a touch screen – I haven’t found a good virtual touch-screen keyboard for PiOS Desktop. Once I do, I’ll update this section.
Ubuntu Desktop
You can also easily setup Ubuntu Desktop on your Raspberry Pi 5. Ubuntu provides a very nice open-source desktop operating system that performs very well. There are two versions available, Ubuntu Desktop and Ubuntu Server. In the sections below, we’ll focus on Ubuntu Desktop.

Quick How-To’s
The sections below provide some quick how-to or mini tutorials on how to perform very specific functions within the Ubuntu operating system for use with the Raspberry Pi 5:
Pin Applications to the Toolbar
To pin an application to the toolbar, see the following:
- Launch the application you wish to pin.
- Locate the associated icon on the toolbar and right-click it.
- Select Pin to Dash.
Add Software
To download and install new software to your Ubuntu installation, see the following:
- Click the App Center icon on the toolbar
- Type in the application you wish to install into the Search for apps area or browse the list of applications from the options on the left.
- Select the application to install and click the Install button. If prompted for a password, enter the password you created when you installed Ubuntu.
- The application will then be downloaded and installed.
- To locate the application, please see here.
Locate Applications

You can locate installed applications easily by:
- In the lower-left, click the multi-square icon, Show Apps.
- A list of applications will become visible. Notice the two dots in the middle of the screen. The brighter dot indicates what page you’re on. If there are more than one dot, you can click the left/right arrow, click the unhighlighted dot or the mouse scroll wheel to switch application pages.
How to Update Ubuntu
Below are steps on how to update Ubuntu:
- Click the Show Apps icon in the lower-left.
- Scroll to the second page.
- Select Software Updater.
- Wait until the Software Updater dialog completes.
- If there are applications to be updated, click the Details of updates section to expand it. *NOTE – If there are updates you don’t wish to apply, you can uncheck them from the list.
- To download+install the selected updates, click the Install Now button.
- If prompted, enter the password you created during the Ubuntu account creation process, then click Authenticate.
- The updates will then be downloaded and installed.
- Once the update completes, you may be prompted to restart. If so, click the Restart Now button.
Change Screen Resolution
You can change the screen resolution by performing the following steps:
- Click the Show Apps icon in the lower-left.
- Select the Settings icon.
- On the left, select Displays.
- Click the Resolution option on the right and select the resolution you want to use (i.e. 1920×1080 16:9).
- Click the Apply button.
- If the display appears properly and is the resolution that you prefer, click the Keep Changes button.
- The new resolution will be applied
Safely Shutdown the Pi 5
See below on how to safely shutdown the Pi 5 within Ubuntu:
- In the upper-right, click the small power icon.
- When the dialog appears, click the grey power icon.
- Select the option Power Off…
- Click the Power Off button.
- The Pi 5 will now properly shutdown.
Troubleshooting
Below are some issues that you may run into. Below I’ll add issues that I’ve found as well as any that are mentioned to me in the video comments.
- PiOS (Desktop) isn’t booting – Answer: make sure that you don’t have any other devices on your network with the hostname ‘raspberrypi’. I initially had a Pi 4 powered on with the same hostname used for the Pi 5 and the Pi wouldn’t boot. As soon as I changed the hostname on the Pi 5, it started up just fine.
- I received the following error in PiOS (Desktop) when attempting to update my Pi 5, how can I fix it? Error is: Error installing packages – The following packages have unmet dependencies raspi-utils: Breaks: libraspberrypi-bin (<= 1:2+git20231018~131943+3c97f76-1)? Answer: You can apply the updates using the Terminal instead, please see here.
Change Log
- 2026-04-10 – Added Pironman 5 Pro Max Setup Guide
- 2026-03-21 – Added OpenClaw Setup on a Raspberry Pi 5
- 2026-03-08 – Added the Raspberry Pi 5 AI HAT+2 Setup
- 2025-11-24 – Added Ubo Pod
- 2025-11-03 – Added Network OS Installer Guide.
- 2025-10-20 – Added Pironman 5 Mini Case.
- 2025-09-03 – Added Pironman 5 MAX Case.
- 2025-07-22 – Added Twister OS.
- 2025-07-11 – Added the Retroflag Dream Case.
- 2025-06-20 – Added the Raspberry Pi Sense HAT.
- 2025-06-16 – Corrected some dead links.
- 2025-06-05 – Added the CrowPi 3 AI & Development Station.
- 2025-05-30 – Added the GeeekPi P33 NVMe PoE+ HAT.
- 2025-05-24 – Added n8n section.
- 2025-03-02 – Added Pi-Apps section.
- 2025-02-17 – Added the AI LLM Model section.
- 2025-02-01 – Add Pi 500 Video.
- 2024-01-11 – Added Windows 11 Install on a Pi 5.
- 2024-11-17 – Added a video on setting up PINN on the Pi 5 to boot multiple OSes.
- 2024-09-25 – Added the Pironman 5 Gaming PC Case.
- 2024-09-01 – Turn most any device, including the Raspberry Pi 5 into a laptop with the CrowView Note.
- 2024-08-10 – Added Raspberry Pi Connect Setup video for remote connection to your Pi.
- 2024-07-30 – Added the M.2 HAT+ NVMe setup.
- 2024-06-02 – Added the new MarsKit.
- 2024-05-12 – Added the Batocera guide.
- 2024-04-26 – Minor formatting updates.
- 2024-03-14 – Added a new section for setting up Recalbox on the AtGames Legends Ultimate Arcade.
- 2024-03-09 – Added Recalbox section.
- 2024-03-04 – Various edits.
- 2024-01-07 – Added a new section for Touch Screens, featuring the CrowVision.
- 2023-12-21 – Added Complete Pi Kits section.
- 2023-12-19 – Added how to update the Pi 5 from the terminal. Added additional troubleshooting.
- 2023-12-15 – Added a 10 slot microSD holder to the accessories section. Started on the Ubuntu section of the guide.
- 2023-12-11 – Tested Windows 11 on the Pi 5 and added those results in the Q&A section (along with some additional questions). Additional edits.
- 2023-12-09 – Added some additional How To’s to coincide with the video, including: Add Software, Change Screen Resolution and Safely Shutdown the Pi 5. Added See How sections to show the video at that the relevant point.
- 2023-12-08 – Updated the guide with the Getting Started with the Raspberry Pi video.
- 2023-12-02 – 2023-12-07 – Start to this guide.