AtGames General Loader
Last Update: 7/16/2024
*DISCLAIMER– The code demonstrated in this guide was created using the 6.0.11 firmware build for the AtGames Legends 4KP products. Accessibility to some features may be subject to change in the future. This guide is intended solely for the purpose of allowing you to generate and run the example applications and to assist developers with a framework for creating their own projects. There are no guarantees expressed nor implied that this code suits any particular purposes and is provided AS-IS. Additionally, please be aware that only run external code on your machine from trusted sources. No development support will be provided by Wagner’s TechTalk nor by AtGames. Please be responsible and only use content that you own or have been granted the right to use.
This guide is intended for those who want to create their own custom applications that run on the AtGames Legends platform. It may be a game, a utility or any kind of application. Applications created will be written in C++, built and deployed to a .elf file (a Linux executable and linkable file). There are a number of tools that will need to be installed to Ubuntu to make this happen, including:
- make/cmake
- Docker
- Visual Studio/VS Code (recommended code editor)
- Sample Application
We’ll step through the basic install and setup of these components. First, you’ll need access to an Ubuntu virtual machine. While it is possible to also build within Windows, this tutorial will utilize Ubuntu for building the executable. As many may not have an available Ubuntu machine, you’ll find a detailed guide on how to setup Ubuntu in VirtualBox, we’ll discuss that process briefly below. After that, we’ll build a sample application and run it on the 4KP as an External Application via the General Loader.
*NOTE – I’m not a C/C++ programmer and some of the example code found on this page was AI-Generated using chatGPT. However, I worked with AtGames to take their build tools and supplement them with this documentation and example applications to help you get started.
Table of Contents
Q&A

Below are some common questions and answers that you may find helpful:
- What USB Stick do you recommend? A: I personally use and recommend the SAMSUNG MUF-256AB/AM FIT Plus 256GB – 400MB/s USB 3.1 Flash Drive. I’ve been using these for all of my Legends products and have not had an issue.
- What is needed, from an end-user standpoint, to run any games/applications that I develop? A: The user will need a FAT32/exFat formatted USB stick with a subdirectory off the root /external. Within that sub folder, a subfolder with your application and any additional resources required by your application. For more details, see here.
- Can I quickly just try the example applications without the full tutorial? A: Sure, see the steps below:
- Format a USB Stick as either FAT32 or exFat.
- Download and extract the external.zip.
- Make sure the ‘external’ folder is copied to the root of your USB stick.
- Plug the USB stick into the blue USB 3.0 port on the Legends 4KP.
- From the menu, select External Applications.
- Launch the application(s) by pressing the Play/Start button or A on the Arcade Control Panel.
- To exit the application, press the AtGames/Home button.
- Have fun!
News and Information
Additional news and activities relating to the use of the General Loader is available below. Please note that I have not personally tested/verified the information provided below.
- Can We Run VPX On AtGames Legends Pinball 4K Without A PC? [PDubs Arcade Loft] – PDubs Live Stream with Nix demonstrating VPX running natively on the AtGames Legends Pinball 4KP.
- Developer behind VPX Standalone on the AtGames Legends Pinball 4KP [Reddit] – Reddit thread discussing the development and project of bringing VPX to the Legends Pinball 4KP.
Setup VirtualBox with Ubuntu
To create applications for the Legends platform, you will need a machine running Ubuntu. I’m sure many won’t have a dedicated machine for this and why the Virtual Machine Guide was created. This guide will provide you with all the details on how to setup Ubuntu within VirtualBox in a virtual machine. It also includes sections that describe how to share the clipboard and a shared folder between the host (i.e. Windows) and the guest (i.e. Ubuntu) operating systems. I highly suggest doing that as we will reference a shared folder from that tutorial later in this guide. Once the Ubuntu virtual machine has been setup, proceed to the next section.
Install Build Tools
There are various tools that will need to be installed before you can begin building your application, we’ll cover each in the following sections. To summarize what each component is, see below:
- Make – Make is a build automation tool that manages the compilation process of a software project. It reads a file called
Makefile, which contains instructions on how to compile the source files into executable binaries. TheMakefiletypically includes rules specifying how to compile each source file, dependencies between source files, and how to link object files together to create the final executable. Make determines which parts of the project need to be recompiled and issues the necessary commands to compile only those parts that have changed since the last build. - CMake -CMake stands for “Cross-platform Make” and is a meta-build system. It generates platform-specific build files (such as Makefiles or project files for IDEs like Visual Studio) based on a script written in its own language, which is typically named
CMakeLists.txt. CMake allows developers to write build scripts in a language-independent manner. Developers specify the project’s source files, dependencies, compiler options, and other build settings in theCMakeLists.txtfile. CMake then generates the appropriate build files for the target platform and build environment. This enables developers to write their build scripts once and generate build files for different platforms and build systems without having to rewrite the build scripts. - Docker – Docker is a platform designed to make it easier to create, deploy, and run applications by using containers. Containers allow developers to package up an application with all of the necessary dependencies, libraries, and configuration files and ship it all out as one package. This ensures that the application runs seamlessly in any environment.
- Dockerfile – To create a Docker image, developers typically write a
Dockerfile, which is a text file that contains instructions for building the image. TheDockerfilespecifies the base image, sets up the environment, installs dependencies, copies application files into the container, and defines the commands needed to run the application. - Building C++ .elf Files with Docker – Developers can use Docker to create a containerized environment for building C++ applications, including
.elffiles. They would start by creating aDockerfilethat specifies a base image containing the necessary build tools, compilers, and libraries for C++ development. Inside the Docker container, developers would mount the directory containing their C++ source code, allowing the container access to the source files. They would then run the necessary build commands within the Docker container to compile the C++ code and generate the.elffiles. Once the build process is complete, developers can copy the resulting.elffiles out of the container to their local machine or deploy them directly from the container.
- Dockerfile – To create a Docker image, developers typically write a
- SDL2 – SDL2 (Simple DirectMedia Layer 2) is a cross-platform development library designed to provide low-level access to audio, keyboard, mouse, joystick, and graphics hardware via OpenGL and Direct3D. Originally developed by Sam Lantinga and released under the zlib License, SDL2 is widely used in the gaming industry, multimedia applications, and other software projects requiring multimedia handling. SDL2 simplifies multimedia programming in C++ by providing a unified and platform-independent API for handling audio, input, and graphics. Its ease of use, cross-platform support, and integration with OpenGL make it a popular choice for developing games, multimedia applications, emulators, and other software projects requiring multimedia capabilities.
make/cmake
In this section we’ll install the Make and CMake tools to build an application to run on the Legends platform. Open a terminal and enter the following commands (you can simply copy/paste each into the terminal) and your password for Ubuntu, when prompted. Also, if prompted if you want to continue, press ‘y’ for any of the following commands:
sudo apt-get updatesudo apt-get install build-essentialsudo apt-get install cmakeThe make code should have already been installed as part of the build-essential install. However, you can verify that by running the following command:
sudo apt-get install makeDocker
Setup the Docker Repository
Copy the entire contents below to the clipboard and paste it into a terminal session and press ENTER. When prompted, press Y to install.
# Add Docker's official GPG key:
sudo apt-get update
sudo apt-get install ca-certificates curl
sudo install -m 0755 -d /etc/apt/keyrings
sudo curl -fsSL https://download.docker.com/linux/ubuntu/gpg -o /etc/apt/keyrings/docker.asc
sudo chmod a+r /etc/apt/keyrings/docker.asc

# Add the repository to Apt sources:
echo \
  "deb [arch=$(dpkg --print-architecture) signed-by=/etc/apt/keyrings/docker.asc] https://download.docker.com/linux/ubuntu \
  $(. /etc/os-release && echo "$VERSION_CODENAME") stable" | \
  sudo tee /etc/apt/sources.list.d/docker.list > /dev/null
sudo apt-get update
Install the latest Docker version
The following will install the latest Docker version to the virtual machine, press y to continue when prompted:
sudo apt-get install docker-ce docker-ce-cli containerd.io docker-buildx-plugin docker-compose-pluginVerify Docker Installation
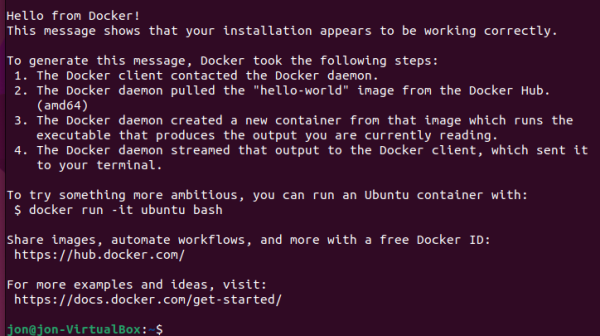
To verify that the Docker installation was successful, run the following command which will pull a sample docker hello-world application from Github:
sudo docker run hello-worldIf the docker install was successful, the terminal window should show the following:
Install VS Code
Visual Studio (VS) Code isn’t a requirement, but a great code editor to have installed. If you prefer another code editor, also known as an IDE or Integrated Development Environment, use what you prefer. You can install Visual Studio code directly in Ubuntu or in Windows or both. I have installed it in both which allows working with the code from either environment. Since the code we’ll be working with is shared between Ubuntu and Windows, any changes made will be shared. The following is how to install Visual Studio Code for each operating system:
Install in Ubuntu
The following steps will help with installing VS Code in Ubuntu:
- Click the Ubuntu Software icon on the left-hand Launcher. It will look like the following image:

- In the upper-left of the Ubuntu Software window, click the Search icon.
- Type Visual Studio and press enter. The VS Code icon should loo like the following image, click that.

- Click the green Install button and enter your password.
- VS Code will now get downloaded and installed.
Install in Windows
The following steps will assist with installing VS Code in Windows:
- Click here to download Visual Studio Code for Windows.
- Launch the installer and follow the prompts.
Example Code
Next we’ll download example code from Github to get you started. You can perform the following from within Ubuntu:
- Change the directory to the vboxShare folder (folder that is shared between the guest and the host operating system) by pasting this command into the terminal: cd /media/sf_vboxShare
- Clone the example code into the shared folder: git clone https://github.com/wagnerstechtalk/ExternalApplication_SDK.git
- The code is now available, in the next section we’ll add the project to VSCode.
Add Example to VS Code
Before we discuss some of the key files included with the example code, we’ll first add the project to Visual Studio Code to make viewing each file easier. To do that, see below:
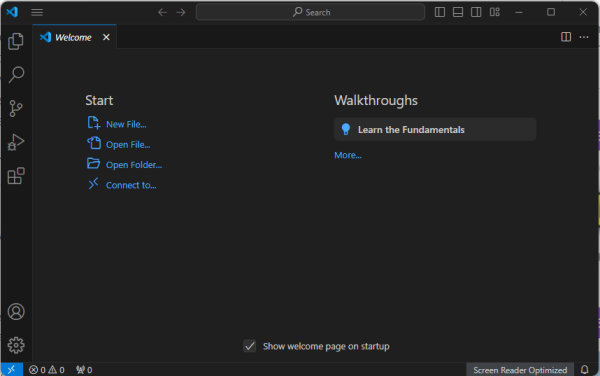
- Launch Visual Studio code in either Windows or Ubuntu (as discussed above).
- Once open, you’ll see a user interface such as the one here:
- Click the Open Folder… link.
- Browse to the location where the ExternalApplication_SDK folder was created.
- In Windows, it will be [drive]:\VirtualBox\vboxShare\ExternalApplication_SDK
- In Ubnutu, it will be /media/sf_vboxShare/ExternalApplication_SDK
- After selecting the folder, click the Add button.
- You’ll be prompted if you trust the authors of the files in this folder. Click the button Yes, I trust the authors.
- On the left-hand side, click on the File icon (top-left) and expand the ExternalApplication_SDK folder. You’ll find a single folder called media. This subfolder contains a number of files, including example projects that you can build and run on the Legends platform. In this next section, we’ll highlight some of the main files you’ll want to be familiar with.
Key Files
There are a number of important files that you will want to become familiar with. Below I’ll highlight them and their basic functions. There are others and modifications will be needed for your own applications.
Shared files
The following shared files are used to build each of the included example applications.
- readme.md – This document discusses more details about the toolchain used for the AtGames Legends platform. It covers the key features and project structure.
- Dockerfile – Contains the instructions to build the Docker image with the necessary tools. More specifically, Dockerfile prepares an environment based on Ubuntu 16.04 with necessary tools and dependencies for cross-compiling software for the AArch64 architecture, and it includes a script (configure.sh) to potentially further configure the build environment or perform other setup tasks.
- run.sh – This script checks if the Docker image “arm-a53-toolchain” exists; if not, it builds it. Then, it runs a Docker container based on that image, either executing a build.sh script with an optional argument passed to it or simply starting an interactive Bash session inside the container.
- build.sh – A Bash script that automates the build process for a given project directory.
- USB (folder) – After building the application, the resulting USB subfolder will be created which contains a .elf file. This .elf file is an executable that will run on the Legends platform.
Example /media/hello-wtt/src
This example code was developed mostly by using AI/ChatGPT and augmented with some additional code to allow exiting the program. It simply draws a small ball on the main playfield display, once the ball reaches the edge of the screen it bounces and continues. It provides the most basic example of a graphical application.
- main.cpp [/media/hello-wtt/src] – This is the C++ source code for the hello-wtt example. Much of the code in this file was generated using openAI’s ChatGPT. Below are the basic steps taken:
- Login to ChatGPT.
- Enter a prompt which explains what you want the AI to generate. The more specific you are, the more likely you’ll have good results. Here’s an example of a prompt used for this code:
- “create a c++ program that uses SDL2 to create a window and display a ball bouncing. Pressing any button should terminate the program”.
- ChatGPT will the respond with some code that I copied/pasted into a main.cpp file in the /src folder of my application.
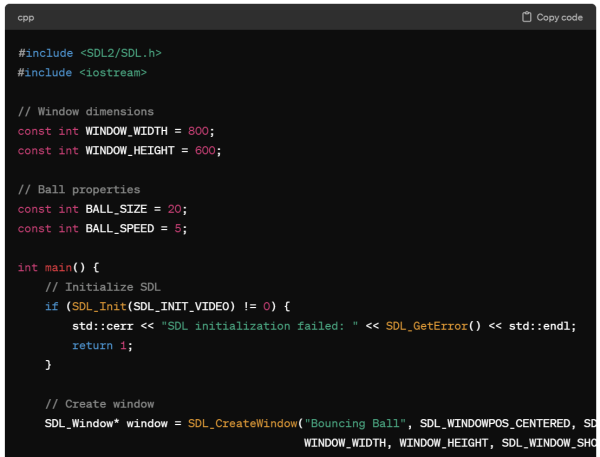
- main.cpp [continued] This code is a simple SDL2 program that creates a window and draws a bouncing ball inside it. This code demonstrates how to create a simple interactive application using SDL2, handling input from various sources, and rendering graphics to create an animated effect. Here’s a breakdown of what it does:
- Header Includes: Includes necessary header files for SDL2,
vector, andiostream. - Constants: Defines constants for window dimensions, ball size, and ball speed.
- Global Variables: Declares a global vector to store SDL game controllers.
- Function Declarations:
loadControllerDB(): Loads controller mappings from a file and initializes connected controllers.
- Main Function:
- SDL Initialization: Initializes SDL and checks for errors.
- Load Controller Database: Loads controller mappings and initializes connected controllers.
- Window Creation: Creates a window titled “Bouncing Ball” using SDL2.
- Renderer Creation: Creates a renderer for the window.
- Initialization: Initializes variables for the ball’s position and velocity.
- Event Handling: Enters a loop to handle SDL events. It listens for quit events, key presses, joystick button presses, and controller button presses. The loop exits when the user closes the window or presses a key or button.
- Ball Movement: Updates the ball’s position based on its velocity and checks for collisions with the window boundaries.
- Rendering: Clears the renderer, draws the ball, and updates the screen.
- Delay: Delays execution to control the frame rate (approximately 60 FPS).
- Cleanup: Destroys the renderer and window, closes connected controllers, and quits SDL.
- Header Includes: Includes necessary header files for SDL2,
- main.h – This header file sets up the necessary includes and declarations for working with SDL2 and provides access to various standard C and C++ libraries.
- CMakeLists.txt – Within each sample application, there is a CMakeLists.txt file which is used by the toolchain to build the executable.
Example /media/sdl2-example/src
A more comprehensive example that provides a snake type of game that demonstrates using the joystick on the Legends device to move a snake around the screen, collision detection, scoring and more.
- main.cpp [/media/sdl2-example/src] – This is the C++ source code for the sdl2-example application. Within the main(), it seeds the random number generator, initializes the graphics, rotates the screen and loads assets. A loop exists to handle any events such as a button press, or key down event.
- GameLogic.cpp [/media/sdl2-example/src] – This code is for a game logic system written in C++ for a snake game. This code manages the core functionality of the snake game, including player input, game logic, and rendering of game elements. Let’s break down the main parts of the code:
- Constructor:
- Initializes various parameters such as speed, scale, grid size, and game state.
- Reset Function:
- Resets the game to its initial state, including resetting scores, snake position, and game state.
- Input Handling Functions:
- Handle user input for controlling the snake’s direction using either keyboard or game controller inputs.
- Logic Functions:
- Perform the main game logic, including moving the snake, detecting collisions with food and walls, updating scores, and ending the game if necessary.
- Also handles generating new food items and checking for conditions such as toxic food consumption or time-based events.
- Rendering Function:
- Renders different game states, such as the main menu, in-game display, and game-over screen.
- Draws the snake and food items on the screen based on their current positions and colors.
- Constructor:
- GameLogic.h [/media/sdl2-example/src] – This class encapsulates the logic and functionality needed to run a game, including handling user input, managing game state, updating game objects, and rendering graphics.
- Header Guard:
#pragma onceensures that the header file is only included once in the compilation process, preventing duplicate definitions. - Include Statements: Includes necessary header files like
"main.h","Snake.h","Food.h","gfx/image.h","gfx/font.h","gfx/sound.h", and"ColorManager.h". - Namespace Declaration: Defines a hash function for
SDL_Colorstruct within thestdnamespace, which is necessary for usingSDL_Colorobjects as keys in unordered containers likestd::unordered_map. - Custom Hash Function: Implements a custom hash function for
SDL_Colorobjects, necessary for using them as keys in unordered containers. - Custom Equality Function: Implements a custom equality function for
SDL_Colorobjects, used for comparing colors in unordered containers. - Enumeration: Defines an enumeration
kGameStateto represent different game states:kGameState_MainMenu,kGameState_Ingame, andkGameState_GameOver. - Class Definition: Declares the
GameLogicclass, which contains various member functions and variables for managing game logic. - Constructor: Initializes member variables and sets up the game environment.
- Member Functions:
reset(): Resets the game to its initial state.input(): Handles user input for controlling the game.logic(): Manages the game logic, such as moving objects and detecting collisions.render(): Renders the game graphics.generateNewFood(): Generates new food items during gameplay.isCoordinateInVector(): Checks if a given coordinate is present in a vector of coordinates.
- Private Member Variables:
- Various member variables to store game state, scores, time, direction, etc.
- Containers to store the snake, food items, and cached color overlays.
- Pointer to the
Coreclass, which likely manages the main game loop and other core functionalities.
- Private Member Functions:
drawSnake(): Renders the snake on the screen.drawFood(): Renders the food items on the screen.
- Header Guard:
- Snake.cpp [/media/sdl2-example/src] – This code defines the implementation of a class called
Snake. Here’s a breakdown of what each part does:- Constructor: This is a default constructor for the
Snakeclass. It doesn’t contain any code because it’s empty. - Reset Function: This function resets the snake’s body to a starting position specified by the
locationparameter. It clears the existing body segments and initializes a new body with three segments, each placed one cell apart horizontally. - Move Function: This function moves the snake’s body in the direction specified by the
moveDirparameter. It updates the positions of each body segment, with the last segment moving to the position of the segment in front of it. The head of the snake wraps around the screen edges if it moves beyond the grid boundaries. - Grow Function: This function adds a new segment to the end of the snake’s body with the specified color. It duplicates the last segment of the snake and appends it to the body, effectively making the snake longer.
- CheckCollision Function: This function checks if the snake’s head collides with its own body or the screen edges. It iterates through the body segments starting from the second segment and checks if any segment has the same coordinates as the head. If a collision is detected, it returns
true; otherwise, it returnsfalse. - Getter Functions: These functions allow access to the snake’s body and body colors. They return references to the
m_bodyandm_body_colorvectors, respectively, allowing other parts of the program to read or modify the snake’s properties.
- Constructor: This is a default constructor for the
- Snake.h [/media/sdl2-example/src] – These member functions define the behavior of a snake object in a game, including movement, growth, collision detection, and access to its body segments and colors.
- Additional files – Additional files are provided such as: core.cpp, core.h, font.cpp, fond.h, image.cpp, image.h, sound.cpp, sound.h, etc. Please see the comments in each file for additional details regarding their function.
Deploy to the Legends Platform
The following steps will prepare the example application for deployment to the Legends platform. Run each of the following command within a terminal in Ubuntu:
Build Application
- From a terminal, type the following to change the folder to the shared folder:
cd /media/sf_vboxShare- You can type ls or dir to see the files and folders in the share. Verify you see the ExternalApplication_SDK folder in the list, then type the following:
cd ExternalApplication_SDK
Now we’ll build the sample application called hello-wtt. The first time we build the application, it will take several minutes. This is because the Docker container will be installed to the system. Subsequent re-builds will go substantially faster as all the components will exist locally.
To build the hello-wtt (ball) example, enter the following command:
sudo ./run.sh hello-wttTo build the sdl2-example (snake game), enter the following command:
sudo ./run.sh sdl2-exampleAfter the build completes, you should see the following in the terminal indicating that the target was built:
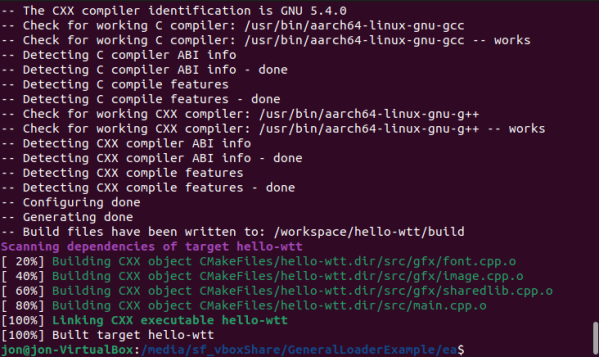
If you want to rebuild the project again, you can delete the build folder, and re-run the the ./run build (above):
rm -r /media/sf_vboxShare/ExternalApplication_SDK/media/hello-wtt/buildrm -r /media/sf_vboxShare/ExternalApplication_SDK/media/sdl2-example/buildPrepare the application
When you built the example application above, a folder was created called USB. In Windows, that folder should be located in [drive]:\vboxShare\ExternalApplication_SDK\media\hello-wtt\USB. Within the USB folder, you should find the linux executable called hello-wtt.elf.
- For the application to appear in the list of External Applications on the Legends platform, we need to identify the name of the executable. This is done by creating an XML file in the same folder as our executable (.elf file). Using VS Code / Notepad (Windows) or other text editor, create an XML file in the USB folder and name it hello-wtt.xml with the following contents (it has already been created for you):
<root>
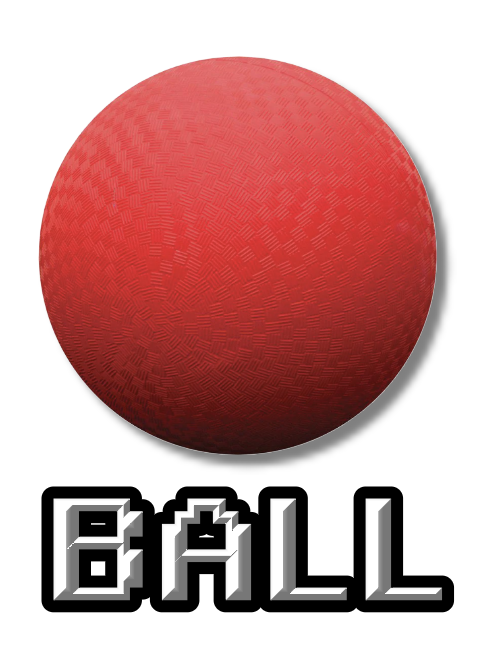
<name>Ball</name>
</root>- Right-click the image below, select Save Link As… and Download the following image and save it to the USB folder with the filename hello-wtt.png (it has already been created for you):
- Your application is now ready to be transferred to a USB Stick. See the next section for preparing the USB stick for use on the Legends platform.
Setup the USB Stick
There are a number of ways the USB stick can be setup. You can have both Flash Drive X (FDX) and your applications run off a single USB stick (dual-partition method). Alternatively, if you aren’t currently using a USB stick with your Legends machine, you can dedicate the entire USB stick contents for external applications. The size of the stick is up to you in either case, however I’d recommend at least a 64GB stick (particularly for the dual-partition method).
Single-Partition Method
If you are using a new stick, the following will assist with formatting it. If you are using a stick that has multiple partitions and want to remove them, you may want to use SD Card Formatter. Then, reformat using the following.
- Insert your USB stick / flash drive into an available USB port on your Windows PC (3.x port if you have one).
- Launch file exporer.
- Right-click on the USB stick and select Format…
- Click the drop-down under File system and select either FAT32 or exFat.
- Enter a Volume label (i.e. External Applications).
- Leaving Quick Format checked is fine.
- Click Start to format the stick.
Dual-Partition Method
- Insert your USB stick / flash drive into an available USB port on your Windows PC (3.x port if you have one).
- Click the Windows Start button and type Disk Management and then click the result for Create and format hard disk partitions.
*NOTE: Be very careful and follow these steps exactly. If you format the wrong drive, you can lose everything on your PC!
- Locate your USB drive, it should state Removable – GB, the size will depend on the size USB drive you™ve attached to your PC. NOTE: I recommend not having any other USB storage devices connected to your computer during this step to avoid any confusion/mistakes.
- Right-click on the drive, and select Delete Volume- and click Yes (again, triple-check it™s the correct drive!)

- Next, we™ll create two separate partitions on this drive. The first will be for Flash Drive X, the other for the your external applications (the programs you create/build).
- Right-click in the Unallocated section of the USB drive and select New Simple Volume-
- Click Next.
- For the Simple volume size in MB, enter 16384 (to create a 16GB partition), 32768 (to create a 32GB partition) or 65536 (to created a 64GB partition). I created a 32GB partition for use with a 256GB USB stick (65536). However, if you™re using a 64GB/128GB USB stick, to go with 16GB (16384). This partition will be re-formatted when we run Flash Drive X and used for running applications.
- Then click Next (no need to change anything on the Assign Drive Letter or Path dialog).
- Now on the Format Partition dialog, select FAT32 for the File system.
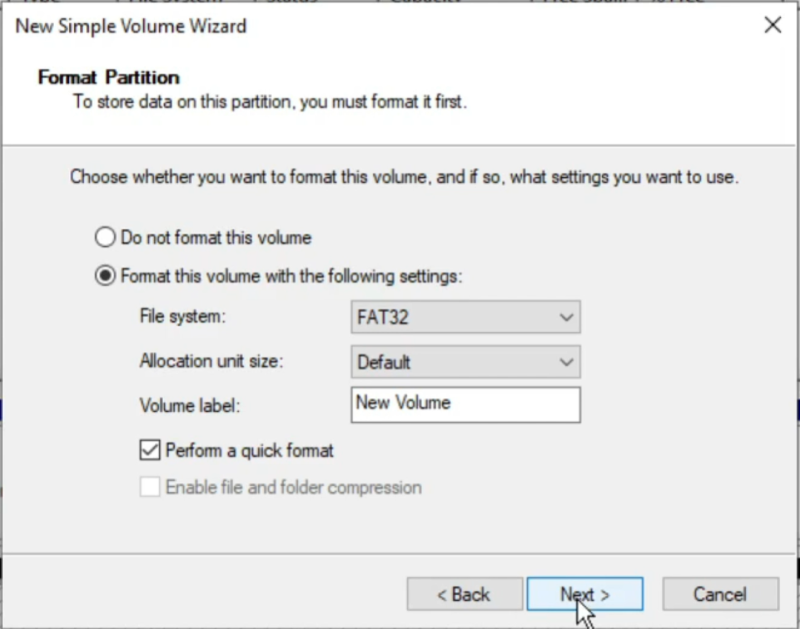
- Click Next.
- Double-check the settings are correct, click the Finish button to the Completing the New Simple Volume Wizard.

- For the remaining Unallocated space, right-click in that box and select New Simple Volume-
- Click Next (dialog states Specify Volume Size “ no changes here).
- Click Next (Assign Drive Letter or Path “ no changes here)
- Click the drop-down under File system and select exFat. You can assign a Volume label if you prefer, such as “MyApps” or leave it as New Volume. Doesn™t matter.
- Click Next.
- Double-check the settings are correct, click the Finish button.
- Take note as to which drive letter is the exFat partition (NOT the FAT32 partition). That is the drive letter you™ll want to use for external applications.
Copy Application to the USB stick
In this step, we’ll copy the application to the USB stick in the correct format. Here’s how:
- Using File Explorer in Windows, create a folder off the root of the USB stick FAT32 partition called external (i.e. [drive:]\external).
- Create a subfolder inside the external folder to match the project you want to copy (i.e. [drive:]\external\hello-wtt, [drive:]\external\sdl2-example, etc.)
- Copy the contents from the the USB folder ([drive:]\VirtualBox\vboxShare\ExternalApplication_SDK\media\hello-wtt\USB) to [drive:]\external\hello-wtt (i.e. hello-wtt.elf, hello-wtt.png and hello-wtt.xml or all files and folders for the \sdl2-example\USB folder).
- Safely eject the USB stick from your computer and insert it into the Legends 4K device.
- In the next section, we’ll run the application.
Run the Application
After copying the example application, hello-wtt to your USB stick and inserting it into the Legends device the following will demonstrate how to run it:
- After inserting the USB stick into the 4K device, a new option should appear in CE-4K UI as External Applications.
- Select External Applications by pressing the Start button.
- Select the application from the list and press the Start button to launch it.
- The application should now start! *NOTE – You can exit the example applications by pressing the AtGames/Menu button.
Legends Games and Utilities
I’m hopeful that the information provided above will be useful to the community and enough information to allow the creation of new and exciting applications on the Legends platform. The ability to run external applications directly on the Legends platform is exciting. Developers interested in porting their games to the Legends platform have a means to do so.
If you have created an application that you would like to see listed below, please reach out to me and I’ll add a link to your website, Github project, etc. and share it with the community below. It can be a commercial game/utility/application or freeware.
Community Developed Legends Software
| Software Name | Description | Link | Commercial / Freeware |
|---|---|---|---|
| n/a | n/a | n/a | n/a |
Change Log
- 2024-07-16 – Added the News and Information Section.
- 2024-05-24 – Added the General Loader Companion video.
- 2024-05-23 – Added a Q&A section.
- 2024-05-16 – Various changes to match the github project. Updated the disclaimer (top of the page). Modified the Key Files section to go more in-depth as to what the code is doing and what functions are performed by both the hello-wtt and sdl2-example (snake).
- 2024-05-15 – In the make/cmake section, added the command apt-get update.
- 2024“03-25 – 2024-04-03 – Start to this guide.