AimTrak Light Gun Legends Guide (ALU 1.1)
Last Update: 3/10/2023
Light guns have been a big part of Arcade and Console gaming since the first light gun game, Seebur Ray-O-Lite, was released in 1936. However, some of the most well known light gun games didn’t appear until the early 70’s and beyond. This guide will focus on Arcade light-gun gaming on the AtGames Legends Ultimate. In the future, I will be covering the Ultimarc AimTrak light-gun on other retro gaming platforms as well as additional light-gun solutions such as Sinden light-guns -so, stay tuned!
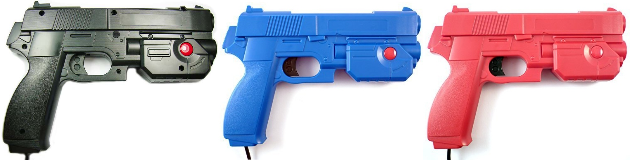
AimTrak light-guns are available in 3 different colors: Black, Blue & Red. I’ve personally purchased the Black and Red guns with recoil. You also have the option to purchase a version without recoil a bit cheaper. Recoil provides feedback within the gun when the trigger is pulled (i.e. solenoid). Without recoil, you don’t have that feedback. The price for each gun with recoil is not cheap, around $170 USD with shipping. This is one of the main reasons why I’ve held off purchasing one for review. However, I’ve had a number of requests to cover Light Gun gaming and finally decided to take the plunge. I’m happy I did.
I hope you enjoy the content below and find it helpful. If you do, I appreciate your support by subscribing to the Wagner’s TechTalk YouTube channel. Here, you’ll find videos on a number of technology topics – now including, the AimTrak Light-Gun on the Legends Platform!
-Jon
How-To link to a specific section on this Guide: go to the Table of Contents (below) and click a section to reference. Copy the URL from the address-bar of your browser and paste in your video description/post/blog. This will direct a viewer to a specific section in any of the guides you find on this site.
Table of Contents
Resources

- AimTrak Light Gun with Recoil [ Ultimarc | Custom Gaming Creations ] – Arcade light gun with line-of-sight aiming. This is the retail boxed version. It emulates a USB mouse and game controller.
- AimTrak Light Gun without Recoil [ Ultimarc | Custom Gaming Creations | Amazon]- Arcade light gun with line-of-sight aiming. This is the retail boxed version. It emulates a USB mouse and game controller.
- Ultimarc Website – Ultimarc are the creators of the AimTrak light gun. At this link, you’ll find additional information about the option, accessories and additional information.
- Custom Gaming Creations – You may find that the light guns are not showing as available on the Ultimarc website. I actually purchased mine from this site instead.
- T-Molding – Another place to purchase AimTrak light-guns.
- CoinOpsX Guide – Using CoinOpsX, there is a category for light gun games that can be used with the AimTrak light gun. CoinOpsX is not required to use this guide, though the game selection that supports AimTrak will be fairly limited without it.
- Hook and Loop Strips with Adhesive (5 yards) – I used these to mount the gun holders on the sides, the command strips didn’t last long when I tried them.
Overview
The AtGames Legends Ultimate has support for AimTrak light guns built-in, though it’s not exactly plug and play. There are certain things you’ll need to do to get it working, this guide will help with that. I’m hopeful that in the future, there will be support for other options for light-gun gaming on the Legends Ultimate. However, as of this writing, only AimTrak support is available. For the setup, you’ll obviously need at least one AimTrak light gun. The guns I’ll be using both include recoil support. It’s up to you if you prefer the same or not. See the Resources section for more on the available models.
You’ll also want a few additional components for a clean installation, primarily the following items:

Accessories
Video: See Examples
- SABRENT 4 Port USB 3.0 Hub – I chose this hub because it allows you to power off each USB port individually by simply pushing a button. This will come in handy when not using the light guns.
- Command Large Picture Hanging Strips – These took a little longer to ship, but local stores only had white strips. I wanted something that closer-matched the black on the Legends Ultimate cabinet.
- SOULWIT 100 Pcs Self Adhesive Cable Management Clips – These clips will help for tidying up the wires going into the Legends Ultimate and the wire to the sensor bar.
- 3D Printed AimTrak light gun sensor bar mount – It is recommended that you mount the light gun mount slightly above the screen on the Legends Ultimate. This 3D printed mount will make it much easier. If you don’t have a 3D printer, you can typically have them printed by your local library very cheaply or in some cases, even free. Contact your local library to see if any in your area provide 3D printed services. To print two of these mounts, it will take about 1 hour to print. Most libraries will print an object that takes less than 4 hours. You’ll provide them with the .stl file from this archive and then just pick it up when done.
- Legends Ultimate Light Gun Sensor Shelf – If you prefer not to use the 3D Printed option mentioned above to mount the sensor bar, you can purchase one already printed for you. This design is a bit different from the one mentioned above but looks like it should work fine. I’ve personally not used this option as I do own a 3D printer and used the one above instead.
- 3D Printed AimTrak Gun Holster for AtGames Legends Ultimate – This holster will use less filament than others I’ve found and should print in under 4 hours (maximum allowed by many public libraries). That is, if you don’t have a 3D printer you can often have them printed by your local library very cheaply or in some cases, even free. Contact your local library to see if any in your area provide 3D printed services.
Credit
I would like to credit Rafael Monroy (RaphSeraph) who created this guide which was very helpful in getting the AimTrak working on the Legends Ultimate. Without his excellent documentation, this guide would have taken much longer to create. I didn’t plagiarize his work here, but it was extremely helpful in figuring everything out.
CoinOpsX Versions
There are two popular CoinOpsX releases for the Legends platform, version 5 is alive (older) and version 5 is still alive (newer). Both will allow use of a single light gun. However, 5 is still alive will allow using two light guns at the same time. In addition, the button combinations are different for starting a game. Please see below for some quick notes on each version.
| CoinOpsX Version | Notes |
|---|---|
| CoinOpsX 5.0 Version 5 Is Alive saUCEy Edition (Guide) | If you will be using light-guns, you will only be able to get one gun to work with this release (see still alive below). To insert a credit, point the gun off-screen and press the left button and the trigger. |
| CoinOpsX Arcade Version 5 Is Still Alive saUCEy Edition (Full Fixed Build) | This build will allow two-player light gun gaming. To insert a credit, press both side buttons on the gun. |

AimTrak Installation to ALU
Video: See how
Before we continue with the installation, I only tested the following with the BitLCD and NOT the BitPixel installed in the Legends Ultimate. There may be no issue with the BitPixel, or it may interfere with the sensor bar (I can’t confirm either way at this time). If you’re not using a BitLCD, you may need to re-route the sensor bar cable to the side of the cabinet instead of under the BitLCD as discussed below (the Adhesive clips above should help with that). With the above understood, let’s discuss the installation process:
- Power off the Legends Ultimate (ALU).
- Unplug the power to the Legends Ultimate.
- Remove all screws from the back of the ALU with the exception of the one screw in the top-center.
- Now carefully remove the last remaining screw while holding the back of the panel with your other hand. The reason for this, there are wires attached to the panel and you’ll want to be very careful here as to not let the back panel fall to the ground.
- Unplug the power and Ethernet cables from the back panel and set it aside.
- Remove the BitLCD from the screw mounts by gently lifting up. Keep in mind, there is a USB cable and power cable still attached. I simply set the BitLCD vertically on the control panel such that the joystick will hold it on the cabinet so it won’t slip.
- Now take the USB cable for the sensor bar and feed it through the marquee area and let the sensor bar dangle from the middle.
- Using a philips head screwdriver, you may want to loosen the 3 screws. This is to provide a little extra space for the sensor bar wire to fit at the bottom of the BitLCD panel.
- Leave just enough of the sensor bar USB cable such that you’ll be able to mount it at the top of the monitor bezel.
- Now place the BitLCD over the screws and make sure it’s seated fully on all 3 screws.
- If you have a 3rd party mount for the sensor bar (3D Printed, etsy, etc., see the Accessories section if needed), remove the tape backing that matches the mount you’ll be using an affix it to the mount(s). In my case, I 3D printed x2 mounts and removed the tape on the left and right size of the sensor bar and affixed it to the mounts. *NOTE – Be sure to dry test how the sensor bar will be mounted using the mount. In my case, the mount looks like a “V” shape and the sensor bar sits inside the “V”.
- Now using Command Strips (or velcro), affix both sides together and remove the adhesive on one side. Then, attach to the back of the mount. Repeat for both the left/right side of the mount.
- Now affix the Command Strips (or velcro) to the back of the mount(s).
- Gently apply the mount to the very top of the monitor bezel, this is how mine looked when done (I could have also trimmed the Command Strips for a cleaner appearance):
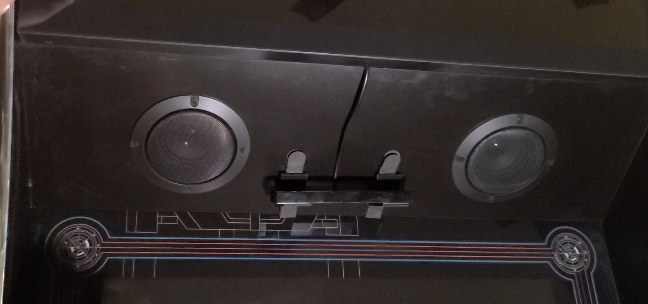
- I used a small Cable Management clip in the middle of the USB cable for a little extra support and cleaner appearance.
- Now using Command Strips (or velcro), attach them to the back of the powered USB hub.
- Affix the hub to a location on the side (or back) of the cabinet that makes the most sense to you. I applied mine to the left-side such that the USB cable from the hub can easily reach the USB 2.0 port on the top of the cabinet (you will have to unplug this cable when restarting the cabinet, more on that later).
- I used a few more cable management clips here to organize the USB cable from the hub to the cabinet. See the image below for an example:
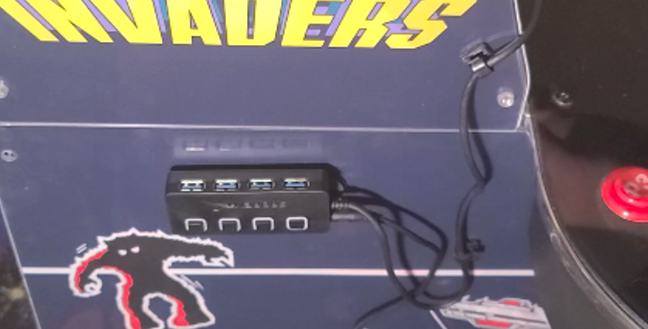
- I then routed the USB cable from the sensor bar to the USB Hub on the back of the cabinet. At this point, you could drill a hole in the back-bottom edge of the panel where the cable will feed through. However, I didn’t want to do this and simply didn’t install any screws at the lower-right back of the cabinet as to not pinch the USB cable going to the sensor bar too badly.
- Re-install the power & Ethernet cables to the back panel and position the back panel.
- Install the top-center screw to hold it in place, then add the remaining screws. If you didn’t make a hole at the back in the lower-right (looking from the back), don’t add screws near that section.
- Plug in the power to the USB hub and it’s time to move on to the light-gun configuration!

Light-Gun Configuration
Video: See how
Before you can use the AimTrak light-gun(s) with your Legends Ultimate, there is some configuration needed. You will need a Windows PC for this initial setup, in most cases this will only need to be done once. In the steps below, we’ll step you through the process.
- Download the AimTrak Configuration Utility Installer.
- Double click the aimtrak_setup.exe to begin the installation process.
- If you see a dialog that states Windows protected your PC, click the More info link and click the Run anyway button.
- Follow the prompts by clicking the Next button four times. Then, click the Finish button to complete the installation.
- Now plug the USB cable from the AimTrak gun into an available port on your PC. No need to connect the power supply for this.
- Click the Windows button in the lower-left and locate the Ultimarc AimTrak icon. Right-click it and select Run as administrator.
- With the light gun plugged in, in the lower-right you may see a red or green box showing the firmware version. At the time of this writing, new units ship with FIRMWARE 9.21. You should see it in green. If it’s red and states NO DEVICE, try unplugging the AimTrak gun, wait a few seconds and plug it back in. If the light-gun is used, you may have to try selecting the DEVICE X as it may have been configured with a different device identifier.
- At this point, we’ll assume you see the firmware version in green. If not, please see the Troubleshooting section for further assistance.
- The Button Assignments from the factory are not ideal for use with Legends devices. Click the drop down for each and make sure the on/off screen selections match the screenshot below, specifically the red highlighted section:
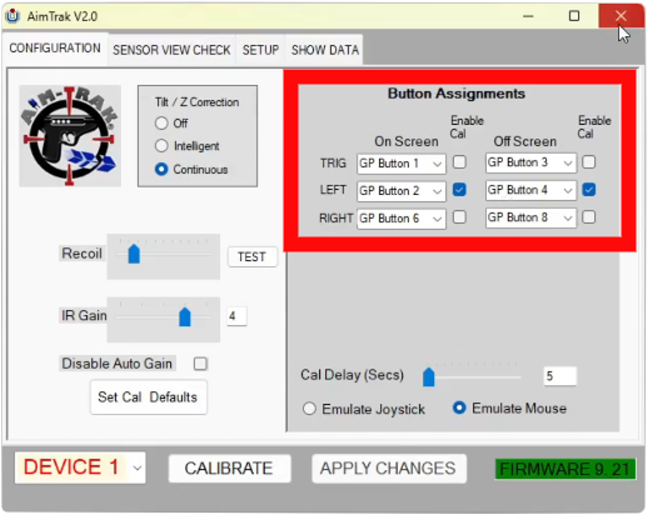
| Button | Mapped As | Notes |
|---|---|---|
| GP Button 1 | P1 A Button | Left Column |
| GP Button 2 | P1 Button B | Left Column |
| GP Button 6 | P1 Button C | Left Column |
| GP Button 3 | P1 Button X | Right Column |
| GP Button 4 | P1 Button Y | Right Column |
| GP Button 8 | P1 START | Right Column |
- After making the changes above, click the Apply button.
- Next, let’s discuss the Firmware. Proceed to the next section below.
Add a 2nd Gun
Video: See how
When your light-gun was shipped, it was set to DEVICE 1. If you want to add a 2nd gun, you’ll have to change the device to 2. Below we’ll discuss how to do that:
- Click the Windows button in the lower-left and locate the Ultimarc AimTrak icon. Right-click it and select Run as administrator.
- Click the Setup tab.
- Click the Set ID To 2 option, it will then turn green.
- Click the OK button.
- The gun will reset after a few seconds (you’ll hear the Windows USB disconnect / reconnect sound).
- From here, click the drop-down in the lower-left and select DEVICE 2. Your light-gun is now set for device 2. *NOTE– The application may become unresponsive after this change. If so, just terminate it with Task Manager and restart it. You can then select the drop-down and select DEVICE 2. I’ve not tested beyond two light guns connected to the Legends Ultimate.
Firmware
Most all of the videos and information I found about the AimTrak indicated that v9.21 won’t work with the Legends Ultimate and that instead you should use version v9.20 or v9.19. Being the rebel that I am, I tried it anyway and found that it did work. I asked AtGames first if there were any recent changes in the current AtGames Legends firmware (v5.68) that might negate the need to downgrade the firmware. I was told, no. At this point I was puzzled and asked Ultimarc, if interested here’s the backstory comparing v9.20 to v9.21:
The only difference is a bug was fixed whereby the device name was mistakenly set to the vendor name string (Ultimarc) instead of the device name.
Unfortunately after we fixed this it prevented the guns working on the Arcade Legends as they had hard-coded the incorrect name into the software so we had to back the change out again. The downside of this means all guns , even with different IDs set, appear with the same device name.
Ok, so that explains why v9.21 was working on the Legends Ultimate for me, the change for the device name was backed out. If your AimTrak states v9.21 and was purchased new recently, you may not need to upgrade the firmware though I still recommend v9.20 for a smoother experience.
Below are some download links to v9.21 (latest) and v9.20. It’s a safe bet, no matter what, v9.20 is recommended. But I was really confused during my testing and wanted to know why v9.21 was working fine when everything I read said it wouldn’t and wanted to provide some background.
Update the Firmware
Video: See how
The following will describe how to update the firmware in the AimTrak light gun. If you need to download a specific version, the chart below are the versions that I’ve been able to acquire. I’ve tested v9.21 & v9.20 from the links below and have used both with a 1 & 2-player configuration. If you decide to update your firmware, click one of the links below (see the comment below the link or you’ll just get a bunch of gibberish) and copy it to your C:\Program Files (x86)\AimTrak (the default installation folder). If you haven’t yet run the AimTrak Configuration Utility Installer, please do so first by following the Light-Gun Configuration section.
NOTE: When you install the AimTrak Configuration Utility, the firmware AimTrak_9_20.ufw (same as below) will already exist in the \AimTrak folder. No need to download this version, unless it’s not available in future versions of the installer.
| AimTrak Firmware Versions | Notes |
|---|---|
| v9.21 (right-click and Save link as…) | Currently the latest firmware release. It is the version that ships with the AimTrak light-guns as of 2/28/23. |
| v9.20 (right-click and Save link as…) | The version that most guides and videos recommend using. |
- Click the Windows button in the lower-left and locate the Ultimarc AimTrak icon. Right-click it and select Run as administrator.
- At the top, click the SETUP tab.
- Click the Upgrade Firmware button and then click the OK button.
- The AimTrak configuration utility will close and you’ll see a new window appear entitled Ultimarc Firmware Upgrader.
- Click the Select Firmware File button.
- The default folder will be your AimTrak folder (C:\Program Files (x86)\AimTrak). At a minimum, you’ll see AimTrak_9_20.ufw. If you downloaded AimTrak_9_21.ufw and copied it to this folder, you’ll see both. Select the version you wish to flash to the gun. In my case, I’m using AimTrak_9_20.ufw.
- Once the firmware has been selected, click the Open button.
- The firmware will then begin flashing to the light-gun. This process may take about 3-4 minutes.
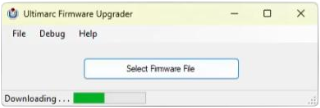
- Once the flash has complete, you’ll see a message in red stating No upgrade device detected or upgrade complete.
- At this point, you can close out of the Firmware Upgrader.
- The next time you launch the AimTrak Configuration Utility Installer (described more here), you should see the version you just flashed in the lower-right of the utility.
- This concludes the firmware installation!
Calibration
Video: See how
This section will describe how to calibrate your light-gun(s) to the Legends Ultimate. It assumes that you have already performed the following:
- You have performed the Ligh-Gun Configuration and set the mappings accordingly.
- You have applied (or currently have running) v9.21 / v9.20 firmware to the AimTrak light-gun.
- You have powered-on the Legends Ultimate without connecting the USB cable from the powered USB hub connected. If you do, you’ll get a message stating NO SIGNAL, such as this one:

Now, let’s continue…
- Once the Legends Ultimate has powered-up (you see the Games, ArcadeNet, Lobby, etc. menus, you can now plug in the USB Cable from the powered hub to the USB 2.0 port on the ALU (the white USB port).
- If you have only one light-gun, make sure it’s plugged into the powered USB Hub. Do not connect any other light guns at this time.
- Navigate to the Settings tab, scroll to the right and on Page 4 you should see the Light Gun Calibration tile.
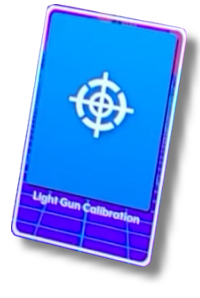
- Select the Light Gun Calibration tile by press the A button on the control panel.
- Press and Hold the left button near the tip of the gun for about 7 seconds or until you see the small red dot move to the upper-left of the screen (see image below for reference):
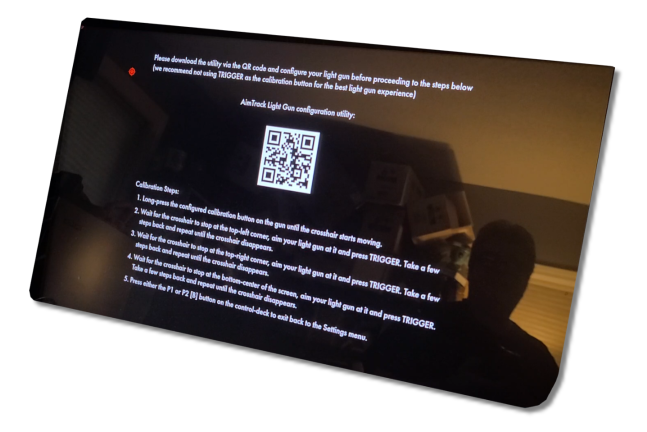
- Point the light-gun to the location of the red dot in the upper-left and pull the trigger. Repeat for the upper-right and bottom middle.
- Press the B button on the control panel to exit the calibration tool.
- That’s it, your light gun is now calibrated! You can now launch one of the games on the Legends Ultimate that supports light-gun gaming or play games from CoinOpsX.
Calibrating a 2nd Gun
Video: See how
The calibration for a 2nd gun is slightly different, here’s how:
- Unplug the USB cable going to the first gun.
- Unplug the USB cable from the powered USB hub to the Legends Ultimate.
- Power off the Legends Ultimate, wait a few seconds and power it back on.
- Make sure the 2nd gun you want to calibrate is plugged into the powered USB hub.
- Once the Legends Ultimate powers back up (you see the Games, AppStoreX, etc.) then plug the powered USB hub into the white USB 2.0 port (white) on the Legends Ultimate.
- Navigate to the Settings tab, scroll to the right and on Page 4 you should see the Light Gun Calibration tile.
- Select the Light Gun Calibration tile by press the A button on the control panel.
- Press and Hold the left button near the tip of the gun for about 7 seconds or until you see the small red dot move to the upper-left of the screen.
- Point the light-gun to the location of the red dot in the upper-left and pull the trigger. Repeat for the upper-right and bottom middle.
- Press the B button on the control panel to exit the calibration tool.
- That’s it, your 2nd light gun is now calibrated. You may now plug in the other light gun and begin playing 2-player light gun games!
Operation
Below we’ll discuss the basic operation of the AimTrak light-gun with the Legends Ultimate.
- Before powering on the Legends Ultimate, make sure the powered USB hub (with the light-gun) in is not connected to the Legends Ultimate’s USB 2.0 port.
- Power on the Legends Ultimate.
- Once fully booted, then plug the powered USB hub connector into the USB 2.0 port on the Legends Ultimate. NOTE: It’s critical that you plug it into the white USB 2.0 port and NOT the blue USB 3.0 port. If you accidentally use the USB 3.0, while in-game, the cross hair will work but none of the buttons will.
- If this is your first time using the light-gun on the Legends Ultimate, see the Calibration section at this point.
- Once calibrated, you can now move over to the Games tab and select one of the included light-gun enabled games from this list to try out your new light-gun. However, there are far more light-gun games available using CoinOpsX. See this guide for more information on how to setup CoinOpsX.
- When done playing light-gun games, disconnect the powered USB hub so the gun controls don’t interfere with the arcade control panel.
Game Reference
The following reference chart was created based on Ultimarc v9.20 firmware (above). If using v9.21 (or more recent versions), the information following may not match 100%.
IMPORTANT – When not playing a light-gun game, disconnect the USB cable from the powered-hub from the Legends Ultimate. Otherwise, you may experience controls that aren’t working properly in non-light-gun enabled games.
ALU 1.1 Light Gun Games
Video: See Examples
The games listed here are included with the Legends Ultimate (v1.1) and support the AimTrak light gun(s).
| Game Name | How to Start a Game |
|---|---|
| Battle Shark | “¢ Green Menu button to Insert Credits “¢ P1 button to Start Game |
| Operation Thunder Bolt | “¢ Green Menu button to Insert Credits “¢ Point light-gun away from screen, press Left or Right side button while pulling the trigger |
| Operation Wolf | “¢ Green Menu button to Insert Credits “¢ Point light-gun away from screen, press Left or Right side button while pulling the trigger |
| Space Gun | “¢ Green Menu button to Insert Credits “¢ Point light-gun away from screen, press Right side button to start. |
CoinOpsX 5.5 Light Gun Games
Video: See Examples
*NOTE – This is not a complete list, games are being added here as I have time to document them.
This is not a complete list of all available light-gun games on the Legends Ultimate cabinet running CoinOpsX 5.5 Still Alive. However, I welcome your comments in the above video to help improve this list. If you installed all the games from the package, when you press the stick to the right several times, you’ll find a dedicated LIGHTGUN GAMES category. This will allow you to filter out only those games that are light-gun enabled. Also keep in mind, not all light-gun games in this play or play perfectly. Many do, but not all.
| Game Name | How to Start a Game |
|---|---|
| Alien 3 The Gun | “¢ Green Menu button to Insert Credits “¢ Left Button + Trigger at Screen |
| Bang | “¢ Right Button to Insert Credits “¢ Shoot to Start |
| Beast Busters | “¢ Green Menu button to Insert Credits “¢ Point the light-gun away, press right button |
| Jurassic Park | “¢ Green Menu button to Insert Credits “¢ Press Right button to Start |
| Operation Thunder Bolt | “¢ Green Menu button to Insert Credits “¢ Point light-gun away from screen, press Left or Right side button while pulling the trigger |
| Operation Wolf | “¢ Green Menu button to Insert Credits “¢ Point light-gun away from screen, press Left or Right side button while pulling the trigger |
| Terminator 2 Judgement Day | “¢ Point light-gun away from the screen, press Right side button. |
Troubleshooting
- I’m able to calibrate the AimTrak gun fine. However, when I launch a game the trigger button and secondary buttons don’t do anything, why? I ran into this issue, initially. The powered USB hub absolutely needs to be plugged into the USB 2.0 port (not the blue USB 3.0 port). After doing this, it should work just fine.
- I installed the light bar as shown, closed everything up but the BitLCD stopped working. What would cause this? This happened to me as well. In my case, I must have pulled on the USB cable to the BitLCD in the process which prevented it from working. Double-check all connections to/from the BitLCD, Power and the USB hub inside the Legends Ultimate. Do that with the power off, then close up the back panel and install a single screw at the top and power on the machine. If everything works, add the remaining screws. If this doesn’t help, also double check that the light bar is routed to the powered USB hub, not the unpowered USB hub inside the cabinet.
- I have everything connected, if I power off the Legends device and power it back on I see NO SIGNAL appear on the display, why? Unplug the powered USB hub that is connected to your Legends device. Power on the device, it should now power up normally. Once fully booted up, plug in the powered USB hub into the USB 2.0 (white) port on the Legends Ultimate.
- The Light Gun was working fine, played some games, then stopped. Why? I ran into this while my wife was playing. Not exactly sure what caused it, but I think it had to do with the side buttons being held down for too long. To resolve the issue, I had to re-flash the firmware, then re-calibrate on the Legends Ultimate. So far, this has only happened once.
- The AimTrak utility locked-up, what do I do? This is likely the result of changing the DEVICE number. I’ve encountered this a few times as well during testing. Click the Window a few times and when prompted close it. If you’re not prompted, open Task Manager, select the AimTrak executable and select end-task. Then, re-launch the application. If you did change the DEVICE number, you’ll also need to select it in the lower-left drop-down.
Change Log
- 2023-03-10 – Initial public release of this guide. Added See How/See Examples links to jump to the relevant section of the video for faster reference.
- 2023-02-20 – 2023-03-08 – Start to this guide.