RetroBat Windows Retro Gaming Guide
Last Update: 3/4/2024

RetroBat is an application that you can download and install to your Windows PC to automatically configure the Emulation Station front end. RetroBat works with a number of emulators, though many of them you will be prompted to install after selecting a game from that emulator. Installing and setting up RetroBat is very simple, we’ll discuss the basic steps below. In my case, I opted to install RetroBat to an external 5TB hard drive. Where you install it is totally up to you. It can be installed on your local hard drive, external drive or pretty much anywhere you want. The reason why I decided on an external drive is so that I can easily test it out on different PC’s as well as handheld computers such as the Steam Deck and ROG Ally without having to install on each local drive. Though, I install RetroBat on a microSD directly on the ROG Ally.
RetroBat is a completely free emulation solution for Windows that is easy to install. It runs in Windows, so you don’t have to reboot, worry about secure boot, etc. Just install it, your bios+roms and play!
I hope you enjoy the content below and find it helpful. If you do, I appreciate your support by subscribing to the Wagner’s TechTalk YouTube channel. Here, you’ll find videos on a number of guides on various technology topics.
How-To link to a specific section on this Guide: go to the Table of Contents (below) and click a section to reference. Copy the URL from the address-bar of your browser and paste in your video description/post/blog. This will direct a viewer to a specific section in any of the guides you find on this site.
Table of Contents
Q&A

- By installing RetroBat, does it remove Windows? Absolutely NOT. RetroBat requires and runs under Windows, just like any other Windows application. Installing it simply allows you to play all the games you may be used to playing on your Raspberry Pi, dedicated retro gaming handheld, Steam Deck, ROG Ally, etc. directly on your PC within Windows.
- Does RetroBat include all the emulators pre-installed? It includes some, but not all. However, if you launch one of the games for an emulator that isn’t already installed, you’ll be prompted to install it and RetroBat will take care of the rest for you.
- How does RetroBat compare to EmuDeck WE (Windows Edition)? EmuDeck WE does include some features that RetroBat doesn’t however EmuDeck is heavily dependent on the Steam client to be installed (Emulation Station won’t run without it). RetroBat is very different in that respect. RetroBat is stand-alone and doesn’t require the Steam client to be installed. In fact, when you run the retrobat.exe, it launches Emulation Station directly. Also, at the time of this writing EmuDeck WE requires a monthly subscription to their Patreon page. RetroBat is completely free.
- How portable is RetroBat? Very portable! For this video, I installed RetroBat to an external 5TB drive with the intent on testing it with various devices. It worked well on two PC’s, a Steam Deck and the ROG Ally! I didn’t find any need to install the recommended redistributable files on any of those devices (see here). After installing it to the drive, I can easily plug it in to any device running Windows and immediately begin playing my games with no further installation required.
- Can I install RetroBat on my PC/Laptop hard drive? Certainly! Just make sure you have plenty of available disk space to copy your bios and games. If you have a lot of games you want to install and low on disk space, you can find the drive I used here.
- Is there anything special I need to do to install RetroBat on the ROG Ally? Nope, you may want to add a microSD if you haven’t already, instead of using the internal 512GB SSD. More on Storage Expansion for the ROG Ally here.
- Is there anything special I need to do to install RetroBat on the Steam Deck? Yes, the Steam Deck doesn’t run Windows out of the box. If you’re interested in running Windows on the Steam Deck you can install it to a microSD, boot from it and install RetroBat. You can find a detailed Windows Installation guide here. In addition, the Steam Deck controllers weren’t recognized by Windows, some solutions to this may also be found here.
More questions? Please drop a comment in the video above and I’ll answer and may add it here too.
Resources
Below are resources that should be helpful for learning more about RetroBat:
- RetroBat download page – Where to download RetroBat.
- Hotkeys – A great reference for the Hotkeys supported by RetroBat.
- RetroBat Wiki – Excellent resource for more details about RetroBat.
- RetroBat Forums – Official RetroBat forums.
- BatGui – Great resource for learning more about BatGui.
- RetroBat Discord – Official RetroBat Discord.
- RetroBat Facebook Group – The official RetroBat Facebook group.
- RetroBat on Twitter – The official RetroBat twitter site.
Comparison
In the chart below, we’ll compare some of the main features of RetroBat with Batocera:
| Feature | RetroBat | Batocera |
|---|---|---|
| Runs within & Requires Windows (8.1/10/11) | âš« |
|
| Stand-alone operating system (must boot from the installed image) | âš« |
|
| Available on multiple computing devices (i.e. Raspberry Pi, various handheld devices/chipsets, etc.) | âš« |
|
| Utilizes the Emulation Station front end | âš« |
âš« |
| Easily portable to another computer, if installed to an external drive | âš«(PC must be running a supported Windows version 8.1/10/11) |
âš«(may need to enter BIOS and disable secure boot) |
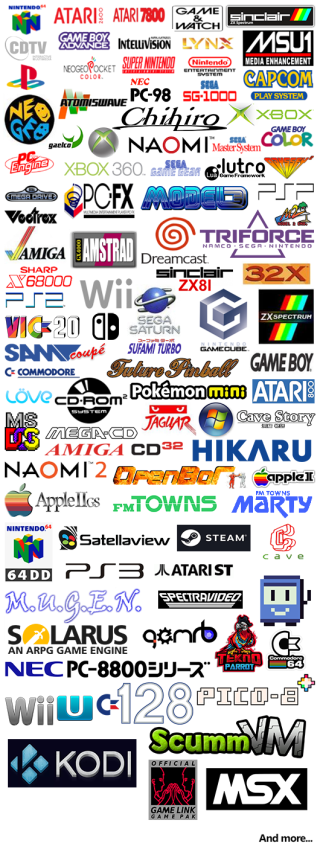
| Supports most popular emulators | âš«(many will require an internet connection for a one-time install on first launch of a game) |
âš« |
Prerequisites
You’ll want a fairly powerful computer and GPU to play some of the more recent systems. Below is a list of recommended hardware/software (Source: the RetroBat wiki):
| Supported Operating Systems | Windows 11, Windows 10 and Windows 8.1 |
| CPU | CPU with SSE2 support (most computers manufactured since 2004 have this). 3Ghz/Dual-core, preferably a machine that is more recent than 2008 |
| Graphics/GPU | A modern graphics card that supports Direct3D 11.1/OpenGL 4.4/Vulkan |
| Dependencies | * Visual C++ 2015, 2017, & 2019 Redistributable Packages (64-Bit) * DirectX |
| Controllers | XInput controllers are highly recommended. There are many available from various manufacturers, in this video I’ll use an inexpensive clone Xbox controller. |
Accessories
Below are various accessories either shown in the video or that you may find helpful.
- Silicon Power 5TB Rugged External Hard Drive [ Amazon ] – This drive is completely optional and there are thousands that will work just fine. But, I used this one because it’s rugged, small and has plenty of storage capacity for years of retro gaming. If you plan to install RetroBat on your HDD/SSD have plenty of available disk space, you can completely skip this item.
- Wired (clone) Xbox 360 Controller [ Amazon] – This is the controller I used in this video. Controllers are mostly a matter of personal preference. There are many excellent PC Game Controllers available from several different manufacturers such as 8-Bit Do (wireless, wired, Arcade sticks, etc.).
- Steam Deck & ROG Ally Dock – This is the dock used in this video for both the ROG Ally and Steam Deck. It has a single USB-C cable that connects to either device, it folds up for easy packing/storage, includes x1 HDMI Output port, x3 USB-A 3.0 ports and PD 100W. This allows you to turn either device into a gaming console for the game/living room connected to a TV/Monitor.
- Asus ROG Ally [ Best Buy ]- This is an amazing PC in a handheld form factor.
- Steam Deck [ Valve | Amazon ] – The Steam Deck has been around for over a year, it’s one of my go-to handheld PCs. While the ROG Ally is a bit more powerful, the Steam Deck is still an awesome device.
RetroBat Installation
RetroBat may be installed on most any PC capable of running Windows 10/11 or even 8.1. This includes a Desktop PC, laptop or even handheld PC’s such as the ROG Ally and Steam Deck (guide on installing Windows to a microSD for use with the Steam Deck here). In a nutshell, you’ll need a fairly recent PC (2010 or newer recommended), you’ll want at least 30GB of disk space available and you can install RetroBat to the internal hard drive or on an external drive –either will work the same. Then simply use the following steps to install RetroBat to your PC:
Video: See how
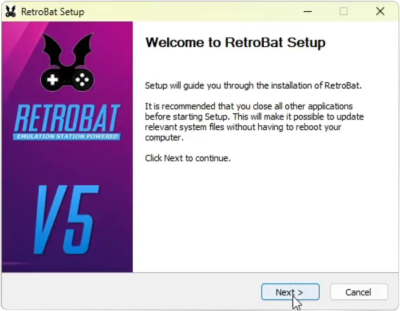
- Go to the retrobat.org website and click the Download RETROBAT button.
- Now click the Download Now button.
- Again, on the next page click the Download Now button (I know, not sure why there are so many download buttons but it is what it is).
- You’ll then see a dialog popup where you can choose to support the RetroBat developers, which I recommend. However, you can simply click the No thanks, just take me to the downloads link.
- Click the red Download button beside retrobat-v5.x.x-stable-win64-setup.exe. You may also want to click the red Download button beside User Manual (PDF) for a copy of the User manual.
- Below the download links, you’ll find some additional dependency files including DirectX and the Visual C++ (VC++) Redistributable packages (select the flag icon nearest to your location). Click the Download button for each of these.
- As mentioned above, your PC may already have all the DirectX and VC++ dependencies installed, however if you’re not sure and want to install them anyways, here’s how:
- Extract the Visual-C-Runtimes-All-in-One-May-2023.zip file by right-clicking the file and selecting Extract All, followed by the Extract button.
- Navigate into the Visual-C-Runtimes-All-in-One-May-2023 folder and double-click the install_all.bat to install all the Visual C++ redistributions. NOTE: This process may take some time.
- To install DirectX double-click the dxwebsetup.exe.
- Review the license agreement and click the I accept the agreement option, then click the Next button.
- Uncheck the Install the Bing Bar option and click the Next button.
- To install RetroBat itself, double-click the retrobat-v5.3.0-stable-win64-setup.exe that was downloaded earlier.
- Select your language and click the OK button.
- Click the Next button.
- Review the license agreement and click the I Agree button.
- For the Destination Folder, you can leave it at the default of C:\RetroBat or if you prefer a different drive, you can simply change C: to a different letter (i.e. D:), or click the Browse button to select a different location. Once done, click the Install button.
- Once installed, you’ll be prompted if you want to Create Desktop Shortcut. Set according to your preference and click the Finish button.
- That completes the RetroBat installation process!
RetroBat Quick-Start
Now that RetroBat is installed, below you’ll find some quick-start information to help you get started with it.
Start RetroBat
Video: See how
To start RetroBat, navigate to the [drive]:\RetroBat sub folder. Double-click on the retrobat.exe. Retrobat will then start.
Map a Controller
Video: See how
Many controllers may work without mapping the buttons (See Supported Controllers on the RetroBat Wiki). However, others may need it. You can use a keyboard to get to the controller mapping, if needed. In the table below, you’ll find the main keys you’ll need to know if using a keyboard, which is often not needed. Here’s how to navigate to the controller mapping option:
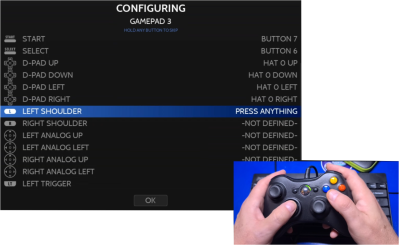
- Plug in your controller (some recommendations here) into an available USB port.
- Press ENTER to bring up the Main Menu.
- Use the Down (↓) key on the keyboard to select CONTROLLER SETTINGS.
- Press X to select CONTROLLER MAPPING.
- Press X on OK.
- Press an hold a button on the Controller until it’s recognized (typically 3 seconds).
- Press each of the buttons/sticks as shown to the left. If there is a button you don’t have on your controller, press and hold a button to skip it. When prompted to map the HotKey, I typically will map it to the SELECT button on the game pad.
- Once done, press A on OK.
- Then B a few times to go back.
| Function | Keyboard Keypress |
|---|---|
| Bring up/close Start Menu | ENTER |
| Navigate options | UP ↑ / Down ↓ Arrow keys |
| Select an option | X |
| Back | Z |
Exit RetroBat
Video: See how
From your controller, press the START button or from a keyboard, press the ENTER key. Move down until you see the QUIT option and select it. The Emulation Station front-end will then exit.
BIOS and ROMs
Video: See how
There are two types files typically needed to play many of the games with an emulator, these are:
- BIOS File(s) – BIOS Stands for Basic Input/Output System. A BIOS is the firmware used to provide runtime services for a given operating system/console and to perform hardware initialization during the boot process. For example, this is the code within a gaming console that tells it how to be a Playstation, Dreamcast or any other system.
- ROMs – ROM stands for Read-Only Memory and is the game or program dumped to a file. These may have originated from classic cartridges, floppy discs, cassette, CD/DVD’s, etc. Essentially, it is the game-specific code.
Due to the fact that both BIOS (system firmware or system files) and ROMs (the games themselves) are copyrighted material, I’m unable to provide direct links to any such files. If you’re unsure what I mean, you can read a bit more about my take on the subject here. I can say, that both BIOS and some games can be found organized in archived packs. For example, if you search archive.org for œRetrobat V 5.0.0 Complete Bios Set you’ll find a great BIOS pack with much of what you’re likely looking for.
Using your favorite search engine, you may be able to find additional bios files you may want by searching œbios archive or for the games themselves, œ[game/system] pack archive or something similar using some of these terms. Hopefully that will be enough information to get you started.
Where to Copy BIOS and ROMs
Video: See how
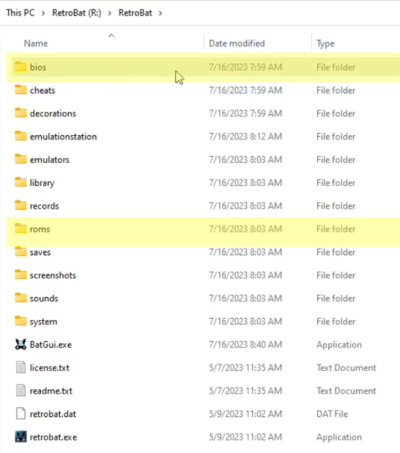
Launch File Explorer in Windows and select the drive where RetroBat was installed. Navigate into the [drive:]\RetroBat sub folder. There you will see two main folders, \bios and \roms. Using the information from the BIOS & ROMs section, download the bios archive, extract it and copy the contents to the \RetroBat\bios sub folder.
For the games (or roms), it will be very similar. Navigate to the \RetroBat\roms sub folder. Within the folder you’ll see a number of different sub folders. Each folder will identify the name of the system or console. Keep in mind, many will be abbreviated such as gb (Game Boy), gba (Game Boy Advance), snes (Super NES), nes (Nintendo Entertainment System, psx (Playstation 1), ps2 (Playstation 2), etc. After you have dumped the roms that you own or downloaded them, copy them to the \RetroBat\roms\[system name sub folder].
The next time you start RetroBat, the game list will be updated with the games you’ve added.
Emulation Station
In the following sections, we’ll discuss some of the key features of Emulation Station, the front-end used by RetroBat, which will allow you to more easily locate the games you want to play, customize your experience and check that you have all the necessary BIOS files available to run the games you want to play.
Navigation
Now that RetroBat is installed and running, below are a few usage tips to assist in navigating the system. Plug in a wired gaming controller, I prefer using a wired Xbox clone controller. This type of controller will typically be automatically configured for you and ready for use.
- Enter Main Menu – Press the Start button to enter the main menu (Enter on a keyboard). From here, there are a number of options and settings you can change. Of those that may be of key interest:
- QUIT – Allows you to exit Emulation Station.
- SCRAPER – Allows you to scrape artwork and meta data for selected systems.
- Load a Game – Navigate the list of systems using the d-pad or left joystick (move left-right). Once the system is highlighted, press A to select it. Use the d-pad or left joystick to highlight the game and press the A button to load the game.
- Exit a Game – Press SELECT + START at the same exact time to Exit a game.
- Jump to Location – After selecting the System/Emulator, press the SELECT button. Move down to JUMP TO GAME BEGINNING WITH THE LETTER and use the left/right stick/d-pad to change the letter. Then press A and the list will jump to games starting with the letter entered.
- Filter Games by Text – After selecting the System/Emulator, press the SELECT button. Move down to FILTER GAMS BY TEXT. Enter some text, i.e. MARIO and press the START button. You’ll now only see games that include Mario in the name.
The following options are available while in-game:
- Enter RetroArch Menu – Many of the emulators/cores utilize RetroArch. To enter the RetroArch menu press SELECT+A.
- Change current State – SELECT + DPAD UP/DOWN.
- Save current State – SELECT + X.
- Load current State – SELECT + Y.
- Insert Arcade Credit – In an Arcade game, press SELECT to insert a credit.
- Start Arcade Game – In an Arcade game, press START to start a 1 player game.
- Change Shader – SELECT + R2/L2.
- Screenshot – SELECT + L1.
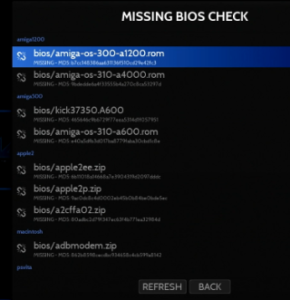
Check for Missing BIOS Files
Video: See how
If a game you’re trying to play won’t start normally, it’s likely missing the BIOS files. Emulation Station has an included utility for checking what emulators are missing BIOS files, below is how to perform that check:
- Press the Start button.
- Select GAME SETTINGS.
- Scroll towards the bottom under SYSTEM SETTINGS → MISSING BIOS CHECK and press A.
- Use L1/R1 to scroll through the list until you find the emulator you’re attempting to launch. Make note of the missing BIOS file(s) and copy them to the \BIOS subfolder.
Download New Themes
Video: See how
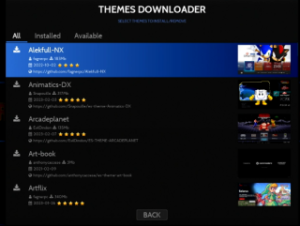
Downloading new themes is a great way to improve the look and feel of Emulation Station. Below is how to download / install new theme:
- Press the Start button.
- Select UPDATES & DOWNLOADS.
- Under DOWNLOADS select THEMES.
- Scroll through the list of Themes you wish to download, press A and INSTALL to begin the download of the selected theme.
- Once done, press B a few times to go back.
Apply Theme
Video: See how

After you’ve downloaded some new themes, below describes how to apply the theme.
- By default, only one theme is installed, ES_THEME_CARBON. If you haven’t already installed any new themes please see the Download New Themes section.
- Press the Start button.
- Select USER INTERFACE SETTINGS.
- Select THEME SET.
- Select the theme you want to apply and press A.
- Once done, press B a few times to go back.
Change GameList View
Video: See how

Depending on the selected theme, the list of games may show large images of each game or perhaps a list. See below for how to change the game list view:
- Select an emulator that contains at least one game in the list.
- Press the SELECT button.
- Select GAME LIST VIEW STYLE.
- Select THEME CONFIGURATION.
- Using the d-pad or left Joystick to change the GAMELIST VIEW STYLE to one of the following, example (I prefer ‘Detailed’):
- Automatic
- Basic
- Grid
- Detailed
- GameCarousel
- Boxes
- Carousel
- Tiles
- Icons
- Automatic
- After selecting the GAMELIST VIEW STYLE (i.e. DETAILED), press B a few times to return to the game list. Your change will now be reflected when showing the list of games.
Scraper
Video: See how
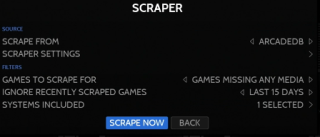
You can use the Scraper to download artwork and other metadata for an emulator. This will make navigating the list of games a bit nicer and provide a more clear indication of the game available. In the steps below, we’ll cover how to scrape the artwork for a given emulator.
- Navigate to the emulator you want to scrape.
- Press the Start button.
- Select SCRAPER from the list.
- Moving the d-pad/joystick left to right, you can change the SOURCE for the artwork on the SCRAPE FROM option. Examples: SCREENSCRAPER, THEGAMESDB, HFSDB, ARCADEDB, etc. NOTE: For additional features and more downloads, some of the sources allow creating an account which is typically free (ScreenScraper’s website may be found here and is in French, right-click and select Translate in the browser to your preferred language). After creating an account, use the username and password under accounts to login).
- Under SCRAPER SETTINGS, you can adjust the IMAGE SOURCE, BOX SOURCE, LOGO SOURCE and any additional SCRAPE FOR options you prefer.
- Under FILTERS → GAMES TO SCRAPE FOR you can select GAMES MISSING ANY MEDIA, GAMES MISSING ALL MEDIA or ALL.
- You can IGNORE RECENTLY SCRAPED GAMES as well, this is handy if you need to resume scraping a large list of games.
- Within SYSTEMS INCLUDED, you can place a checkbox beside any systems you want to scrape. There are buttons on the bottom to SELECT ALL or SELECT NONE, if you want to quickly set several.
- Once all options have been set, select the SCRAPE NOW button. Scraping will now begin.
- Scraping artwork / data for a large list of games may take awhile.
- That concludes this section on the Scraper!
Update Game List
Video: See how
After adding additional games to your PC, you’ll need to update the Game List for them to become available to play. Here’s how:
- Press the START button.
- Select GAME SETTINGS and press A on UPDATE GAMELISTS.
- Press A on YES to confirm REALLY UPDATE GAMELISTS?
- Any newly copied games will now be updated and available within Emulation Station.
Other Settings
Below are some other settings and information that have ben asked from the above video comments and added to this guide:
| Settings | How-To |
|---|---|
| How do I Globally change an emulator for a given system? | Press Start → Game Settings → Per System Advanced Configuration Select the System, set the emulator, etc. |
| What Hotkeys are available for each of the Emulators while in-game? | See the Official RetroBat Wiki here. |
| After some period of time, the screen saver kicks in playing games and it’s loud. How do I change this? | Press Start → User Interface Settings → Screensaver Settings Change it from RANDOM VIDEO to DIM |
RetroBat on ROG Ally
Video: See how
The only thing special that is needed to run RetroBat on the ROG Ally is to make sure your controller is set for Gamepad. To do that:
- If you haven’t already, Install RetroBat.
- Open the Command Center by pressing this button (Button #6).
- Select the Control Mode tile, make sure the mode is set to Gamepad. If not, press the A button until it changes to Gamepad.
- Close out of the Command Center by pressing this button (Button #6) again.
RetroBat on Steam Deck
Video: See how
First, you’ll need Windows 10/11 installed on your Steam Deck. You can install it to a microSD card, for a complete guide on how to do that see the Steam Deck Windows Guide. However, the Steam Deck controls won’t work out of the box. The easiest way is to use the Steam Client under Windows, if you already have it installed. Once Windows and Steam are installed, you can then either install RetroBat to the microSD card or use an external HDD/SSD. You can also use SWICD without the need for the Steam Client, you can learn more about this software on the Steam Deck Windows Setup Guide.
Once RetroBat is installed, you can then add RetroBat as a non-steam game using the following steps:
- Install the Steam Client under Windows and launch Steam.
- In the lower-left, select Add a Game
- Select Add a Non-Steam Game…
- Click Browse… and locate the retrobat.exe on [drive:]\RetroBat\retrobat.exe.
- Make sure retrobat is selected and click Add Selected Programs.
- (optional) Locate retrobat in the list on the left, click Properties… and rename retrobat to RetroBat and then close out of the properties dialog.
- Click Play!
Troubleshooting
- I tried downloaded RetroBat. I get the splash screen, and then the screen goes blank. It just hangs and hangs. Any idea why? Could be a couple of things, display scaling between internal/external HDMI not being the same or a potential issue with Windows 10 AMD drivers. Please see this thread for possible solutions.
- I installed RetroBat, the game(s) start but but the audio+video are slow/sluggish. I’m also using an NVIDIA GPU, any recommendations? Yes, go into the NVIDIA Control Panel → Manage 3D Settings → go to the Program Settings tab (not the global tab), click Add and locate RetroArch and add it to the list. Then scroll down to the VSync option → Off → apply and re-start RetroBat.
Have an issue not listed here? Comment in the video above, I’ll help if I can.
Change Log
- 2024-03-04 – Minor formatting updates.
- 2023-08-09 – Updated the troubleshooting section for slow/sluggish NVIDIA issue.
- 2023-08-06 – Added to the troubleshooting section.
- 2023-07-28 – Initial public release of this guide and video.
- 2023-07-20 – 2023-07-28 – Initial Guide development.