ALP Initial PC Setup / Preparation
Last Update: 6/30/2023
As you may be aware, the AtGames Legends Pinball (ALP) machine can be used to to play pinball tables from a PC. This page will cover some of the basics you’ll need to know and things to consider before going forward. If you are already familiar with how to do this, you can just double-check the steps from the Quick Setup instructions.
It is a lot of work creating and maintaining the guides on this site. I appreciate any support from the community by subscribing to the YouTube channel. Commenting on/and liking the videos all help tremendously in growing the content you’ll find here. ““Jon
How-To link to a specific section on this page: go to the Table of Contents (below) and click a section to reference. Copy the URL from the address-bar of your browser and paste in your video description/post/blog. This will direct a viewer to a specific section in any of the guides you find here.
Table of Contents
Getting Started
Setting up a PC to your AtGames Legends Pinball (ALP) is not difficult, however you’ll want to make sure to understand a few things before embarking on this journey. There are a number of different software packages you can install to your PC to play pinball tables on the ALP. Here are some of the main methods:
- Zen FX3 Pinball tables (via Steam) – These are what you might consider fantasy tables and are available through steam for the PC. Some tables are also available on most phones/tablets via their associated app. stores, though no-cross buy between phones/tablets and the PC. They typically include animated on-screen characters and feature impressive artwork, physics and game-play. Often times you can pickup tables/bundles from Steam on sale, if interested in picking up the complete set of tables definitely keep an eye on sales.
- VPX via Pinup Popper / Baller Installer – created by Nailbuster, this is an all-in-one installer that is virtual pinball community friendly (i.e. no commercial tables included) which will install Future Pinball (FP), Visual Pinball X (VPX), Pinpup Popper, PinEvent and includes 1 VPX + 1 FP PinEvent table. There is a huge library of community-created tables available.
After browsing some of the links above, you may be ready to dive in. That’s great, but first you’ll want to make sure that you have a fairly powerful PC and GPU (Graphics Processing Unit), adequate storage space (Hard Drive/HD or Solid State Drive/SSD) and a few additional things to consider.
Hardware
This section will describe some basic hardware requirements for the PC, VIBS Board (more on that below) and additional hardware you may need for an improved pinball experience.
PC Requirements
NOTE: I recently came across a handy tool to help you determine if the PC you’re considering will work well with Pinball FX3. Click here to open the tool, then enter the CPU, Graphics (GPU), RAM and OS and see if what you’re considering will run it well. If so, it should work equally well with PinUP Popper Baller Installer also.
There are no perfect minimum requirements for a PC, that I’m aware of. However, the following is the recommended hardware for FX3. This is not to say that VPX and PE will play equally well with these stated specifications. I will reach out to the community to further expand this section:
- Windows 10 (Operating System) – This is a requirement to play all the tables above on the ALP.
- Processor – Intel I5-4590 (or AMD equivalent) or higher.
- Memory – 8GB (I personally recommend 16GB)
- Graphics Card: NVIDIA GTX 970 (or faster) / AMD 290x – In my opinion, you may wish to avoid an AMD GPU with the ALP and consider an NVIDIA card instead, if it is a new purchase. The reason for this, most AMD GPU’s will have problems with the VIBS Board, should you consider adding a VIBS Board.
- Multiple HDMI Ports – You’ll need enough HDMI ports coming out of the PC to support the number of screens you want to display content on your ALP. Obviously, at least x1 will be needed for the playfield. However, if you want to use the VIBS/Backglass with a PC, you’ll need another HDMI port. See the next section for another option which may work well for you.
- Storage – This will vary depending on what package you wish to install, number of tables, etc. I personally would recommend at least a 250GB drive, preferably an SSD drive (NVMe / M.2 or SATA III 2.5″)
For the above, I wound up purchasing this PC: 2021 Newest DELL G5 Gaming Desktop PC (larger capacity drive than the one I ordered). I have installed Steam, FX3 and the game-play experience has been excellent. The GPU is an NVIDIA GeForce GTX 1650 Super and compared to the previous PC I tried, has performed very well. Given that GPU’s are quite expensive at the present time, due to parts shortages, you may be able to find a better price elsewhere or at a later time. While I’m pleased with the performance of my purchase, I’m not pleased with the price I had to pay for it. Totally up to you what you decide to go with.
VIBS Board
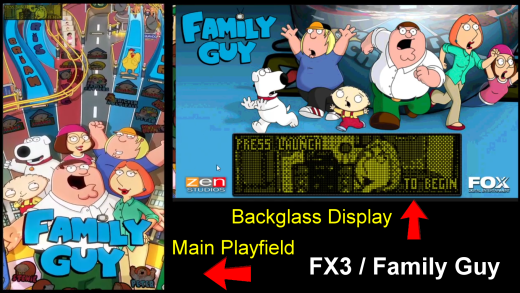
The ALP does have an HDMI Input port on the top-left of the cabinet. This is great for playing PC-based pinball tables on the ALP with one drawback, the backglass won’t be able to display the scoreboard / artwork coming from the PC without a modification to the ALP. This modification is in the form of a board (or PCB/printed circuit board) called the VIBS Board (Video Input Backglass Switchboard). For more on the VIBS, including the official installation videos please see here. This is a modification that you, the end-user, would need to make to your ALP. While not difficult, not everyone will feel comfortable making this modification as it does involve:
- Removing the back panel to the backglass.
- Disconnecting ribbon cables.
- Mounting the VIBS PCB in the backglass.
- Re-attaching the ribbon cables.
- Routing an HDMI cable from the connector to the outside of the cabinet.
- Potentially drilling a hole for the VIBS Button assembly and installing/wiring the single button (used to switch from the ALP circuitry to the PC’s secondary HDMI port).
While a backglass connected to your PC isn’t required, it is recommended for an ideal pinball experience. The installation isn’t difficult and typically takes around 30 min. However, if you’re not comfortable with the points above, you may want to ask a friend/family member to help you.
Additional Hardware
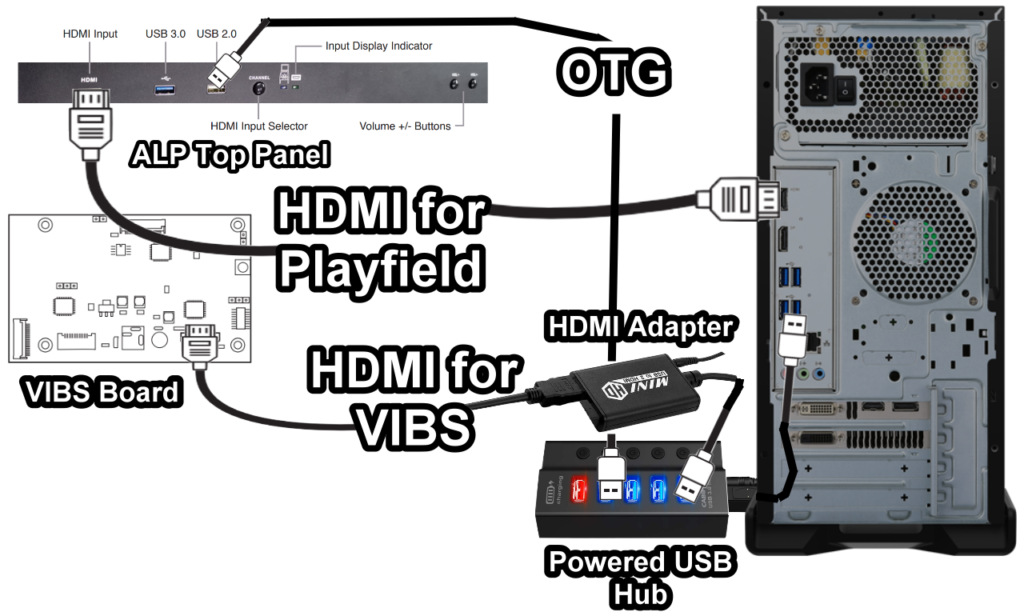
If you purchase a VIBS board, you’ll want x2 HDMI cables (x1 for the PC and x1 for the VIBS board itself). You’ll also want to make sure the HDMI cable has plenty of length to allow you to place the PC where you want it. Depending on the physical size of the PC, you may be able to install the PC inside the ALP. However, if you do and need to make changes to your configuration (add RAM, Storage, etc.), this may be an inconvenient location to place your PC. Until you get everything 100% setup the way you want and running perfectly, you may want to consider placing the PC on the floor below the ALP or hidden away nearby.
- OTG Cable – For this, I recommend the UGREEN USB to USB Cable (on Amazon). This cable worked well during my testing.
- Powered USB Hub – I initially had problems connecting the OTG port (far right USB port) on the ALP to my PC. I was informed that I should use a powered USB hub, so tried an Amazon Basic hub that I had available and still had issues. This is what was recommended Powered USB Hub atolla Aluminum 5-Port USB 3.0 Hub (I can confirm this hub worked on my Dell PC with FX3, VPX and Future Pinball). A previously recommended hub is now unavailable (
Powered USB Hub). If you have any difficulties, please see the OTG Troubleshooting section. For issues with latency, please see the Minimize Flipper Latency section. - HDMI Cables (x1 for PC-ALP, the other for PC-VIBS) – 6-10 feet in length (choose the length ideal for your setup).
- VIBS Board – The VIBS board is currently available on the AtGames product page here.
- HDMI Adapter – if your PC does not already have the number of HDMI ports that you’ll need to support your ALP (mine also did not), you may find this a great option: UNSTINCER USB 3.0 to Dual HDMI Adapter (Amazon). It supports x2 HDMI ports and would be ideal for future expansion of adding a dedicated DMD.
- CyberPower UPS – I didn’t want a power surge or lightening strike to destroy my new ALP and PC, so I picked up a UPS. This isn’t the same exact model I’m using (mine is no longer available), however this is the same brand that I also use for my home server.
- Accessories – additional accessories I use with my ALP.
Switch HDMI Input

After connecting the PC to your ALP, you’ll want to switch the HDMI Input to the PC to be able to view the PC video signal on the main playfield. To do that see the following steps:
- Press the Channel button on the top-middle panel of your ALP, check that each of the settings are assigned as.
- Control Mode to OTG.
- Display set to Main display.
- Degree set to 90.
- Then press/select the OK button
- If you have installed the VIBS board, press the button to switch the VIBS Input to the secondary HDMI coming from your PC.
Software Considerations
The following are some software considerations that you may want to make to your ALP PC.
JoyToKey
To map the ALP OTG-connected buttons to the PC, you’ll want to use JoyToKey. The configuration file I’m using may be downloaded from here. It will work with the base ALP, including: plunger to launch the ball and if you have the Legends Control Panel will allow pressing the A button to left-mouse click and B to right-mouse click (trackball operates as the mouse).
*Note – The initial configuration for JoyToKey I started with was the generous community post by Joe F. (FB thread here), then modified slightly for the Arcade Control Panel L/R Mouse buttons. Also, if you have mapped the buttons under Steam, you’ll want to clear those button mappings prior to using JoyToKey.
How to Setup JoyToKey
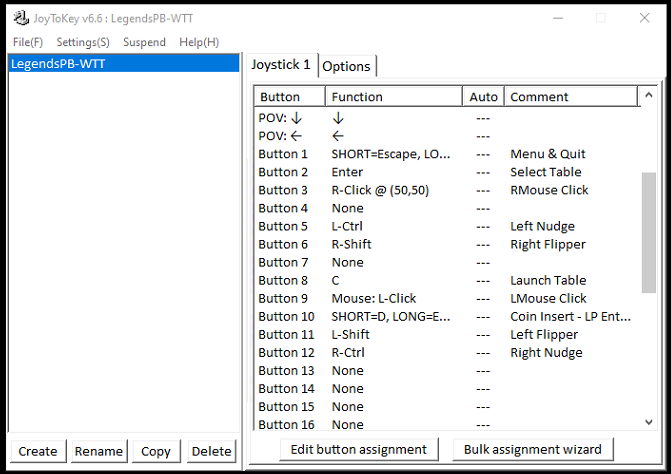
- Download and install JoyToKey.
- Download the LegendsPB-WTT.zip (right-click and Save link as…), extract it and copy it to your /Documents/JoyToKey sub-folder. *Note – before it will show up in the JoyToKey list, you’ll need to exit JoyToKey, copy the .cfg file and re-launch JoyToKey.
- Under the Preferences menu, you can select set JoyToKey to Start JoyToKey in a minimized mode. Keep in mind, if you do, to see the UI again you’ll need to right-click the JoyToKey taskbar icon and select Open main window.
- You may also want JoyToKey to start automatically when Windows Starts. To do this, press the Windows Key+R, then type shell:startup, place the JoyToKey shortcut in the Startup folder.
- Basic Functions:
- L/R Flippers + nudge
- Plunger to launch ball
- Forward nudge – Enter/Select
- Rewind button – back
- Play Button (while in-game) – Change View (View 1 is ideal)
- A button on Arcade Control Panel – left-mouse click
- B button on Arcade Control Panel – right-mouse click
- Use the trackball to function as a mouse cursor
- NOTE: To use the left/right Mouse buttons with the Arcade Control Panel, be sure to minimize JoyToKey prior to attempting to use those buttons.
OTG Troubleshooting
- I don’t see the JoyToKey Profile I downloaded/copied listed – Make sure you restarted JoyToKey completely. In the lower-right on the taskbar you’ll see the JoyToKey icon. Right-click and select Close, then restart JoyToKey. You should see the copied profile listed now.
- When I plug the USB/OTG cable in, it doesn’t show up on my PC – I know of some that have used various USB cables that had issues. Many of which were resolved by using the UGREEN USB to USB Cable (on Amazon). In other cases, this still did not help. It may be that your PC needs a powered USB hub. I asked AtGames for their recommendation. This is what was recommended Powered USB Hub atolla Aluminum 5-Port USB 3.0 Hub (I can confirm this hub worked on my Dell PC in FX3, VPX and Future Pinball). If the cable alone doesn’t resolve the issue, then the powered hub should.
- I’ve got the OTG cable and the Hub, still not working – Let’s double-check it’s not working. Press Win+Q and type “USB game controllers” and select the result from the list. If the ALP is being recognized, you’ll see HID Interface listed under Installed Game Controllers. Select HID Interface and click the Properties button. When you press buttons on the Legends Pinball, the corresponding button should turn red while pressed. If so, your Legends Pinball is connected to your PC and working. If not, see the previous point.
Minimize Flipper Latency
There are a number of factors which can impact latency (or lag). Issues may arise if the PC being used doesn’t meet the PC Requirements. If you find a substantial delay in the time that you press a button on the ALP and the time in which the on-screen action occurred, this is latency. Below are some things that can help minimize this issue:
- Verify that your PC meets the recommended PC Requirements.
- Make sure you have the latest firmware installed on the ALP. Some older versions had issues that were resolved in more recent builds.
- Verify that you’re using an OTG cable and/or powered hub that will perform well, as mentioned here.
- Right-click on the Windows icon and select Run and type services.msc and select the Services tab.
- Click the Status column to sort by the services that show a status of Running.
- Research the Service Name/Description and identify any services that aren’t necessary.
- Then right-click on the service and select Properties. If it’s not necessary, click Stop and change the Startup type to Manual or Disabled.
- Repeat for any additional services. Once done, reboot the PC.
- After verifying the above, restart the PC and see if this has improved the latency.
Hide Backglass Taskbar
You won’t need the taskbar on the backglass, for that I recommend the following:
- Right-click on the Taskbar and select Taskbar Settings.
- In Windows 10: Scroll down until you see Multiple displays – Show taskbar on all displays and click to the disabled/off position.
- In Windows 11: Scroll down until you see Taskbar behaviors and expand that section. Uncheck Show my taskbar on all displays.
Keep PC Available
You can adjust your PC’s settings to turn off the screen or put the PC to sleep after a certain period of time.
- Press the Windows Logo key + X
- Click Power Options
- There you can set when the screen turns off or when the PC goes to sleep. I set mine to Never for all options (Screen & Sleep).
Remote Desktop Connection
There will be times when you may want to remote-connect to your ALP without being physically on the machine. This may be useful for adding new tables, adjusting the configuration, etc. Team Viewer is a package I’m currently using and works very well. There are others that may work for you or that you prefer, but Team Viewer is free and allows you to see both ALP displays at once.
Basic Setup
- Team Viewer – Upon installation, select the option to use the Free version for personal use. Then perform the following:
- Click Sign In and create an account by selecting Sign Up.
- Enter the credentials you wish to use and follow the instructions to activate your account.
- Repeat the same on the PC you will be using with your ALP.
- On the source PC (machine which will connect to the ALP), enter the Partner Id.
- You will now be able to connect to your ALP and can view both screens at the same time (side-by-side) by clicking the View option (at the top) and select the 4-square monitor option.
Capturing Remote Video
Not sure if anyone is interested in this, but if you’d like information on how to record video (HDMI-1 & 2) from Team Viewer into OBS Studio comment in one of my ALP videos and let me know there is interest. It’s a bit involved. The image above is a composite still from a video that recorded both displays simultaneously.
Quick Setup
Now that you have a PC, the ALP, VIBS Board and Additional Hardware you are ready to set it up. Below are Quick Setup steps to assist. There are links to more detailed information, should you need it:

- Complete the Windows installation. Install any needed Windows Updates, etc.
- Plug in the Powered USB Hub to your PC (see here) .
- Connect the HDMI Cable from the ALP (top-left panel) to the primary HDMI port on your PC (see here). This will be the display for your main playfield.
- Connect the 2nd HDMI Cable from the VIBS Board to the secondary HDMI port on your PC (see here). This will be the display for the backglass.
- Connect the OTG Cable from the top-left of the ALP (right-most USB port) to the powered USB Hub on your PC (see here).
- Switch the HDMI Input on the ALP to the PC to be able to view the PC video signal on the main playfield (see here).
- Within Windows, right-click on your Desktop and select Display settings. Align HDMI 1 (playfield) to the left-most display and HDMI 2 (backglass) to the right-most display. Make sure both monitors are top-aligned perfectly as shown in the image above.
- Set the Scale and layout on both monitors to 100%. Set the Display resolution on both monitors to 1920 x 1080.
- Install JoyToKey per the instructions found here.
- Hide the backglass taskbar per the instructions found here.
- If you would like to keep your PC from sleeping or automatically turning off the display see this.
- If you would like to be able to remote control to your ALP from another computer on your network, Team Viewer is a great solution (see here).
- That concludes this guide for the Initial PC Setup / Preparation. You may now proceed to the next Guide found here (bullet 1/Option #1). *Note: My VIBS backglass settings in FX3 may be found here (for now). It will be moved to a new section dedicated to FX3 soon.
Troubleshooting
The following will assist you with troubleshooting some common issues:
- Flashing colors on the back-glass using a Radeon GPU connected to VIBS Board – See first bullet.
- Haptics don’t work over OTG – Haptic feedback only works with the games installed from ArcadeNet.
- JoyToKey Button Mapping not working / Double Entries– If you have previously mapped the buttons under Steam, you’ll want to clear those button mappings prior to using JoyToKey.
Change Log
- 2023-06-30 – Added info. for hiding the taskbar under Windows 11.
- 2023-04-18 – Minor edits/corrections.
- 2021-09-30 – Added Minimize Flipper Latency
- 2021-09-24 – Added OTG Troubleshooting
- 2021-08-05 – Minor edits.
- 2021-07-07 – Minor corrections and improvements. Additional Troubleshooting added.
- 2021-06-16 – Additional edits and refinements. Added Team Viewer, Quick Setup and more.
- 2021-06-12 ““ Start to this guide.