
PocketGo v2 Tips, Emulators & Resources
Welcome to the Bittboy PocketGo v2 Tips page (Also known as PlayGo, Miyoo Max, etc.) ! If you find this content useful, I welcome you to subscribe to my YouTube channel. There you will find all kinds of new, retro and unusual tech (click around the menu above while you’re here). The information below is exclusively for the PocketGo v2, I hope you find exactly what you’re looking for! Your likes and comments on the videos are much appreciated and motivate me to bring you even more future content. If you have your own tips/tricks not found here, please comment in the videos below or let me know what you want to see in the future. All content on this page is for educational purposes only.
I purchased my PocketGo 2 from China, it took a full month for it to arrive (arrived on 1/22/2020). As a result, it took time to get to the point where I can actually try it out and begin documenting this page. While I’m learning about this device, I will be using my experience gained from a similar device. You’ll see frequent updates on this page as some of my past documentation efforts should still apply to the PocketGo v2.
You may comment/ask questions on anything I write on the WTT Facebook page or you can also e-mail them directly to jon [at] wagnerstechtalk.com. Please share this page with anyone that might find it helpful. Let’s get started!
Linking to this page (of course, including fellow YouTubers): You’re more than welcome to link to any of the information you find on this page. To link to a specific heading on this page, go to the Table of Contents and click the link from there. Copy the URL in the address-bar and paste in your video description/post/blog. This way you’ll always have the latest information.
Table of Contents
PocketGo Version 2 Review and Game play: Demonstration of GB, FBA, Sega, NES, SNES, MAME and more!
In this video, we’ll take a look at the all new PocketGo Version 2! We’ll go over the specifications, un- box, game play and identify a few issues to help you can decide if they are important to you, or not.
Specifications
The following are the specifications for the PocketGo v2:
- Screen – 3.5 Inch IPS screen 320 x 240
- CPU – JZ4770 1.0 GHz MIPS (Dual-Core 64Bit)
- RAM – 512M DDR2
- Firmware SD card – 32GB – User accessible without the need to open the case! Yay!
- Storage Expansion SD card – Support up to 128GB
- Battery – Li-Ion BM20 2000mAh user-replaceable battery which provides ~3 hours of continuous use.
- Charging Port – USB-C
- Product Weight – 160gr / 5.64oz
- OS – OpenDingux
Helpful Resources
The following are some helpful resources I’ve run across along with a brief note/description about why it might be helpful to you. If you’re aware of others, please let me know.
- dingoonity.org – Thanks to a WTT viewer that let me know that many of the GCW Zero emulators (see the Releases thread under GCW Zero) will work on this device as well.
- Jutley’s Website – Firmware upgrade, forums and additional information.
- OpenDingux Software List – List of available emulators, consoles, applications, etc.
- Bittboy Subreddit– Great information source for the New Bittboy PocketGo v2.
- GCW Zero Wiki (old archive) – Many of the programs that run on the GCW Zero will work, without modification on the PocketGo v2.
Accessories
More will be added here, as they are identified.
- Magnetic Charging Cable – Charges your PGv2 by simply attaching the magnetic end to a small adapter in your USB-C port on the handheld. Very cool since you can leave the small USB-C adapter plugged in at all times, when you need to charge it just connect the magnetic end. Just pick it up and go!
- PocketGo 2 / PlayGo / MiyooMAX D-pad – Replacement d-pad for the PocketGo 2 / PlayGo / MiyooMAX handheld gaming console. (*Note – I have not personally tried this -yet)
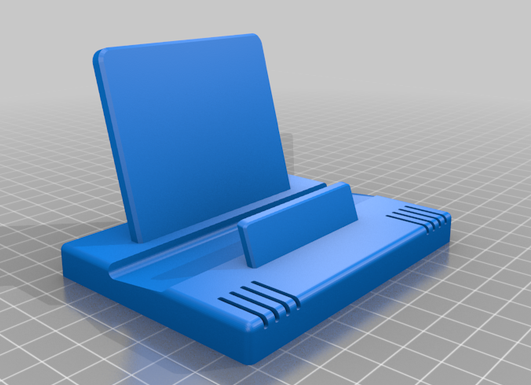
NEW – Free Handheld Retro Gaming Stand (3D Print) – fits the New PocketGo v2 (and others) check it out here. This is the same stand used in most of my Retro Handheld videos and a great way to display your cool new device. It was designed by me and is free for you. Enjoy!
Where to get a PocketGo v2?
The following are known US re-sellers:
- Amazon – Price is much higher and it’s not 2-day Prime. I’ll update if a better deal is found.
The following are re-sellers in China:
- BittBoy’s Website – This is where I ordered my unit, took a full month to arrive.
- RetroMiMi
Interesting Tips
More are coming, this is just what I’ve figured out thus far.
- Mame4all keeps forgetting rom location on second SD card , what gives? Actually, it’s not that it’s forgetting the location, it is because many of the included MAME Roms aren’t the correct romset (should be MAME4ALL 0.37b5 of which there are 2,270 in that set). When you launch a game in MAME and the loading is unsuccessful, it won’t remember that location the next time you start MAME. If however you launch a game that loads successfully, it will remember that location the next time you launch MAME.
- The Menu button doesn’t always offer options to exit the emulator – This is true, for a few emulators. For assistance, please see this.
- How do I access PS1 Roms from my storage microSD Card? Launch Pcsx4all from the emulators tab. Press the ‘A’ button on the “..” (or ‘B’ continuously) until you see the media sub folder. Select the media subfolder and press ‘A’. Select sdcard (or if you named your card, the name you gave it). Then select the subfolder containing your PS1 Roms (i.e. /Roms/PS1). Launch the game you want to play by selecting it and press ‘A’!
- How do I set the Emulator Directory? Launch the emulator, then to go to the root directory (press ‘A’ on the “.” or “..” until you see a subfolder called ‘media’ – you can often also press the ‘B’ button to move up a level), then select /media/sdcard ( or /media/[SD Card Name] ). Next, browse to the appropriate sub folder that contains the games/roms for the emulator you just launched. Then press the Start button to set the directory or select the game and press the ‘A’ button. In most cases, the emulator will remember this starting folder location. There are a few exceptions, mostly consoles such as the Commodore 64 (Vice) emulator, among others.
- My MAME4ALL button configuration is hosed or I want to change it to my storage microSD, can I fix it? Sure, the following will delete the configuration for mame4all. Go to the applications tab and select DinguxCmdr. On the left-side, navigate to the root by pressing the ‘B’ button until you see a sub folder called media. Select the media folder (press ‘A’), select home (press ‘A’), select the .mame4all folder (press ‘X’), move down to Delete and press ‘A’. Then exit DinguxCmdr (press ‘Y’) move down to Quit (press ‘A’) and launch mame4all emulator. Press the “..” until you’re at the root and select /media/sdcard/roms/mame4all (or wherever you have your roms installed), then press the Start button. You should now see a list of mame roms, select one and press the ‘A’ button.
- Games don’t show up on the PGv2– If you are unable to see your games when inserting an external microSD, make sure the microSD card is formatted as fat32 (in windows). Formats ext2/ext3 are fine as well for other platforms. Obviously, backup any files on the microSD card before reformatting.
- How should I organize folders on my storage (right) microSD? It is best to organize the games (ROMs) on your storage microSD according to the type of games contained within it. For example, create a folder called /ROMS and subfolders for : C64, CPS1, CPS2, FBA, GB, GBA, GBC, INTELLIVISION, MAME, NES, SNES, etc. and place the games under each. (For questions about Roms, please see this.)
- Emulator File Formats – You may be wondering, should my roms be zipped or unzipped? That’s a good question and here is a basic guideline that might help: If the rom is used by Mame4all, keep it zipped. For others, some will work off of .zip files others won’t. If unsure or having trouble, try unzipping one of the archives and see if it works.
- USB Devices with an OTG Adapter (USB-C to USB-A) do not appear to work – At this point, it does not appear that additional devices can be used with the PocketGo v2. I tried an OTG Adapter with the WiFi Adapter (used on my RG-350) with GCW Connect and had no success with the PocketGo v2. I also tried a folding USB keyboard with no success. Until I find out otherwise, I’ll have to conclude these type of devices do not work with the PocketGo v2 at this time.
- How can I set the internal Clock? I have not been able to get the PGv2 clock to retain the date+time using the instructions I wrote up for another OpenDingux device. It’s my conclusion that the internal clock does not work on the PGv2.
Issues List
The following are a list of issues I hope to figure out a solution for, either via firmware upgrade or other means.
- Odd File System Issues – While recording a video for testing the 256GB and 512GB microSD card, I encountered an odd issue where a sub-folder on the internal microSD could not be deleted (segment starts here). This type of situation should not have happened and is concerning.
- Unit won’t power-on – After recording the microSD card video, another odd issue occurred when the unit wouldn’t power-up. Removing/reinstalling the battery didn’t work, multiple attempts at powering on the unit didn’t work. What eventually worked was removing the battery, plugging in the USB-C cable, installing the battery and powering it on. It hasn’t happened since, but keeping an eye on it.
- D-Pad Buttons don’t respond consistently – Not sure how wide-spread this issue is, but I did notice others on the Bittboy sub-Reddit that have the same issue. 8/10 times I press the up/down d-pad buttons, it responds. If I “lightly” press a button, it doesn’t register. If I apply a slight more pressure, the button responds. This is a pretty serious issue for a Gaming handheld, so very interested in finding a solution. My device arrived on 1/22/2020, pretty sure it’s not due to being an “early” build but a possible manufacturing/engineering defect.
- USB Devices do not work via OTG – I’ve tried connecting a WiFi Adapter (which worked on a similar device) and keyboard via OTG, neither worked on the PGv2 -sadly.
- Setting the Clock doesn’t Stick – I’ve tried setting the PGv2 clock without success. Not sure at this point if it’s user error, software or hardware. But, something to note here.
Exiting the Various Emulators
Most emulators on the PGv2 utilize the Menu button to bring up a set of options for such things as Exit/Quit, GPU, etc. This is great step forward compared to other devices (overly complex on the RG-350). However, there are a few nuances with some emulators where the table below may be useful. There is also a column to indicate if it’s ok to leave files zipped or not (I just went by what I tried for this initial list).
| Emulator | Exit In-Game | Exit List | Uses .zip ROMs? |
| FBA (Final Burn Alpha) |
MENU Then, move down to ‘Exit’ and press ‘A’ |
Press SELECT twice |
Yes |
| Fceux (NES/Famicom Emulator) |
MENU Then, move down to ‘Exit’ and press ‘A’ |
Press START | .nes |
| Gambatte (Gameboy Emulator) |
MENU Then, move down to ‘Quit’ and press ‘A’ |
Press START | Yes |
| Genesis Plus GX (Genesis Plus GX for GCW-Zero) |
SELECT + START Then, move down to ‘Quit’ and press ‘A’ |
Press START | .md |
| Pcsx4all (PS1 Emulator) |
MENU Then, move down to ‘Quit’ and press ‘A’ |
Press START | Many Types OK |
| Picodrive (Megadrive/Genesis Emulator) |
MENU Then, move down to ‘Exit’ and press ‘A’ |
Press START | .bin |
| PocketSNES (Super Nintendo Emulator) |
MENU Then, move down to ‘Exit PocketSNES’ and press ‘A’ |
Press START | Yes |
| ReGBA (Game Boy Advance Emulator) |
MENU Then, move down to ‘Exit’ and press ‘A’ |
Press START | .gba |
| mame4all (MAME Arcade Emulator) |
START + L + R | L + R | Yes |
| gngeo (NEOGEO Emulator) |
SELECT + START Then, move down to ‘Exit’ and press ‘A’ |
SELECT (1-2 times) |
Yes |
Will a 256GB or 512GB microSD work?
I’ve been asked if the RG-350 or the Pocket Go version 2 support larger capacity microSD cards. My honest answer up to this point was, I’m not sure. Well, in this video we’ll bring them to the test to see if a 256GB or a massive 512GB will work for your games on both. In all these tests, we used the existing (base) firmware that shipped with each unit and used the secondary (or storage) microSD only for these tests. ** Spoiler ** – Yes, they work.
Links to the microSD cards used in this video
- Samsung 256GB 100MB/s (U3) MicroSDXC EVO Select
- Samsung 512GB 100MB/s (U3) MicroSDXC Evo Select
- Samsung 128GB 100MB/s (U3) MicroSDXC EVO Select
*NOTE – Use caution with the following tool, always tipple-check that the drive you’re formatting is indeed the one you want formatted. Once formatted, it will ERASE all data on the selected drive. That said, this is the download link to the free tool used in this video: FAT32 Formatting tool (for Windows and they do accept donations).
Convert & Play Video
The PGv2 includes a video player called FFplay. In order for videos to play well on the PGv2, you will want to convert it to a file that will allow smooth playback. The following will help with that. Special thanks to Thom B. for this tip!
Convert Video
- Download the version of HandBrake for you computer here.
- Install & launch HandBrake.
- Drag/drop a video file or select Open a single video file for the video you want to convert from.
- From the top menu, select Presets –> Devices –> Apple 240p30
- At the bottom, click the Browse button for the Save As prompt.
- Browse to the location where you want to save the converted video for the PGv2 . Make sure the file name you provide ends in .mp4 and click the Save button.
- Click the green Start Encode button at the top.
- Once the file has been encoded, copy the file to your PGv2 storage microSD card or remove the microSD from the PGv2 and copy the file using your computer into a directory on the storage microSD card (example: /mp4 ).
- Then, re-insert the microSD card into the PGv2 once the file has been copied.
- That’s it!
Play a Video with FFplay
- First, make sure you have copied at least 1 video file using the instructions mentioned above.
- Press the L/R button to select the applications tab.
- Select the FFplay icon and press the ‘A’ button.
- Press the ‘B’ button multiple times until you see a sub-folder called media. Select the media folder and press ‘A’.
- Select the sdcard (or name you gave your mSD card) and press ‘A’.
- Select the sub-folder which contains your converted .mp4 video files.
- Select a single file and press ‘A’.
Quick tips for FFplay use
- Use the D-pad left/right button to rewind/fast forward the video.
- Use the D-pad up/down to skip through large sections of the video.
- Press the Select button to exit the video
- Press the L1 to jump to the beginning of the video, L2 to skip to the end.
- Press the ‘Y’ button to see the audio wave-forms from the video. Press repeatedly to cycle through waveform, audio graph or video.
- Press ‘X’ to pause the video playback.
Easy Way to Copy Files to your PocketGo v2
I’ve been experimenting with an easy way of copying files to my PocketGo v2 without having to remove the microSD each time. This is not a full replacement for managing the the microSD on your computer or using DinguxCmdr. However, for a simple transfer of files, this is a useful option. There are some limitations including:
- This method doesn’t allow you to copy/move files between folders on the device itself. Example: if you have a file in folder A (on the PGv2) and want to copy it to folder B you will need to copy the file (or folder) to the computer first and copy/paste from the computer to the destination file/folder on the PGv2.
- You won’t have access to hidden files/folders on the PGv2 (*Note: if you create the shortcut using the root user, you’ll have access to more).
- You can’t use this method to backup/restore game saves.
A simple copy of files/folders from your computer to your PGv2 can be done this way within Windows Explorer and no software/drivers to install. For a quick and easy way to copy files to the PGv2, this solution is useful and easy. For some power users, you may not prefer this method. If you need to reorganize several files/folders or move large amounts of data then DinguxCmdr or managing the microSD on the computer may be faster/easier. So, here’s how!
Assumptions
- I’m assuming you’re running Windows 10 – If you’re not, I’m sorry but these instructions may not be entirely helpful to you.
Create Shortcut
- Connect the USB-A (to your PC) and the other USBC-C end to your PGv2.
- On the PGv2 , Press the L/R shoulder button and go to the Settings tab.
- Select the Network icon (on the PGv2 ) and press ‘A’.
- Use the D-pad and move up to Allow login without password. *NOTE: This shouldn’t be a security concern as there is no WiFi chip in the PGv2 and you’re directly connected between the PGv2 and your PC.
- On your computer, open Explorer (not Internet Explorer, the file explorer – yellow icon) and right-click the Network icon under “This PC” and select Map Network drive…
- At the bottom of the dialog you’ll see a link that states Connect to a Web site that you can use to store your documents and pictures. Click this link.
- After reading the welcome prompt, press the Next button.
- Select Choose a custom network location and press the Next button.
- For the Internet or network address, enter the “IP addrs:” that you see on the PGv2 screen in this format: ftp://[ip_address_on_your_pgv2_screen] . Example: ftp://10.1.1.2
- Click Next
- Make sure that Log on anonymously is checked, press Next. (*Note: if you want access to more files/folders on the internal microSD, uncheck Log on anonymously and enter root for the User name field).
- When asked “Type a name for this network location”, simply type “PocketGo” (or whatever you prefer) and click Next.
- Click Finish.
- At this point, you can now copy files to the Firmware microSD (/apps) and the external microSD (/media) shares or files from your Desktop into either one! How easy was that?
Troubleshooting (FTP)
If you are getting an FTP permission error. Here are some things to check (or double-check):
- If you’re not running Windows 10 or can’t connect, please see this possible solution as well.
- Make sure the Network (on the PGv2 ) has been launched and you selected Allow login without password.
- If you’re still having trouble, try disabling any Antivirus software (temporarily) to see if the antivirus software is blocking the FTP connection between the PC+ PGv2 . If it works after disabling the antivirus software, you’ll have to add an exception for FTP in the antivirus software for it to work.
- If none of the above works, the only thing I can recommend is to remove the storage microSD card (the one on the bottom-right of the unit) from the PGv2 and copy the files to the microSD directly from your computer. Keep in mind, if you create a sub-folder on your microSD card called “/apps” you can install any additional .opk files in the “/apps” subfolder and they should show up on the PGv2 when you re-insert it.
Remove Shortcut
If you’re done copying files and wish to delete the shortcut created above, here’s how (not necessary, but something you may want to do):
- In Explorer, select ‘This PC’.
- Right-click on ‘PocketGo’ (or whatever you called the connection)
- Select Delete.
- After reviewing the dialog carefully, click Yes.
- That’s it!
Installing ROMs
First, please don’t ask me or anyone where to get ROMs. We can’t, or shouldn’t answer you. It’s not an appropriate topic for discussion. There are places where you can download legal ROMs for installation to your PocketGo V2 and in fact, several are pre-installed for you already (at least, they were for me). My recommendation is to search google (or your favorite search engine) and locate whatever it is you want to install. Once you do that, here are some basic instructions:
- In many cases, you don’t need to unzip the file/rom you downloaded. Though, with some you do. Try it zipped first, if that doesn’t work unzip it and try.
- There are a number of ways you can install roms, the easiest of which is using the external microSD card installed in your PG2. You may want to create a folder structure of /ROMS and under that folder create a sub directory for the type of system you are going to use, examples: A2600, AMIGA, FBA, GB, GBA, GBC, MAME, etc. You can simply install the external microSD card into your computer and create the folder structure there, then copy the roms into the appropriate sub folder.
- Most of the problems users have installing ROMs has to do with the fact that the ROM they downloaded didn’t match the correct emulator version they tried to run it under or the rom copied is dependent on another file that was not copied/missing.
- Once all associated ROMs are copied, launch the emulator. Browse to the root of the PG2 (press the “..” until you see /media in the list). Then select the media/sdcard/roms and the rom subfolder you created (above). Then press the Start button (for MAME4All) or press ‘A‘ to select the game.
- This is the most help I can provide on this topic.
How To: Open Package Creator to customize OPK files for use with your RG350 or Pocket Go v2
Open Package Creator is a useful tool if you want to re-package an OPK or customize icons, add additional games and much more. In the video above, we will simplify the installation of the TI-99 emulator from 17 steps to only 2 (See here – OPK works on the PocketGo v2 or other OpenDingux devices). Comment in the video description with how you used Open Package Creator!
Links
- Open Package Creator (v1.1.2)
- Dingux-TI99 Download Link (incase you want to follow along)
- 7-Zip Download – Can also be used to extract OPK Files!
Adding Additional Retro Systems
This section will be helpful if you want to add additional retro computers or consoles to your PGv2. What you see below are additional systems that were added that didn’t come pre-installed on my PGv2. However, it’s quite possible that future firmware upgrades/Rogue updates may contain one (ore more) of these emulators pre-installed. That said, here’s how to add more!
Atari 2600 Emulator (Stella)
*NOTICE- Your ROMs MUST BE zipped for them to show up by the Atari 2600 (Stella) emulator. If they are unzipped, they will not appear in the list. Thanks to Reddit user cavanaughphoto for this tip.
See below for instructions on how to set up the Stella (Atari 2600) emulator on the PGv2!
- Download the Stella Emulator from here (Source of information).
- Remove the microSD from the PGv2 and insert into your computer.
- Copy the stella_X.X.X.opk file to your microSD to a folder on the right-microSD root called “apps” (create this folder if it doesn’t already exist).
- Remove the microSD from your computer and re-install into the PGv2.
- Press the R (Right-bumper) and select emulators.
- Select Stella X.X.X
- Select the folder on your storage (right) microSD card that contains your Atari 2600 games. *NOTE – all games must be in individual zipped files.
- That’s it!
Controls
- START – To exit the Stella emulator and use the thumbstick to select ‘Exit Game’ in the lower-left.
- Press SELECT to start a game.
- Use the d-pad to control and the ‘A’ button as the fire button.
Daphne
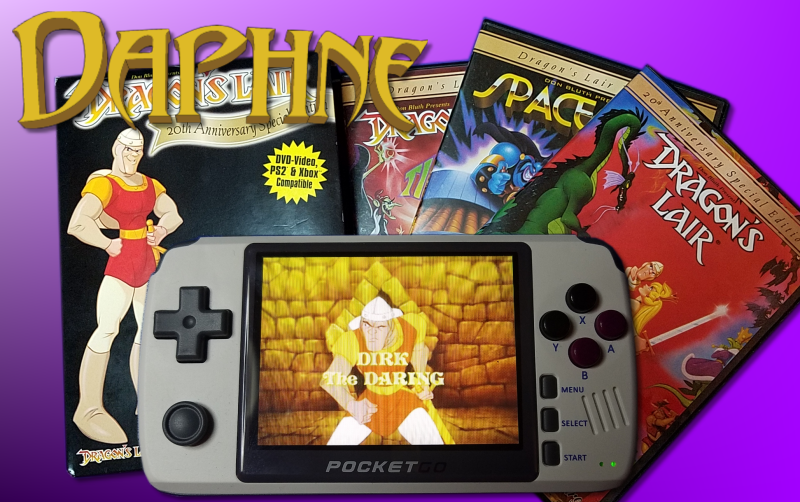
Your Pocket Go 2 can also play those laser disk games from years ago, games like: Dragon’s Lair or Space Ace and many more! The instructions below will attempt to help you get these games up and running quickly and as easily as possible. It’s not extremely easy, but the games appear to run well once you get the files converted properly.
These instructions will assume that you have a legal copy of Dragon’s Lair 20th Anniversary Special Edition (DVD) which includes the games mentioned above. If you don’t have a copy, they are not being produced anymore but may be found below :
- Amazon (used) – This is the exact copy you see in my video.
- ebay – at least, at the time of this writing. This is where I bought my copy.
- There may be others, search for “Dragon’s Lair 20th Anniversary Special Edition (DVD)”
Resources
- The instructions that follow are based on the excellent information by David Knight which may be found here.
- Daphne Emulator website
- Daphne Emulator Wiki
- Digital Leisure – Owner’s of the Dragon’s Lair trilogy intellectual property.
- More about Dragon’s Lair and Space Ace on Wikipedia
Setup Instructions
- Download the Daphne.opk from here (right-click and select ‘Save As’). Copy this file to your external microSD card in the /apps sub folder (if the “apps” sub folder doesn’t already exist, create it – any .opk files copied here will become available once the microSD is inserted into the PGv2).
- Go to daphne-emu.com, select Download and download the .zip (for Windows)
- You’ll need the rom file for the game(s) you want to play. I can’t link to roms here, so you’ll have to search for something like “dragon’s lair rom download for daphne” or similar keywords.
- Create a folder on your computer such as C:daphne using Windows Explorer.
- Unzip the contents of daphne-1.0v-win32.zip to your daphne folder you created above.
- Insert the Game DVD/CD into the drive.
- Browse to your C:Daphne sub-folder and double-click on DaphneLoader.exe (If prompted to update, allow the update to occur).
- Select the game from the Daphne Loader you want to install. In my case, I’ll select Dragon’s Lair. Then, click the Start! button.
- You’ll be prompted to insert one of the following: (Game Name) 20th Anniversary – DVD-Video, (Game Name) – DVD-Video, ROM or Video-PAL. Make sure the disk is in the CD/DVD drive and click the OK button.
- The Daphne Loader will then search the disk to validate your copy of the game. This will take some time, so be patient. At this point, the Daphne Loader may also begin downloading additional files that may be needed, allow it to continue.
- Once completed, the game will try to start. Press a key to allow it to continue. Then, once the game starts playing, close the emulator.
- The resulting files will be located in C:daphnevldp_dl with a sub directory for ace (Space Ace), lair (Dragon’s Lair), etc.
- Download the static build of FFmpeg from this page.
- Create a subdirectory in your c:daphne sub-folder called ffmpeg and unzip the archive in that sub folder.
- Open a command prompt (right-click the Windows button and select Run). Type “CMD” (without quotes) and press ENTER.
- Type or copy/paste (CTL+V will paste into the command window) “set PATH=%PATH%;C:daphneffmpegbin” (without quotes). This will append the path to the bin sub folder which contains the ffmpeg.exe. *NOTE – If you have any trouble later, make sure you have this path correct.
- Type or copy/paste “cd c:daphnevldp_dl[game directory]” where game directory is ace, lair, etc.
- I recommend creating a subfolder in the game folder and making a backup copy of the .m2v file(s) before issuing the commands below. By doing this, you’ll have a copy of the original file for use with other systems (i.e. RetroPie, etc.)
- From the command prompt, issue Command 1 (copy the full text below and press CTL+V to paste into the command window). *NOTE: The video file will then be converted, the file size will be roughly half the original size, once completed.
- From the command prompt, issue Command 2 (copy the full text below and press CTL+V to paste into the command window).
Commands
Dragon’s Lair
ffmpeg -i lair.m2v -b:v 2000k -vcodec mpeg2video -filter:v yadif -s 320×240 lair.mpg
ffmpeg -i lair.mpg -vcodec copy -an lair.m2v
Space Ace
ffmpeg -i ace.m2v -b:v 2000k -vcodec mpeg2video -filter:v yadif -s 320×240 ace.mpg
ffmpeg -i ace.mpg -vcodec copy -an ace.m2v
- Next, copy the gamename.zip (.zip rom file you downloaded earlier) as well as the gamename.txt (frame file), gamename.ogg (audio file) and the gamename.m2v (video file) from the c:daphnevldp_dl[game name] sub directory to a subdirectory on your microSD card. I found it much faster to remove the right microSD card from the PGv2, insert it into the SD adapter then create a /ROMS/Daphne/lair.daphne and /ROMS/Daphne/ace.daphne sub directory to store the files.
- On the PGv2, go to the emulators tab (press L/R).
- Select the Daphne emulator.
- Browse to the subfolder which contains the files you copied above (i.e. /ROMS/Daphne/lair.daphne) and select the one file that appears – lair, for example and press the ‘A’ button.
- You’ll be prompted “Press ‘Y’ to Parse video…”, press the START button. The video file will then be processed, this will only need to be done once and will take a minute or two.
- Once processed, the game should load. It may take about 20-30 seconds before you see something happening.
- See the next section for assistance with the game Controls.
- That’s it!
Controls
| Control | Function |
| D-Pad or Left Stick | Directional movement |
| L | Insert a coin |
| START | Start the game |
| SELECT | Quit the game |
| A | Button 1 |
| B | Button 2 |
| X | Button 3 |
| Y | Tilt/Swap vertical controls |
| R | Pause |
Troubleshooting
- I have not yet gotten Dragon’s Lair 2 to work. If you have, please let me know the trick and I’ll add it here.
- For more games and additional trouble shooting, please see the excellent information by David Knight which may be found here.
Intellivision
This emulator will include sound and allow you to play many of the intellivision games you played back in the day!
The following is how to setup the Intellivision emulator on your PGv2:
- Download the dingux-int.opk from here (Source of information).
- Remove the microSD from the PGv2 and insert into your computer.
- Copy the dingux-int.opk file to your microSD to a folder on the right-microSD root called “apps” (create this folder if it doesn’t already exist).
- Download the following files (search your favorite search engine- I can’t link to roms), these are the files needed by the emulator: ecs.bin, exec.bin, grom.bin and ivoice.bin and copy to your microSD ( Example: emulators).
- Remove the microSD from your computer and re-install into the PGv2.
- Select Intellivision
- This will have created a subfolder in /media/home/.intel
- Exit the emulator by pressing moving down to ‘Exit’ and Press ‘A’ (‘B’ to confirm)
- Now use DinguxCmdr to copy the 4 .bin files from step 4 to the /usr/local/home/.intel/bios folder. That is, set the left folder to “/emulators” and the right to “/usr/local/home/.intel/bios ” and select the files on the left by pressing ‘Y’ and then ‘X’ to copy.
- Press ‘Y’ and select ‘Quit’ and press the ‘A’ button.
- Press the R (Right-bumper) and select emulators.
- Select Intellivision
- Select the folder on your microSD card that contains your Intellivision games.
- That’s it!
Controls
- Reset – Left-top button
- ‘A’ shoot / d-pad for directions
- START– brings up the virtual keyboard
- SELECT + START – returns to the main menu. From here, you can select a new rom, exit, etc.
Amiga Emulator (UAE)
Took a bit of trial and error, but I have the Amiga Emulator running using the Kickstart 1.34/Workbench 1.34 files. The Amiga 1000 was the 2nd computer I ever owned, the first was the TI-99/4A. I think I still have my Amiga 1000 in storage, I have a sudden urge to want to locate it.
Also, I did try the speech synthesis capability and sound works! I can also use the joystick to control the mouse pointer and the Virtual keyboard works.
Setup UAE4All on PocketGo v2
- Download the uae4all.opk from here.
- To run the Amiga on the PGv2, you’re going to need two primary files, these are: kickstart.rom and the workbench.adf file. I found that you can purchase a fully operational and licensed copy of the Amiga kickstart and workbench files from Amiga Forever here (includes a slick Amiga emulator that runs on your PC as well!) Also, if you only need v1.3 of the Kickstart+Workbench files, then you can pick up the the $9.95 Value Edition which is a great deal. It’s your choice how you choose to obtain the files, but I always prefer to support those in the retro computing community.
- I used the amiga-os-130.rom file (located in the folder C:UsersPublicDocumentsAmiga FilesSharedrom ) and the amiga-os-134-workbench.adf (located in the folder C:UsersPublicDocumentsAmiga FilesSharedadf). Alternatively, you can also launch Amiga Forever, then select the menu option Open Folder/Amiga Files then open the shared /rom sub folder and locate the amiga-os-130.rom or shared/adf to locate the amiga-os-134-workbench.adf .
- Remove the (right/external) microSD from the PGv2 and insert into your computer.
- On your computer, browse to the microSD card and create a folder structure of /emulators/amiga.
- Then, copy the uae4all.opk to to a folder on the microSD root called “apps” (create this folder if it doesn’t already exist – i.e. apps).
- Copy the amiga-os-130.rom and amiga-os-134-workbench.adf files (from the Amiga Forever locations, above) to the /emulators/amiga sub folder.
- Rename the amiga-os-130.rom to kick.rom on your microSD sub folder (must be kick.rom for UAE4All to work on the PGv2 ).
- Remove the microSD from your computer and install in the PGv2 (right-storage slot).
- Power on the PGv2 and select the applications tab (should start here on boot).
- Navigate to the emulators tab, scroll down and you’ll now see UAE4ALL. Select it and press ‘A’ to open it. We’re doing this so the directory is created for you.
- You’ll now be informed it couldn’t find the kick.rom (Kickstart), select ‘Exit UAE4ALL’ and press ‘A’.
- Go back to the applications tab and launch DinguxCmdr.
- On the left, browse to the /media/data/local/home/.uae4all sub folder.
- On the right, browse to your /media/sdcard/emulators/amiga sub folder.
- While on the right-side, select the kick.rom and press ‘X’. Select copy and press ‘A’. This will copy the kick.rom to your .uae4all sub folder.
- Press ‘Y’ and select Quit to exit DinguxCmdr
- Proceed with the following section to Boot the Amiga!
Boot the Amiga
This section assumes you followed the above steps to install the UAE4ALL emulator and kick.rom to the appropriate locations. If not, do that first then resume here.
- Go to the emulators tab and select UAE4ALL.
- You will be prompted with ‘Load disk image (X)’, press ‘A’ here.
- Press ‘A’ on the option ‘Load DF0 image (X)’.
- Browse to the location of your workbench.adf and select it by pressing ‘A’ (example /emulators/amiga/amiga-os-134-workbench.adf’).
- For the following, set the options accordingly: Throttle 0, Frameskip auto (audio will sound much better with this set), Screen pos 8, Sound on, Save disks on, Use analog on.
- Select ‘Start Amiga (R)’ (or press the Right bumper button).
- After a few seconds, the Amiga will boot!
- That concludes this section.
Controls
This section assumes you’ve already setup the Amiga Emulator and are able to boot it successfully. If not, please see the above 2 sections.
- Mouse Control – The left bumper (top left button) will enable/disable mouse control. That is, you can use your thumbstick to move the mouse cursor where you want it. You can double-tap (i.e. mouse double-click on a location on-screen by double-tapping the ‘X’ button.
- Virtual Keyboard – The right bumper (to right button) will enable/disable the keyboard control. You’ll be able to type in any Amiga Character by using the left joystick or d-pad to highlight a character and press the ‘A’ button.
- Back to the UAE Menu – To go back to the UAE Menu, press the Select button. From here, you can load a different disk, Save the State, change settings, Reset the Amiga, Return to the Amiga or Exit UAE4ALL.
- Physical Keyboard – No OTG devices have worked on my unit, therefore on the PGv2 you’ll need to use the virtual mouse (thumbstick) and virtual keyboard.