Steam Deck and Emulation Guide
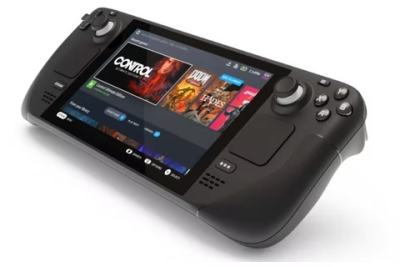
Back in July 2021 the Valve Steam Deck was announced with great fanfare. Shortly after the announcement, YouTube was flooded with speculation about the device, hardware specifications, etc. I delayed putting in a reserve for the Steam Deck by a day or two, which turned out to be a mistake. The demand for this device was clearly very high and nearly one year after it’s announcement, my Steam Deck arrived on June 24th, 2022. Since that time, Valve has also released the Steam Deck OLED, however I’ve not yet upgraded to the OLED model. The original Steam Deck LCD continues to serve me well and priced around $200 cheaper.
This guide has been created to become a repository for everything I learn about the Steam Deck and to share that information with my viewers. As I learn new things about the Steam Deck, try additional accessories and of course the games themselves, I’ll continue to add to this guide. New content is coming and will be added, check back regularly. The Change Log will be updated to make it easier to know what’s been changed/added since your last visit.
I hope you enjoy the content below and find it helpful. If you do, I appreciate your support by subscribing to the Wagner’s TechTalk YouTube channel. Here, you’ll find videos on a number of technology topics – now including, the Steam Deck!
-Jon
How-To link to a specific section on this Guide: go to the Table of Contents (below) and click a section to reference. Copy the URL from the address-bar of your browser and paste in your video description/post/blog. This will direct a viewer to a specific section in any of the guides you find on this site.
Table of Contents
Gaming on the Steam Deck
In full transparency, I’m not a big PC gamer (gasp). Or at least, I wasn’t until recently. I’m a big fan of Star Wars, so many of the games I played on the PC were Star Wars-related games from years ago. But, over the past year (or so) I’ve also been very active in Virtual Pinball and play a lot of Pinball FX3 on my Legends Pinball machine from my Steam Library and even connected my pinball machine to my Steam Deck (see here, if interested). But honestly, that was about it.
So why in the world would someone who doesn’t play many PC-based games spend $500+ on a device that is geared for PC Gaming? First of all, I sit at a PC in my day job. When I get off work, I create guides like this and YouTube videos – on a PC. If I played PC games on a PC, I’d likely never see my family. The Steam Deck allows me to spend more time with my family and away from my main office computer(s).
Almost every night, at a certain time I turn off the computer and watch movies with my wife and kids. While they are staring at their phones (playing games) watching a movie, I can sit in the same room and on the Steam Deck with a little bit of game play here and there.
Having the Steam Deck has definitely opened up a whole new world of portable PC/Linux gaming, both in terms of games available from the Steam library as well as the best performance I’ve ever seen on a handheld for Emulation using EmuDeck and Batocera.
Another advantage, at least to me, is that separation from your work/home computer that the Steam Deck provides. With the Steam Deck, I can load all of those games (some old, most new) that I want to play and keep them on the Deck. If I want to take a break from YouTube or writing, I can step outside on the hammock with the Steam Deck. Load up a game and kick back and see what all I’ve been missing out on.
So yes, I’m now enjoying PC gaming again. I hand off the Steam Deck to my kids and my kids friends and let them have fun with it. The performance of the machine is great for a 1st generation device, based on my experience with it so far. I have no doubt the Steam Deck will be around for many years to come!
Why the Steam Deck?
Everyone is going to have their own reasons for why/why not to pick the Steam Deck. Below are some reasons why I think you may/may not want to consider picking one up. Keep in mind, I paid for this unit at full-price and waited a long time for it to be delivered. We’ll start with the Why’s first.
Why To Consider

- Performance – The Steam Deck is without a doubt the most powerful Gaming PC in a handheld form-factor currently available. But, it’s a big handheld (see below).
- Windows Game Play – The Steam Deck runs Linux, not Windows, when it ships from the factory. You may wonder, how it’s able to play games made for Windows in Linux? There is a compatibility layer called Proton which allows you to install and run Windows games that do not have native Linux versions. While not yet perfect, it works very well for many games and Valve is constantly verifying additional titles from their library on the Steam Deck.
- Desktop Mode – The Steam Deck includes a Desktop Mode which essentially turns it into a Desktop PC. You can install additional applications on the Steam Deck and use it like you would most any Linux PC. The Firefox web browser is pre-installed and allows you to browse websites (such as this one) directly on the Steam Deck. For more on Desktop Mode, see here.
- Retro Gaming – Thanks to the hard work from the EmuDeck development team, it’s also possible to play Retro Games on the Steam Deck through emulation. For more on this topic, please see here.
- Run Windows – The Steam Deck is essentially a PC and yes, you can even install Windows to your Steam Deck! In this section, we’ll cover how to install Windows to a microSD. In this process, you can run Windows 10/11 or swap microSD cards and go back to SteamOS gaming. The best of both worlds, so-to-speak.
- Connectivity Options – You can connect the Steam Deck to all kinds of different controllers (wired or USB), Docks add a keyboard+Mouse or even connect it to a home Arcade machine. For more in this area, please see this section.
- Storage Expansion – Every Steam Deck includes internal storage. Depending on the model you choose, it will have 64GB, 256GB or 512GB installed. The Steam Deck also has a microSD slot at the bottom which will allow you to increase the amount of storage available for your games. You can read more about Storage Expansion here, or exactly how to add a microSD card here.
- Solid Construction – The Steam Deck feels like a premium device with solid controls. There are two joysticks, two touchpads buttons on the front, top and bottom of the unit. All the controls feel great in your hands and are well-positioned for long gaming sessions. It looks and feels like a premium device.
Why Not To Consider

- Cost – This is not a cheap device, it will cost anywhere from $399-$649 depending on the model you are considering. However, if you’re one that buys a new Gaming handheld every 3-6 months, this may be the only device you will need for several years to come.
- It’s Big– This can be a pro or a con, depending on your perspective. However, I would be remiss in not stating the obvious – it’s a big handheld device! It’s not something you’ll be able to carry in your pockets. If that’s what you’re looking for, then some of these may be better suited for you.
Picking the Steam Deck
There are three options when ordering the Steam Deck, arranged from least-most expensive. The primary difference between each model is the amount of storage (and speed of storage). The more expensive option also includes anti-glare etched glass.
Deciding on which option to pick may not be easy. In my case, I chose the middle option with 256GB. It seemed to have the right balance of built-in storage and features. While you can expand your Steam Deck with a microSD card, some Steam games are quite large and can easily/quickly consume 64GB of internal storage.
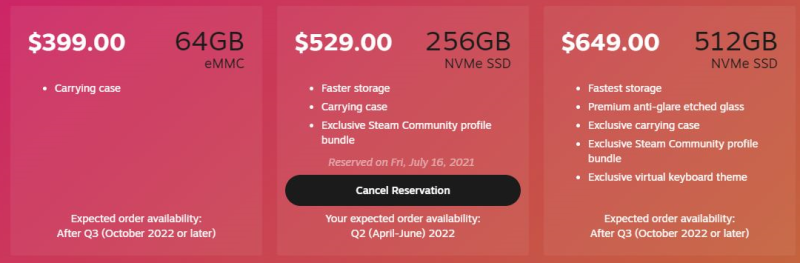
Games can be saved directly to the microSD instead of internal storage. Just keep in mind, if you go with the 64GB version you may later find yourself wanting more internal storage on the Steam Deck itself. It is possible to upgrade the internal storage, but not a simple process and not for the faint of heart.
Storage Expansion
You will most likely want to supplement your internal storage on the Steam Deck with storage on a microSD card. What size microSD card to get really depends on the type and number of games you want to have available on-Deck and available to play.
For best performance you’ll want to consider a U3 A2 card. A2 represents the Application Performance Class and a class of 2 will provide much better performance over A1 cards. A U3 card provides faster write speeds over that of U1 cards, 30MB/s vs 10MB/s.
Many of the most-recent titles can consume as much as 30-100GB (or more). However, if you primarily want to use the Steam Deck for emulation those will typically consume much less storage. Balancing the amount of storage you will want or need can be tricky. If you start with a smaller capacity microSD card such as 64/128GB, you may quickly find that a 512GB or even a 1TB card might have been a better choice. You can certainly change your mind later and swap microSD cards, if needed.
I went with the Lexar 1TB microSD, it has been working well for me (even bought a 2nd one, for Windows 11). I typically buy either Samsung, Gigastone or SanDisk microSD’s for use with my handheld devices. However, due to variances in prices, speed and availability I went with the Lexar card. It’s a decently fast microSD card and I’ve been able to install a fairly large library of games (both from Steam and via EmuDeck). Time will tell if it was a good choice, if I find out otherwise I’ll update this section.
Where to Buy a Steam Deck?
Below are some locations where a Steam Deck may be purchased:
- Steam Deck – Direct from Valve’s website (best price).
- Steam Deck 64GB [Amazon] – Priced a few hundred dollars above direct from Valve, this is not a good option. However, if direct from Steam is not an option, this is another.

Steam Deck Resources
- Steam Deck – Valve’s website.
- Steam Deck Basic Use & Troubleshooting – Basic troubleshooting steps for the Steam Deck.
- Steam Deck Controller Guide Guides – An impressive and detailed guide for Steam Deck Controllers.
- ProtonDB – verified titles that run natively on Linux + Steam Deck.
- Frequently Asked Questions (Reddit Wiki) – Many Q/A’s that may be helpful can be found here.
- Reddit Post Announcing this guide – I made a simple post regarding this guide on Reddit and I was honored and blown away by the support for this guide. I will do my best to provide new, honest and exciting content going forward. Thank you all for your support!
Emulation
Emulation is an exciting aspect of the Steam Deck, one we will explore in the sections below. It is anticipated that there will be a number of ways to emulate your favorite classic arcade and console games in the future. As such, each method of emulation will have it’s own guide to go into further detail as well as provide a platform to expand the content. At this time, we have Batocera and EmuDeck.

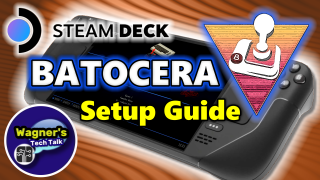
Batocera
See: Steam Deck Batocera Guide
Steam Deck Batocera Guide – Batocera is a popular retro gaming operating system that is available for a number of different devices and platforms. This guide will focus on using Batocera with the Valve Steam Deck and how you can get the most out of it.
EmuDeck
See: EmuDeck Guide
EmuDeck is an excellent tool to quickly and easily install and configure a number of emulators on the Steam Deck. This guide will cover how to install EmuDeck, run the Steam ROM Manager, assign artwork and much more!
XReal Air Augmented Reality Glasses
See: Xreal Air AR Glasses Guide

The XReal (formerly known as nreal) Air Augmented Reality (AR) glasses are an excellent companion for the Steam Deck. The glasses project a 130″ virtual display when used with the Steam Deck allowing you to essentially bring a large-screen TV with you, wherever you go!
In this guide (and video), we’ll discuss how to use them with the Steam Deck as well as demonstrate some actual game-play examples. This is something few videos do, mainly because it’s not easy.
Run Windows from microSD
See: Run Windows from microSD Guide
You can install Windows 10/11 to a microSD with full driver support easily using this guide. It will step you through creating a Windows ISO file, Creating the Windows MicroSD image, copying/installing the drivers, tips and more.

Virtual Pinball
See: Steam Deck with Legends Pinball Guide
Ever since receiving my Steam Deck, I’ve been interested in finding out if it can be used for virtual pinball via OTG (USB or On-The-Go) to my AtGames Legends Pinball cabinet (ALP) and have two monitors connected. A guide and video has been developed to show you how you can use your Steam Deck for use with Pinball FX3, Future Pinball and Visual Pinball X (VPX) running Windows from the microSD.
Steam Deck Reference
The following will assist you with some common Steam Deck shortcut functions that will be helpful to you as you learn more about the device:
| Command | Description |
| Steam + B (long press) | Force Game Shutdown |
| Steam + X | Show on-screen keyboard |
| Steam + L1 | Toggle the Magnifier |
| Steam + R1 | Take a Screenshot |
| Steam + L2 (soft pull) | Right mouse click |
| Steam + R2 (soft pull) Steam + Right Touchpad Button |
Left mouse click |
| Steam + Right Stick Button | Joystick Mouse |
| Steam + Left Stick Up | Screen brightness increase |
| Steam + Left Stick Down | Screen brightness decrease |
| Steam + Right D-Pad button | Enter key |
| Steam + Down D-Pad button | Tab Key |
| Steam + Left D-Pad button | Escape Key |
Specifications
The specifications for the Steam Deck are below:
- CPU: Zen 2 4c/8t, 2.4-3.5GHz (up to 448 GFlops FP32)
- GPU: 8 RDNA 2 CUs, 1.0-1.6GHz (up to 1.6 TFlops FP32)
- APU power: 4-15W
- RAM: 16 GB LPDDR5 on-board RAM (5500 MT/s quad 32-bit channels)
- STORAGE
- 64 GB eMMC (PCIe Gen 2 x1)
- 256 GB NVMe SSD (PCIe Gen 3 x4 or PCIe Gen 3 x2*)
- 512 GB high-speed NVMe SSD (PCIe Gen 3 x4 or PCIe Gen 3 x2*)
- All models use socketed 2230 m.2 modules (not intended for end-user replacement)
- All models include high-speed microSD card slot
- DISPLAY
- Resolution: 1280 x 800px (16:10 aspect ratio)
- Type: Optically bonded IPS LCD for enhanced readability
- Size: 7″ diagonal
- Brightness: 400 nits typical
- Refresh rate: 60Hz
- Touch enabled: Yes
- Sensors: Ambient light sensor
- CONNECTIVITY
- Bluetooth: Bluetooth 5.0 (support for controllers, accessories and audio)
- Wi-Fi: Dual-band Wi-Fi radio, 2.4GHz and 5GHz, 2 x 2 MIMO, IEEE 802.11a/b/g/n/ac
- AUDIO
- Channels: Stereo with embedded DSP
- Microphones: Dual microphone array
- Headphone / mic jack: 3.5mm stereo headphone / headset jack
- Digital: Multichannel audio via DisplayPort over USB-C, standard USB-C, or Bluetooth 5.0
- POWER
- Input: 45W USB Type-C PD3.0 power supply
- Battery: 40Whr battery. 2 – 8 hours of gameplay
- EXPANSION
- microSD: UHS-I supports SD, SDXC and SDHC
- External connectivity for controllers & displays: USB-C with DisplayPort 1.4 Alt-mode support; up to 8K @60Hz or 4K @120Hz, USB 3.2 Gen 2
- SOFTWARE
- Operating System: SteamOS 3.0 (Arch-based)
- Desktop: KDE Plasma
Accessories
If you arrived here from the Accessories video, there is much more to explore in this guide such as: EmuDeck (for Retro Game emulation), installing Windows to a microSD card, using the Steam Deck for Virtual Pinball and much more.
Below are accessories I purchased for the Steam Deck that you may find helpful (bold items were recently added to the list). Below are the accessories mentioned in the above video, the numbers match their appearance to make them easier to locate:
- TouchProtect Steam Deck – This is cool little accessory to further customize the look and feel of your Steam Deck trackpads. There are a number of different styles and textures available. I recently added these and while a little expensive for what they are, I like them.
- Lexar 1TB microSD – I typically buy Samsung or SanDisk branded microSD cards. However, the price differences and speed of each lead me to the Lexar 1TB microSD instead. The reviews for it were good (5 *’s) and the price was reasonable ($135.99). MicroSD cards beyond 1TB are very new, difficult to find and/or will likely be expensive. Micron has announced a 1.5TB microSD card but unknown when they will be available or how much they will cost. For now, a 1TB microSD card makes the most sense, to me, for storage on Steam Deck. Keep in mind, you can choose a much smaller capacity microSD, if you prefer.
- Steam Deck TPU Protective Case – Fits the Steam Deck very well and provides protection for the bottom of the Steam Deck (no display protection).
- TS TRANSETT Tempered Glass Screen Protector – Let’s face it, the display is one of the most important and expensive components on the Steam Deck to replace. Why not protect it from scratches and damage. This kit includes x2 screen protectors and something you may want to consider.
- daydayup Steam Deck Carrying Case [Recommended over the Steam Deck case] – PLEASE NOTE: I noticed Daydayup has updated this case design. As a result, not all accessories shown in the video above may still fit in the newly designed version. Original comments for the design shown in this video were: It has enough room that I can add the power supply, dock, extra microSD cards, HDMI cable, folding keyboard, etc. inside this case. Perfect if you want to travel with your Steam Deck and keep all your stuff in a single case that offers good protection. If you have a TPU protective case over the Steam Deck, it is a tight fit in this case but it will fit. [ If I find/test a replacement I will update this section ]
- Steam Deck Charger, 45W Fast Charge – I wanted a smaller power adapter for the Steam Deck that I can keep in the carrying case. This one seems to work perfectly and fits well.
- Stand Base Compatible with Valve Steam Deck – This is a decent and relatively inexpensive stand for the Steam Deck. It folds, so it will fit in the above carrying case.
- USB-C Dual Monitor Docking Station – This docking station is packed with many useful options, including x2 HDMI Output ports, x1 USB 3.0 port, x2 USB 2.0 ports, SD/TF reader, type C power port (for charging while docked) and x1 DP Output. Video demonstration here.
- 10 Slots Micro SD Card Case Holder – this near credit card sized holder can easily store 10 microSD cards. I picked this up as my microSD card library for the Steam Deck is growing. Such as a base Windows 10 Pro install, Virtual Pinball install and other things I’m using. With this case, there is one side where you can use a pencil to label the card (without writing on the card directly). I liked it and have been using it since.
- 2-Pack Ultra Thin HDMI Cable 3 ft – I wanted a small HDMI cable I can easily fit in the carrying case should I want to connect the Deck up to a TV/Monitor while out and about. It’s thin, small and only 3 feet long.
- Foldable Keyboard, iClever BK08 Bluetooth Keyboard – This is a handy keyboard and trackpad to have for use with Desktop Mode and Windows 10 on the Steam Deck. Instead of breaking out my wired USB keyboard and mouse I can easily put this in my pocket. It also allows pairing to 3 different devices so you can easily use it with your phone, tablet, etc. also.
- TOZO T10 Bluetooth 5.3 Wireless Earbuds with Wireless Charging Case – Probably not the best ear buds available, but for a portable set of earbuds for the Steam Deck, I think they’re worth the ~$23 price tag. I tested them on a voice call from the gym and the recipient couldn’t hear me as clearly. May be good for listening but maybe not as good for voice chat during game-play.
- 8BitDo Lite SE Bluetooth Gamepad – I picked up this controller simply so I have something small that I can carry around either in my pocket or the case (sans keyboard in the case). It worked out pretty good for me, the price is a bit high but it works in a pinch if you want a small controller to easily carry with you.
- AtGames Legends Ultimate – The Legends Ultimate is a full-size Arcade cabinet which provides an OTG or Bluetooth connection to allow playing your Steam Deck through the arcade machine. I have a full guide on the ALU here. In this video, I demonstrate connecting the Steam Deck to the Legends Ultimate, it works best when connected over Bluetooth.
- 3D Printed Stand (by WTT) – While not specifically designed for the Steam Deck, it’s one that I designed a few years ago and has worked with every handheld I’ve reviewed/tried, including the Steam Deck.
- 8Bitdo Sn30 Pro+ Bluetooth Controller – This controller worked very well with the Steam Deck. If you’re looking for a BT wireless controller for your Steam Deck, this is a good option.
- XBox 360 Wired (USB) controller (clone) – This clone wired Xbox 360 controller worked well on the Steam Deck. Since this is a USB-A connection, you would also need the USB-C Docking Station (or similar) device to use this controller. It is an inexpensive option if you prefer a wired connection vs. wireless.

Quick How-To’s
The sections below will provide some assistance with some useful how-to information for the Steam Deck.
Apply Updates
When you first receive your Steam Deck you’ll be prompted to login with your Steam Account. If you don’t already have one, you can click the Create Account button. Once the account is created, proceed with the following:
- Login with your Steam Login and Password, then click the SIGN IN button.
- You will be prompted to enter your Steam Guard Code, check the e-mail account associated with your Steam Account. Enter the code and tap the SIGN IN button.
- Press the STEAM button on the left side of the unit.

- Move down and select the System option, it may show a yellow exclamation point in the icon, indicating there is an update to apply.
- Under UPDATES, if you see an exclamation point (!) beside Software Updates and an Apply button, tap the Apply button.
- Once the update has completed, tap the RESTART button.
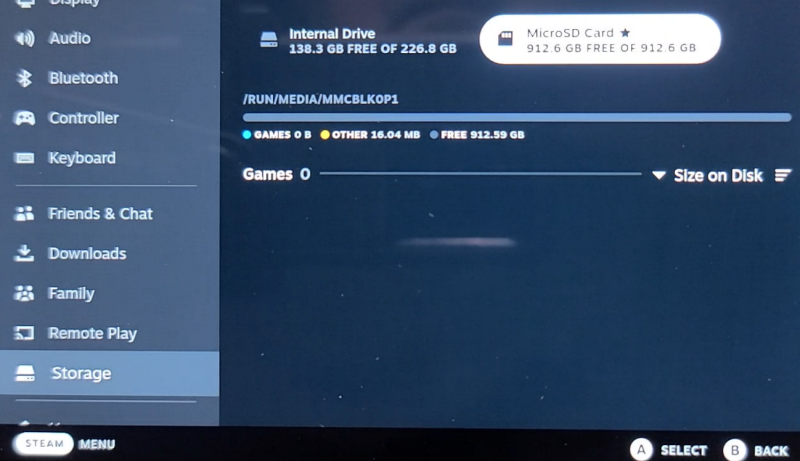
Setup microSD Card (Storage)
Setting up a microSD card for storing your Steam games is easy, but here are some steps to get you started:
- Insert your new microSD card in the slot at the bottom of the Steam Deck. For more information regarding microSD card storage, see here.
- Press the STEAM button on the left side of the unit.
- Move down and select the System option.
- Under SYSTEM SETTINGS you may see an option for Format SD Card and a button to the right that states Format. Click Format to prepare the microSD card for game installation.
- If you’re sure you are ok with the contents of the microSD being erased, select the Confirm option to format the microSD card.
- You will first see the TESTING status as the Steam Deck ensures that the card you’ve inserted meets the minimum requirements for installing games to the Steam Deck. You’ll then see FORMATTING, this process may take a few minutes.
- Once the format has completed, you’ll see it listed under the Storage option with the amount of FREE storage available for your games.
Enter Desktop Mode
This section will discuss how to enter Desktop Mode. But what is Desktop Mode? Basically, it provides a Linux desktop environment on the Steam Deck. Further, you can install additional applications, browser the internet (just like any other modern OS), work on office documents or pretty much anything you would typically do on a dedicated PC.
- While not required, you may want to connect a keyboard and mouse to your Steam Deck and perhaps HDMI Output to your TV or Monitor.
- Using the Steam Deck, press the Steam button.
- Navigate down to Power.
- Select Switch to Desktop.
- After a brief delay, the Steam Deck will enter Desktop Mode where you can perform many of the same functions as you would on a typical PC. The Firefox web browser is pre-installed and useful if you want to navigate the internet.
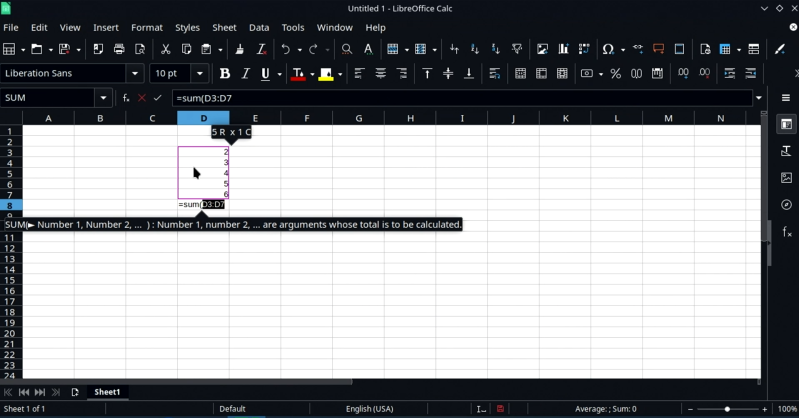
Discover Software Center
The Steam Deck is a Desktop Computer. As such, you aren’t limited to just gaming on the device. If you want to install an Office suite for working on documents, spreadsheets, etc. this can easily be done via the Discover Software Center. Below I’ll provide one simple example by installing the popular Libre Office package.

- Enter Desktop Mode.
- Launch the Discover Software Center icon on the lower-left of the taskbar (looks like a shopping bag).
- On the left panel, click Applications.
- Then select Office (you can also type a keyword into the search box to locate a specific application).
- Click the Install button to the right of the application you want to install, LibreOffice in this example.
- Once the installation completes, you can launch LibreOffice by clicking the Steam button (lower-left icon) †’ Office and then the office application you’re interested in (i.e. LibreOffice Calc is a spreadsheet application).
- Explore the many applications that are available to you on the Discover Software Center!
Energy Saving
While running the rom manager to scrape artwork in EmuDeck, you may not want your Steam Deck to switch off while on AC Power for awhile. To change this setting, see the following:

- If you haven’t already, enter Desktop Mode.
- Click the System Settings icon (lower-left on the taskbar).
- Under Hardware, select Power Management.
- Under the On AC Power tab, make sure that Screen Energy Saving is checked.
- Change the Switch off after to a much higher setting, perhaps 30-160 min.
- Click the Apply button.
- That’s it!
Show Frame Rate
When testing out the performance of a game, it’s often useful to be able to see certain performance metrics, such as the frame rate. To do so is easy, here’s how:
- Press the “…” button on the lower-right to open the Quick Access Menu (QAM).
- Select the icon that looks like a battery.
- At the top, set the Performance Overlay Level to 2.
- Scroll down to the very bottom until you see Show Perf Overlay in Steam and enable it.
- You will now see the performance metrics, including the FPS/Frames Per Second in the upper-left.
- If you want more/less detail, adjust the Level slider accordingly.

Steam Deck Tips
Below are some tips I’ve learned that I think you’ll find helpful and useful. If you have others that should be added, please comment on any video on this guide. I’d love to hear them!
Steam Button Shortcuts
Near the top of this guide, you may have noticed the Steam Deck Reference. What might not be apparent is that you can press+hold the STEAM button for about 3 seconds. Keep holding and you’ll see a similar reference appear on the screen.
Change Keyboard Theme
The default keyboard theme isn’t all that exciting. You can change it by pressing the STEAM button †’ Settings †’ Keyboard. Select the drop-down under the Current Keyboard Theme to change to a different theme. My favorite is Steam Green, but try them all and see which one you prefer. You can also press the keyboard icon on the far-right to see what it looks like (or press STEAM + X).
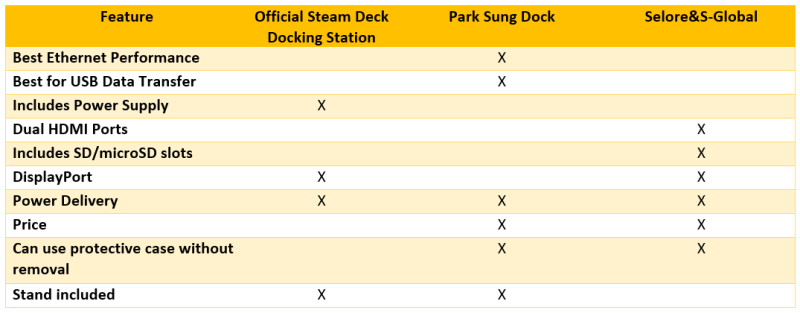
Official Steam Deck Docking Station
Valve has released their Official Steam Deck Docking Station. You can learn more about it here. I purchased one to review and test. During testing, I found some things that were a bit interesting both in terms of general-usage and how it compares to other docking solutions. But first, let’s take a look at the features of the Official Steam Deck Docking Station according to Valve’s website:
| Feature | Official Steam Deck Docking Station |
| Power Delivery (PD) | Yes |
| Price | $89 |
| HDMI 2.0 Ports | x1 (4k@60Hz or 1440p@120Hz) |
| DisplayPort (1.4) | x1 |
| Gigabit Ethernet | Yes |
| USB-A 3.1 Ports | x3 (10Gb/s) |
Valve was actually late to the game providing their official dock. My expectations for the dock were high. The reality, based on my testing, is that it is an ok dock –not great. There are other options that will provide better USB and Ethernet performance. If you plan to use a dock for serious on-line PC gaming (which I do not, typically), network performance is very important for those low ping rates. If you’re interested in a more portable option that supports up to x3 external monitors, then there is a dock below that covers that use-case as well.
There are a number of Docking Station options available, the few mentioned below are just a handful that I’ve been able to test. I’ve featured the Selore&S-Global dock in a few videos on the channel (See the Dock Options section for more). I’ve also received a dock from Park Sung for review, which I also put to the test. I compared it directly against the Official Steam Deck Dock and was surprised by the results. It’s half the price and performed better.
On paper, the Official Steam Deck Dock should have had an edge while transferring a large 1.2GB file from a USB 3.1 stick across a Gigabit Ethernet connection to my NAS. The reality was, the Park Sung dock outperformed the Official Steam Deck Dock in two separate data transfer tests using both SteamOS and Windows 11. Fortunately, Valve has the ability to update the firmware, so this may see some improvements in the future.
| Feature | Park Sung Dock |
| Power Delivery (PD) | Yes |
| Price | $45.99 |
| HDMI 2.0 Ports | x1 (4k@60Hz) |
| Gigabit Ethernet | Yes |
| USB-A 3.0 Ports | x3 (5Gb/s) |
How does it Compare?
In the table below, you’ll find a summarized comparison among three of the docks that I’ve tested. The Selore&S-Global dock does not include an Ethernet port and no network performance testing was possible. However, a direct comparison between the Official Steam Deck Docking station and the Park Sung Dock were performed. The Park Sung Dock outperformed the Official Steam Deck Dock (as of 11/3/2022).
Docks Tested
- Official Steam Deck Docking Station – available directly from Valve’s website.
- Park Sung Dock – available from Amazon.
- Selore&S-Global Dock – available from Amazon. For detailed information, see here.
In the following test, I copied a 1.2GB file from a USB 3.1 stick from the dock to my NAS. The following table is a summary of those results:
| Dock | SteamOS / USB+Ethernet | Windows 11 / USB+Ethernet | Transfer time (SteamOS/Windows 11) |
| Official Steam Deck Docking Station | ~37MB/s | ~98MB/s | 32s / 13s |
| Park Sung Dock | ~58MB/s | ~111MB | 21s / 10s |
Based on the test results, the following was my experience with each dock. In the table below, I identified those that outperformed or had similar/same results. The Official Steam Deck Docking Station is priced around $89, the other two compared are roughly half the price at $40-$45 (may also have coupons available).
Dock Options
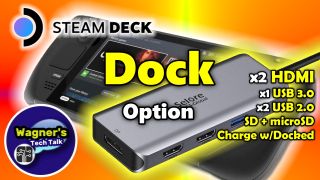
This Steam Deck Docking Station Option has dual HDMI ports, x1 USB 3.0 port, x2 USB 2.0 ports an SD Slot and a microSD slot. If you own a Steam Deck, one of the first things you may want to do is connect it up to a TV or Monitor and this video will show you just how to do it!
We’ll connect a number of devices including: wired Xbox 360 controller, 8Bitdo SN30 Pro+ BT controller, Keyboard and Mouse (USB), Legends Ultimate Arcade, x2 external monitors and a microSD card.
There are other docking station options available and most will work similarly (or exactly) as shown in the video above. However, keep in mind, not all docking stations will include x2 HDMI ports or the ability to add external storage (SD/microSD cards).
Below you’ll find additional information regarding connecting the Steam Deck to other input devices that I’ve tried.
HDMI to TV/Monitor
Being able to capture video from the Steam Deck is rather important for someone who makes YouTube videos, such as myself. However, even if you have no interest in capturing the video, the ability to use the large screen TV in your living room or game room may be just as important to you.
There are many different devices available to take the audio+video from the Steam Deck and send them to your TV. However, I currently only own one. This may change in the future, when it does I’ll update this guide with more options. For now, this is how I connect the Steam Deck to my TV/Monitor/Video Capture device:
- Connect power from the Steam Deck to the USB-C Dual Monitor Docking Station (or equivalent).
- Connect an HDMI Cable (here is one of several I use) from the TV to the Dock.
- Connect the USB-C cable from the dock to the top port of the TV/Monitor.
- After a few seconds, the audio+video signal from the Steam Deck should appear on your TV. If it doesn’t make sure you have the correct HDMI Input selected on the TV/Monitor.
- That’s it!
XBox 360 Controller (USB)
Connecting an XBox 360 controller to the Steam Deck via USB is very easy, assuming you have a docking station or adapter to convert a USB-A to USB-C connection. The basic steps are as follows:
Video: See how
- Connect power from the Steam Deck to the USB-C Dual Monitor Docking Station (or equivalent).
- Plug in the USB-A end of the XBox 360 controller to an available USB-A female port on the dock.
- Plug in the USB-C cable from the dock into the Steam Deck.
- The Steam Deck will auto-detect the controller. From here, you’ll be able to press the XBox button to act as the STEAM button on the Steam Deck. All other buttons are properly mapped for you and available.
8BitDo SN 30 pro+ (BT)
Many Bluetooth controllers should work for you and the steps below will be pretty much the same for any you may already own. I used the 8Bitdo Sn30 Pro+ Bluetooth Controller, the “SN” in the name means it resembles the Super Nintendo controller. Keep in mind though, that model appears to have a price $30 more than other styles. Be sure to take a close look at the pricing options before considering it. That said, here’s how to connect it:
Video: See how
- Press START + B at the same time. The LED at the bottom front will then come on, blinking slowly. *NOTE: If not using the 8Bitdo Pro+ Controller, check the documentation for your controller as it may differ.
- Then press+hold the wireless button at the top-back of the controller for about 3 seconds until the LEDs move left-right continuously. *NOTE: If not using the 8Bitdo Pro+ Controller, check the documentation for your controller as it may differ.
- Using the controls on the Steam Deck, press the STEAM button.
- Navigate to the Settings option.
- Then down to Bluetooth.
- Under the AVAILABLE TO PAIR section, locate your controller, select it and press the A button to pair the controller to the Steam Deck.
- That’s it, load up a game and have fun!
Keyboard and Mouse (USB)
Connecting a keyboard and mouse is a great way to use your Steam Deck as a PC. The Firefox web browser is built-in to the machine (while in Desktop Mode) and you can visit your favorite websites, play YouTube videos, etc. Below we’ll touch on how to attach your keyboard and mouse over USB.
Video: See how
- Enter Desktop Mode on the Steam Deck.
- Connect power from the Steam Deck to the USB-C Dual Monitor Docking Station (or equivalent).
- Plug in the USB-C cable from the dock into the Steam Deck.
- Plug the USB cable(s) for the keyboard and mouse into the USB-A port(s) on the dock.
- That’s it!
Connect to ALU (USB)

You can also connect the Steam Deck to the AtGames Legends Ultimate via USB/OTG (On-The-Go) as well as Bluetooth. I personally recommend using Bluetooth instead of USB as some important buttons such as the Menu and STEAM button don’t immediately map properly via USB. That said, here’s how to set it up:
Video: See how
- If you have the Legends BitPixel connected, disconnect it (power off or if you added a USB switch, flip it to the off position).
- Power-cycle the Legends Ultimate (turn it off/on).
- Connect power from the Steam Deck to the USB-C Dual Monitor Docking Station (or equivalent).
- Plug in the USB-C cable from the dock into the Steam Deck.
- Connect one end of a USB-A to USB-A cable from the ALU 2.0 port (white USB port) on the top panel, the other end to an available port on the dock. The cable I used is here.
- Connect one end of an HDMI Male-to-Male cable from the ALU HDMI input port on the top panel, the other end to HDMI 1 on the dock.
- On the Legends Ultimate, navigate to the Settings tab and select the OTG Mode tile. You should see a message at the bottom of the dialog indicating “USB connected, LEGENDS ULTIMATE can not be used.” (or similar).
- Press the Channel button on the top panel of the ALU to switch to the Steam Deck.
- Navigate to a game you want to play using the Joystick and have fun! *NOTE: As mentioned previously, the Menu and STEAM buttons do not map while in OTG mode. Therefore, you’ll need to use those buttons on the Steam Deck when needed.
Connect to ALU (BT)
The section below will describe how to connect the AtGames Legends Ultimate (ALU) to the Steam Deck via Bluetooth. This method is recommended over USB as both the Steam Menu button and STEAM buttons are accessible and mapped for you over Bluetooth. Here’s how to connect it:
Video: See how
- Press and hold the P2 (Player 2) button for about 8 seconds until the blue LEDs in the upper-right begin to blink rapidly.
- Connect power from the Steam Deck to the USB-C Dual Monitor Docking Station (or equivalent).
- Connect one end of an HDMI Male-to-Male cable from the ALU HDMI input port on the top panel, the other end to HDMI 1 on the dock.
- Press the Channel button on the top panel of the ALU to switch to the Steam Deck.
- On the Steam Deck, press the STEAM button and navigate to Settings †’ Bluetooth option.
- Under the AVAILABLE TO PAIR section, locate Control deck-P1 (for Player 1), select it and press the A button to pair the controller to the Steam Deck. You can repeat to connect Control deck-P2 (for Player 2).
- Once paired, you’ll notice the blue blinking LEDs have stopped blinking and have become a solid blue color.
- Load up a game and have fun! *NOTE: You can press the P1 button to access the Steam Menu button and the AtGames button will act as the STEAM button.
Troubleshooting
Below are some general troubleshooting options that you may find helpful:
- Steam Deck Recovery – Valve has some excellent instructions on how to perform a System Recovery should it be needed. In the event that you are unable to boot, installed another OS or would like to get back to the standard Deck Steam OS or other serious issues, please see the instructions here.
Change Log
- 2024-08-22 – Minor edits.
- 2023-11-12 – Minor edits, including some references to nreal which is now xreal.
- 2023-02-10 – Added Steam Deck Batocera Guide.
- 2022-12-22 – Minor updates.
- 2022-11-13 – Added the Xreal Air Guide.
- 2022-11-04 – Added the Official Steam Deck Docking Station section and video.
- 2022-10-31 – Minor updates; removed the long lead-time point under Why not as Steam Deck production is now at normal levels.
- 2022-09-18 – Updated the Accessories section with new information regarding the Daydayup case. Additional minor updates.
- 2022-09-09 – Added start to a new Troubleshooting section; Minor restructuring of guide.
- 2022-08-28 – Added new Steam Deck Accessories video and additional items under the accessories section. Additional edits.
- 2022-08-09 – Moved the Run Windows from microSD to it’s own guide here. Multiple organization and general improvements.
- 2022-08-08 – Added the new Steam Deck with Legends Pinball Guide.
- 2022-08-05 – Updated the Storage Expansion section with additional clarification regarding U3 A2 cards.
- 2022-08-02 – Added a new section Swap between SteamOS and Windows.
- 2022-07-31 – Minor updates.
- 2022-07-28 – Fixed a few broken links.
- 2022-07-26 – Added Discover Software Center section.
- 2022-07-24 – Added how to show the Frame Rate. Added new Steam Deck case with room for most all your accessories
- 2022-07-23 – Minor updates; new Emulation section which also links to the new EmuDeck Guide.
- 2022-07-19 – Guide was made public. Released the Windows Install on the Steam Deck video.
- 2022-06-26 – 2022-07-18 – Continuation…
- 2022-06-24 €“ Start to this guide.