Pinball FX/M Cabinet Mode Guide: Legends Pinball HD

This guide will assist with the installation and configuration of the latest version of Zen Studio’s Pinball FX for use on a physical pinball machine in cabinet mode on a Windows PC. We will focus on it’s usage with the the AtGames Legends Pinball (ALP HD) or Legends Pinball Micro (ALPu) but should be equally helpful for any PC-based cabinet mode use of PinballFX. This guide is intended for the ALP HD model setup, the ALP 4K will have it’s own separate documentation.
There was a lot of fine-tuning involved in creating this guide and experimentation to provide the best performance possible. It’s now at a state where I think Pinball FX should perform quite well for many. I’m not using an extremely high-end machine for testing, here are some of the key specs for reference:
| CPU | Core i5 10400F 2.9 GHz |
| GPU | NVIDIA GeForce GTX 1650 4GB GDDR5 |
| RAM | 16 GB DDR4 |
| SSD | 512GB (C:) /1TB (D:) |
| OS | Windows 11 |
If you want to see what Pinball FX looks like on the Legends Pinball, you can click here to view a YouTube short that shows 6 Pinball FX tables playing on the Legends Pinball machine (video was made before I had good backglass images). Images that you’ll find down below, so yours will look a bit more spiffy.
I hope you enjoy the content below and find it helpful. If you do, I appreciate your support by subscribing to the Wagner€™s TechTalk YouTube channel. Here, you€™ll find videos on a number of technology topics – now including, Pinball FX in Cabinet Mode!
How-To link to a specific section on this page: go to the Table of Contents (below) and click a section to reference. Copy the URL from the address-bar of your browser and paste in your video description/post/blog. This will direct a viewer to a specific section in any of the guides you find here.
If you are a content creator and use this information to assist in your video, please mention this guide.
Table of Contents
Resources
- Zen Studios Pinball FX Page – information regarding additional platforms, available tables and more.
- AtGames Legends Pinball – information and details regarding the AtGames Legends Pinball cabinet.
- AtGames Legends Pinball Micro – information and details regarding the AtGames Legends Pinball Micro cabinet.
- Pinball FX Cabinet Support FAQ – Zen Studios Cabinet FAQs.
- Steam Client Download – Where to download the Steam client.
- Legends Ultimate Subreddit – Great place to ask questions and get feedback from the community using Pinball FX on the AtGames Legends Pinball.
Hardware Recommendations
Below is a list of all the hardware used for this project, discussed in this guide and where each may be found.
- Legends Pinball [ Amazon | AtGames ] – where to pick up the Legends Pinball machine.
- Legends Pinball Micro [ Amazon | AtGames ] – Where to purchase the Legends Pinball Micro (smaller version of the Legends Pinball, but with the same capabilities).
- Arcade Control Panel for Legends Pinball [ Amazon | AtGames ] – Optional Arcade Control Panel for the Legends Pinball.
- PC / Asus ROG Ally – You’ll need a PC with a decent GPU/Graphics Card and/or an ROG Ally (see here for ROG Ally-specific configuration). If using a PC, you will need two HDMI output ports, or use a DV adapter for the backglass connection. If you need a dual HDMI Adapter, this is one I use for the Legends Pinball.
- VIBS Board for Legends Pinball [ AtGames ] – VIBS board (Video Input Backglass Switchboard) is needed to allow displaying the artwork and virtual DMD on the backglass of the Legends Pinball.
- VIBS for Legends Pinball Micro [ Amazon | AtGames ] – this board is needed for backglass support on the Legends Pinball Micro.
- OTG Cable USB-A to USB-A 6.6ft [ Amazon ] – Cable needed to connect the PC / ROG Ally to the Legends Pinball.
- HDMI Cable x2 needed [ Amazon ] – I used this cable for the main playfield, mainly because it has a swivel connector which fits well on the front panel of the Legends Pinball. You can find cheaper HDMI cables, if you prefer.
- USB Keyboard/Mouse – You likely already have a USB keyboard and mouse available, it will be helpful for the initial setup.
Q&A

This section will help with some of the more common questions you may have about using Pinball FX in cabinet mode.
- What is Pinball FX? Pinball FX is the latest version of Zen Studios popular pinball platform. You will need a fairly powerful gaming PC for cabinet mode (see Prerequisites).
- Can I import my previous tables from Pinball FX3 to Pinball FX? Unfortunately, no. Please see the Pinball FX FAQ for more on this.
- Does FX support the ability to use the BitPixel/HV? BitPixel doesn’t appear to be supported, currently for FX from what I see from the pixelcade.org website.
- My OTG Cable isn’t working, what do you recommend? All the cables, adapters and the UPS that I’m using may be found here.
- Can the ASUS ROG Ally play Pinball FX? Yes and it plays very well. There are some settings you’ll want for an optimal setup. You can find more information on the Ally-specific settings here.
- Is there a list of currently available Pinball FX tables? Yes, you’ll have access to 3 free tables (Wild West Rampage, Fish Tales and Sorcerer’s Lair) which will be helpful for testing out Pinball FX on your cabinet. Additional tables are listed on the Pinball FX FAQ.
- How is the latency/lag with Pinball FX on the Legends Pinball? Using JoyToKey, it was unacceptable (more here). After further testing, I found Xpadder performed much better with Pinball FX. Keep in mind, latency in-general, will have a lot to do with the PC that you have connected to the Legends Pinball machine. There was a massive difference between JoyToKey and Xpadder, Xpadder response times were much better and the game play is fun!
- Are there issues with Pinball FX that I need to be aware of? At present, yes. Please see the Troubleshooting section with those issues I encountered and any solutions.
- Does FX support surround sound audio? I don’t think so, or at least if it does I’ve not found an option for it.
- Will the Xpadder profile (below) also work with Pinball FX3, VPX and FP? In short, yes. I tested it with FX3. You may need to go into Options-> Controls and re-map the left+right nudge buttons in Pinball FX3 (only change needed). However, the Xpadder profile will work fine with it. VPX also worked. I upgraded my test machine from Win10 to Win11, as a result Future Pinball (FP) wouldn’t launch. I will look at that later. If running Win10, should be fine.
- Why not bypass Xpadder entirely and just use Steam’s Controller mapping? You certainly can, however that won’t help for Visual Pinball X (VPX) or Future Pinball (FP). On this site you’ll find a number of guides for FX, FX3, PinUp Popper (VPX & FP). It is far easier for the end-user to have a single method of mapping the ALP buttons rather than individually configuring Steam, VPX and FP. JoyToKey has worked well in the past, but with Pinball FX, it was not a good fit. In the Button Mapping section below, Xpadder has performed much better and kept the process simple. I prefer simple and hope I’ve clearly explained my reasoning for using it.
Prerequisites
The following are prerequisites that you may find helpful prior to following what is written in this guide:
- PC Setup
- You will need a decently powerful machine and graphics card to run Pinball FX, below are some of the specs taken from here:
- OS (Windows 10 64 bit, I went with Windows 11)
- CPU: Intel Core i5-2500K@3.3GHz or AMD FX 6300@3.5GHz / Intel Core i7-4770K@3.5GHz or Ryzen 5 1500X@3.5GHz
- Memory(RAM): 16GB
- Graphics: Nvidia GTX 960 or AMD R9 380
- You will need a decently powerful machine and graphics card to run Pinball FX, below are some of the specs taken from here:
- Steam Deck – Steam Deck is not currently support under Pinball FX running natively under SteamOS. However, I do plan on providing an alternative method of using the Steam Deck with Pinball FX (if it works out). For now, that is not part of this guide and support for Pinball FX may happen in the future.
- You will need a VIBS board installed in your Legends Pinball or Legends Pinball Micro to utilize the backglass display for Pinball FX.
- Your PC will need two HDMI ports (one for the main playfield, the other for the backglass). If your PC only has one HDMI output, I used this USB 3.0 to Dual HDMI adapter. The reason is that it adds two additional HDMI ports which may be useful if I ever decide to add a dedicated DMD.
Pinball FX Coverage
Below are content creators that I follow that cover Pinball FX and all kinds of great gaming-related content:
- Pinball FX On Steam and Huge Content Update First Impressions! Should You Upgrade From Pinball FX3? [ MichaelBtheGameGenie ] – Excellent look at the new tables released for Pinball FX!
Pinball M

Pinball M is a separate product from Zen Studios Pinball FX but shares much of the core capabilities and features, this includes cabinet mode! Pinball M provides more mature content than what you’ll find with Pinball FX. This includes some saucy language in some tables as well as blood and gore. My notes below are based on setup and testing via a connected PC over OTG on the AtGames Legends Pinball 4KP (The Addams Family Cabinet). That is, the playfield is 4K and the backglass & dmd are both HD.
Cabinet Mode
At the time of this writing, the ability to easily position the backglass and DMD displays during setup are missing in Pinball M. However, you can copy your Settings.ini file for Pinball FX into the folder located at \Program Files (x86)\Steam\steamapps\common\Pinball M\PinballM\Mods\Cabinet if you already have it setup and working. Make sure that you arrange the displays in Windows from left-right with the playfield, backglass and (optional) DMD in that order. See here for more on the Display Setup.
Pinball M Notes
- Each time you launch Pinball FX, you’ll need to go into the settings within the Pinball M UI and activate cabinet mode. I’m sure this will change, but as of this writing, it’s necessary.
- Like Pinball FX, no backglass artwork is included with Pinball M. Thanks to Jeremy H. for providing a set of base images that I slightly modified and are available here. To make them available, after installing Pinball M and downloading the artwork, copy the .png files to \Program Files (x86)\Steam\steamapps\common\Pinball M\PinballM\Mods\Cabinet (see Backglass Image Setup for more details).
Settings.ini (Example)
If your playfield display is 4K, a file can be created in the folder mentioned above called Settings.ini and the contents below copied into that file (make a backup copy of the file first, if it already exists). The setup below assumes the playfield, backglass and dmd are all on separate displays as it exists on the Legends Pinball 4KP. If not, some tweaking will be needed for the DotMatrixWindow settings.
For HD playfields, the PositionX values below will need to change. For example, the PositionX under the BackglassWindow section should be set to 1921 and DotMatrixWindow to 3841.
| [DotMatrixWindow] Enabled=True Priority=2 MonitorNumber=1 PositionX=5760 PositionY=0 Width=1920 Height=1080 ExternalDevice=False DotMatrixSize=Medium Rotated=False [BackglassWindow] Enabled=True Priority=1 MonitorNumber=0 PositionX=3841 PositionY=0 Width=1920 Height=1090 ExternalDevice=False [General] CabinetEnabled=True |
Install Steam & Pinball FX
In this section, we’ll install both the Steam Client and Pinball FX to our PC.
Steam Client
Video: See how
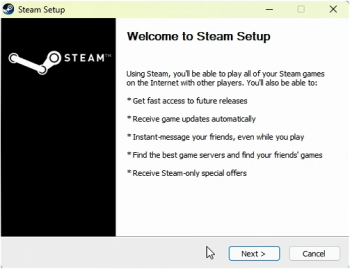
- To install the Steam client, visit here.
- Click the Install Steam button.
- Once the SteamSetup.exe has been downloaded, click installer from your browser window and select Open.
- Click the Next button on the Welcome to Steam Setup dialog.
- Select your preferred Language and click the Next button.
- The Destination folder defaults to C:\Program Files (x86)\Steam\ , if you need to change this you can click the Browse button. Otherwise, click the Install button.
- The Steam client install will begin. Once done, you’ll see a checkbox to Run Steam. Leave it checked and click the Finish button.
- Additional updates for the Steam Client will begin downloading/installing, just be patient until it has completed.
- You will then be prompted to Sign in with your Account Name. If you have an existing Steam Account, enter your account name and password and click the Sign in button. If you don’t have a Steam Account, you can create a free account by clicking the Create a Free Account link to the right of Don’t have a Steam account? *NOTE – if you have Steam Guard setup (I recommend it), check your associated e-mail account for the 5-digit code to login.
- The Steam client install is now complete, see the next section for installing Pinball FX.
Video: See how
Install Pinball FX
- Launch the Steam Client.
- Click the Store tab at the top.
- In the Search field (upper-right) type Pinball FX.
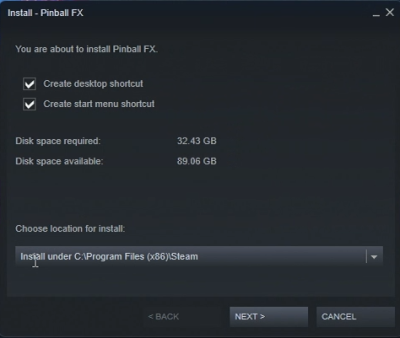
- Select it from the list and click the INSTALL button.
- During the installation, you’ll see two checkboxes at the top (Create desktop shortcut & Create start menu shortcut), leave both checked. Towards the bottom, you’ll see a selection for Choose location for install. If you have a second drive with more storage capacity, click the drop-down and select the other drive (i.e. Create new Steam library on drive D:). Otherwise, go with the default and click the NEXT > button.
- Review the license agreement and click I AGREE.
- The Pinball FX installer will then begin. The installation may take several minutes, be patient.
- Once the installer has completed, you can click the large green PLAY button to start Pinball FX or use the shortcut on the Desktop.
- That completes the basic installation of Pinball FX. If you want to use Pinball FX in cabinet mode, please see the following section.
Cabinet Mode
In Pinball FX3 (previous version), it was necessary for you to request a cabinet code from Zen Studios along with a picture of your physical cabinet. This is no longer the case with Pinball FX! In the sections below, we’ll discuss how to enable cabinet mode, starting with the Control Mode option on the Legends Pinball machine.
Legends Pinball OTG
Video: See how

If you will be using the AtGames Legends Pinball or Legends Pinball Micro, connect the HDMI from the to the HDMI main playfield input (on the top for the Legends Pinball, back port on the Legends Pinball Micro). Connect the secondary HDMI (backglass) from the PC to the VIBS Board. After making both HDMI connections from the PC to your ALP, you€™ll want to switch the HDMI Input to the PC. This will allow you to view the PC video signal on the main playfield. To do that see the following steps:
- Press the Channel button on the top-middle panel of your ALP, check that each of the settings are assigned as.
- Control Mode to OTG.
- Display set to Main display.
- Degree set to 90.
- Then press/select the OK button
- If you have installed the VIBS board, press the VIBS Switch button to display the backglass display coming from your PC.
Windows Display Configuration
Video: See how
For the following setup procedure, you’ll want to plug in a USB Keyboard and mouse into your PC. Alternatively, if you have another main computer that you prefer to use for the setup, you can use TeamViewer to remotely connect to it for a more comfortable setup experience (my personal preference).
Display Setup
Before proceeding, make sure that you have two HDMI ports connected to your PC. If you don’t, the prerequisites section which has a recommendation for an adapter I used. To setup both displays, please see the following:
- Right-click on the Desktop and select Display Settings.
- Make sure Extend these displays is selected.
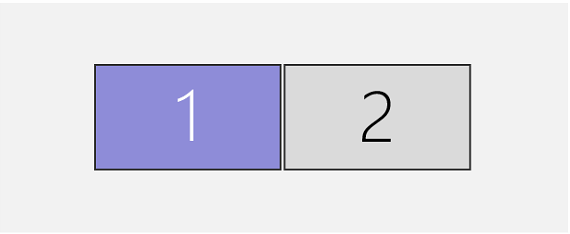
- Position the VIBS display (the backglass) to the right of the playfield display (display 1 shown) within Windows Display Settings (make sure display 1 & 2 are lined up perfectly (as shown to the right), playfield on the left/backglass on the right). Keep in mind, your display numbers may be different from the image to the right. *NOTE: If you’re using a laptop, a physical DMD display or have a 3rd display appearing, move it to the far-right of of the backglass display.
- Playfield should be set as the Primary display by checking Make this my main display.
- Both displays should be set to 1920—1080
- Both displays should be scaled at 100%
- Both displays should have the Display orientation set to Landscape Mode.
- Keep in mind, Windows may scale one (or both displays) to 150%. If so, you€™ll need to change this setting to 100% for the following settings to work properly. Simply click each display and verify any needed changes.
Backglass Image Setup
Video: See how
Pinball FX does not include any pre-made backglass images. Therefore, you’ll have to download and copy them to the appropriate folder on your PC. The following will assist with those steps:
- If Pinball FX is running, close it (here’s how).
- Download the backglass artwork from here (for Pinball FX) or here (for Pinball M) using your favorite browser.
- Launch File Explorer and unzip the FX pinball backglasses.7z archive from your Downloads (if you don’t have 7-zip installed, you can find it here).
- Pinball FX: Depnding on where you installed Pinball FX, there may be two possible locations on where to copy the backglass images. Copy the backglass images to:
- [install drive letter]:\Program Files (x86)\Steam\steamapps\common\Pinball FX\PinballFX\Mods\Cabinet OR
- [install drive letter]:\SteamLibrary\steamapps\common\Pinball FX\PinballFX\Mods\Cabinet
- Pinball M: for Pinball M, copy the .png backglass images to:
- [install drive letter]:\Program Files (x86)\Steam\steamapps\common\Pinball M\PinballM\Mods\Cabinet OR
- [install drive letter]:\SteamLibrary\steamapps\common\Pinball M\PinballM\Mods\Cabinet
- Once all backglass images have been copied, you can now re-launch Pinball FX.
Enable Cabinet Mode
Video: See how
The following is how to enable cabinet mode in Pinball FX:
- Launch Pinball FX.
- Using a connected keyboard, press ESC to enter the OPTIONS menu.
- Select SETTINGS and then the VIDEO tab.
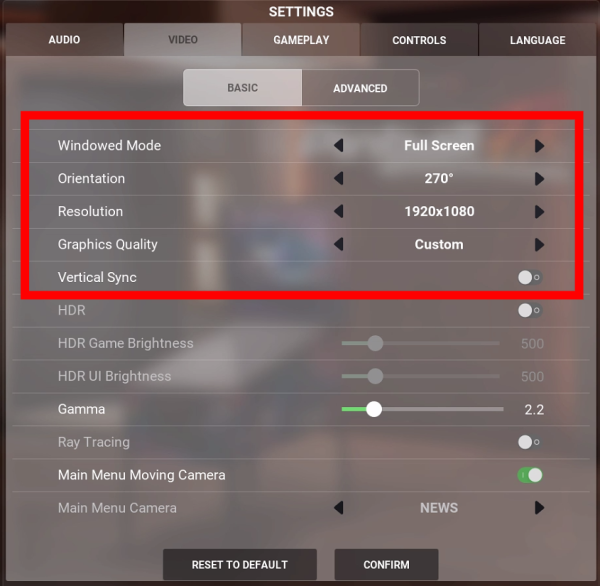
- Then set the following options:
- Windowed Mode = Full Screen
- Orientation = 270°
- Resolution=1920×1080
- Graphics Quality = Medium (depending on your PC setup, you may need to experiment with Low/High for best performance).
- Vertical Sync = OFF (this seemed to work fine on my PC). Under the ADVANCED tab, make sure the Framerate Limit is set to 60 and Render Scale to 70% (optional).
- Press ESC once the above configuration has been made, your main Playfield display should be oriented properly at this point.
- Select CABINET SUPPORT.
- Click the ACTIVATE button. Cabinet mode will now be activated! *NOTE – there is no longer a need to contact Zen Studios to activate cabinet mode for Pinball FX.
- Press ESC twice to exit the Options dialog.
- To setup the Backglass and DMD Window, please see the following two sections.
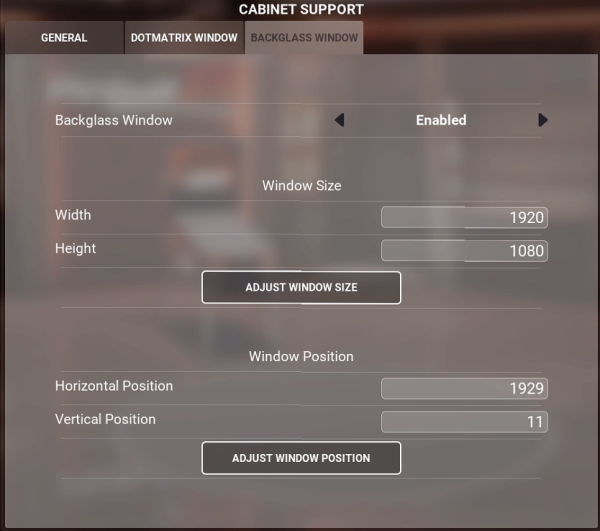
Backglass Window Setup
This section assumes you’ve already enabled Cabinet Mode. If you haven’t, please see here.
- Using a connected keyboard, press ESC to enter the OPTIONS menu.
- Select SETTINGS and then CABINET SUPPORT.
- Select the tab BACKGLASS WINDOW.
- Make sure that Backglass Window is set to Enabled.
- Click on each field and enter the following:
- Windows Size Width = 1920
- Window Size Height = 1080
- Window Position Horizontal Position = 1929
- Window Position Vertical Position = 11
- *NOTE – You can also click the ADJUST WINDOW SIZE or ADJUST WINDOW POSITION buttons and fine-tune any of the above settings, if needed.
- See the image below for reference.
- Press ESC to exit.
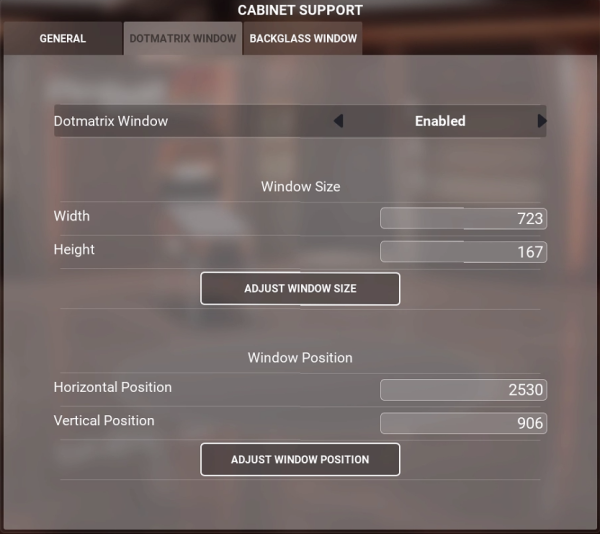
Dot Matrix Window Setup
This section assumes you’ve already enabled Cabinet Mode and have configured the Backglass Window. If you haven’t, please see here.
- Using a connected keyboard, press ESC to enter the OPTIONS menu.
- Select SETTINGS and then CABINET SUPPORT.
- Select the tab, DOTMATRIX WINDOW.
- Make sure that Dotmatrix Window is set to Enabled.
- Click on each field and enter the following:
- Windows Size Width = 723
- Window Size Height = 167
- Window Position Horizontal Position = 2530
- Window Position Vertical Position = 906
- *NOTE – You can also click the ADJUST WINDOW SIZE or ADJUST WINDOW POSITION buttons and fine-tune any of the above settings, if needed.
- See the image below for reference.
- Press ESC to exit.
Button Mapping
During my initial testing of Pinball FX, I used JoyToKey. I had noticed some significant latency, far more than when using it with Pinball FX3, VPX and Future Pinball which was almost non-existent. I asked my wife to try and she confirmed the same. Pinball FX was unplayable using JoyToKey on my machine. However, I’ve also heard from someone else that said JoyToKey worked just fine for them. So, before purchasing XPadder, you can try JoyToKey which may save you $10 USD:
- JoyToKey Setup and profile instructions
- If you have an NVIDIA GPU, apply this recommendation.
If you find that JoyToKey works well for you, no need to follow the XPadder instructions below. If however, the performance is unacceptable, continue reading.
To make the configuration as easy as possible, I set out to try another tool called XPadder. I found that Xpadder performed much better with Pinball FX. Unlike JoyToKey, it wasn’t free, it was $10 USD. In an effort to provide the most optimal experience and ease of configuration, I purchased it. My wife then tried Pinball FX again using Xpadder and said it was far better. She enjoyed playing for about an hour trying various tables and confirmed Xpadder was a better solution. I had to interrupt her so I could continue working on this guide 🙂
I will continue to refine the profile below, however it’s in a fairly good state. If you make improvements, please don’t hesitate to contact me. This profile was created/tested and used with the Arcade Control Panel, if not using the ACP this profile may not work 100% for you (or it might, not sure).
Purchase Xpadder
*NOTE – I’ve received two reports that the right flipper isn’t holding as it should (all other buttons are fine). I’ve added an Xpadder Troubleshooting section to help with anyone having issues with it.
Before purchasing Xpadder, please see the note above regarding the current profile implementation.
- Link to Xpadder here. Select your Language and Country.
- Enter your e-mail address and click the Go button to receive a link via e-mail.
Setup Xpadder
Video: See how
Below we’ll discuss how to install Xpadder and setup the profile for use with the Legends Pinball (and Micro). If you intend to use Xpadder instead of JoyToKey, you’ll want to make sure that JoyToKey is removed from Windows Startup and terminated (here’s how).
- Make sure you have connected an OTG cable (USB-A to USB-A) from the PC to the USB 2.0 port (white) on the Legends Pinball machine.
- From the link you received from Xpadder, click the Download button. *NOTE – do not share the link with anyone. It appears to be tied to your e-mail account.
- Create a subfolder (i.e. C:\xpadder) and copy the Xpadder.exe into that folder.
- Launch the Xpadder.exe installer and follow the prompts.
- Click Start button 5 times.
- Click the Program Location button.
- Click the Do not Associate button.
- Xpadder will start, click the Xpadder taskbar icon to bring up the user interface.
- Download the ALP_Layout_v2a.zip (Xpadder profile) for the Legends Pinball.
- Extract the ALP_Layout.zip and copy the two files ALP_Layout.xpaddercontroller.xpadderprofile & ALP_Layout_v#.xpaddercontroller to a subfolder you create under /Documents (I.e. /Documents/xpadder).
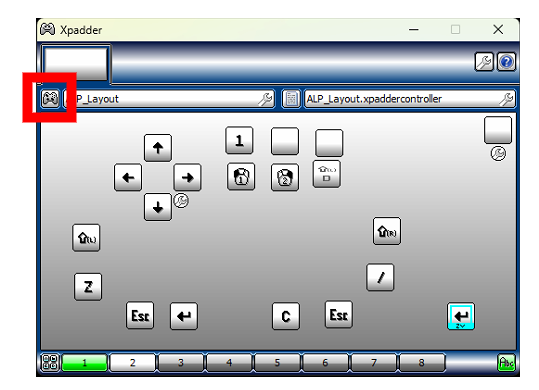
- Click the small controller icon in the upper-left (see image below) and click Open.
- Browse to the location where you copied the ALP_Layout_v#.xpaddercontroller file, select it and click the Open button. Then click the OK button, if prompted.
- You’ll now see an empty controller layout. In the upper-right, click in the (Untitled profile) field and select [All…].
- Browse to /Documents/xpadder and select ALP_Layout.xpaddercontroller.xpadderprofile and click the Open button. The empty buttons will now populate with images indicating their function.
- You may also want to create a shortcut for Xpadder. Right-right click on the shortcut, select Properties, then Advanced and set it to Run as administrator (optional).
- In the upper-right of the Xpadder UI, there is a wrench icon. If you click that, under Options you can have Xpadder Start with Windows by clicking the checkbox. Once done, click the OK button.
- It’s a good idea to test the buttons and make sure all the buttons are responding, see here for instructions.
- You can now minimize Xpadder, your buttons for the ALP/ALPu should now be mapped.
- If you have any difficulties getting Xpadder working or want to make sure it’s working properly, please see here.
ALP_Layout_v1.xpaddercontroller UPDATES:
- Update 4/15/2023 ~11:41pm US Central
- Mapped the Left/Right ALT buttons so no need to re-map them in Pinball FX (see Troubleshooting for why this was done).
- The plunger is mostly working, if you pull back the plunger will pull back, release will launch the ball. Not 100% correct, but it’s working.
Control Panel Layout
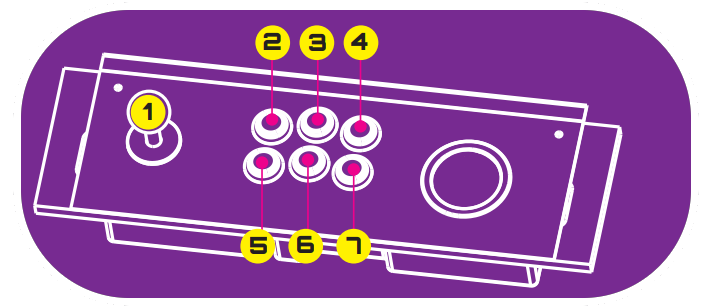
- Joystick – navigates up/down/left/right.
- 1-Player Start – Starts a 1 player game (in VPX/FP).
- Not mapped – Left this button available so you can map as you wish. Just load up the profile, click the button and map to any key you want.
- Not mapped – Left this button available so you can map as you wish. Just load up the profile, click the button and map to any key you want.
- Left Mouse click – Emulates the left mouse button being clicked, use trackball as a mouse.
- Right Mouse click – Emulates the right mouse button being clicked, use trackball as a mouse.
- Insert a Credit – inserts a credit for those tables that need them, some may require more than one.
- Forward Nudge (not shown above) – Selects any option, or press+hold to launch a ball. Press this button on a selected table to start the game.
- Rewind (not shown above) – goes back or exits a table, game or selection.
- Play Button (not shown above) – Will change the view on a currently loaded table (same as pressing ‘C’ on the keyboard).
- AtGames/Menu (not shown above) – If on the HOME tab, it will enter the Settings menu.
- Flipper Left/Right buttons (not shown above) – will operate the flippers left/right (red button).
- Left/Right Nudge buttons (not shown above) – will nudge the table left/right (white button).
- Plunger – Pull back and release to launch a ball.
Xpadder Troubleshooting
After you install Xpadder and load the profile as documented here, make sure all the buttons are responding. Here’s how:
- Leave all other applications closed except Xpadder (don’t run Pinball FX, FX3, etc. at this time).
- Make sure that the OTG cable (USB-A to USB-A) is connected from your PC/USB Hub to the USB 2.0 port on the top of the Legends Pinball (the white port).
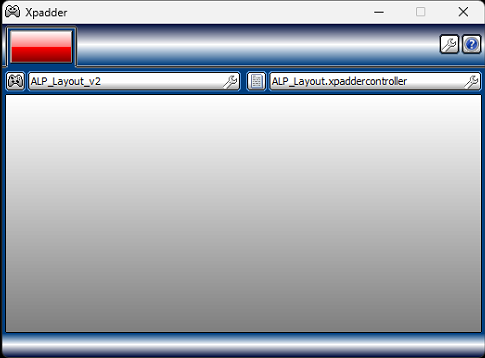
- If there is a connection problem, Xpadder will show a red square in the upper-left. See the image below for an example. If you’re seeing this, the ALP controls aren’t being recognized. Please see this section for additional recommendations (ignore the first point regarding JoyToKey, however).
- In the red area below, if you see more than one rectangle in this area and your pinball buttons aren’t working, try clicking it and assigning the layout and profile there. I did encounter on another device that two were showing up, the pinball buttons weren’t working because I needed to make the assignment to the proper rectangle which is your physical game controller (the emulated xbox 360 controller on the pinball machine).
- Once any connectivity issues have been resolved, Xpadder should now look like the following:
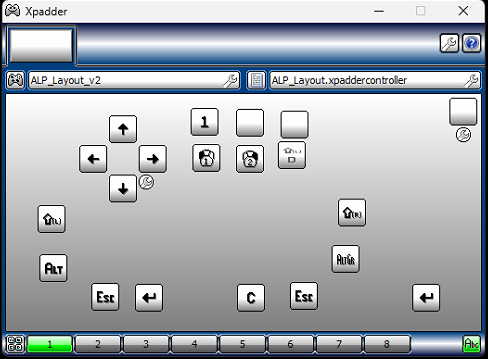
- Now, press each of the buttons on the ALP individually and make sure Xpadder recognizes each of them. That is, press the left/right flipper, nudge, plunger, front-facing buttons etc. They should turn green when pressed.
Right Flipper Issue
I’ve received two reports that the right-flipper may act twitchy, while all other buttons are fine. If you encounter this issue, here’s some things you can do:
- To change a button mapping, right-flipper is “Twitchy”, not working or you don’t like how it was assigned, click the button with the left mouse button. You’ll then see a virtual keyboard appear like the one below:
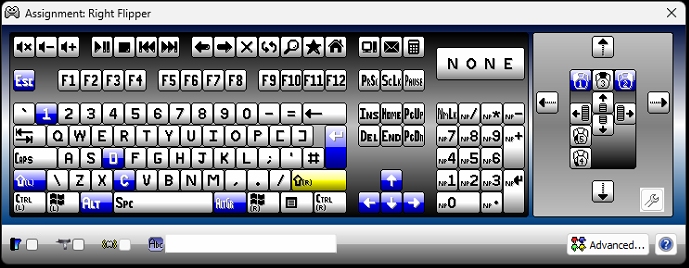
- Click the associated button on the keyboard layout that you want to map the physical ALP button to (i.e. right-Shift, right-Ctrl), etc. That’s it, the button will be mapped. From the Xpadder UI, make sure the button you’ve assigned is being recognized properly when pressed by pressing the button on the ALP.
- If any changes were made, click the controller icon in the upper-left of the main UI and save the profile to a new name.
- Using the above information, re-map the right flipper to the right-Ctrl button (if you mapped it above).
- In Pinball FX, go into Settings Controls Keyboard and assign the Right Flipper to the right-Ctrl button by first clicking on Right Flipper then pressing the right flipper on the ALP.
- Then ESC out of the settings and try a table, this should resolve the right-flipper issue. Keep in mind, if you’re using any other pinball applications such as FX3, VPX, etc. with Xpadder, similar changes will be needed.
Quick How-Tos
Below is some how-to steps to assist with frequent/common operations.
Exit Pinball FX
Below is how to exit Pinball FX:
- Navigate to the Home Tab (if you’re not, press the left/right flipper or left/right shift keys).
- Press ESC on the keyboard (or the Rewind button) and select EXIT GAME.
- When prompted with Are you sure?, select YES.
- Pinball FX will now close/exit.
Remove JoyToKey from Startup
You don’t want to run JoyToKey and Xpadder at the same time. Things can start to get really weird. If you will be using Xpadder as mentioned in this guide, you’ll want to make sure you removed JoyToKey from Starting when Windows boots. Here’s how:
- Press the Windows Key+R.
- Then type shell:startup
- Remove the select the JoyToKey icon from the Startup group and press the Delete button. This will keep JoyToKey from starting on boot, however it may already be running. See the next section on how to Terminate JoyToKey .
Terminate JoyToKey
If JoyToKey is running, here’s how to terminate it:
- In the lower-right on the Taskbar, click the ^ icon.
- Right-click on the JoyToKey icon and select Terminate JoyToKey (X).
- JoyToKey will now be closed.
Improve Latency with NVIDIA GPUs
This tip came in from Rene D. and has greatly improved flipper latency on my NVIDIA GeForce GTX 1650 but should work for most all NVIDIA GPUs:
- On the lower-right of the taskbar, open the NVIDIA Settings.
- Select Display Change resolution and under the 1080p, 1920×1080 (native) option set the Refresh rate to 59Hz (down from 60Hz, the default). Then, click the Apply button.
- Under 3D Settings Adjust image settings with preview, and drag the slider from Quality to Performance (far-left). Then, click the Apply button.
- Exit the NVIDIA Control Panel and re-start Pinball FX.
Helpful Tips
Below are some tips that should be helpful.
- Power-Off ALP or Press Channel button when done playing Pinball FX (or FX3/VPX/FP) over OTG – After some extended period of time of the Legends Pinball machine being connected to a PC (~4-6 hours or so), you may find Windows acting strangely or disconnect. Not sure of the exact reason for this, however pressing the Channel button when done playing over OTG or powering-off the ALP will prevent this from occurring. If it has happened, power-off/on the ALP and then it will work fine again.
- Further Reduce Latency – In Settings, select Video Advanced and set the Render Scale to 70%. This may help improve game-play performance and latency.
- Minimize the Taskbar on the Backglass – See here.
- How to Remotely connect to my dedicated ALP PC from another – I used TeamViewer in this video, please see here for more information.
Troubleshooting
Below are some issues and potential solutions to issues you may encounter with Pinball FX.
- Pinball FX doesn’t launch the backglass display I configured after exiting/restarting, why? This appears to be a bug. In some cases it would seem to always load after pressing a button from the main screen (after launching Pinball FX) and other times it wouldn’t until I rebooted the PC. You can force it to re-load from your previous settings by:
- Navigate to the Home screen (far left tab).
- Click the Settings (gear) icon in the upper-right.
- Select Cabinet Support.
- Click the RELOAD CONFIGURATION button.
- Press ESC twice to exit.
- You should now see the backglass image.
- The Settings (Gear Icon) in the upper-right while in cabinet-mode doesn’t respond when I click it, why? This appears to be a bug. I found if I’m persistent, it will eventually bring up the settings. Double-click the icon and wait a second or two to see if it opens the settings. Keep trying until it eventually loads. The better solution is to make sure you’re on the HOME Tab, then try clicking the Settings (Gear) icon.
- How can I turn off the Main Menu Music, but leave the table music? You can turn down the Music volume, however the music menu volume doesn’t have it’s own setting, at this time.
- When I select a table while in Cabinet Mode, the backglass artwork doesn’t change, why? When you load a table, the backglass artwork will change (assuming you added the backglass artwork as discussed here). However, when selecting a table it will show the generic artwork. This appears to be simply not implemented yet in Pinball FX.
- I’m still experiencing severe latency, any other recommendations? Make sure your PC meets the recommended specs in the prerequisites section. Make sure you’re not still using JoyToKey with Pinball FX, if you are see here. If still having issues, make sure that you aren’t running any unnecessary background services, see the 4th point for some additional recommendations.
- I’ve installed Xpadder and it doesn’t look like the one shown in this guide, why? Make sure that you have the ALP turned on and connected to the PC as described above (and in OTG mode). Now everything should match what you see in this guide.
- Remapped the right flipper mapping in FX still isn’t working after going through these troubleshooting steps, why? Try uninstalling/reinstalling Steam FX, remap the non-working button to Ctrl (unless it’s working) and see if that corrects the issue. This was confirmed once to help one viewer, thank you Bill!
Steam Deck
Below are issues/solutions that you may encounter while playing Pinball FX on the Steam Deck:
- Pinball FX locks up on the Steam Deck, how can I fix this? Thanks to the kind folks on this Reddit thread, below are some steps that should help:
- Go to the main Pinball FX launch page on the Steam Deck.
- Navigate to the gear/cog wheel icon on the far-right.
- Select Properties.
- Under the Compatibility tab, check the option Force the use of a specific Steam Play compatibility tool. Then set to Proton Experimental.
- Press B to go back, select Play and you shouldn’t get any more lock-ups.
Credits
I would like to credit the following for their assistance in reviewing this guide and assisting with the Xpadder profile validation:
- Zen Studios -Thank you to Akos G. for providing feedback to questions asked! Zen has been very helpful and responsive throughout this process!
- Big thank you to Fernando P. and Tim B. for their help on Xpadder testing – Some have reported issues with the right flipper button. Fernando and Tim have been very helpful testing and helping to resolve this issue.
Change Log
- 2024-02-18 – Updated some sections to specifically stated ALP HD to differentiate from the ALP4K.
- 2023-12-01 – Added backglass images for Pinball M.
- 2023-08-12 – In the Button Mapping section, mentioned that JoyToKey did work well for someone else.
- 2023-07-05 – Update the guide to mention the Asus ROG Ally in the Q&A section.
- 2023-07-01 – Added Hardware Recommendations section.
- 2023-06-30 – Multiple minor updates.
- 2023-06-08 – Added a new section Improve Latency with NVIDIA Cards.
- 2023-05-07 – Added more to the Troubleshooting section.
- 2023-04-30 – Added steps on how to fix lockups on the Steam Deck.
- 2023-04-25 – Added more to the Q&A section based on feedback/questions.
- 2023-04-24 – Updated a few more Helpful Tips.
- 2023-04-22 – Added the Pinball FX Cabinet Mode Setup video to this guide (top).
- 2023-04-20 – Additional cleanup/edits. Updated the Setup Xpadder section, I was missing some steps from my initial installation. I also uploaded a new profile, the previous version was missing a file (you should have two files in the archive, not one).
- 2023-04-18 – Added Xpadder Troubleshooting section. Removed mention of the settings not saving properly. Zen has corrected it on 4/18/2023 with the following update:
- Fixed an issue where the Master Volume settings weren’t affecting the Williams Tables
- Fixed an issue where the ‘9 Zeroes’ and ‘Challenge Accepted’ achievements were granted right at the game start
- Fixed an issue where key bindings and Cabinet Mode DMD, Backglass settings didn’t save after restarting
- Fixed an issue where the player would see their own profile when clicking on a friend’s profile
- 2023-04-17 – I’ve had two reports that the right flipper using the Xpadder profile isn’t holding as it should (all others are ok). Working to get this figured out.
- 2023-04-16 – Updated the Xpadder profile to allow using the plunger to launch the ball. I’ve also mapped the left/right ALT buttons such that you won’t have to re-map them manually. Minor change to Cabinet Mode settings (VSYNC Off/60fps). Updated Backglass and DMD Window settings. Updated the Control Panel section with additional button mappings. Added the Helpful Tips section and additional Troubleshooting item regarding latency. Various other edits and cleanup.
- 2023-04-13 – 2023-04-15 – Start to this guide.