RPi 4 as a NAS with OpenMediaVault (OMV) 5 Beta
In this project, we’re going to setup a Raspberry Pi 4 NAS using openmediavault. At this point in time, the software being used is beta – openmediavault 5. There was a post here that provided some basic instructions for setting up OMV5 on buster. We will use that as a basis to for the installation. Keep in mind, OMV does not support RAID for USB-connected devices, if that is a key requirement for you then this may not be what you’re looking for. There are other non-RAID methods that can be used with OMV for safeguarding your data, however.
It is not recommended to use a beta version of any software for productive use. As such, everything here is for experimental purposes only. I appreciate any support on the video by liking/sharing/commenting and of course subscribing to WTT.
That said, let’s give OMV5 (beta) a try and go for a test drive!
Table of Contents
Components used in this Video
- CanaKit Starter Kit for the Raspberry Pi 4 with 4GB RAM – This includes the case, heat sinks, fan, power adapter & 32Gb microSD card.
- Mediasonic H82-SU3S2 ProBox 8 Bay 3.5″ Hard Drive External Hard Drive Enclosure (USB 3.0) – I just happened to have one of these available with multiple drives already installed from my old MediaSmart EX475 server. It may be overkill, but who cares I’m using it anyway and it works!
- Raspberry Pi Official Keyboard and Mouse Value Pack (RPi4 Desktop Kit Review Video) – You can use any USB keyboard + mouse, I had this available from a prior project.
- 15.6 Inch Portable Touchscreen Monitor (Video Here) – IPS LCD 1920x1080P – Any HDMI monitor will do, but I really like this one. It’s portable, but large (15.6″) and includes touch-screen support.
Install OpenMediaVault 5 (OMV5 Beta)
- Download Raspian Buster from the Raspberry Pi Download page.
- To extract the Raspian image, I prefer to use 7-zip. It’s a free tool which will allow you to extract the image file. Extract the archive and you should have a resulting (date)-raspian-buster-full.img file.
- Burn the image (.img file) to a microSD card 16Gb (or larger) using etcher (also free). If you’re unfamiliar with etcher, simply download/install it. Then, select the image for Raspian (buster) you just downloaded/extracted, insert/select the microSD card and click the Flash button to burn the image.
- Setup the Raspberry Pi 4 with heatsinks and fan. If you don’t have a Raspberry Pi 4 or need some assistance, here is a kit I highly recommend: CanaKit Starter Kit for the Raspberry Pi 4
- Insert the microSD card into the Raspberry Pi4.
- Connect the HDMI Monitor, Keyboard and mouse to the Raspberry Pi.
- Turn on the Raspberry Pi 4.
- Follow the Welcome prompts during the setup to enter your timezone, wifi connection/password, etc.
- You may want to set the hostname to something other than ‘raspberrypi’ and perhaps set a static IP address. In my case, I set the hostname to ‘omv’ for simplicity during testing. To do that:
- Open a shell prompt
- Type ‘sudo raspi-config’
- Select ‘Network Options’
- Select ‘Hostname’
- Change the hostname, I used ‘omv’
- Select ‘Ok’
- Tab over to ‘Finish’ and press ENTER.
- Select ‘Yes’ (to reboot) and press ENTER.’
- Open a shell and type: sudo su and press ENTER
- Copy / paste the entire code block and paste it into the shell window, then press ENTER :
cat <<EOF >> /etc/apt/sources.list.d/openmediavault.list
deb https://packages.openmediavault.org/public usul main
# deb https://downloads.sourceforge.net/project/openmediavault/packages usul main
## Uncomment the following line to add software from the proposed repository.
# deb https://packages.openmediavault.org/public usul-proposed main
# deb https://downloads.sourceforge.net/project/openmediavault/packages usul-proposed main
## This software is not part of OpenMediaVault, but is offered by third-party
## developers as a service to OpenMediaVault users.
# deb https://packages.openmediavault.org/public usul partner
# deb https://downloads.sourceforge.net/project/openmediavault/packages usul partner
EOF- Then execute the following Shell commands one at a time (copy the command, paste into the shell window) and press ENTER after each command has been pasted:
*Note: One of the commands below that starts with “apt-get –yes” occupies 6 lines, so grab all 6 lines. This command will take around 20+ minutes to run, be patient. Those lines that begin with a # are comments and don’t need to be executed.
export LANG=C.UTF-8
export DEBIAN_FRONTEND=noninteractive
export APT_LISTCHANGES_FRONTEND=none
wget -O "/etc/apt/trusted.gpg.d/openmediavault-archive-keyring.asc" https://packages.openmediavault.org/public/archive.key
apt-key add "/etc/apt/trusted.gpg.d/openmediavault-archive-keyring.asc"
apt-get update
apt-get --yes --auto-remove --show-upgraded \
	--allow-downgrades --allow-change-held-packages \
	--no-install-recommends \
	--option Dpkg::Options::="--force-confdef" \
	--option DPkg::Options::="--force-confold" \
	install openmediavault-keyring openmediavault
# Populate the database.
omv-confdbadm populate
# Display the login information.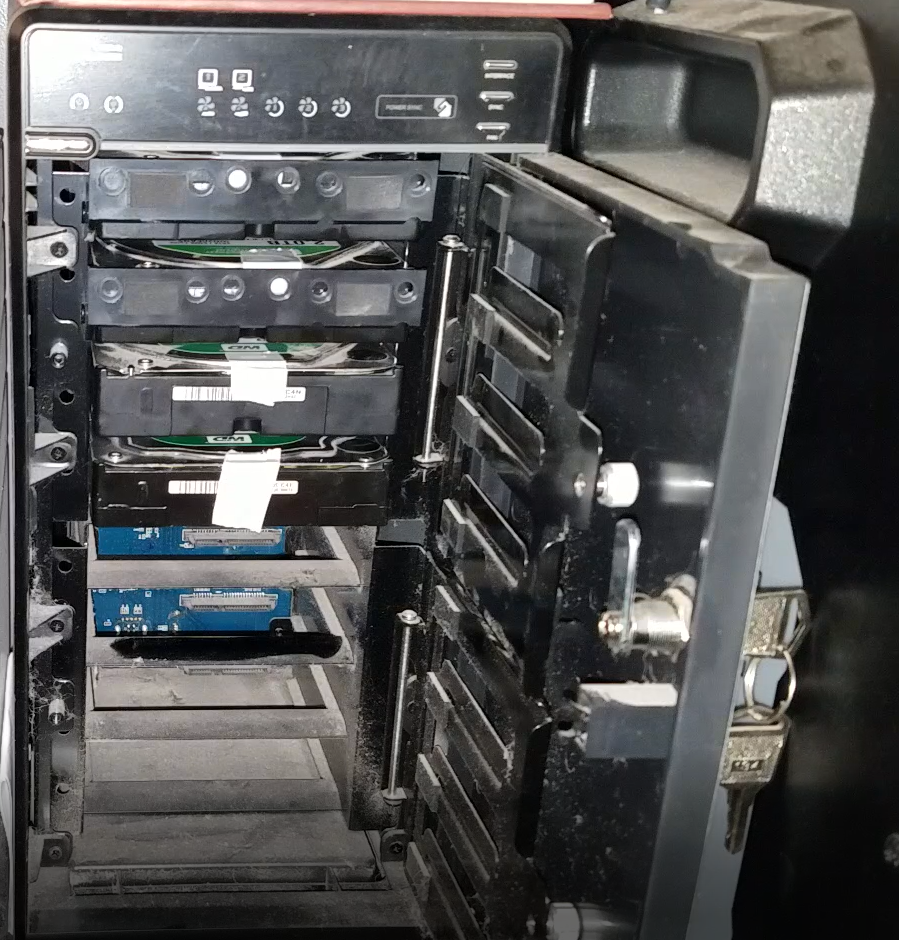
cat /etc/issue- Connect your external USB drive(s) to the Raspberry Pi 4. The following image is the 8-bay drive array I will be using (I’ve had it a few years, yes it’s dusty).
- Restart the Raspberry Pi, probably not necessary but my preference.
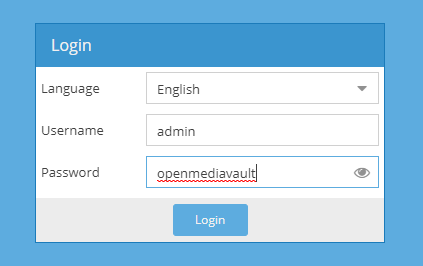
- Open the Chromium browser (or other browser) and type http://localhost and press ENTER. You can also access it on another computer on your network by typing http://<hostname> and press enter (i.e. http://omv , if you used the same hostname I used above)
- Login using the user of admin and password of openmediavault
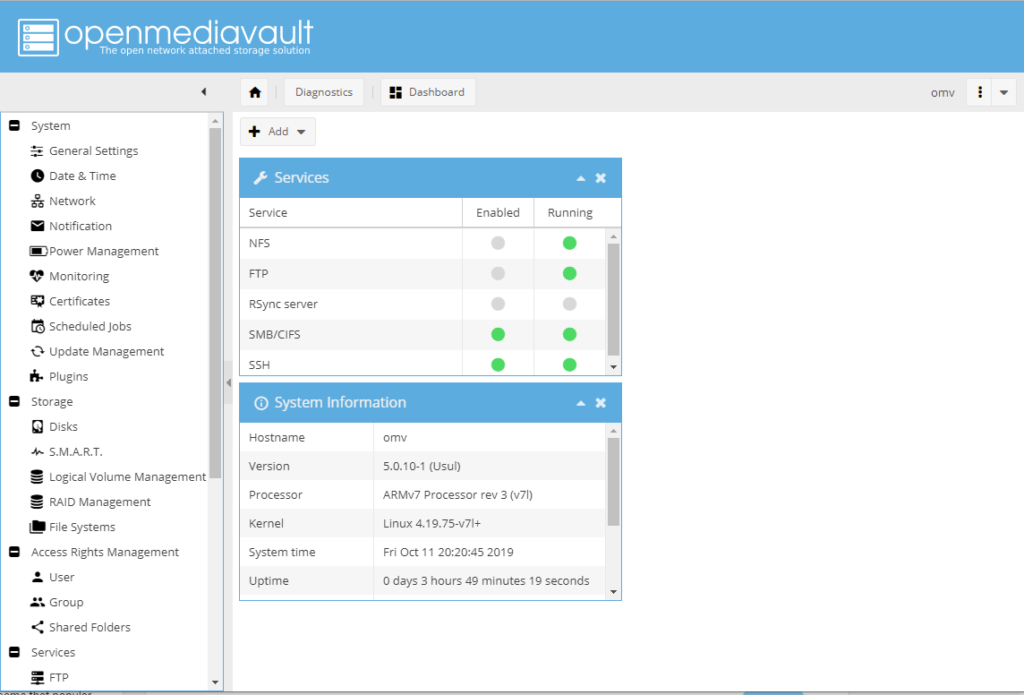
- You should now be logged in and see a screen similar to the following:
Depending on the number and size of the drive(s) you have installed, you can configure OMV a number of different ways. Please see the video above for more details. In the future, I may also document them below if there is interest, please leave comments in the video to let me know! Below are some ideas for future content.
Use RSync to Duplicate one local Share to another
This method will allow you to use the RSync feature of openmediavault to duplicate data from one local share to another share within your OMV 5 server. This assumes you have 2 (or more) physical drives connected to your omv server. This is useful in the event one of your drives fails, a duplication of your data exists.
Please see above video for more details.
Use RSync to Duplicate a local Share to a Remote Share on another server
This method will allow using the RSync feature in openmediavault to duplicate data on a local share in OMV to a remote share (on another server).
Like/Comment in above video to let me know you want to see more!
Use Logical Volume Management (LVM) to create Logical Volumes
This configuration will allow you to utilize 2 (or more) drives as a logical larger drive. For example, you can combine two 2 terabyte drives into a single logical 4tb volume.
Like/Comment in above video to let me know you want to see more!
Adding additional storage capacity to an existing LVM
This section will demonstrate how to add an additional drive to an existing LVM Volume Group and expand the volume.
Like/Comment in above video to let me know you want to see more!