ALP/ALU MAME Game Guide
Back to the Legends Pinball Guide
Back to the Legends Ultimate Guide
Last Update: 10/2/2021
NOTE: The guide below will work fine, however before using the information here you may want to check out the CoinOpsX Guide instead. I’m currently using CoinOpsX myself and prefer this method over what you find on this page. However, everything below remains valid and therefore leaving it here for anyone who needs it.
I didn’t buy the Legends Pinball (ALP) machine to play MAME Arcade games, but knew going in that it was possible. Of course, you can use this feature on most AtGames products, including the Legends Ultimate (ALU).
There is a new accessory for the ALP which will make playing these games much more fun with the Arcade Control Panel for Legends Pinball. With the base ALP machine, your controls are a bit limited to the d-pad and a few buttons to shoot/jump.
In the sections below, I’ll guide you through what you’ll need to play these games on your Legends Pinball or Legends Ultimate. It’s not as simple of a process as you may be familiar with for other machines (i.e. Raspberry Pi, PC or others). However, it’s easy to do just slightly more time consuming as each game will need to go through a process of packaging the game (rom), artwork and emulator. There are ways to batch-build if you prefer a semi-automated method of packaging files. We may investigate that in the future, but for now we’ll just quickly package a few games so they may be played on the Legends Pinball.
Table of Contents
Arcade Control Panel Notes
The Arcade Control Panel on the ALP may work fine out-of-the-box without any changes needed based on the instructions below. The trackball worked fine for Centipede, Millipede and Arkanoid without needing a different core than the one mentioned below. What this means, essentially, is by creating the .UCE files needed you should have no issues enjoying the games that you want to play using the Joystick+buttons or trackball+buttons. You may still need to map the jump/fire button (or other key buttons needed by the game) but launch the game first and see before re-mapping. I’ve been very happy with the performance of the stick, trackball and buttons thus far.
Prerequisites
- You will need a Windows computer to follow along below.
- The following instructions demonstrate how to package a MAME 2003 Rom to a .UCE file to be played on the Legends Pinball.
- UCE Games can be played offline. But after 5 USB disconnects, and the tokens run to 0, you will need to reconnect to your ArcadeNet Account again (WiFi or Ethernet).
- One other point, is that when generating the .UCE files for your games you will be missing the samples. For some games like Donkey Kong (Mario walking), Galaga (explosion) and others this will be noticeable to those of us that grew up playing those arcade games. I’ve not yet been able to get the samples working (tried adding the .wav files to the archive). Comment in the video if if you know of a solution and I’ll add it to the guide. *Note – May have a solution, theRexerShow responded that a different core may be needed for samples to work.
Step 1 – Format the USB Stick
- First, you’ll need a USB Flash Drive. I used a 16GB drive I had available. If you don’t have one already, my recommendation would be to pickup a Samsung 32GB Flash Drive (it’s low-profile). You can go with a larger capacity, if you prefer.
- Now that you have a USB Flash Drive, you’ll need to format it as FAT32. Insert the flash drive into one of the available USB ports on your computer.
- Windows will allow formatting a USB stick using FAT32 in explorer, up to 32GB in size. To format a USB Stick with FAT32 on stick larger than 32GB, I recommend downloading Disk Genius. This tool has a lot of great features, the free version will allow you to format a drive as FAT32 but triple-check you select the correct drive (should start with RD for removable drive) and it matches the size of the USB stick you wish to format. Once selected, click the Format icon on the toolbar. When prompted, click the Format button. When prompted that you’re sure you want to format the partition, make sure the correct drive is being formatted and click the Yes button.
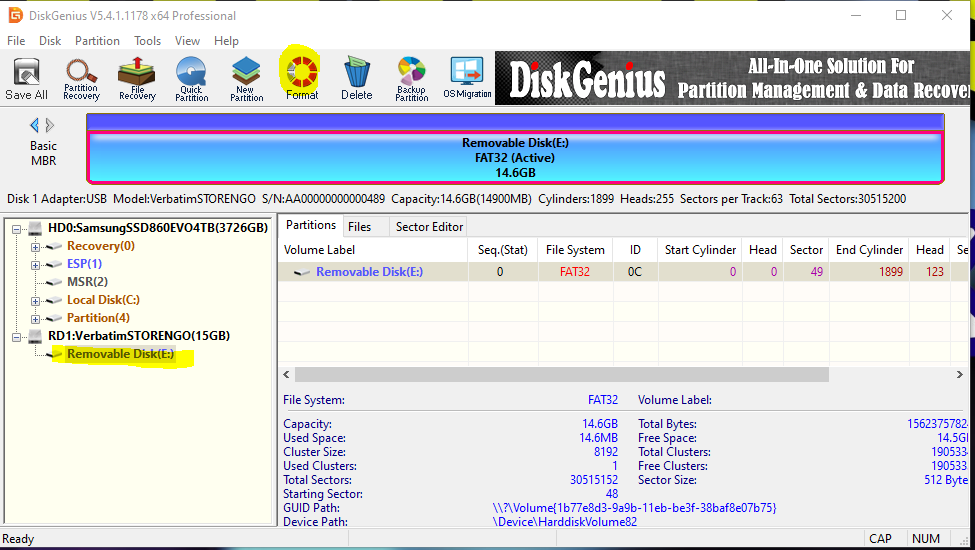
*NOTE: The folks at DiskGenius were kind enough to provide us with a 30% OFF Coupon code: DG30-YUTE-STPR for DiskGenius Professional Edition – if you choose to register. Registration is not necessary to format the USB Stick, but if you like the tool and want to use some of it’s more advanced features, the code will save you some money. It is a bit pricy, ~$99 USD without the coupon.
Step 2 – Download Files
There are a few files you’re going to need. I’m going to assume you’re wanting to play classic arcade games such as Pac-Man, Galaga, 1943, Donkey Kong, etc. These are good games to consider for a vertically-oriented gaming experience on the Legends Pinball. You can do the same for consoles, however I’m only going to discuss MAME Arcade games here. If there is interest in other emulators, please comment on the video above.
*NOTE: Instructions below require a Windows PC to generate the .UCE files (files needed by the BYOG feature).
- I recommend creating a directory called \ALP or \ALU somewhere on your computer. Then, download and copy the following files to that subdirectory.
- FalkensMaze Ultimate AddOn Tool – From this page, click the Download button to download the AddOn Tool from the Github repo. To read more about this great tool, please see this page.
- Double-click the AddOnToolInst.exe to install the AddOn Tool to your computer.
- Next, you’ll want to download some image files for your games (artwork). These images will be in .png file formats. Click here for a list of available boxart packs, you’ll want to download the MAME.zip pack from that page which is quite large (about 3.2GB in size). Once downloaded, move this .zip file to your \ALP sub folder and unzip the archive. If you don’t have an unzip tool, I recommend 7-zip which you can download here (free).
- You’ll now want to download the mame2003_plus_libretro.so file and unzip and copy the .so file to your \ALP sub folder.
- Next, you’ll have to locate the MAME 2003 rom files that you want to play on your Legends Pinball. I’m unable to provide links to these as it is copyrighted material and you should only install those games that you own. You can read more about acquiring roms here. Once you have decided what roms you want to install, create a sub folder under your ALP directory called /ALP/roms and paste those files into the subfolder.
Step 3 – Create UCE File
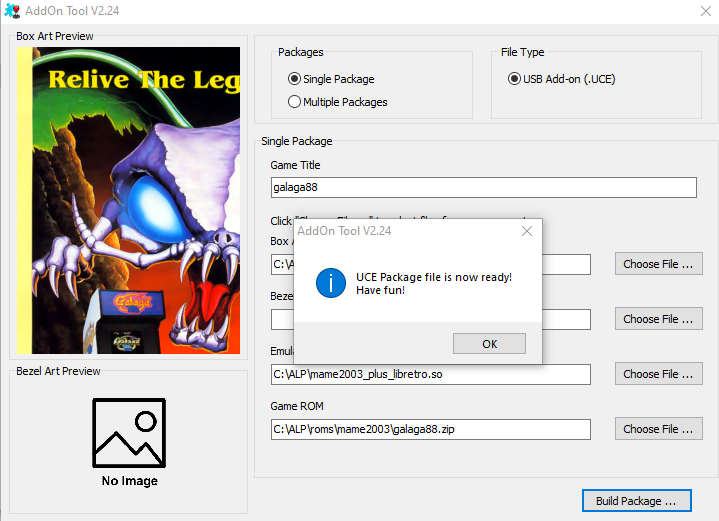
To install the game(s) to your ALP, they will need to be packaged in a UCE file format or a UniCode Extension file. The AddOn Tool you downloaded and installed above will be the tool we use to create this game file for the ALP. Below are the steps you’ll need to repeat for each game you want to install on your ALP:
- Launch the AddOn Tool.
- Select the Game ROM (bottom) by clicking the Choose File … button. Select the MAME 2003 game you want to convert (i.e. 1943.zip, galaga.zip, pacman.zip, etc.). Click the drop-down to the right-bottom to display Any Files (*.*).
- Select the Emulator Core by clicking the Choose File … button and select the file you downloaded above mame2003_plus_libretro.so.
- Ignore the Bezel Art, it isn’t useful for the ALP so no selection is needed here.
- Select the Box Art by clicking the Choose File … button. Select the \ALP\boxart\MAME\Named_Boxarts sub folder and click on the first file. Then, if you want to jump to an image file that starts with a specific character, just press that character to jump to that location (i.e. “G” and then scroll to look for Galaga). After selecting the image, click the Open button.
- Check that the Game Title at the top is exactly how you want the game name to appear on your ALP.
- When ready, click the Build Package … button to create the .UCE file. I recommend creating a subfolder of \ALP\UCE and place the generated files there. Select the subfolder and click the Save button.
- When the files have been packaged, you should see a dialog that states “UCE Package file is now ready! Have fun!”.
- Repeat the steps above for all games you want to install on your ALP.
- Once done, copy these files from \ALP\UCE to the root of your USB Stick.
- Now you’re ready to try it out on the AtGames Legends Pinball machine!
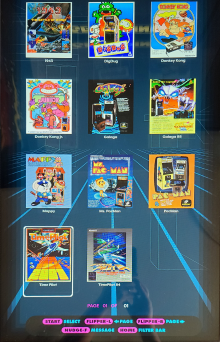
Play MAME Games
Now that you’ve generated all the .UCE files and have copied them to your USB Stick, you’re ready to play! Below are a few tips to help you get started.
- Insert your USB Stick with the .UCE files into the USB 2.0 port on the Legends Pinball. I would recommend using the USB 3.0 port for any pinball tables you may have purchased. Since those files are typically larger, the extra speed of the USB 3.0 port will be ideal for that.
- Select the BYOG tab at the top, then select AddOn by highlighting it and press the Play/Select button on the front of the ALP.
- Using the d-pad, move down and select the “/” (root of the USB stick) and press the Play/Select button on the front of the ALP. You should see a list of all your games at this point.
- Press the Play/Select button to insert a credit, again to start the game.
- See below if the game requires any extra buttons to be mapped. Games such as Pac-Man and Ms. Pac-Man should play without any further mapping by using the d-pad.
MAME Button Mapping
For games that require shooting or jumping, you will need to map a button(s) to perform that action. Here’s how:
- Select a game that requires a jump/shoot button and press the Play/Select button.
- Press the Play/Select button to insert a credit, again to start the game. You may notice at this point that you can move using the dpad but the jump/fire buttons aren’t mapped. To do that:
- Press the Left Nudge button to bring up the MAME menu
- Select Input (general) and press the Forward Nudge button (white arrow up button).
- Hold the d-pad down until you see P1 Button 1 and select it.
- Press the Forward Nudge button, then the button you want to assign as the jump/fire button (i.e. right-flipper button).
- Press the Left Nudge button to close the MAME configuration menu.
- You should now be able to use the right-flipper button to shoot/jump!
In-Game Assistance
The following are some helpful tips while playing BYOG in-game:
- Quit a Game – To Quit a game, press the Menu button and press the Play/Select button (green play button on the front).
- Insert Credit / Start a Game – After loading the game, press the Play/Select button (green play button on the front) to insert a credit. Press the Play/Select button (green play button on the front) a 2nd time to start the game. For mapping buttons, see above.
- Add Scanlines – To add scanlines, press the Menu button, move down until you see Scanline Filter. Use the d-pad left/right to alternate between OFF, HORIZONTAL or VERTICAL (Vertical looks best, IMO)
Troubleshooting
- Unable to insert a credit for certain games – If you’re having difficulties inserting a credit by pressing the Start/Play button, hold down the controller/joystick and press the Start button at the same time. This should insert a credit for the game (i.e. Donkey Kong seems to require this).
Acquiring ROMs
First, please don’t ask me or anyone where to get ROMs. We can’t, or shouldn’t answer you. It’s not an appropriate topic for discussion. There are places where you can download legal ROMs for installation to your Legends Pinball. My recommendation is to search google (or your favorite search engine) and locate whatever it is you want to install. Once you do that, here are some basic instructions:
- You don’t need to unzip the file/rom you downloaded.
- Most of the problems users have installing ROMs has to do with the fact that the ROM they downloaded didn’t match the correct emulator version they tried to run it under or the rom copied is dependent on another file that was not copied/missing.
- This is the most help I can provide on this topic.
Change Log
- 2021-10-02 – Added disclaimer to mention CoinOpsX Guide as an alternative.
- 2021-08-14 – Refreshed page to mention ALU as well.
- 2021-07-25 – Added a Troubleshooting section.
- 2021-05-08 – Minor updates regarding the new Arcade Control Panel (more coming).
- 2021-04-15 – Added the Companion video.
- 2021-04-13 – Added a link to freeware MAME Games and prerequisites.
- 2021-04-11 – Initial creation of this page.