Legends BitLCD Guide
Last Update: 12/4/2023
Video: AtGames Legends BitLCD Arcade Marquee Setup and Review
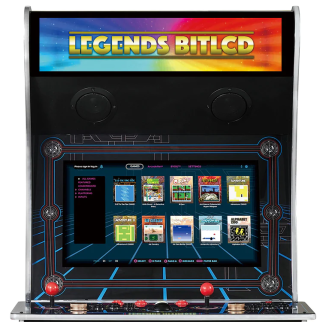
AtGames has released the latest version of their popular digital marquees for the Legends Ultimate called, the Legends BitLCD. This device is a replacement for the lighted marquee found in the ALU or the BitPixel (LED) marquee that you may also have installed. Instead of using LEDs, this accessory uses an LCD panel to display marquee artwork (static images or video).
After having the BitLCD for about a day, I was very impressed with the product and created this BitLCD YouTube short video. There was less than a day until the NOD-A 2022 was ending and wanted to make sure that anyone interested could at least catch a glimpse of the BitLCD.
Since then, I’ve been working on digging more into the technical details and capabilities of the device. You’ll find all that I know currently, below. The integration into the ALU is very good and seems to work well. However, there is a lot of artwork missing, at present. This will most certainly improve over the next few weeks as people begin receiving them and the community steps in to fill this gap.
If you ask my opinion if the BitLCD is a worthwhile upgrade over the stock or BitPixel marquee, I’m going to go with definitely! The price may be a turn-off for some, fully understand that. However, the price is certainly competitive as this is a very unique dimension for a display.
I hope you enjoy the content below and find it helpful. If you do, I appreciate your support by subscribing to the Wagner’s TechTalk YouTube channel. On this site, you’ll find supporting videos and guides on a number of technology topics and easily located on the guides page.
How-To link to a specific section on this Guide: go to the Table of Contents (below) and click a section to reference. Copy the URL from the address-bar of your browser and paste in your video description/post/blog. This will direct a viewer to a specific section in any of the guides you find on this site.
Table of Contents
Prerequisites
There are a few things you’ll need to complete this installation.
- USB Stick, formatted as FAT32 (16-32GB is likely plenty). If you’re unsure how to format as FAT32, here’s one method that I prefer to use. This method is recommended for the following reasons:
- It works on various operating systems: Windows, Mac, Ubuntu x86 and the Raspberry Pi.
- Windows will only allow formatting up to 32GB. If you want to use a larger capacity USB stick (likely not very necessary), Pi Imager can handle it.
- Make sure you remove any externally connected USB drives before using the Pi Imager. This is to minimize the possibility of formatting the wrong external drive.
- Philips head screwdriver.
Resources
The following are some helpful resources regarding the BitLCD:
- Where to buy a BitLCD (Amazon) – Where you can purchase a BitLCD.
- BitLCD Manual – The latest manual for the BitLCD.
- LegendsUltimate (Subreddit) – one of my most-visited places for information on the Legends platform. This subreddit is very active and be sure to say hello to the moderators. Always helpful and some great friends!
- FansOfsaUCE (Subreddit) – Lots of information regarding CoinOpsX builds and much more.
- The “Official” AtGames Global Arcade Fan Page – Great resource and folks discussing all-things AtGames Arcade-related.
Artwork Packs
- CoinOpsX BitLCD Marquee Video Pack 3.0 saUCEy Edition – This package from the CoinOpsX team includes over 1200+ Marquee videos for use with the BitLCD on the AtGames Legends Ultimate. In the above video, I’ll demonstrate how to set it up and demonstrate some examples of the marquee images.
- CoinOpsX BitLCD Marquee Pack 3.0 [FansOfsaUCE/reddit]- The CoinOpsX crew is back with an awesome set of new BitLCD Marquee’s (static images, not video marquees here). Click the Fans of Sauce link for a thread announcing it’s availability!
- JamesT1968 – JamesT has now made his BitLCD artwork available on the Pixelcade forums. There have been a number of updated images made since the above video was released and you’ll be able to find the latest here.
BitLCD Reviews
Below you’ll find BitLCD YouTube video reviews from content creators that I think you’ll enjoy. It’s always a good idea to not base a purchase decision based on one review. Also, don’t forget to subscribe to their channels!
- Legends BitLCD Adds Much Needed Nostalgia To Your AtGames Legends Ultimate [
MichaelBtheGameGenie ] - How to install BitLCD for Legends Ultimate and add more Art [ TampaTec ]
- AtGames BitLCD Unboxing [ The Tech Buzz Gaming ]
- Legends BitLCD Arcade Marquee Setup and Review [ Wagner’s TechTalk ]
Where to Buy
The AtGames BitLCD may be found at the following locations:


Accessories
Here is one thing you may want to consider adding to your BitLCD:
- Angled USB 2.0 Type-A Male to Female Extension Data Flat Slim FPC Cable – If you find yourself removing the BitLCD marquee often and want a little more convenient option, this flat extension cable may be what you’re looking for. Video: See how
BitPixel vs BitLCD

There are some important differences between the BitPixel (LED) vs the BitLCD. Just to make sure they are clear, please see the table below :
| Feature | BitPixel (LED) | BitLCD |
| Resolution | 128×32 pixels | 1920×360 pixels |
| Panel turns off when the power button is pressed on the ALU. | No. But it is possible via a 3rd-party accessory called the LBPA board. | Yes, no accessories needed. |
| OTG works without changes | No. You will need to use a USB A/B switch and power-cycle the machine to use OTG with the BitPixel connected (more here). | Yes (See Q&A section for the latest information this topic). |
| Separate Power Supply needed | Yes, included with the BitPixel. | No, power splitter and 4-Port USB hub included for internal installation. |
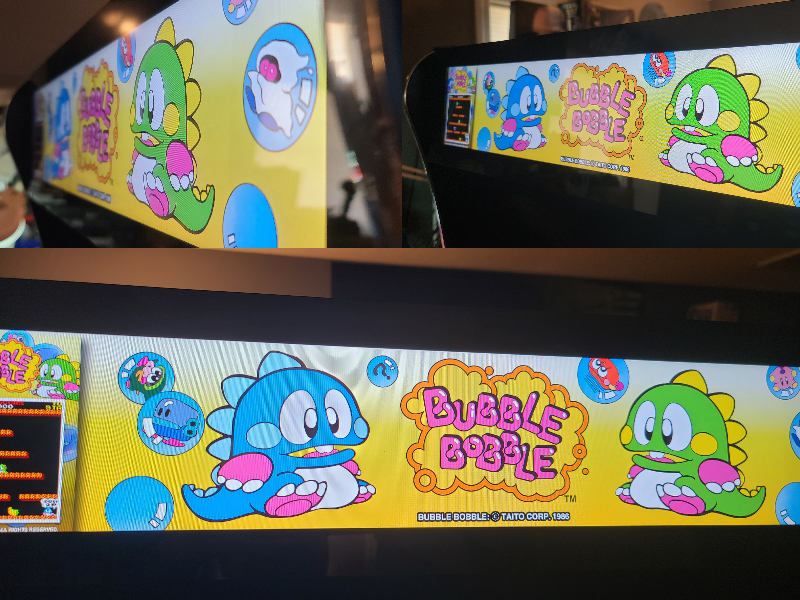
BitLCD Viewing Angles
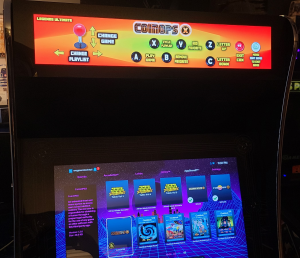
Viewing angles are an important aspect of a product such as the BitLCD. Granted, my camera isn’t the best and the images have been scaled to fit on this page. However, when viewing from an angle, the images look great! I see no “ghosting” effects or washed out colors. If you look at the ALU display from the same angles, that is roughly what to expect with the BitLCD. Below are some images to help demonstrate.
Q & A
The following are questions that have been asked and answers that I received from AtGames or found during testing :
- Will the BitLCD work identically on the ALU 1.0 as compared to the ALU 1.1? Installation and setting are identical on ALU 1.0 and ALU 1.1, except for:
- Screw holes on the marquee might be placed slightly differently from different factories. Installation for different screw patterns have been addressed in the Step 4 in the instruction manual (See Resources for the latest Instruction Manual).
- The USB cable needs to run outside connecting to the USB port on the control deck of the ALU 1.0 while the USB cable is connected to the USB hub inside the cabinet ALU1.1. This has been addressed in the Step 5 in the instruction Manual (See Resources for the latest Instruction Manual).
- Some games don’t have artwork available, why? It takes time for artwork approvals from IP owners. Please be patient and you can periodically check AppStoreX → BitLCD → Update Resources for the latest image artwork for the BitLCD. Also, you may find many community artwork packs available soon. See the Resources section for places to check for new artwork packs.
- Can the BitPixel work connected to the USB 2.0 port while the BitLCD is operating? Yes, this works. A segment will be added in the above video to demonstrate.
- When pressing the power button on the ALU, is it really removing power to the BitLCD? Yes, when you turn off the power to the ALU it does turn the signal off to the backlight on the BitLCD.
- What kind of display panel is being used in the BitPixel? TFT-LCD display.
- How can the BitLCD be used with a PC? Windows HDMI display monitor mode is not supported at this time. To be supported in a future update.
- What function does the HDMI port on the back of the BitLCD perform? At the present time, Windows display monitor mode is not supported. To be supported in a future update.
- Will the BitLCD work with any Legends device other than the ALU? I would hold off on purchasing the BitLCD for any devices other than the ALU 1.0/1.1/1.2 at this time. It’s unclear at this point how this would work as the power going into the BitLCD is supplied by the ALU (internally).
Installation and Setup
The following are some quick steps to assist with the BitLCD installation. This assumes you will be installing the BitLCD to the ALU 1.1 (not wall-mounted, see included documentation for wall-mount options).
- Turn off the ALU by pressing the Power button.
- Unplug the power from the back of the cabinet.
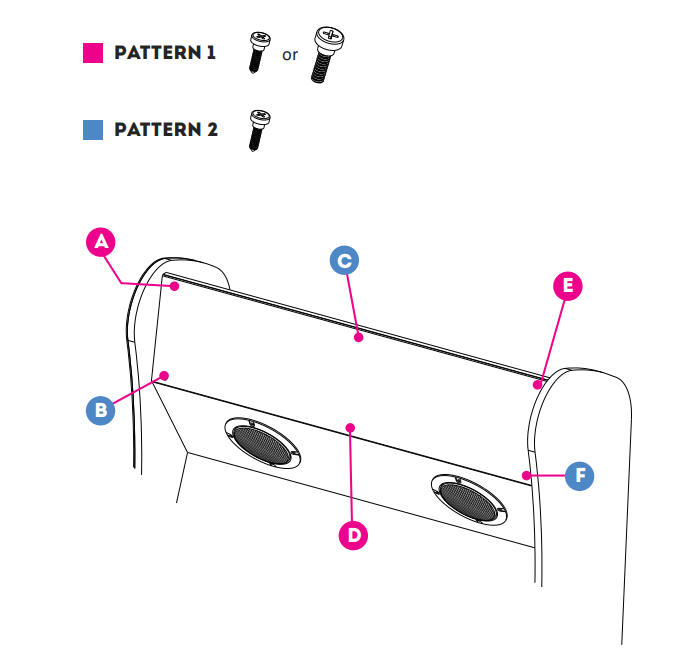
- Using a philips head screwdriver, remove all the screws except the top-middle screw on the top back panel of the ALU.
- Remove the top-middle screw and gently remove the panel from the back. Keep in mind, there are 3 cables connected to the bottom of the panel. CAUTION: slowly remove the back panel to avoid any stress/damage to the cables attached to the back panel (there are 3).
- Remove the two power cables and the Ethernet cable from the back panel. Set the back panel aside.
- If you previously installed the Legends BitPixel, unplug and remove the power adapter and USB cable going to the BitPixel. If your cabinet has the lighted marquee, remove the mounting screws at the top of the marquee and set it aside (it is no longer needed). Now insert the 3 mounting screws for the BitLCD in one of the patterns identified in the manual. For reference, I went with Pattern 2 (upside down “V”) on an ALU 1.1 cabinet.
- Make sure you have a FAT32-formatted USB stick and plug it into the USB port at the back of the BitLCD (far left, if flipped upside down). See the Prerequisites section for more information.
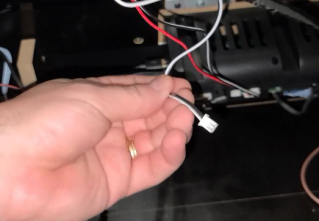
- There is a 2-wire small black and white cable connected to the ALU main board. This is for the stock light-up marquee. If it’s connected, you may want to disconnect it as it’s no longer going to be necessary.
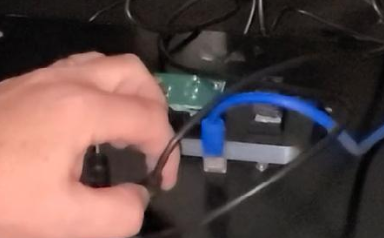
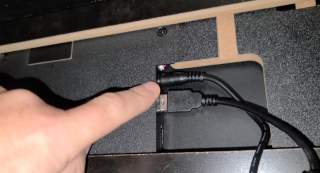
- Disconnect the USB cable going into the Main board of the ALU (far-right black box inside the cabinet).
- Plug the USB cable going from the Control Panel into the side of the included USB Hub that only has a single USB port.
- Connect the USB hub (male end) into the Main board of the ALU (far-right black box inside the cabinet).
- Take the included long USB cable and connect it to a USB on the hub.
- The other end of the included long USB cable should be connected to the USB port near the middle of the BitLCD (USB port near the power input) at the back of the panel.
- Next, take the long power cable included with the BitLCD and plug it into the BitLCD.
*NOTE for ALU 1.0 owners (from a viewer): On the ALU 1.0 I had to connect the power splitter outside the cab. The splitter did not fit the inside power port. I also had to heat up the glue holding my original Marque on to get that off.
- Connect both of the loose power cables into the power splitter/adapter (not the BitLCD power). Connect the long power cable from the BitLCD to the other power jack on the back panel of the ALU.
- Connect the Blue Ethernet cable to the back panel of the ALU.
- Re-install the back panel to the ALU, place a single screw at the top-middle to hold it into place and re-install the remaining screws.
- Plug the power cable back into the ALU.
- That completes this section of the installation! Now proceed to the next section to Prepare FAT32 USB Stick.
Prepare FAT32 USB Stick
We will now prepare the Flash Drive/USB Stick for use with the BitLCD.
- Plug the flash drive into your computer.
- We will be using Raspberry Pi Imager software to erase and format the Flash Drive as FAT32.
- Once you have downloaded and installed Raspberry Pi Imager, please launch it.
- Under Operating System, select the button that says Choose OS. Scroll down until you see Erase and select it.
- Under Storage, select Choose Storage and from the popup, please select your Flash Drive from the list. IMPORTANT: Please Make Sure You Select The Correct Flash Drive You Want To Format For The BitLCD.
- Select Write and from the popup please verify everything is correct and select Yes.
- Once the write has been successful, select Continue. You may now close the Raspberry Pi Imager. Then plug the USB stick directly into the BitLCD (USB port nearest the power input) and proceed to the next section, Update the BitLCD Firmware and Resources.
Update Firmware and Resources
In the following sections, we’ll update the Legends Ultimate (ALU) and the BitLCD firmware and resources.
*NOTE: You will need to be on ALU firmware version 5.67 for the following setup. If you’re unsure how to update the firmware on the ALU, please see below. If you’re already running 5.67 (or higher), you can skip this portion.
- Login using your ArcadeNet account using your Legends Id and password.
- On the top tab bar, go to Settings → Version (x.y.z) and press the A button.
- If no update exists, press the B Button to exit. Otherwise, select the Download option. Once complete, select the Update option (this may take ~10+ min. to apply the firmware update).
- The machine will restart and display the status while updating, then reboot once more when the firmware update has completed.
After installing the BitLCD into your Legends Ultimate and having installed firmware v5.67 (or higher), you’ll also need to update the firmware in the BitLCD and download the resources (folder structure, images, etc.) to the installed USB stick. All of this is performed using the BitLCD application in AppStoreX. This section assumes that you have prepared the FAT32-formatted USB stick and have installed the BitLCD into your Legends Ultimate. Please proceed below:
- Navigate to the AppStoreX tab.
- Launch the BitLCD application.
- Press A to Select.
- You will be prompted to Install BitLCD, select the Install button and press A.
- Press A to launch, navigate to the far-right option to Update BitLCD.
- Select the option to Update BitLCD Firmware. This process may take several minutes. Once done the BitLCD will restart. You will see a message stating The update is complete. Please wait for the BitLCD to restart.
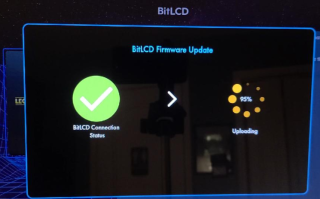
- Once the BitLCD has restarted, launch BitLCD →Update BitLCD → Update BitLCD Resources. This process will take much longer (~20 minutes). It will create the initial folder structure on the USB Stick and download any available 1st-party artwork. Once complete, you’ll see the message The update is complete.
- This concludes the section for updating the firmware and downloading the resources. You can now select options and any new artwork should appear for gameson the BitLCD
*NOTE – At the time of this writing, images were still being approved/added. From the Games tab, select TAITO Arcade to see some of the available marquees. Check the BitLCD application periodically for updates and re-run the Update BitLCD Resources from time-to-time to get the latest.
Access the BitLCD USB Stick
You don’t need to remove the back panel to get access to the USB Stick used for the BitLCD. To assist, please see the following:
- Power off the ALU.
- Gently slide the BitLCD upward to release it from the 3 screws holding it in place.
- Carefully bring the panel down to a comfortable position. NOTE: Be very cautious when removing the panel. There are two cables attached to the back (power and USB) and you might need to to help the cables down as to not place any unnecessary strain on the connectors attached to the BitLCD.
- Remove the USB Stick from the back of the BitLCD.
- Gently set the ALU on the control panel.
- You can now copy any new custom artwork, etc. from your computer to the USB stick.
- Once done, re-install the USB Stick into the back of the BitLCD.
- Gently feed the cables back into the marquee area and slide the BitLCD over the screw locations on the back.
- Turn the ALU back on and enjoy your newly added artwork!
BitLCD Images

Ideally, images for the BitLCD will be 1920x360p for optimal viewing. Static images may be .jpg or .png formats. Animated videos may also be used and should be in .mp4 format with the same resolution.
The BitLCD does have a border around the display. It’s roughly 1″ at the top and bottom and about 1-3/4″on the left/right side.
Creating Custom Artwork
There are any number of graphics applications that can be used to create custom artwork for the BitLCD. I’m not going to go into too much detail on this topic as everyone is going to have their own favorite graphics and video generation applications they prefer to use. However, I will mention a few that I use and if you want to use them, great. If not, you can do the same with most other packages available.
Static Marquee Images
At the time I received the BitLCD, there was no CoinOpsX artwork available. I’m sure there will be community artwork packs created to fill this gap. In the meantime, I set out to find a “quick way” to generate some. Obviously artwork is copyrighted material and I can’t provide direct links for what was used below. However, using your favorite search engine you may find some using “mame marquees” for the search criteria.
Batch Convert Images
I didn’t want to manually convert all ~4k images, this guide and the above video would never have been created. So, using the artwork mentioned above, I downloaded them and ran them through a batch conversion process. Keep in mind, some images will be scaled and the artwork may look a bit stretched for many (others will look fine). It really depends on the image. This is still 1000x better than manually converting the images, until downloadable packs are created by the community. The process goes fairly quick (within about 5-10 minutes). Below are the basic steps I took.
- Download and install IrfanView from here.
- The set of marquees I used was divided into two parts Full-Set 0.219 1 and Full-Set 0.219 2. There will be a lot of unnecessary artwork, I chose to convert it all (less time consuming than deleting).
- Download and extract all marquees you wish to convert (see hint above) to a single folder. If you use the pack I downloaded, it’s in two parts so copy all files into a single folder.
- Using File Explorer, create a 2nd subfolder for the resized marquee images (Output folder for result files).
- Launch IrfanView Thumbnails.
- From the left-side explorer, navigate to the folder containing the marquees. You should see thumbnail images on the right for all the artwork at this point.
- Select one of the thumbnails and then Select all files by pressing Ctrl+A or the Options → Select All menu.
- Press the “B” (for batch) button.
- A dialog will appear for the Batch conversion. Make the following assignments:
- Batch conversion is selected.
- Set the Output format to JPG – JPG/JPEG Format.
- Set the Output folder to the folder you created about for the Output folder for result files.
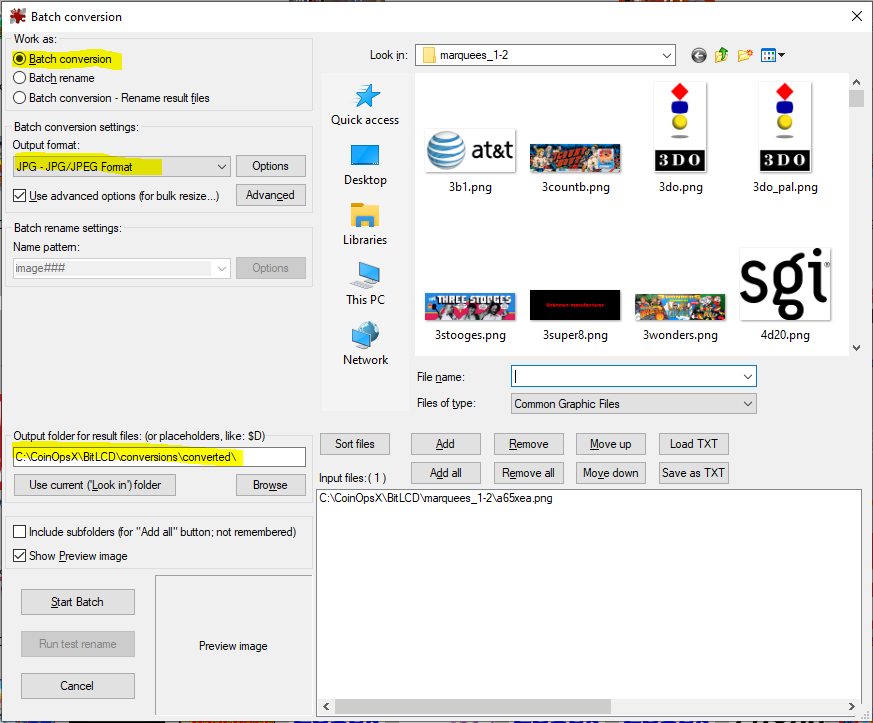
- Click the Advanced button.
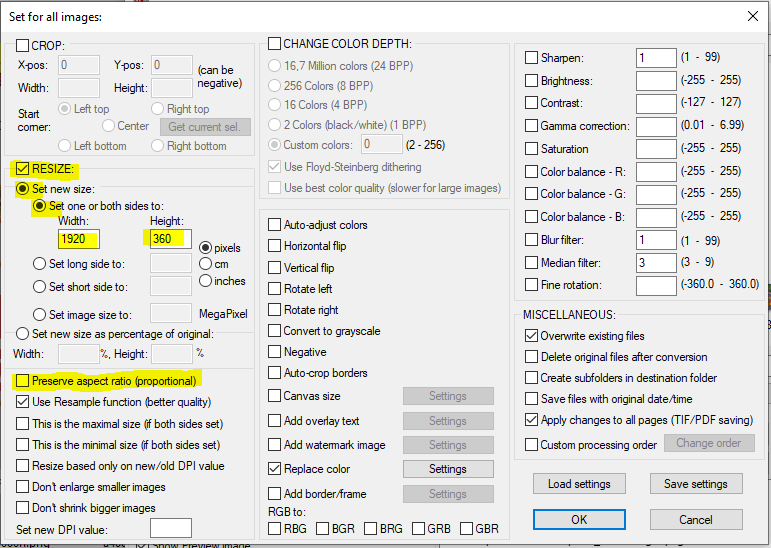
- Make sure the following selection are set:
- RESIZE is checked.
- Set new size, Set one or both sides to are selected.
- Set the Width to 1920 and the Height to 360 (pixels)
- Make sure Preserve aspect ratio (proportional) is unchecked. If you enable this setting (which might make sense, initially) the artwork will appear on the far-left of the marquee.
- The Use Resample function (better quality) option is checked.
- Click OK to close the dialog.
- You’ll notice the input files are in the list at the lower-right. These are all the images that will be converted to the new size we assigned above.
- Click the Start Batch button. Depending on the number of files selected, this process may take 5 min. (or more).
- Once done, using File Explorer, locate the subfolder you assigned for Output folder for result files. This folder now contains all the converted marquees that will now fit on the BitLCD. Now proceed to the next section to copy the artwork to the BitLCD.
Copy Marquee Artwork to BitLCD
If you’ve converted your own artwork, as described above, or received a downloadable set of artwork you will then want to copy it to the USB drive used by the BitLCD. The instructions below will step you through it:
- Power off the ALU.
- Gently remove the BitLCD from the hangers holding it (raise up and out). For a more detailed explanation, see here.
- Locate the USB stick and remove it from the back of the BitLCD and position the BitLCD back to it’s location on the ALU marquee area.
- Plug the USB stick into your computer.
- Navigate to the USB stick, you should see a folder at the root called bitlcd. This folder contains some additional subfolders such as those below:
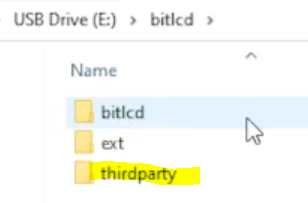
- Marquee artwork for CoinOpsX should be copied to the /bitlcd/thirdparty subfolder. While navigating the menu options/games, any 1st party artwork found will be pulled from /bitlcd/bitlcd folders first. If not found there, artwork that exists in /bitlcd/thirdparty will be used – if found and the image file name matches the selected option or game title.
Animated Marquee Video
Comment in the video above if you’re interested in a tutorial on this. It would be time consuming to create, so think it’s best to gauge interest before proceeding.
Issues
The following are any issues encountered during my testing. Issues noted below may be the result of using test firmware and may not exist once the BitLCD application is available in AppStoreX :
- FDX USB Drive may become inaccessible after leaving CoinOpsX running for an extended period of time – Before turning in for the evening, I left CoinOpsX running. It was cycling through the game list and everything seemed fine. When I checked on it in the morning, there was an error that stated USB Fail. Please mount USB disk from Flash Drive X. Unfortunately, the only way to resolve this was to power-cycle the machine. –Issue has been reported to AtGames.
- Control Panel not Responding after power-on – When I power-cycle the ALU, I’ve noticed the Bluetooth pairing is enabled (blue LEDs in the upper-right are blinking). Likely a result of the test firmware needed for testing, however the control panel won’t respond when this happens. To turn off the pairing, press+hold the P2 button about 7 seconds. This is apparently an issue also in v5.67, notified AtGames.
CoinOpsX Reference Marquee
Susan, a WTT viewer, left a comment in the BitLCD video with a brilliant idea: use the CoinOpsX reference cards (from this guide) as a marquee image! The image will only appear when CoinOpsX is selected from AppStoreX. If someone wants to go through the task of setting all CoinOpsX image filenames to match the name of this marquee, it would then show this reference card in the event you don’t have any artwork for the game. Then, as you acquire new marquee artwork, just copy over this one. If anyone does this, let me know 🙂
How to use it
Copy it to your BitLCD’s FAT32-formatted USB stick in the following two folders: \bitlcd\thirdparty and \bitlcd\thirdparty\byog . Download Image (right-click and select Save Link As)

Troubleshooting
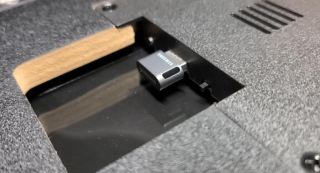
- No Video signal and/or unable to update BitLCD Firmware – Make sure your FAT32-formatted USB stick is connected to the USB port near the HDMI port on the back of the BitLCD. Also, make sure the small switch is positioned towards the USB port.
- Unable to update the BitLCD Firmware – If you’re unable to update the firmware/resources, try unplugging the power connection from the back of the ALU. Leave it off for about 15 seconds and plug it back in. Then perform the following:
- Install the ALU 1.0/1.1/1.2 firmware (version 5.67 or higher)
- Install/update the BitLCD app
- Run BitLCD app → Update BitLCD → Update the BitLCD firmware
- Run BitLCD app → Update BitLCD → Update the BitLCD resources
- I have a black screen on the BitLCD and unable to update the firmware/resources – The steps below should resolve this issue (big thanks to The TechBuzz and AtGames Customer Service for this solution).
- First, re-format the FAT32 drive (instructions here).
- Download the bitlcd_update_online.img.
- Once it has successfully been downloaded, copy the bitlcd_update_online.img file to the the root of the Flash Drive (one used at the back of the BitLCD).
- Once you have successfully copied the file to the root of the Flash Drive, properly eject the Flash Drive from your computer.
- Now take the Flash Drive, with your ALU powered off, plug the Flash Drive into the BitLCD. IMPORTANT: Please make sure the little switch is up closest to the USB port
- Once the Flash Drive is plugged in to the BitLCD, you may power on the ALU. If upon powering on you receive the flashing blue BT pairing lights, please hold down the P2 button for 7-10 seconds and this should take it out or BT pairing mode and turn the lights off.
- Once Powered on and you have been successfully signed in, go to the AppStoreX tab and launch the BitLCD application.
- Once launched, please scroll over and select Update BitLCD.
- If the above still fails, try the above again using a different or new flash drive. If it still fails, please contact AtGames Customer service here and complete the form to generate a support ticket.
- Video marquees are not playing, but static marquees are -why? I had a viewer mention that after you apply video marquees to the BitLCD USB stick, then power off the ALU by disconnecting the power at the back, that the videos will stop playing. I tried this, they stopped showing for me as well. The fix was to update the BitLCD firmware (not the resources). Once done, the video marquees then began playing again. I’ve notified AtGames that this appears to be a BitLCD firmware issue to be corrected.
- The control panel isn’t responding and there are blue LEDs flashing – Press and hold the P2 button for 7-10 seconds, this should turn off Bluetooth pairing mode. The blue LEDs will stop flashing and you’ll be able to use the control panel normally.
- If none of the above resolve your issue – Please contact AtGames Customer service here and complete the form to generate a support ticket.
Change Log
- 2023-12-04 – Per request, added Where to Buy.
- 2023-07-18 – Updated the BitLCD 3.0 Pack Link.
- 2023-06-05 – Added MichaelBtheGameGenie’s review of the BitLCD! Great job Mike!
- 2023-02-15 – Minor updates.
- 2023-01-22 – Added video marquees are not playing to the troubleshooting section.
- 2023-01-19 – Added CoinOpsX Video and Image Marquee pack.
- 2023-01-04 – Minor updates.
- 2022-11-13 – Added the CoinOpsX BitLCD Marquee Pack link here.
- 2022-10-24 – Added a little more info. to the Troubleshooting section.
- 2022-09-29 – Added TampaTec’s BitLCD review; Added additional Troubleshooting information; Added CoinOpsX Reference Card BitLCD Marquee.
- 2022-09-19 – Minor updates.
- 2022-09-16 – Added a new Accessories section.
- 2022-09-15 – Minor updates.
- 2022-09-14 – Updated Resources with the latest link from JamesT; Added BitLCD Reviews section.
- 2022-09-12 – Updated Issues section.
- 2022-09-11 – Various additional updates such as: installation for ALU 1.0 customers. Added a new Troubleshooting section.
- 2022-09-10 – Added BitLCD video.
- 2022-09-09 – Added pixel resolution in BitPixel vs BitLCD.
- 2022-09-08 – Minor updates and metadata added.
- 2022-09-06 – 2022-09-07 – Continuation/Public release
- 2022-09-05 – Start to this guide.