Asus ROG Ally Guide
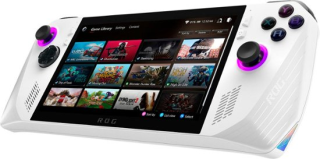
The ASUS ROG Ally (RC71L) is a gaming handheld that can play most of the popular PC titles as well as retro gaming systems. The ROG in the name stands for Republic Of Gaming. It is designed to compete head-on with the Steam Deck. While it’s design is clearly focused as a handheld gaming machine, that’s not it’s only use. It is a small PC and is quite capable of running all your favorite productivity applications as well. As this device ships with Windows 11 pre-installed, this is the first-ever handheld that I used to actually create/write a guide. That is, much of what you see here was written directly on the Asus ROG Ally with a dock, external keyboard and mouse attached. Even much of the artwork was created directly on this handheld.
In the sections below, we’ll take a look at a number of ways you may want to use the device. Some you’ll expect, such as gaming, which will ultimately be it’s claim to fame and a key focus for this guide. Other sections will cover using this ROG Ally in ways that are borderline sci-fi. It will make more sense later once I develop that section.
I hope the information you find on this guide will help you get the most out of your Asus ROG Ally. If you want to support my work, I hope you’ll consider subscribing to the Wagner’s TechTalk YouTube channel. Here, you’ll find videos on a number of technology topics – now including, the Asus ROG Ally!
How-To link to a specific section on this Guide: go to the Table of Contents (below) and click a section to reference. Copy the URL from the address-bar of your browser and paste in your video description/post/blog. This will direct a viewer to a specific section in any of the guides you find on this site.
Table of Contents
Resources
Below are some helpful resources for the ASUS ROG Ally handheld:
- Purchase Links [ Best Buy | ASUS Amazon Store ] – The ASUS ROG Ally is currently only available via pre-order from Best Buy.
- ASUS ROG Ally (RC71L) Product Page – ASUS ROG Ally product page on the asus.com website.
- ROG Ally FAQs – Some FAQs from the ROG Ally site that you may find helpful.
- Republic of Gamers (ROG Ally) Discord – Great community to discuss the ROG Ally.
- ASUS ROG Ally Guide (Github) – Great community resource on all things ROG Ally.
- ROG Ally Subreddit – Lots of excellent information and a great place to ask questions or find answers to specific functionality.
- ROG Ally (2023) RC71L Driver Download page (Official) – Driver download page for the device.
- ROG Ally Articles (Official) – Various guides and articles.
- ROG Ally (2023) RC71L User’s Manual (Official) – The User’s Manual for the device in various languages (PDF download). English version here.

Q&A
Below we’ll assist with some of the more common questions you may have about the Asus ROG Ally:
- What kind of games can I play with the ROG Ally? Pretty much anything you can play on any other PC. All major launchers are supported such as: Steam, XBox Game Pass, Epic Games Launcher, Ubisoft Connect, EA and GOG Galaxy. Games that are downloaded are automatically imported into the Armoury Crate Game Library.
- Can I use the Ally for more than just gaming? Certainly, it is a Windows PC and works very well as a regular PC also. However, I would recommend a few accessories if you go that route. Primarily, a docking station, external keyboard and mouse. See the Accessories section for some that I’ve found particularly helpful.
- What kind of microSD card should I get? The ROG Ally supports UHS-II microSD cards which provide the fastest transfer speeds, with lower capacities and higher cost (Examples: Lexar and ADATA). What is best for you will depend on your price vs. performance preference. That is, are you willing to pay a higher price for the fastest card available, even though the amount of storage will be relatively small? I personally recommend using a U3 A2 card, those cards have much higher capacities, better prices, albeit not as fast as a UHS-II card. A few cards I recommend are: Lexar 1TB (what I’m using now) and the Samsung 512GB EVO Select. I’ve used both cards with the Steam Deck and the Lexar card in my ROG Ally and both have worked perfectly fine. More on storage expansion here.
- How does the ROG Ally compare to the Steam Deck? Please see here for a comparison of features.
- I’ve heard about Armoury Crate, what is it? Please see here for more information regarding the Armoury Crate software that is included on the device.
- Can I use the Asus ROG Ally just like any other PC? Yes, in fact we’ll cover some of that in the Use-Case section.

Accessories
The following are some accessories that I’ve found helpful that you might as well.
- Lexar 1TB U3 A2 MicroSD Card – Expanding the available storage via a microSD is the easiest and potentially least-expensive method. There are various brands that work just as well as this recommendation, including those from Samsung, SanDisk, etc. Although, I’ve had no issues with this card and has performed well. For information on microSD cards, please see here.
- Foldable Bluetooth Keyboard with Touchpad (Full Size) – Much of this guide was written using this folding keyboard connected via Bluetooth to the Ally. It works very well, though I’m not a fan of touchpads in-general and instead use a mouse along with the keyboard. However, the keyboard works great. You’ll first press the Function key and one of the 3 available Bluetooth keys (1-3). Then, enter pairing mode (Function + C), then pair the keyboard to by right-clicking the Bluetooth taskbar icon and Add a Bluetooth Device. This keyboard includes a USB-A to USB-C cable for charging, or you can use your own.
- Dock for your ROG Ally (unofficial / single HDMI Output) – If you’re looking for a compact yet flexile docking solution for your ROG Ally, this one works well. It has 1 HDMI 2.0 4k@60Hz port, Ethernet, adjustable integrated stand, 3 USB-A 3.0 ports and power delivery (PD) of 100W. This is ideal if you want to use the Ally as a desktop PC or want to simply connect an external keyboard and mouse. It’s also much cheaper and capable than the official dock.
- Dock for your ROG Ally (unofficial / dual HDMI Output) – If you need two HDMI ports (i.e. for this use case), then you may instead want this Docking Station. As this dock doesn’t have a stand to prop up the Ally, this one should work well. I didn’t like how the USB-C cable stood straight up on the top of the Ally, so I also picked up a 2-pack of 90 Degree USB-C male to female adapters.
Why / Why Not?
Below we’ll highlight some reasons why and why not to consider the Asus ROG Ally.
| WHY? | WHY NOT? |
|---|---|
| Performance – The ROG Ally is currently one of the most powerful handheld PC’s available on the market today. | Cost – This device isn’t cheap. Costing $649.00 USD, it is a rather expensive device. |
| Familiar OS (for many) – The ROG Ally ships with Windows 11 which may be a pro/con depending on your experience with the operating system. If you prefer a machine that is not running Windows, yet similar in capabilities you may find the Steam Deck more to your liking. | It’s Big – The unit feels good in your hands, but it’s clearly not a device you’ll be able to put in your pocket and carry with you without a case. If you’re looking for something a little more pocketable (and cheaper), some of these may be of interest. |
| Windows Game Play – Of course, the main reason anyone would consider the ROG Ally is to play modern PC titles. The Ally does this particularly well and the built-in Armoury Crate application and Command Center, it does work well on the Windows platform. | Did I miss one? Let me know. |
| Many Connectivity Options – You can easily connect a dock, keyboard+mouse, external display and any number of additional devices to the Ally. For a few ideas, please see the Accessories section. | |
| Retro Gaming – The Ally is a retro-gaming beast! You’ll be able to play games on many systems on the Ally that just aren’t possible with other devices. We’ll discuss this in more detail in the Emulation section of the guide. | |
| Storage Expansion – the Ally comes with a 512GB SSD built-in. This is a decent amount of storage capacity, however many modern games can consume it quickly. You can also expand the storage using a microSD card. |
Storage Expansion

You will most likely want to supplement your internal storage on the ROG Ally with a microSD card. What size microSD card to get really depends on the type and number of games you want to have available on the device.
The ROG Ally supports UHS-II microSD cards which provide the fastest transfer speeds, with lower capacities and higher cost (Examples: Lexar and ADATA). What is best for you will depend on your price vs. performance preference. That is, are you willing to pay a higher price for the fastest card available, even though the amount of storage will be relatively small? I personally recommend using a U3 A2 card, those cards have much higher capacities, better prices, albeit not as fast as a UHS-II card. A few cards I recommend are: Lexar 1TB (what I’m using now) and the Samsung 512GB EVO Select.
I personally recommend a U3 A2 card. A2 represents the Application Performance Class and a class of 2 will provide much better performance over A1 cards. A U3 card provides faster write speeds over that of U1 cards, 30MB/s vs 10MB/s.
Many of the most-recent titles can consume as much as 30-100GB (or more). However, if you primarily want to use the Ally for emulation those will typically consume much less storage. Balancing the amount of storage you will want or need can be tricky. If you start with a smaller capacity microSD card such as 64/128GB, you may quickly find that a 512GB or even a 1TB card might have been a better choice. You can certainly change your mind later and swap microSD cards, if needed.
Comparison
Below we’ll compare the Asus ROG Ally with similar devices in this class.
Steam Deck
The Asus ROG Ally is a clear and direct competitor to the Valve Steam Deck. Both devices are fully capable PC’s. While the Steam Deck has SteamOS pre-installed, you can also run Windows on the Steam Deck. In the table below, you’ll find a breakdown of the specifications of each device to help you determine which is most important to you. Keep in mind, there is a $50 price difference between the ROG Ally and the Steam Deck’s higher-end model.
| Specification | ASUS ROG Ally | Steam Deck |
|---|---|---|
| Price | $699.99 (USD) | $399.00 – $649.00 USD (depending on options) |
| CPU | AMD Ryzen Z1 Extreme Processor | Zen 2 4c/8t, 2.4-3.5GHz (up to 448 GFlops FP32) |
| GPU | AMD Radeon™ Graphics (AMD RDNA™ 3, 12 CUs, up to 2.7 GHz, up to 8.6 Teraflops) | 8 RDNA 2 CUs, 1.0-1.6GHz (up to 1.6 TFlops FP32) |
| RAM | 16GB LPDDR5 on board (6400MT/s dual channel) | 16 GB LPDDR5 on-board RAM (5500 MT/s quad 32-bit channels) |
| APU Power | 9-30W | 4-15W |
| Storage | 512GB PCIe® 4.0 NVMe™ M.2 SSD (2230) | • 64 GB eMMC (PCIe Gen 2 x1) • 256 GB NVMe SSD (PCIe Gen 3 x4 or PCIe Gen 3 x2*) • 512 GB high-speed NVMe SSD (PCIe Gen 3 x4 or PCIe Gen 3 x2*) All models use socketed 2230 m.2 modules (not intended for end-user replacement) All models include high-speed microSD card slot |
| Display | • 7-inch • FHD (1920 x 1080) 16:9 • IPS-level • glossy display • sRGB:100% • Adobe:75.35% • Gorilla® Glass DXC • Gorilla® Glass Victus™ • Touch Screen (10-point multi-touch) • Refresh Rate: 120Hz • Response Time: 7ms • Brightness: 500nits • FreeSync Premium |
• Resolution: 1280 x 800px (16:10 aspect ratio) • Size: 7³ diagonal • Brightness: 400 nits typical • Refresh rate: 60Hz • Touch enabled: Yes • Sensors: Ambient light sensor |
| Connectivity | Wi-Fi 6E(802.11ax) (Triple band) 22 + Bluetooth® 5.2 (Bluetooth® version may change with OS version different.) | • Bluetooth: Bluetooth 5.0 • Wi-Fi: Dual-band Wi-Fi radio, • 2.4GHz and 5GHz, 2 x 2 MIMO, IEEE 802.11a/b/g/n/ac |
| Audio | • AI noise-canceling technology • Hi-Res certification • Dolby Atmos • Built-in array microphone • 2-speaker system with Smart Amplifier Technology |
• Stereo with embedded DSP for an immersive listening experience • Dual microphone array • Multichannel audio via DisplayPort over USB-C, standard USB-C, or Bluetooth 5.0 |
| Battery | 40WHrs, 4S1P, 4-cell Li-ion | 40Whr battery. 2 – 8 hours of gameplay |
| Power Supply | TYPE-C, 65W AC Adapter, Output: 20V DC, 3.25A, 65W, Input: 100~240V AC 50/60Hz universal | 45W USB Type-C PD3.0 power supply |
Button Reference
Before using the Armoury Crate software, it’s a good idea to familiarize yourself with the main buttons and functions of the device. The information below should be a helpful initial resource.
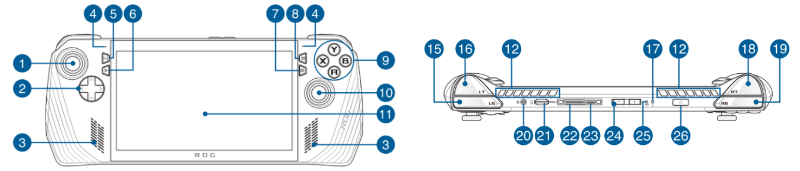
| 1. Left stick | 14. Macro 2 button (M2) – See below for some additional functions |
| 2. Directional buttons (d-pad) | 15. Left bumper (LB) |
| 3. Audio speakers | 16. Left trigger (LT) |
| 4. Array microphones | 17. Power indicator |
| 5. View button | 18. Right trigger (RT) |
| 6. Command Center button (more info. here) | 19. Right bumper (RB) |
| 7. Armoury Crate button (more info. here) | 20. Headphone/Headset/Microphone jack |
| 8. Menu button | 21. microSD slot (supports up to UHS-II) |
| 9. A/B/X/Y buttons | 22. ROG XG Mobile interface |
| 10. Right stick | 23. USB 3.2 Gen 2 Type-C/DisplayPort 1.4/Power (DC) input combo port |
| 11. Touch Screen | 24. Volume buttons |
| 12. Air vents | 25. Two-color battery charge indicator |
| 13. Macro Button (M1) – See below for some additional functions | 26. Power button/Fingerprint sensor |
Additional button functions:
- Ctrl+Alt+Del – If you press and hold the Command Center button, it will invoke Ctrl+Alt+Del. This will allow you to Lock the device, Switch the user, Sign out, Change your password, Open Task manager or Power off/Restart your device.
- Take a screenshot – Hold the M1 or M2 button and tap the A button.
- Record a video – Hold the M1 or M2 button and press Y.
- On-screen keyboard – Hold the M1 or M2 button and press UP on the d-pad.
Armoury Crate
The ROG Ally includes a powerful application pre-installed to assist in maximizing the usefulness of your device, called Armoury Crate. It is a launcher for your games, information center, configuration tool and much more. We’ll touch on each of the primary sections below.
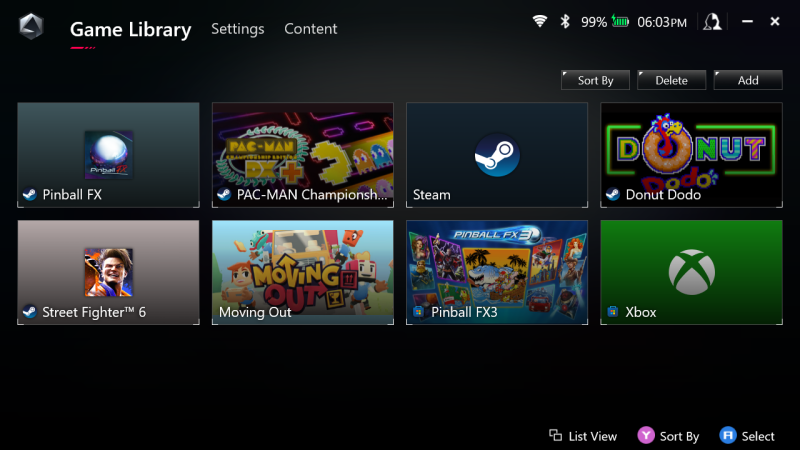
Game Library
Armoury Crate may be may be opened using the button just below the menu or 3 line button (see button reference). When the application is first started, the Game Library tab will be selected by default. From here, you can see individual games and platforms that are available to launch. You can select by using the d-pad or left-stick and then press the A button to launch. Below is what my Game Library currently looks like, for reference:
Settings
You can use the top LB or RB buttons to alternate the selected tabs, use the touch screen or navigate using the d-pad/left joystick. Navigate to the Settings tab, on the left you will find a lot of options for configuring and customizing the device. On the right, you’ll see Edit Command Center, there you can customize what appears when you press the Command Center button (see button reference).
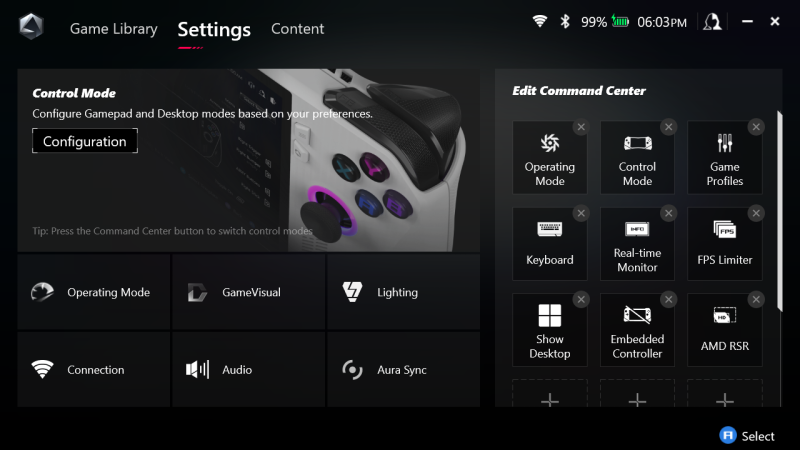
Below, we’ll cover some of the main options available under Settings:
| Feature | Description |
|---|---|
| Operating Mode | Operating Mode – Allows customizing the performance of the device (Windows, Silent, Performance, Turbo or manual configuration). System Stats – Display statistics for the CPU, GPU, Memory (RAM) and Storage (internal and microSD) as well as the Fan Speed. Eco Assist – Provides two options for Extreme Standby Mode which extends battery life, including disabling the power indicator LED light. Modern Standby Assist will assist in entering hibernate mode to save battery power and avoid excessive battery drain. GPU Settings – By default, the ROG Ally is set to utilize 4GB of it’s 16GB of RAM for the integrated graphics. You can set this value to Auto or 1-8GB. 3-4GB is what I would personally recommend leaving it set to. Lowering from 4GB to 3GB will provide a little extra RAM to be used by Windows. |
| GameVisual | There are a number of options here for adjusting the color temperature based on the content you’ll be playing/watching. Some of the available options are: Default, Racing, Scenery, RTS/RPG, FPS, Cinema, Eyecare and Vivid. |
| Lighting | There are two main options, these are: Lighting – allows you to change the LED lighting around the left/right joystick in a number of ways, such as: Static, breathing, Strobing, Color cycle, Rainbo and Aura Sync. If you play around with the settings and don’t like the changes, you can click the Reset to default button. Settings – Allows you to customize the lighting settings such as if the lights remain on during boot up/shutdown, while on battery power, when plugged in, etc. |
| Connection | Wi-Fi – Allows connecting to a Wi-Fi network. Bluetooth – Allows pairing the device to another Bluetooth device. |
| Audio | Microphone Modes – Provides various options regarding the audio quality including: Cardioid Mode, Stereo Mode, Omnidirectional Mode or Single-Presenter Conference call. Speaker modes – Utilizes AI Noise-Canceling Speaker to filter out non-human sounds (i.e. musical instruments, ambient noise, dog barking, etc.). There are 3 settings: Low, Mid and High. |
| Aura Sync | Sync devices – Allows the Aura (lighting) settings to be synchronized across multiple devices. Aura effects – allows you to change the LED lighting around the left/right joystick in a number of ways, such as: Static, breathing, Strobing, Color cycle, Rainbo and Aura Sync. If you play around with the settings and don’t like the changes, you can click the Reset to default button. |
| Edit Command Center | The options displayed here will appear when you press the Quick Launcher button (see button reference). You can Move, Delete or add additional tiles and organize them according to your preference. I personally leave them at the default, but that may change in the future. |
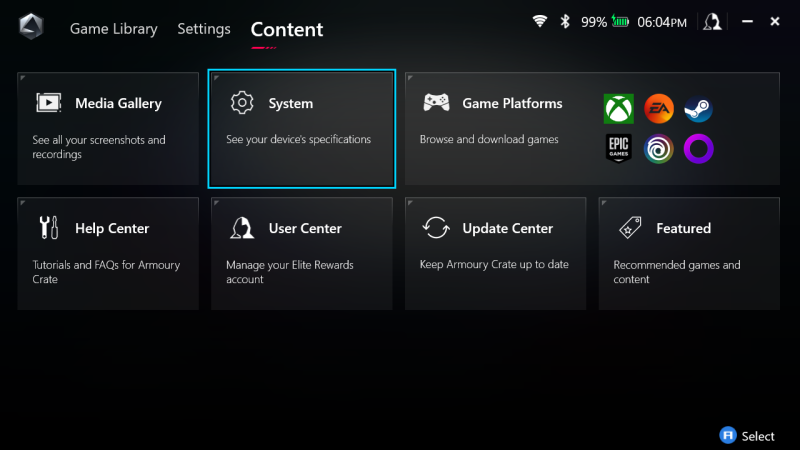
Content
The Content tab within Armoury Crate contains miscellaneous options for determining more information about the machine, updating, adding Game Platforms and general system information. In the table below, we’ll touch on each of these options in a bit more detail.
| Option | Description |
|---|---|
| Media Gallery | In this section, you can press one of the macro buttons (M1/M2) on the back of the unit plus the A button to perform some function. A few examples Macro+A to take a screenshot, Macro + Y to use the screen recording function. |
| System | Device Info – provides information regarding te processor, serial number, display, memory (RAM) and storage. Storage – Identifies the amount of local / external storage, including the amount of storage used. You can also use the Media save location option to change storage from local to external storage (i.e. microSD). You can Manage screenshots/recordings or move all media from/to local or external storage. About – Provides version information and additional details. |
| Game Platforms | Indicates what Game Platforms are installed. If one is not installed, clicking the tile will take you to the platform website to allow installing the game platform. |
| Help Center | Tutorials – Various brief on-screen tutorials (animated gifs) that demonstrate some basic functions. About XG Mobile – Brief information on how to unlock/activate the XG Mobile dock. FAQ – Various FAQs regarding usage of the device. |
| User Center | Unsure of what this is used for, indicates it’s unable to connect on my machine. I assume it’s to provide service/support. |
| Update Center | Allows you to check for updates across your device. It’s a good idea to periodically click the Check for Updates button and apply any updates for the device. |
| Featured | Features various Game Deals, Content Platform, Recommended and Redemption of games that are available at discounted prices. |
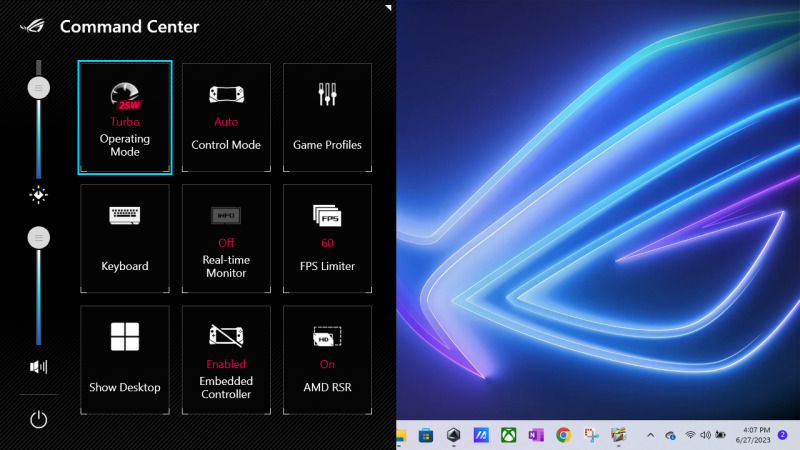
Command Center
You can access the Command Center (or Quick Launcher) by pressing the associated Command Center button to the right of the d-pad (see button reference). By default, some common commands are already provided. You can customize the order and options available in Settings → Edit Command Center (right side of the screen), see the Settings section for additional information regarding customization.
There are a number of commands that can be added. Below, we’ll discuss some of the key commands that you’re most likely to want to become familiar with. In the image below, you’ll see an example of the Command Center appearing on the left of the screen.
| Option | Description |
|---|---|
| Operating Mode | Single-tapping this option will toggle the performance of the device, by default these are the available options: 25W (Turbo), 10W (Silent) and 35W (Performance) where the “W” is Watts (power). |
| Control Mode | This is an option you’ll want to become familiar with quickly. The Control Model allows you to change how the navigation of the device is currently set. Auto – In Auto mode, the device will attempt to automatically set the control options based on the active window being used. However, Auto isn’t always right. For example, if using EmuDeck WE, you must manually set the Control Mode to Gamepad to be able to navigate the tiles. Gamepad – Gamepad mode will allow you to use the d-pad/left stick in the same way as cursor keys on a keyboard. This is ideal for navigating many UI’s such as Steam, XBox, Emulation Station, etc. Desktop – When set for Desktop mode, you can use the right stick as a mouse pointer to navigate the screen. You can also left-click using the RB button and right-click with the RT button (see button reference). |
| Game Profiles | Opens the Armoury Crate application to allow selecting the Control Mode (Gamepad Mode or Desktop Mode). |
| Keyboard | Brings up the on-screen keyboard. You can also bring up the on-screen keyboard with this how-to. |
| Real-time Monitor | This option may be toggled on/off and provides a transparent overlay indicating some key metrics including CPU, GPU, APU WATT, FPS (frames-per-second), Temperature and battery level. |
| FPS Limiter | This is a useful feature for increasing/decreasing the performance of the device which can extend or reduce battery life depending on your selection. There are five options that can be toggled by tapping: 15, 30, 45, 60 or Off. The lower the fps, the less battery consumption you’ll experience, the higher it’s set the more power it will consume. |
| Show Desktop | Minimizes all Windows with the exception of the Command Center, which you’ll toggle by pressing the Command Center button. |
| Embedded Controller | If you’ll be using an external controller (i.e. wired or wireless) instead of the controls on the ROG Ally, you can toggle the internal controller on/off with this option. |
| AMD RSR | Radeon Super Resolution (or RSR) is an in-driver upscaling feature that allows gamers to take advantage of Radeon Super Resolution technology. |
Use Cases

In the sections below, we’ll discuss various use-cases for the ROG Ally. First and foremost, it’s clearly a handheld device intended for playing your favorite PC games on the go. However, as a very capable PC, it can perform any tasks that you would expect any PC to be able to perform. Below we’ll discuss some ways you can use the ROG Ally, some sections will link to additional guides that provide more information that is applicable to the topic being discussed.
Emulation
Emulation is an exciting aspect of the ROG Ally, one we will explore in the sections below. It is anticipated that there will be a number of ways to emulate your favorite classic arcade and console games in the future. As such, each method of emulation will have it’s own guide to go into further detail as well as provide a platform to expand the content. At this time, we have RetroBat with more coming!
RetroBat

See: RetroBat Setup Guide
RetroBat Windows PC Emulation Guide (works great with the ROG Ally) – RetroBat is an application that you can download and install to your Windows PC, ROG Ally or Steam Deck (running Windows) to automatically configure/play games within the Emulation Station front end. RetroBat is completely free to download and supports some of the most popular emulators.
RayNeo XR Glasses
The RayNeo Air 2 XR Glasses allow viewing a 201″ virtual display while watching movies or playing your favorite games at an impressive 120Hz refresh rate. These glasses are an excellent companion for your ROG Ally, Steam Deck or any device that supports USB-C DP (Display Port).
Helpful Links
Virtual Pinball Cabinet Mode

One of the first things I had to try out when the ROG Ally arrived was virtual pinball, more specifically using the ROG Ally with Pinball FX in Cabinet Mode connected to an AtGames Legends Pinball machine. There are several great pinball packages that could potentially be used with the Ally, but if Zen Studios, Pinball FX played well, the rest should as well. You can already find a detailed cabinet mode setup guide for Pinball FX setup on the Legends Pinball. In the section below, I’ll highlight a few differences that you may want to make to allow the Ally to run Pinball FX a bit better. Overall, the performance has been very good, I can see it replacing my Desktop PC from a few years ago as the primary way I play PC-based virtual pinball on my Legends Pinball machine.
Pinball FX Setup
This section will identify settings specific to the Ally that differ from those on the main Pinball FX Setup Guide. I would recommend using the Pinball FX Setup Guide, initially, then return back to this section to fully optimize it for the Ally. As additional optimizations take place, this guide will be updated and contain the latest information.
Hardware Needed
Below is a list of all the hardware used for this project and where each may be found.
- Asus ROG Ally [ Amazon | BestBuy ] – where to find an Asus ROG Ally
- Docking Station [ Amazon ] – There are many docks available that will work just fine, however I used this one as it provides x2 HDMI outputs (one for the backglass, the other for the playfield) as well as 3 USB ports, power delivery (PD), ethernet, etc. As this dock doesn’t have a stand to prop up the Ally, this one should work well. I didn’t like how the USB-C cable stood straight up on the top of the Ally, so I also picked up a 2-pack of 90 Degree USB-C male to female adapters.
- If you don’t have a Legends Pinball machine, see the Hardware Recommendations section for more information.
- Totally optional, you can place the ROG Ally on a nearby desk/table. However, I added a drawer at the back of the Legends Pinball to make it easier to connect a handheld device. If that is of interest to you, you can learn more about it here.
Prerequisites
- You’ll need the Asus ROG Ally and AtGames Legends Pinball (HD) to follow along, see Hardware Needed (above).
- You’ll need an OTG Cable (USB-A to USB-A), VIBS board and x2 HDMI cables (~6ft.), see Hardware Needed (above).
- You’ll want to Install Steam and Pinball FX first.
- Follow the steps in the Cabinet Mode Setup (including: Display Configuration/Setup, Backglass Image Setup, Enable Cabinet Mode, Backglass Window Setup and Dot Matrix Window Setup).
- Once the above steps are completed, we’ll fine-tune the Video configuration below.
Video Setup
After connecting the ROG Ally to the Legends Pinball, installing Pinball FX (Cabinet Mode) and connecting the x2 HDMI Cables and OTG cable between the Legends Pinball and the ROG Ally, see below for how to optimize the Ally on the Legends Pinball.
- Launch Pinball FX.
- Using a connected keyboard, press ESC to enter the OPTIONS menu.
- Select SETTINGS and then the VIDEO tab.
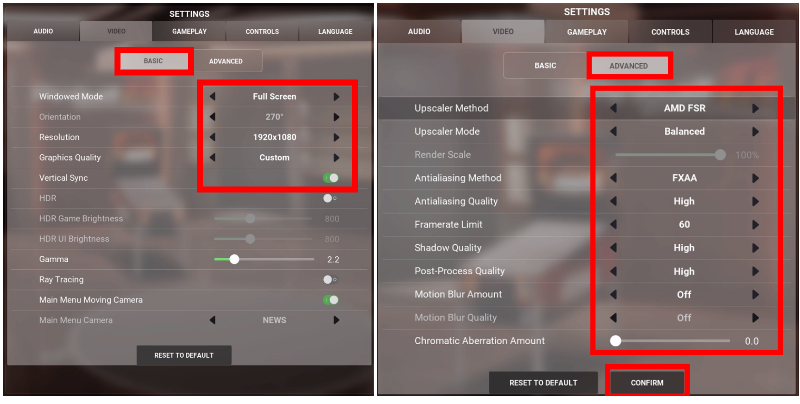
- Then set the following options:
- Windowed Mode = Full Screen
- Orientation = 270°
- Resolution=1920×1080
- Graphics Quality = Custom (This will be set after making the Advanced changes, below).
- Vertical Sync = ON
- Under the ADVANCED sub-tab, make the following adjustments:
- Upscaler Method is set to AMD FSR
- Upscaler Mode to Balanced
- Render Scale to FXAA
- Framerate Limit is set to 60
- Shadow Quality set to High
- Post-Processing Quality set to High
- Motion Blur Amount set to Off
- Chromatic Aberration Amount set to 0.0
- Click the CONFIRM button once all changes have been made.
- Press ESC once the above configuration has been made, your settings should match the following image.
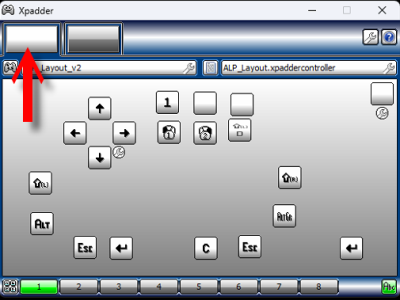
Xpadder
In Xpadder, there were two rectangles at the top toolbar (see red arrow) which differed from my prior PC installation. Each rectangle represents a connected USB controller. When I installed Xpadder to the Ally, the button mapping to the ALP didn’t initially work until I selected the far-left rectangle and followed these instructions:
- Follow the instructions here to connect the OTG cable and load the profile.
- The rectangle that should contain the mappings should state Controller (XBOX 360 For Windows). Click one of the rectangles.
- At the far-left controller icon, select Properties to see the name of the controller. If it states the Name as “Controller (XBOX 360 For Windows)”, that’s the correct one to load the profile for.
- If not, repeat the above for any other controllers listed at the top. As long as the OTG cable is connected between the Ally and the ALP, there should be at least one available. If you have any issues, see the Xpadder Troubleshooting section.
In the future, I may cover Pinball FX3, Visual Pinball X and Future Pinball Setup on the Ally –if the community requests it. If interested, please comment in the video above and let me know!
Portable PC
The ROG Ally is, in fact, a very powerful PC in a handheld form-factor. It is certainly possible for someone to use the device as their main PC. As mentioned at the beginning, much of the writing and artwork on this guide was created directly on the Ally. I did add an external portable monitor, keyboard and mouse to make the experience easier. The device performed very well in graphic design, website browsing, game play and productivity applications. However, if using the device in this manner, be mindful of any unnecessary background services or applications that may reduce overall gaming performance.
To take full advantage of using the Ally as a PC, I’d recommend a few accessories. Particularly a Docking station, keyboard, mouse and an external display. These accessories (and more) may be found in the Accessories section. However, let’s briefly touch on why they may be important to you:
- A Dock – There is an official dock that works with the Ally that is available from Best Buy (link here). However, it’s not one I plan to purchase/cover on this channel. It only has a single USB 2.0 port and HDMI 2.0 for a much higher price than others that are available. You can use it to power the Ally, connect a keyboard and an external display and that’s it. However, other options exist that are around half the price and include 2 HDMI ports and multiple USB 3.0 ports which is ideal for adding a keyboard, a mouse or even an external hard drive.
- Keyboard / Mouse – While you can certainly use the touch virtual keyboard on the Ally to enter some quick text, it’s not at all good for lots of typing. For that, grab a dock that supports more than one USB port and you can use whatever keyboard and mouse you prefer.
- External Display – If you’re going to use the Ally as your main PC, you’re likely going to want a larger screen. You can, of course, hook it up to an existing TV that has HDMI inputs, but it likely makes sense to pick up an external monitor. I will be demonstrating some options on this in the near future.
Hopefully the above will provide enough information to help you determine what may be needed to get started using the Ally as a traditional PC. If you already have all of the above, there is clearly nothing else you need to purchase. You may already have an external monitor, keyboard and mouse. A dock may be the only thing you really may want to consider and the Accessories section can help with that.
How-To

Below are some how-to resources to help make finding information easier for you to find.
Setup MicroSD Card
One of the least expensive ways to expand the storage capabilities of the ROG Ally is to add a microSD card. The ROG Ally supports UHS-II Cards, for more on that please see the Q&A section. However, the card that I’m using is a 1TB Lexar Play microSD. Setup is easy, but below are some steps if you’re unsure:
- Insert the microSD card into the slot at the top-left of the Ally.
- Launch file explorer in Windows.
- Right-click on the drive and select Format.
- Under the File system drop-down, select NTFS.
- Now click the Start button to format the microSD card.
- You’ll receive a warning that all data on the disk will be erased. Click OK.
- Click OK once the Format is complete and click the Close button.
- That’s it!
*NOTE: If your card is not showing up in Windows, it’s likely in a format that Windows does not recognize. In that case, please see the following:
- Click the Windows Start button and type Disk.
- Click Create and format hard disk.
- Very Important (make sure there are no other removable disks connected): You should see the removable disk below the internal disk. Long press or right-click on the removable disk and select Delete Volume… , then click Yes.
- Long press or right-click on the removable disk and select New Simple Volume.
- Click Next until you see Format Partition and make sure that the File system selected is NTFS. Then click Next/Finish.
- Close out of the Disk Management application.
- Launch File Explorer and double-click on the microSD card. If you’re prompted to Format disk, click the Format disk button.
- Make sure the File system selected is NTFS.
- Click Start/OK to format the disk.
- When you see Format Complete, click OK.
- That’s it!
Windows Tweaks
Below are a few tweaks for Windows you may want to consider for best results.
Single-Click to Double-Click Launch
By default, when the Ally is set such that a single-click launches/opens an item. This can be particularly problematic when you’re trying to copy files in explorer. Below is how to change the action from a single-click to a double-click.
- On the taskbar, click the Windows icon and type Control Panel. Then, select it.
- Select the option Appearance and Personalization.
- Under File Explorer Options, click Specify single- or double-click to open.
- From the dialog, under Click items as follows, select the option Double-click to open an item (single-click to select).
- Then click OK. The option will now be set.
Enter the BIOS
- First, shutdown Windows.
- Press the Power button, while holding the volume button down (-) until you see the BIOS Configuration screen appear.
- *NOTE – If you’re attempting to boot the Ally from a microSD, this does not appear to work currently.
Bring up on-screen keyboard
- Hold one of the two buttons on the back of the machine (M1/M2) while pressing the D-Pad UP position.
TIPs and Tricks
In this section, we’ll cover some tips and tricks that may be helpful to you.
- 15 TIPs & Shortcuts to Set up and Optimize your ROG Ally – A great article from Asus that contains 15 tips that will improve your overall experience with the device.
Troubleshooting
As issues and solutions are identified, they will be added in this section.
Change Log
- 2023-11-20 – Changes for an upcoming video.
- 2023-11-17 – Minor edits/cleanup.
- 2023-07-28 – Added RetroBat Guide (works great with the ROG Ally) or any Windows PC.
- 2023-07-07 – Minor updates/corrections.
- 2023-07-03 – Public release of this guide.
- 2023-06-16 – 2023-07-03 – Start to this guide.