AtGames Legends Pinball 4K Guide
A Guide has been developed for the Legends Pinball 4K to assist with Latency Measurements. This guide may be found here.
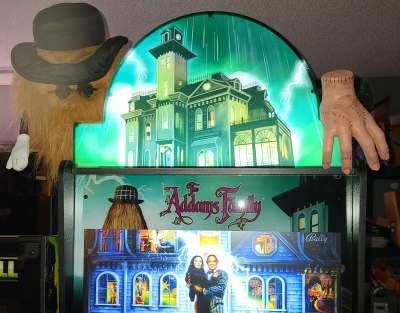
The Legends 4KP is the latest version of the Legends Pinball line developed by AtGames. The Legends Pinball 4KP SE features The Addams Family™ themed pinball cabinet and also includes the Zen Studios pinball table. There are additional themed pinball cabinets available such as:
- Legends Pinball 4KP Jurassic Park [SE]
- Legends Pinball 4KP The Addams Family™ [SE]
- FX Legends 4K Peanuts [CEP]
- FX Legends 4K Star Trek™ [CEP]
- Legends Pinball 4KP Dinosaur Dynasty Standard Edition [SE]
- FX Legends 4K Attack From Mars™ [CEP]

The machines include the following features:
- Fast RK3588 CPU built-in – This CPU allows playing hundreds of tables developed by AtGames, Magic Pixel, Zen Studios, Gottlieb and others directly on the machine.
- 32″ 4K Playfield – The playfield display can render images at 3840×2160 (4K UHD) resolution.
- Large 23.8″ Backglass Display – The backglass display will allow you to see the table artwork easily on the large screen. Lighted animations occur to provide a realistic pinball experience.
- Dedicated 8″ DMD – An 8″ dedicated DMD is positioned directly below the Backglass display and provides scoring and additional information during the game or when selecting a table.
- 3.5″ Speakers – There are two large speakers to the left/right of the DMD.
- Solenoids / Haptic Feedback / Accelerometer – Solenoids are built-in to the machine, that is when you press the flipper buttons you’ll hear/feel the sounds of the flipper. Haptic feedback provides the vibration effect to simulate on-screen activity. The Accelerometer is used for physically nudging the table, just as you would a physical pinball machine.
- Expandable (Advanced Features are optional) – Should you wish to connect a PC, Steam Deck, ROG Ally or similar device to your ALP 4K machine, you certainly can. It can also utilize 3 different inputs for all 3 of the built-in displays. Connecting an OTG (On-The-Go) cable or USB-A to USB-A cable, you can use the ALP 4K’s buttons to control the action using the buttons from the machine. This allows you to run any virtual pinball package available on your Legends Pinball 4K.
- New CE-4K interface – The interface has been completely redesigned to provide a more natural and easy-to-use experience. However, if you prefer a tiled interface, that option also exists in the UI Settings.
- Topper and Builder’s Plate (Optional, depending on the model) – Each machine may include a custom Topper to reflect the table theme as well as a Builder’s Plate which identifies the manufacture date and the unique unit number of the machine.
How-To link to a specific section on this Guide: go to the Table of Contents (below) and click a section to reference. Copy the URL from the address-bar of your browser and paste in your video description/post/blog. This will direct a viewer to a specific section in any of the guides you find on this site.
Table of Contents
Q&A

Here we’ll discuss some questions that have been received about the Legends Pinball 4KP cabinets:
- What is the height of The Addams Family (Standard Edition) cabinet with the topper? A: It’s about 79″ tall. Also, the topper itself is 22.25″ wide and about 12.25″ tall from the top of the backbox to highest point on the topper.
- Can I use the cabinet without the topper? A: Yes you can, but it looks much nicer with the topper.
- Where can I find the videos and content for the Legends Pinball EVT (pre-production) model? Answer: you can find the Legends Pinball 4KP EVT page here.
- Is the original Arcade Control Panel (ACP) be compatible with this cabinet? Answer: Yes, the current ACP will be compatible with the Legends 4K series. However, I’ve seen reports that it doesn’t work over OTG at the present time. I need to transfer mine to the production machine and test this (I’ll remove this statement once done).
- Do the exciters work in conjunction with the solenoids? Answer: Haptic speakers and solenoids both work and you’re able to turn either off or both off through the menu. I’ve tested this on the production machine and it works very well, I was impressed (no false positives from the solenoids, as previously reported).
- What is the refresh rate of the playfield display? Answer: 60Hz
- Will previous games / game packs be playable on this machine? Answer: Packs will be ported to Legends 4K Format to support (a) CE-4K OS, (b) optimized CPU/graphic power, (c) 4K playfield, HD backglass, HD DMD, and (d) SSF Kit data. They will be sold separately. HD packs will not run on Legends 4K Format.
- Is there noticeable latency with OTG? Answer: Answered in this video.
- Will any future pinball packs require the 4k model or will all future pinball packs work on the standard hardware? Answer: Legends HD and Legends 4K Format will not be compatible. All future first party tables will be released in both formats (Legends HD and Legends 4K).
- Is head tracking to subtly change the view of the playfield a thing in virtual pinball? Answer: (Jon: I’ve seen an Xbox Kinect being used to accomplish this type of effect with a PC for virtual pinball. More to explore on this at some later time)
- If you have the PC or other source that worked on the HD version, can you play them on this 4K version in HD? Answer: Yes, you can connect via OTG to the x3 HDMI Input ports + x1 USB 2.0 cable (OTG) to play HD tables on the 4K display (at 1080p).
- What is CE-4K? Answer: CE-4K is the complete redesign of the Legends ecosystem built from the ground up. At the core of this design, the focus is on an open and connected platform, providing the user with the latest and greatest features and games. Following the industry standards, CE-4K will require periodic mandatory updates to ensure the system is up and running at the optimal capacity while introducing new features, games, and experiences. Like other gaming platforms, Call of Duty, for example, CE-4K will notify the user of required updates and will prompt the user to begin the process. If the user chooses to delay the update, they can still enjoy their legends device by playing games locally without any online features. Once all mandatory updates are complete, the online system features will be updated and restored.
- Where can I find a comparison of the ALP HD and the ALP 4KP? Answer: Please see here.
- Where can I find a list of Zen Pinball Packs for Legends 4K machines? Answer: Please see here.
- How long are the pinball legs? Answer: They are about 29 3/4″ tall from the floor to the top of the leg (not fully extended at the feet). Extending the feet may increase the height by 1-2″ more.
- How many Solenoids does the ALP 4KP have pre-installed? Answer: Two, these are fired when the flippers are pressed and may be turned off also.
- Does SSF work in OTG mode? Answer: From the Day One Update 6.0.x release notes (see here), it states: SSF Kit support for OTG is included in the Day One Update as an Open Beta. We (AtGames) will provide a free update to this functionality on March 29, 2024. Please note, as OTG performance can vary, experiences may differ.
- Do the solenoids work in OTG Mode? Answer: Last I tested this (during the EVT series), yes they did. This test will be repeated on the production machine after I finish some upcoming getting started content.
- Has AtGames stated the actual hardware used for the SSF kit? The early videos show 8 ohm Dayton exciters that are screwed into place but nothing about the sub in the middle. Answer: Asking… I’ll also find out when the SSF kit arrives.

Resources
The following resources are available for the Legends 4KP for additional information. As more become available, they will be added.
- AtGames and Zen Studios Partnership Announcement PR – PR announcing the partnership between AtGames and Zen Studios to bring Pinball FX tables to the Legends platform.
- Legends Ultimate (subreddit) – Great place to ask questions or find answers relating to the Legends Pinball 4K.
- Legends Pinball (subreddit) – Another great location to find answers and ask questions about the Legends Pinball 4K.
- Pinball FX3 (subreddit) – Check out this page for the latest news and information about Zen Studios Pinball FX. While not focused on the Legends Pinball 4K products specifically, at present, you may find several posts in the near future that may be applicable.
- Legends 4KP Preorder Information – pre-order information available from the AtGames website.
- Legends 4KP EVT Page (early pre-production model) – Information page and video series that covers many aspects of the Legends 4KP.
Facebook Groups
- AtGames – AtGames official Facebook page.
- The Official AtGames Legends 4K™ Fan Page – The Official AtGames Legends 4K™ Fan Page is your home for the Legends 4K™ Arcades, Pinball, Accessories, Pinball Packs, PinballNet™, and more.
- The “Official” AtGames Global Arcade Fan Page – The original AtGames Fan Page group that is endorsed by AtGames and their line of products. Brought to you by Glen’s Retro Show on YouTube.
- AtGames Legends 4K Ultimate & 4K Pinball User’s Group CANADA & USA – For all the latest Legends 4K-related News and Information, you’ll find this group valuable! There will be a specific emphasis on the new, upcoming 4K product lines. We will soon be seeing the launch of the Legends 4K Pinball machine and the exciting news of the recently announced partnerships with both Zen Studios along with Microsoft/RARE. Lots to look forward to in 2024!
- Unofficial AtGames Legends Group – This group will be an UNOFFICIAL group for discussions around the AtGames Legends line of products including the Ultimate, Pinball, Gamers, Connect, Cores, and accessories.
Friends of the Channel
Below are some friends of the channel that cover the AtGames Legends 4K and FX Legends 4K virtual pinball machine. As more are identified, they will be added. The YouTube channels listed here have received their machines and creating content for it:
- ATGAMES 4K Pinball hits the UK – and I get to try one…after putting it together. [ Techmoan ] – The 4KP will be hitting the UK and Techmoan shares his experiences with it. Excellent first look and impressions in this video!
- TampaTec – Tons of awesome videos on all kinds of tech products/projects, now including the Legends Pinball 4KP.
- AtGames 4KP Addams Family Hands On Review [ Evil Genius Entertainment ] – Excellent overview of the Legends 4KP, what other options are available and JDV’s overall impressions of the machine. This is a must watch if you’re considering a Legends Pinball 4KP.
- Arcade Talk & Star Wars Reviews – Several AtGames Legends Pinball 4K videos have been released, always a fun time to watch the streams.
- Papa Brad Live – Check out Papa Brad Live for his thoughts on the Legends Pinball 4KP, tutorial videos and more.
Helpful Tips

Below are some tips that may be helpful with your Legends Pinball 4K machine:
- After I lose a ball, in a Magic Pixel table, there is an animation that appears summarizing the scores. Can I skip past this? Yes, if you press and hold the Left+Right flippers at the same time while the animation is playing it will skip it. You may need to take your fingers off the flippers and press both again once or twice. This also works with tables running on the Legends Pinball HD.
- The Addams Family quick change between Gold and Normal Mode – This interesting tip allows you to toggle between all features such as ball trails, score popups, etc. (Normal) and the Gold mode (all effects turned off). Navigate to The Addams Family table and launch the table. Before starting the game, press the forward nudge button to alternate between gold and normal mode. Press again to toggle back.
AtGames News & Updates
For the latest AtGames News, visit the AtGames News Updates page.

Where to Buy
*NOTE– There will be additional cabinets released in the future as Collector’s Edition Pinball (CEP’s) and limited to 5,000 units each – PR here. At this time, we don’t know all cabinets that will be available, pricing, options, etc. See here for those cabinets currently available for purchase. If you don’t see a cabinet that you prefer, waiting is an option 😉 .
Below are the locations where you can purchase the Legends Pinball 4K.

Table Editions

AtGames has announced several themed cabinets in the form of the Legends Pinball 4KP and FX Editions. Below you’ll find a quick summary of what tables are included with links to the preorder pages for each:
| Cabinet Table Edition | Artwork | Cabinet Summary |
|---|---|---|
| The Addams Family™ Legends Pinball 4KP Standard Edition (Order here) | The Addams Family™ Zen Studios themed artwork | The Addams Family™ + Core Tables (15 total tables) |
| Dinosaur Dynasty Legends Pinball 4KP Standard Edition (Order here) | Dinosaur Dynasty themed artwork. Trailer video. | Core Tables (including Dinosaur Dynasty 18 total tables). Tables releasing in 2024 and also included with this machine are: Natural History 2 – Antarctica, Africa, Deep Ocean & Egypt. |
| Peanuts FX Legends Pinball Collector’s Edition (Order here) | Peanuts Zen Studios themed artwork. Trailer Video. | Peanuts Snoopy Pinball + Core Tables (15 total tables) |
| FX Legends 4K Star Trek™ Collector’s Edition Pinball (Order here) | Star Trek themed artwork. Trailer video. | Star Trek™ Pinball: Kelvin Timeline, Star Trek™ Pinball: Discovery, Star Trek™ Pinball: Deep Space Nine + Core Tables (17 total tables) |
| FX Legends 4K Attack from Mars™ Collector’s Edition Pinball (Order here) | Attack from Mars themed artwork. Trailer video. | Attack from Mars™ Pinball: Attack from Mars + Core Tables (15 total tables) |
Add-On Table Packs
For a full list of available add-on 4K table packs, please see the AtGames site.

Accessories
Below are a number of accessories that are available for the AtGames Legends Pinball 4K:
1st Party
The following accessories are available directly from AtGames and additional authorized resellers:

- Arcade Control Panel [ AtGames | Amazon ]- The Arcade Control Panel provides the ability to add 6 additional buttons, a trackball and joystick to the apron area of the machine.
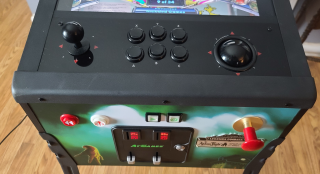
The Arcade Control Panel that you currently own, or purchase separately will work with the Legends Pinball 4KP. I personally installed and tried it. I’m able to navigate the tables using the Joystick in all directions. All button actions are: A=Start/Select, B=Back, C=Favorite, X=Navigate Left, Y=Navigate Right and Z=Scroll wheel. The default mapping could change prior to release, but this is how they are mapped at present.

- SSF / Surround Sound Feedback (Kit) [ AtGames ] – The SSF kit supports the Legends 4K Pinball surround sound feedback feature. It simulates the physical feedback of a real pinball machine. That is, you can hear the ball rolling on the playfield, the bumpers and an overall more realistic experience. *NOTE: Parts used in the SSF Kit will come from multiple sources/suppliers to meet production quantity requirements, yet each will maintain the same level of QA standards.
Jurassic Park Topper
The Topper for the Jurassic Park Legends Pinball 4KP Premium Starter features look stunning! In this video, we’ll unbox it, install it to the machine and check it out.
3rd Party
The accessories here are available from 3rd party resellers and work well with your Legends Pinball 4K machine.
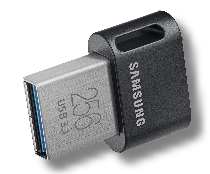
- Samsung USB Flash Drive [ Amazon ] – This is the Flash Drive that I use for Flash Drive X (FDX). It’s low-profile USB stick with a metal chassis. I use these on all my AtGames Legends devices and have never had an issue with them.

- Magnetic Cup Holder [ Amazon ] – Without a doubt, one of my favorite 3rd party accessories. This magnetic cup holder easily attaches to the Legends Pinball 4K leg using magnets. It holds the drink well and is large enough for most cup sizes.
- 3 inch Threaded Stem Casters Set of 4 [ Amazon ] – I saw these on Arcade Talk & Star Wars Reviews and ordered a set to try out. Thanks TM!
- ALP 4K “Thing” cup holder [ Etsy ] – I’ve not ordered this but saw others that have, I might wind up getting one later. It’s a 3D Printed cup holder with thing holding it up, pretty darn cool!
SSF Kit Installation (Optional Accessory)
The SSF Kit or Surround Sound Feedback is available from [ AtGames ] – The SSF kit supports the Legends 4K Pinball surround sound feedback feature and simulates the physical feedback of a real pinball machine. That is, you can hear the ball rolling on the playfield, the bumpers and an overall more realistic experience utilizing 9 speakers (5 part of this kit).
In the following tutorial we will install the AtGames SSF Kit into an Legends Pinball 4K (or FX Legends Pinball 4K) machine. Installation of this kit requires two people for safe assembly and was designed for the more technical DIY (Do It Yourself) user. The full written installation instructions may be found from the AtGames website.
Items Shown
- AtGames Legends Pinball 4K
- Legends 4K SSF Kit
- Flawless Screen Cleaner Spray with Microfiber Cleaning Cloth for LCD, LED Displays
SSF Install Tips
- You may find it easier to use a small screwdriver or the screws for the exciter to punch holes through the protective backing in all four holes of the exciters. I didn’t, but the thought came later 🙂
*NOTE: Parts used in the SSF Kit will come from multiple sources/suppliers to meet production quantity requirements, yet each will maintain the same level of QA standards.
Cabinet Comparison (HD vs 4KP)
Below you’ll find the dimensions of the current Legends Pinball HD vs. the Legends Pinball 4KP.

Unboxing & Assembly
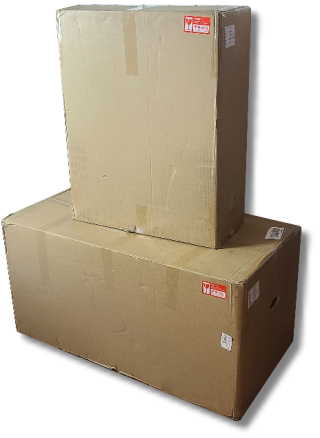
When the Legends Pinball 4KP ships, it will arrive in two boxes. The largest box contains the base or main playfield. The smaller box contains the pinball legs, hardware (screws, wingnuts, etc.) and the backbox itself. Assembly is fairly straightforward, however the video above and the guide below will assist with all the steps.
Below are the dimensions and weight of each box:
| Box | Height | Width | Length | Weight |
|---|---|---|---|---|
| Large (Playfield) | 21.75″ | 21.25″ | 43.24″ | ~83Lbs. |
| Smaller (Backbox) | 25.25″ | 24.50″ | 32.25″ | ~55Lbs. |
Hardware Included
The following hardware is included to fully assemble the Legends 4KP:
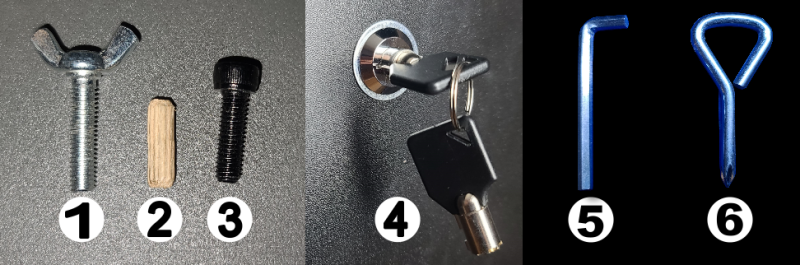
- 1 – x4 Wing Nuts (1 extra)
- 2 – x2 Dowels (1 extra)
- 3 – x8 Pinball Leg screws (1 extra)
- 4 – Key to the Base backing
- 5 – Allen wrench
- 6 – Philips head screwdriver
- Power cord (not shown)
Unboxing
- Cut the three edges of the box. Open the box to see which end is the back of the machine and set that end of the box on a carpeted floor or rug vertically.
- Gently slide the playfield out of the box and remove the packing material.
- Open the box containing the backbox. Remove the box containing the pinball legs, box of hardware and the backbox itself.
Assembly
*WARNING– Never attempt to unplug or plug-in any connections while powered-on. This may result in damage to the displays or main board. Always make sure the power to the machine is unplugged prior to assembly.
Step 1: Install Pinball Legs
- Using the included Allen wrench, install x2 black screws (3) through the leg holes into the base assembly. Repeat for all four legs.
- With the help of a 2nd person, raise the machine up on all four legs.
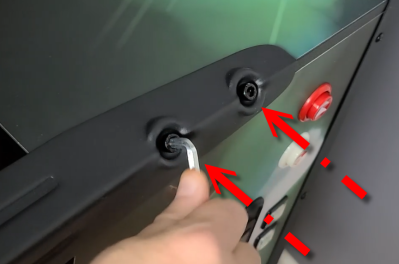
- Use the key to remove the back panel on the back of the playfield.
Step 2: Add Wooden Dowels
- Insert x2 wooden dowels (2) into the holes on the top-back of the machine.
Step 3: Remove Screws from Backbox
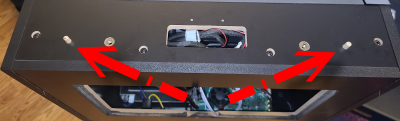
- Place the backbox on a soft flat soft surface (screen facing down) and remove all 8 screws from the back.
- Gently grab the silver handle and remove the back panel of the backbox.
Step 4: Install Backbox
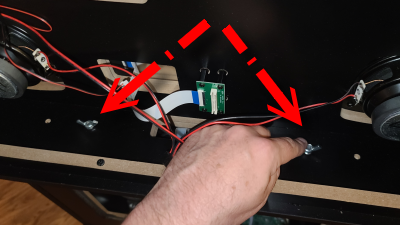
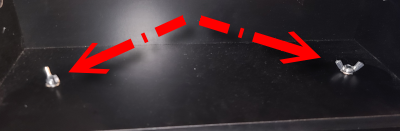
- Position the backbox upright, set it on the back top of the cabinet over the wooden dowels. Use the cutout in the middle of the backbox as a guide for the alignment.
- Using x2 wingnuts (1), tighten each in the holes on the bottom of the backbox to secure the backbox to the base of the machine.
Step 5: Feed cables
- Feed all 5 cables from the bottom of the cabinet through the opening into the backbox. There is a 6th, that will be for the topper.
- Remove the cable tie (or remove the rubber band) around the connectors, be careful not to cut into any of the cables.
- Separate all the cables so you can clearly see the labels and cables.
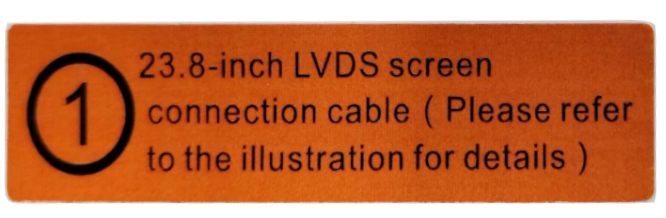
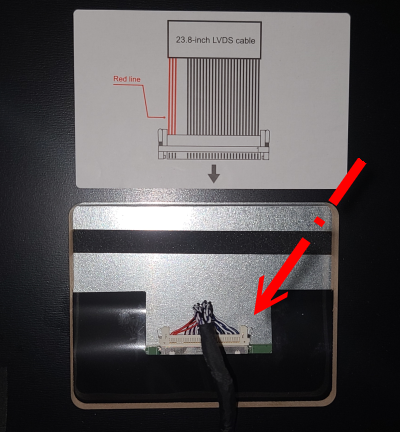
Step 6: Install LVDS to Backglass
- Insert the cable labeled for the LVDS connection (#1) to the backglass. The red wires on the white connector should be to the left, as indicated by the diagram posted directly above the connector.

Step 7: Connect Backglass Backlight Cable
- Connect the two white connectors (#2) going to the backglass backlight.


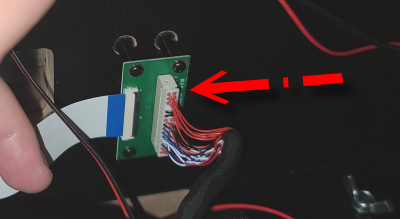
Step 8: Connect DMD LVDS Cable
- Insert the keyed (small teeth on each end) #3 LVDS Cable to the DMD into the small green board (PCB) at the back. The connector is keyed and can only go one way.

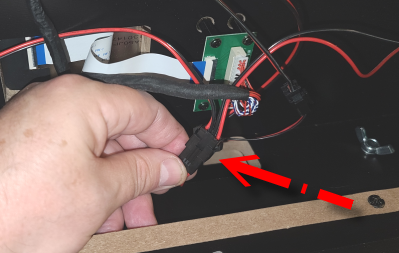
Step 9: Connect 4-Pin Speaker Cable
- Connect the (#4) 4-pin speaker connection cable (larger black speaker connectors) until they lock into place.
Step 10: Install Topper
- Set the topper at an angle on the top of the backbox.
- Feed the LED wire through the hole near the switch on the back of the backbox. Make sure the cable is all the way through the hole and set the topper flush to the top of the cabinet.
- Install two Wingnuts (1) into the two holes on the top of the Topper to secure it into place.

Step 11: Connect Topper LED wires
- Connect the two LED wires at the upper-left of the backbox (#5).
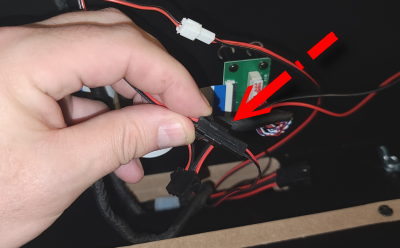
Step 12: Connect LED Adapter Cable
- Connect the two smaller black connectors going to LED Adapter cable (#6).
Step 13: Install Back Panel to Base
- Reinstall the back panel to the back of the base of the machine and lock it using the included Key (4). Turn the key counter-clockwise to lock it into position.
Step 14: Install Back Panel to Backbox
- Reinstall the back panel to the backbox by securing all 8 screws to the back. Start with the screw at the top-middle until all have been re-installed.
- Place the machine in a location that has a nearby power outlet.
- Connect the included power cable to the back of the machine.
- Flip the power switch at the bottom-right of the cabinet, near the front of the machine, to turn it on.
- Remove all protective covers from the apron, playfield, topper and backglass.
- That concludes the assembly process!
Navigation
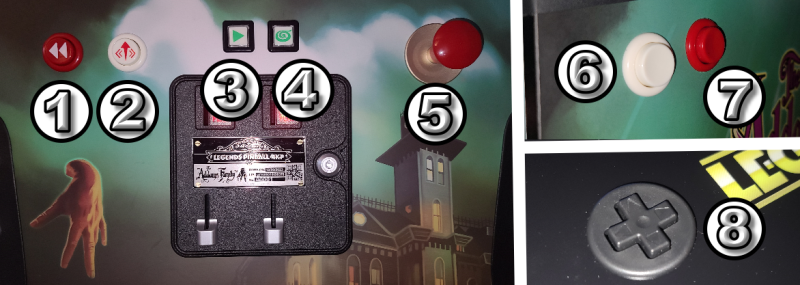
Navigating and playing tables on the Legends Pinball 4K is easy and intuitive. However, if this is your first experience with Legends Pinball, a simple explanation of the buttons will be helpful in getting started. Below you’ll find an image showing the front-facing view of the cabinet and a (right) side view. These are the main buttons you’ll use to when playing and navigating the machine.
The image and table below provides more detail about each of the specific functions:
| Number | Name | Description |
|---|---|---|
| 1 | Rewind/Back Button | The Rewind button will return to the previous option or go back. |
| 2 | Forward Nudge Button | While in-game, this button will nudge the table forward. While in the menu, it is used to navigate into a selected menu option. |
| 3 | Start/Play Button | The Start button will start a game or select an option. |
| 4 | Menu/AtGames button | While in-game, this button will display the menu for the game. When in the menu system, this button will display notifications. |
| 5 | Plunger | Pull back and release to launch a ball. |
| 6 | Nudge Button | There is a left and right nudge button. Press either to nudge the ball left or right during a game. |
| 7 | Flipper Button | There is a left and right flipper button. While in a game, pressing the button will engage the flipper. Press either flipper to navigate an option in the menu system. |
| 8 | D-Pad | While in the menu system, you can use the 4 directions of the D-pad to navigate in the corresponding direction. In-game, the d-pad may also be used to nudge the table. |
Initial Setup
After Unboxing / Assembling and powering on your machine, you’ll be greeted with the Setup Wizard. In the sections below, we’ll step through the Setup Wizard and Day One Update.
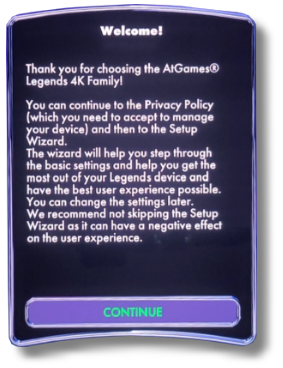
- Privacy Policy – When you first power on your Legends Pinball 4K machine, you’ll see a brief intro. Once it completes, you’ll be greeted with the Welcome screen. This Setup Wizard will step you through getting your machine up and running. Scroll down to the bottom by holding the d-pad down. Once at the bottom, press the Start/Play button on the front of the cabinet to accept the privacy policy.
- Network Setup – you can connect an Ethernet/LAN cable to the back of the machine or use Wi-fi.
- Wired LAN Connection – If you’ll be using a wired LAN or Ethernet cable, go ahead and plug it in now. Once done, click the Continue button.
- Wi-Fi – If you’ll be using Wi-Fi, select SETUP WI-FI.
- The machine will search for available Wi-Fi networks and display a list. If yours doesn’t appear immediately, just give it a little more time.
- Now, select your Wi-Fi network name using the d-pad and then press the Play button to select it.
- You’ll then select Enter Wi-Fi Password using the d-pad and Play button, enter the password for your network/SSID. Then, select Done.
- Now Select Connect to connect to your network. Once connected, you should see a connection successful message. Just select Back, then Back again.
- Move down to Continue and select that option.
- Time Settings – Now we’ll assign our time zone by selecting Setup Time Zone.
- Select Time Zone.
- Select your location and then Confirm.
- If you prefer a 24 hour clock, you can change that here also.
- Then, select Continue.
- Account Setup – You will need a Legends ID which is an account you create with AtGames. This will allow us to upload our high scores to the leaderboard, download additional purchased tables and much more. Just click the Setup Account button if you don’t already have an account.
- If you already have a Legends ID that you use with another AtGames Legends device, you can select Sign in with Legends ID.
- From here, you can create your own Legends ID. Alpha numeric and a few special characters can be used. I recommend keeping it easy to remember. Then also enter your e-mail address and your password twice. Once done, select the SUBMIT button.
- Now check your e-mail. If you don’t see the account creation e-mail immediately, check your Spam folder.
- In the confirmation e-mail, you can either enter the code directly on the machine or just click the Confirm my Legends Account link. Then, select the Confirm your account button.
- Back on the Legends Pinball 4K, you can now simply select SIGN IN WITH LEGENDS ID, enter your Legends ID, password and select SIGN IN.
- Once Logged in, select Back.
- Flash Drive X (FDX) – FDX is Flash Drive X, this is a method of increasing the available storage on your machine. For more information on FDX, please see here.
- That’s it, we’re done with the Setup Wizard. Next we’ll perform the Day-1 update.
- Auto Firmware Update – After completing the Setup Wizard (above), you’ll see a dialog indicating a firmware update is available. The entire process will take around 15 minutes.
- Firmware Update – Press the Start / Play button to begin the update. The update download will begin.
- Once downloaded, the machine will automatically reboot.
- The new firmware will get applied (may take ~7 minutes).
- Once done, press the Play button again to reboot or wait for the timer to expire.
- Component Update – The machine will then search for Components to update. If an update is found, press the Play button to perform the component update.
- Once done, press the Play button again to restart the machine.
- The screen will remain black for awhile after the intro video plays, be patient.
- You’ll then see Loading and the Day One Update has now been successfully applied.
- ArcadeNet Promo – You will be asked if you want to switch from the Basic ArcadeNet plan or the Standard plan. ArcadeNet for Legends Pinball 4K will be released at a later time. For now, select REMIND ME LATER and press the Play button.
- Your machine now has all the latest updates!
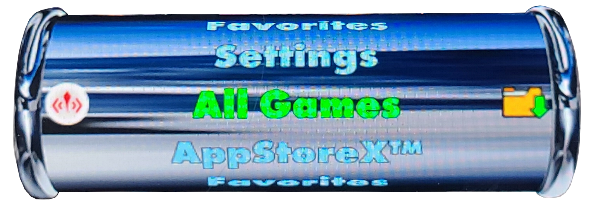
Table Game Play
Below are a number of short videos that demonstrate the playfield gameplay of each of the tables. For these shorts, I’ve mounted the camera directly above the 4KP, facing down onto the playfield to get a full view of each of the tables (backbox and DMD won’t be visible in these videos). Each short video was recorded/rendered in UHD 4K 60fps:
*NOTE – If you aren’t viewing on a 4K monitor or TV, the video shown won’t be an accurate reproduction.
Core Tables
Click the bold title for a one minute short video of each table. The Core tables are those tables that are included with every Legends 4KP sold (excluding Legends Premium Starter editions). All Tables listed here were developed by the talented Magic Pixel team.
| Amazonia (Natural History 1) |
Dinosaur Dynasty (Natural History 1) |
Exoplanets (Natural History 1) |
Last Ice Age (Natural History 1) |
| Battle Deluxe (Zaccaria Deluxe) |
Cine Star Deluxe (Zaccaria Deluxe) |
Farfalla Deluxe (Zaccaria Deluxe) |
House of Diamonds Deluxe (Zaccaria Deluxe) |
| Pool Champion Deluxe (Zaccaria Deluxe) |
Robot Deluxe (Zaccaria Deluxe) |
Red Show Deluxe (Zaccaria Deluxe) |
Spooky Deluxe (Zaccaria Deluxe) |
| Strike Deluxe (Zaccaria Deluxe) |
Universe Deluxe (Zaccaria Deluxe) |
Zen Studios Tables

Click the bold title for a one minute short video of each table. All Tables listed here were developed by the talented Zen Studios team and are Pinball FX tables running directly on the Legends Pinball 4K machine.
AtGames Original Natural History
Click the bold title for a one minute short video of each table. All Tables listed here were developed by the talented Magic Pixel team.
AtGames Original Dr. Seuss Tables

Click the bold title for a one minute short video of each table. All Tables listed here were developed by the talented Magic Pixel team.
| Cat In The Hat (Get this Pack – Dr. Seuss Pinball Pack 1) |
How the Grinch Stole Christmas! (Get this Pack – Dr. Seuss Pinball Pack 1) |
Fox in Socks (Get this Pack – Dr. Seuss Pinball Pack 1) |
| Green Eggs and Ham (Get this Pack – Dr. Seuss Pinball Pack 2) |
Oh, the Places You’ll Go! (Get this Pack – Dr. Seuss Pinball Pack 2) |
Dr. Seuss’s ABC (Get this Pack – Dr. Seuss Pinball Pack 2) |
| One Fish Two Fish Red Fish Blue Fish (Get this Pack – Dr. Seuss Pinball Pack 2) |
AtGames Original TAITO Tables
Click the bold title for a one minute short video of each table. All Tables listed here were developed by the talented Magic Pixel team.
| Arkanoid (Get this Pack – TAITO Pack 3) |
Space Invaders (Get this Pack – TAITO Pack 1) |
Zoo Keeper (Get this Pack – TAITO Pack 2) |
The Legend of KAGE (Get this Pack – TAITO Pack 3) |
| Bubble Bobble (Get this Pack – TAITO Pack 3) |
Chack’N Pop (Get this Pack – TAITO Pack 2) |
Darius (Get this Pack – TAITO Pack 1) |
Elevator Action (Get this Pack – TAITO Pack 2) |
| Front Line (Get this Pack – TAITO Pack 1) |
Operation Wolf (Get this Pack – TAITO Pack 2) |
Rainbow Islands (Get this Pack – TAITO Pack 3) |
Rastan Saga (Get this Pack – TAITO Pack 1) |
Zaccaria Tables
Click the bold title for a one minute short video of each table. All Tables listed here were developed by the talented Magic Pixel team. Many more Zaccaria tables remain to be added and will be as time permits.
| Aerobatics (Get this Pack – Zaccaria Volume 1) |
Aerobatics Retro (Get this Pack – Zaccaria Volume 1) |
Beast Master (Get this Pack – Zaccaria Volume 1) |
| Blackbelt (Get this Pack – Zaccaria Volume 1) |
Blackbelt Retro (Get this Pack – Zaccaria Volume 1) |
Blackbelt2018 (Get this Pack – Zaccaria Volume 1) |
| Caveman (Get this Pack – Zaccaria Volume 1) |
Cine Star (Get this Pack – Zaccaria Volume 1) |
Circus (Get this Pack – Zaccaria Volume 1) |
| Circus 2017/Remake (Get this Pack – Zaccaria Volume 1) |
Circus Retro (Get this Pack – Zaccaria Volume 1) |
Gottlieb Tables
Click the bold title for a one minute short video of each table. All Tables listed here were developed by the talented Far Sight Studios team.

Settings
For a detailed reference of all the Legends Pinball 4KP Settings, please visit the Legends Pinball 4KP Settings guide.
Mini Tutorials
The following provides procedures and customization information that you may find helpful.
Backbox Style
If you would like the backbox image stretched to take up the entire backglass display, below is how you can make this adjustment:
- Select Settings → Pinball Table Settings.
- Press the Right Flipper once (Page 2/4).
- Change Back Box Style from FULL to STRETCH.
- Back out of Pinball Table Settings and re-launch the table.
- NOTE– you will need to launch the table to see the stretched backglass. It will not show stretched while navigating the list of tables.
Adjust Haptics
If you’re feeling an excessive amount of vibration coming from the front of the machine, or none at all, this can easily be adjusted with the following:
- Press the Vol + (or -) on the Volume button located at the top-right corner of the playfield.
- Quickly (within 3 seconds), press the Channel button to switch to the haptic adjustment.
- Press and hold either the Vol + or Vol – button on the panel to increase or decrease the haptic strength.
- After about 3 seconds, the overlay at the bottom will disappear and your adjustment will take immediate effect.
Adjust Solenoids During Navigation
The defaults for the machine are to have the solenoids fire while navigating the left/right options using the flippers. I recommend turning this option off during navigation as it can be distracting. However, we’ll leave solenoids on (firing) during game play. Here’s how:
- Select Settings → Haptic Feedback.
- Using the D-pad, set the first option from Enable (ON) to Disable (OFF).
- Now, while using the flippers for navigating left or right, the solenoids won’t fire.
Adjust Display Brightness
You can adjust the brightness level of all 3 displays to some preset values (LOW, MEDIUM or HIGH), however you can also set each to a custom value, if you prefer. Here’s how:
- Select Settings → UI Settings.
- Select SCREEN BRIGHTNESS
- Select option LOW, MEDIUM or HIGH based on your preference to set each display to a pre-defined value. However, you can also select CUSTOM and adjust each display individually, for example:
- Playfield screen, Backglass screen or DMD screen can each be adjusted in 5% increments using the d-pad to navigate to the option and press left/right on the d-pad to change the value.
- NOTE – See UI Settings for more information.
Factory Reset
If you need to perform a factory reset, please see the following steps:
- Hold down Both Left Flipper + Left Nudge buttons.
- Power on machine.
- Press the START button.
- The factory reset will then begin.

Parental Controls
The interface used by the Legends 4KP (CE-4K) allows you to create sub-accounts. A sub-account is simply a way to customize what kind of content younger family members can see. The following is how to create a subaccount and content that may not be appropriate for all family members. AtGames calls this AMA™ (AtGames Mature Audience) content. When future AMA™-based content becomes available, that content will be automatically blocked for any sub-accounts if AMA™ Content is set to HIDE.
Settings Lock
Settings lock allows you to create a PIN code to get access to the menus. Be sure to remember or save the PIN code you enter.
- Browse to Settings → Settings Lock.
- Select the option ENABLE (ON) to enable Settings Lock.
- Enter a PIN Code twice (i.e. 111111), the PIN must be 6 digits. Then select OK.
- Next select CONFIRM to confirm the new PIN Code, followed by DONE.
- Settings lock is now enabled.
Parental Controls
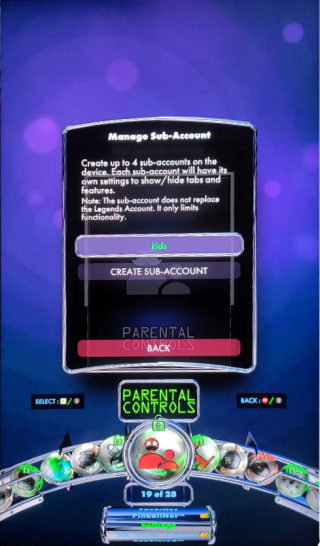
In this section, we’ll create a subaccount and call it ‘kids’. We’ll then go in and set it up to customize viewing of any tables we don’t want our kids to have access to. Keep in mind, any future content that AtGames releases that is marked as AMA™ will be automatically hidden for our kids sub-account, automatically if AMA™ Content is set to HIDE. Here’s how to set it up:
- Navigate to Settings → Parental Controls.
- Select PIN and enter your PIN number you assigned in the Settings Lock section (above) and select OK.
- Select the SUBMIT button.
- Select MANAGE SUB-ACCOUNT.
- Select CREATE SUB-ACCOUNT.
- Select Sub-Account Name.
- Enter a name for the sub-account (i.e. ‘kids’) and select DONE.
- Select SUBMIT.
- Select the kids sub-account.
- Move down to SETTINGS.
- Here you can block access to various menu options such as:
- Subscriptions (i.e. PinballNet)
- Online Multiplayer
- BYOG
- AppStoreX
- AMA™ Content
- Tables & Games Block List
- Lets assume we want to block AMA™ content, perhaps a specific table or tables. Navigate to Page 2 and make sure AMA™ Content is set to HIDE.
- Under Tables & Games Block List, select MANAGE.
- Select MANAGE TABLES & GAMES.
- Now page through the list of tables and mark those tables that you wish to add to the block list. That is, those tables that you don’t want your kids to be able to see, select them here. Once done, select BACK a few times.
- You’ll then see an option for SWITCH USER, choose the ‘kids’ account by pressing the SELECT button, followed by DONE.
- At this point, you’re now using the kids account. You’ll see red locks over those settings that require a PIN to access.
- If you navigate to All Tables & Games, you’ll now find that any games that you’ve added to the Block List are no longer visible using the kids sub-account.
- You can switch back to your main account at anytime by going back into PARENTAL CONTROLS, entering your PIN and choosing SWITCH USER.
Disable Settings Lock
If you would like to disable the Settings Lock entirely, here’s how.
- Navigate to Settings → Settings Lock.
- Select PIN and enter your PIN number you assigned in the Settings Lock section (above) and select OK.
- Select the SUBMIT button.
- Select DISABLE (OFF). You’ll be promoted that PIN protection will be removed and Parental Control will automatically be turned off. Select YES and DONE.
- Settings Lock is now disabled and may be re-enabled at anytime. The ‘kids’ sub-account still exists, if you wish to delete it you can do so using MANAGE SUB-ACCOUNT.
OTG Setup
Videos forthcoming as they become available.

OTG Guides
The following guides are available to assist with OTG Setup:
- Legends Pinball 4K OTG PC Setup Guide – This guide will assist with what OTG is, the basic Hardware/Software Configuration and additional relevant information. The links below will jump to specific sections of the OTG Guide:
- Quick Start – This will assist in getting started quickly, allow you to easily skip over what you already know with links for more details.
- Hardware – Not sure what hardware is needed? This section has some suggestions and several community members have shared their PC recommendations to help (thank you to those who helped with this!)
- Software Configuration – Looking for details on how to setup your Windows PC for OTG, this section will assist with that.
- Button Mapping – This section covers the button mapping aspects using Xpadder and why I prefer using it.
- Windows 11 SSF Support Setup – This section will describe how to setup 7.1 surround sound in Windows with the SSF kit.
- Pinball FX & M Setup – This section will assist with the setup and configuration of Zen Studios Pinball FX and Pinball M.
- Pinball FX3 (by TampaTec) – In this video, TampaTec demonstrates how to setup your PC to run Pinball FX3 on the Legends Pinball 4KP.
- VPX / Future Pinball – Coming soonish 🙂
Legends Pinball 4K Latency
Learn more about AtGames Legends Pinball 4K Latency on the AtGames Legends 4K Latency Guide.
Key sections in this guide
- Manual Latency Test Procedure – The section outlines the steps to accurately measure latency in a virtual pinball machine. This ensures consistent, precise reporting of both flipper and audio latency.
- Millisecond to Frames – Using frames to measure latency, especially in the context of video displays or gaming, is more intuitive and practical than using milliseconds alone. This section covers how to convert milliseconds to frames.
- Automated Latency Tester (or ALT) – ALT is a specialized tool created to automate and enhance the precision of flipper latency measurements on ALP 4KP.
- Test Results – Latency test results may be found in this section.
Offline Mode
A new feature has been introduced for the Legends Pinball 4KP to enable an automatic method of playing your pinball packs offline. Here’s how it works: whenever you launch a table from a pack while connected to the internet, that table becomes available for offline play. If your internet connection drops out later, you can still play any previously launched tables without interruption. There’s no need for any manual setup or action from the user”simply launching the table is all that’s required.
This feature also simplifies sharing a single license across multiple machines. If you have more than one Legends Pinball 4KP device, you can seamlessly transfer a license between them. For example, if machine A has a table loaded and you want to play the same table on machine B, simply ensure both machines are powered on and connected to the internet. On machine B, you can request the license transfer, which will automatically close the game on machine A and activate it on machine B. Once the table or pack is launched on machine B, the license will stay with that machine until it’s transferred again.
Although the legacy Offline Mode still allows you to manually take packs offline, this is no longer necessary thanks to the new automatic system. Please see here for the latest release notes for Firmware v6.0.32.
Fun and Easy Mods
Below are some simple mods you can use to make your Legends Pinball 4K or FX Legends 4K -your own! Have a great mode idea or have created one? Let me know.
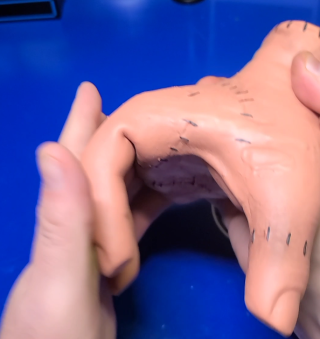
Thing Mod
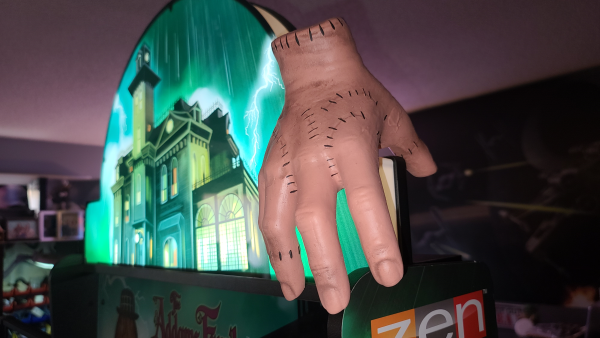
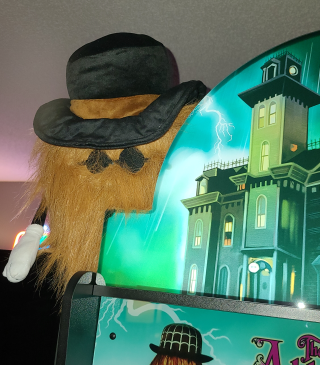
If you have The Addams Family cabinet, here’s a fun mod that will take just about 10 min. to assemble. First, you’ll need a few things, actually let me re-phrase that, you’ll need one thing and some other stuff 🙂
Items I used
- Thing (made of a soft flexible latex) – Picked it up on Amazon with a 20% off coupon at around $15 (it’s now ~$10). It’s made of latex, likely foam rubber inside, very soft and flexible. If it were to fall, it would just bounce.
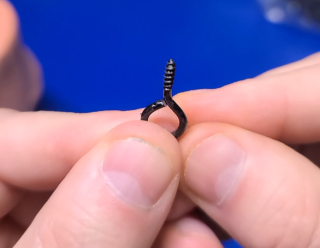
- Black Screw Eye Hooks – I’d recommend getting them at your local hardware store, it may be cheaper. The pack I bought has 100 pieces and 6 different sized. I figured I could use them around the house at some point. Here is what I ordered.
- Black String – Honestly don’t know why I bought these. I attached 3 to each other to make them work. I’d recommend just getting some black string from a hardware store or perhaps even a local dollar store.
Put it together
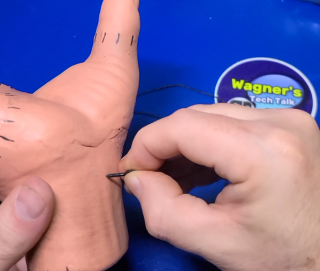
- Take a small hook and twist Thing into the screw end. May want to add a little bit of glue for additional support around the outside (I didn’t). I placed it on the back of the wrist, but you might prefer another location.
- Take a piece of string and tie it to the small hole in the hook.
- Position Thing where you want it (i.e. hanging off the topper maybe) and tie the other end off on one of the wingnuts securing the topper. This will also act as a reminder to remove Thing before removing the topper.
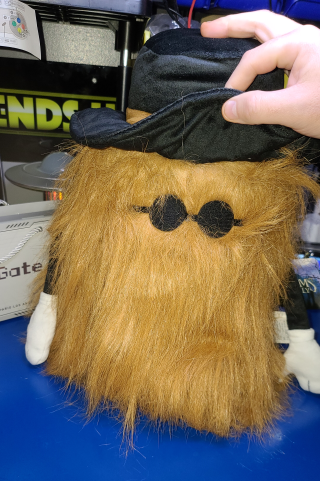
Cousin Itt
I ordered Cousin Itt from Amazon (~$22 USD) and added Itt to the topper. It’s a little larger than I thought, but still worked out well. All that was done is to tie a black string to Cousin Itt’s left arm and wrap it around the far-left wingnut (left, if facing the machine) and it stayed in place behind the topper as the wingnut is close to the back of the topper.
EVT Video Series
Below you’ll find all the video content created for the Legends Pinball 4KP EVT (pre-production) Series. This 5-part series covered an early version of the Legends Pinball 4KP and provided here fore easier reference. You can find the full dedicated guide and everything learned about the ALP 4KP EVT here. The key content in each of these videos will eventually be replaced with the production model of the Legends Pinball 4K machine.
Part 1: Hardware Tour

The AtGames Legends Pinball 4K is the next generation of the popular Legends Pinball virtual pinball machine. In the video below, we’ll explore the 4KP hardware from this v1.0 EVT pre-production model. At present, the v1.1 and a v1.2 has been built and will have slight differences than what is shown here (see differences). We’re definitely getting closer to the full production model!
Part 2: Software Tour

In the video to the right, we’ll take a closer look at the software aspects of the Legends Pinball 4KP. That is, the new CE-4K user interface, Settings, how the displays look, play some games and get a good idea of the differences between the HD and 4K models!
Part 3: OTG

In the video to the right, we’ll take a look at using OTG to connect a laptop to the Legends Pinball 4KP. We’ll locate a machine to use for testing, set it up, go over some important configuration aspects and play some tables. After checking out Pinball FX, VPX and Future Pinball at the end of each gameplay session we’ll also measure the latency. This is a topic that many have asked for and covered in detail below.
Items you may need
- PC/Laptop – If you want to run the playfield in 4K, you’ll need a relatively powerful PC/Laptop+GPU. In this video, I picked up this machine while on-sale at Best Buy (open box). A few things I’ve learned since the video, I can adjust the performance level using the Armoury Crate software so the fans aren’t blaring during game play. This machine is overkill, but performs extremely well in my testing. I’ve since upgraded it with 64GB of RAM and x2 4TB SSD’s. Comment in a video if you’d like to see how that was done. *NOTE – I do have an odd issue with the audio from this laptop (hoping it’s a software issue that will be corrected in an Windows 11 update). Sometimes I have to go into the sound settings, change/set the audio frequency then launch Pinball FX for the audio playback to work.
- Laptop Docking Station Dual Monitor 4K@120Hz (USB-C) – I picked up a few of these Baseus Laptop Docking Stations, they work decently but are USB-C. If your PC/Laptop doesn’t have a USB-C port, this won’t work for you. I actually used the HDMI output for the backglass and DMD over USB to a separate adapter that I’ve used for a few years (no longer available). But, I could have also used the HDMI output from this docking station also.
- OTG Cable – I always use the UGREEN USB-A to USB-A cables on both the ALP HD and ALP 4K. I have several of these and they have worked out well. Be aware if you using an Insignia (Best Buy) OTG cable, some have had issues (on the ALP HD).
- x3 HDMI Cables (support 4k@60Hz) – For the HDMI cables, you’ll need three of them. One for the Playfield, Backglass and DMD displays. Make sure the cables are rated for 4K and 60Hz. I often use these.
Part 4: Gameplay & Farewell

This is the final episode of the AtGames Legends Pinball 4K EVT. In this episode, we’ll play 14 included tables on this engineering sample unit and box the machine up to be returned to AtGames.
Part 5: AtGames + Zen Partnership

AtGames and Zen Studios have partnered to bring Pinball FX to the AtGames Legends 4K product line! In the video at the right, we’ll discuss the press release and details of what this all means. The original PR may be found at AtGames and Zen Studios Partnership Announcement PR .
Troubleshooting
- I’m having a problem that appears to be hardware-related, what do I do? Answer: Please contact AtGames Customer Service (CS). There is a purple chat icon in the lower-right where you can chat with someone live during normal business hours. I’ve used this a few times and typically get someone in about 3min. or less. Additionally, you can fill out the form and submit a ticket, you should receive a response within 24-48 hours.
- There is a lot of vibration on the apron, how do I fix this? Answer: Please see this mini-tutorial to adjust the haptics to your preference.
- The solenoids are firing during navigation (pressing flippers), is there a way to turn this off? Answer: Yes, please see this mini-tutorial.
- This display (or displays) aren’t bright enough for my preference, how can I adjust them? Answer: You can adjust the brightness levels using some presets or custom for each. Please see here for a mini-tutorial on how to adjust the brightness.
- I’m seeing flipper lag/latency with Zen tables, what’s the latest on this? Answer: Please see here.
- The DMD display doesn’t look right, what can I do? Answer: Power off the ALP 4K and unplug it from the back. Leave it off for about 30min-4 hours, then plug it back in and see if that corrects the issue. If not, see #1 (above).
- After setting up my ALP4k, I’m getting an error that states “Solo Mode: Offline Mode is active on another device or this game is being played on another device. Disable Offline Mode or exit this game on the other device to enable access on this device”. What do I do? Answer: It’s likely an update that was missed. Please re-run each of the updates as discussed here.
- I’m having trouble with one of my displays, how can I fix it? Check out Paul’s video here for several troubleshooting steps that may help. -Thanks Paul!
OTG Troubleshooting
- I have a high-end PC connected to the ALP 4K, however at times the flippers won’t react to the button presses periodically. 95% of the time it’s great, but sometimes it will seem to not respond, how do I fix this? Answer: A viewer that encountered this issue stated: Using a powered USB hub seems to remedy this issue. PC to hub to 4KP. No more micro stutters. Credit to Bryan G. for this tip!
- I’ve installed the Arcade Control Panel (ACP) and it’s not being recognized over OTG, why? Answer: At present, there is an issue with this that AtGames is working on. The ACP works fine natively, but isn’t detected in Windows when in OTG. There should be an update to correct this available soon.
Change Log
- 2025-01-14 – Added the new Offline Mode details.
- 2024-12-23 – Added several new Zen Studios and AtGames Original NH3 short videos.
- 2024-12-04 – Add additional Zen Titles here.
- 2024-10-30 – Minor adjustment to the Haptic mini-tutorial.
- 2024-10-27 – Add additional Zen Titles here.
- 2024-10-18 – Added the Jurassic Park Topper video.
- 2024-10-16 – Added Parental Controls Mini Tutorials.
- 2024-10-14 – Added Legends Pinball 4KP Jurassic Park [SE] video (top of page).
- 2024-09-19 – Added a mini tutorial for changing the Backbox Style.
- 2024-08-26 – Latency analysis section will be replaced with a new, far more detailed guide based on more recent data and analysis.
- 2024-08-21 – Add additional Zen Titles here.
- 2024-05-23 – Added The Twilight Zone here.
- 2024-05-21 – Added StarTrek TNG and Attack from Mars here.
- 2024-04-20 – Added StarTrek Zen Tables here.
- 2024-04-15 – Added Paul’s Display Troubleshooting video here (#8).
- 2024-03-26 – Added all 22 Gottlieb short videos here.
- 2024-03-23 – Start to adding the Gottlieb tables section. Short videos forthcoming.
- 2024-03-10 – Added Zaccaria vol 1 short videos. All volumes will be added, eventually.
- 2024-03-07 – Added additional short game play videos. Added JDV’s latest video on the ALP 4KP.
- 2024-02-28 – Updated Latency section with Gottlieb test results.
- 2024-02-26 – Minor updates (added a few missing links).
- 2024-02-21 – Added AtGames News & Updates section (in preparation for NOD).
- 2024-02-20 – Added the new OTG PC Setup Guide.
- 2024-02-19 – Added Gloomhaven (OTG) under Latency section.
- 2024-02-17 – Added additional Troubleshooting item.
- 2024-02-16 – Added a new placeholder section, OTG Setup. Content forthcoming.
- 2024-02-09 – Revised the SSF Kit installation video, due to a few things: In the original video, step #7 showed the cable installed backwards. It’s not an issue electrically, but just the color of the wires. Also, adjusted the step #’s to match the latest install PDF. It’s all minor stuff, but want to make sure this video is 100% accurate.
- 2024-02-07 – Added additional Troubleshooting item.
- 2024-02-05 – Added Cousin It mod.
- 2024-02-03 – Added a new OTG Troubleshooting section for OTG-specific issues.
- 2024-02-01 – Started a new section for the SSF Kit Installation.
- 2024-01-31 – Added Friends of the Channel section.
- 2024-01-30 – Updated the Legends Pinball 4K Latency section. Added Thing mod.
- 2024-01-28 – Minor updates in various sections (Q&A, Where to Buy, etc.) to keep things current.
- 2024-01-27 – Added Peanuts’ Snoopy Pinball (short) in 4K. Added Legends Pinball 4K Latency test results.
- 2024-01-26 – Added Initial Setup video (Part 2).
- 2024-01-24 – Various updates in the Initial Setup section to coincide with the next video. Minor cleanup in other areas that needed a little more explanation.
- 2024-01-23 – Added a new section for the Initial Setup (covers the Setup Wizard and Day One Update).
- 2024-01-22 – Added a Troubleshooting section to assist with some potential areas that may be helpful. Added the Pinball FX3 subreddit to the Resources section.
- 2024-01-21 – Updated image during assembly of the legs. Changed the Customization heading to Mini Tutorials. Moved Settings above Mini Tutorials. Removed Latest Updates section, information there was no longer relevant. Added Adjust Haptics, Adjust Solenoids During Navigation and Adjust Brightness under Mini Tutorials. Moved the EVT Series content towards the bottom as it will become less and less relevant.
- 2024-01-20 – Added links to the Core Tables section to play short videos of each table. Updated Navigation section artwork (production model). Added additional artwork to fill out the page better.
- 2024-01-18 – Made the Unboxing & Assembly video available.
- 2024-01-17– Updates to the Unboxing + Assembly sections.
- 2024-01-15 – Various edits to bring the guide up to more recent information.
- 2024-01-13 – Added The Addams Family Game Play video.
- 2024-01-05 – Moved the Legends Pinball 4KP Settings to a separate guide.
- 2023-12-17 – Minor updates, re-organized sections slightly.
- 2023-12-12 – Added Attack from Mars CEP.
- 2023-12-02 – Added link to Zen Pinball Packs FAQ (See #14 here). Updated the Table Editions section to include the Star Trek CEP.
- 2023-11-19 – Added the EVT Video Series to this guide. Added a comparison of the ALP HD vs ALP 4KP (The Addams Family cabinet).
- 2023-11-18 – Minor updates to the Q&A section.
- 2023-11-13 – Updated the Table Game Play section, broke out each set of tables (Core, Zen, Dr. Seuss, TAITO, etc.) Added a link to the Arcade Control Panel on Amazon. Additional formatting improvements. Added Q&A section.
- 2023-11-06 – Added Latest Updates section with some good news, the coin door will be centered (and more).
- 2023-11-05 – Initial public availability.
- 2023-11-01 – Added additional information for the ACP and a screenshot in the Accessories section.
- 2023-10-31 – Documented the remaining Settings.
- 2023-10-30 – Document Settings.
- 2023-10-26 – Start to this guide (Unboxing & Assembly)