Glen’s Retro Show Products
Last Update: 7/4/2025

The products on this page are available thanks to Glen’s Retro Show! Glen has been providing some awesome replacement components for several years, which also happen to work just great with the GRS Viper, Raspberry Pi & DIY Arcades. Check out Glen’s Retro Show on YouTube for all the details!
Table of Contents
GRS Viper
The GRS Viper, is a powerful and affordable single-board computer designed for DIY arcade builds, the GRS 1:6th scale Build-A-Cade, and iiRcade. In this video, we unbox the GRS Viper, explore its pre-installed R-CADE software, walk through the setup, and show how easy it is to add games, browse the internet, and more. The GRS BUILD-A-CADE FU (FULL-SIZE Arcade) on Kickstarter (available through Aug. 2025).
Product Links
- GRS Viper SBC [tsticks]
- Beikell SD Card Reader [Amazon]
- YAEYE Wired Controller for Xbox 360 [Amazon]
- GIGASTONE 128GB 2-Pack Micro SD Card [Amazon]
GRS Viper Documentation
- Getting started with your GRS Viper SBC
- GRS Viper SBC User Manual
- Build-A-Cade Viper SBC Assembly Instruction
- More about R-CADE
TRON 2022
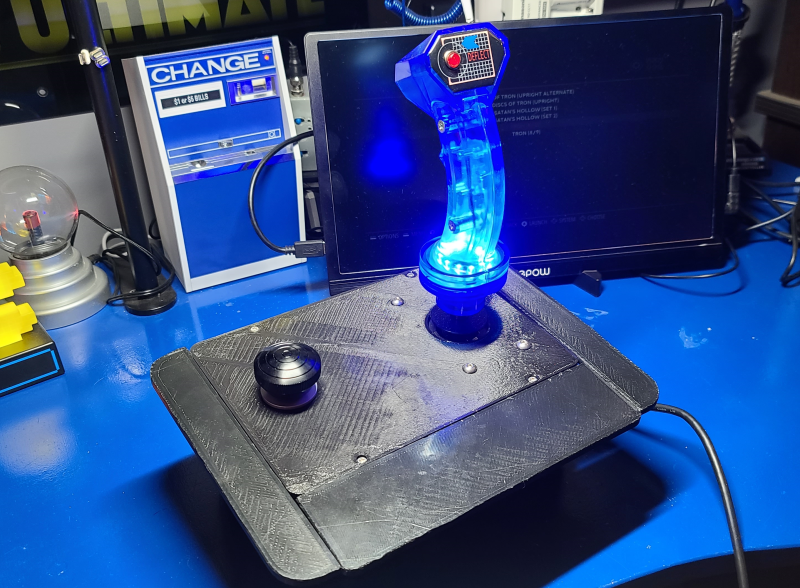
If you would like to be able to play the classic Discs of Tron Arcade game, you likely already know that the controls are rather unique for this game. Fortunately for us, Glen has released the Push-Pull spinner and DOT Flightstick. What is different between these two controls and the ones shown here, is that the push-pull spinner allows you to not only use it as a traditional spinner, but also assign buttons for pushing down and pulling up on the spinner. While the DOT Flightstick includes a secondary button at the top for the deflector button.
The 3D model for the above controls may be found here (control panel only). For more information on printing the base (box) and side panels, please see here.
Questions Received
The following are questions I’ve received so far:
- What is the height of the stick from the surface of the control panel to top of stick? The 3D printed control panel shown in this video is 5mm thick. From the top of the panel to the top of the Stick is exactly 7.5″.
- Do you recommend any specific encoder? The one shown in the above video was included with the original Tron stick, at the time (in 2019 and no longer included). I asked Glen about this, he said basically any inexpensive USB encoder should be fine.
- Why did you use Advance Mame? It was the easiest to setup. The spinner is recognized immediately without any setup. Launch a game, press the Tab key on an attached keyboard and you can easily re-map the deflector and trigger buttons. The same is true for the two directions (up/down) on the push-pull spinner.
- Are both controls compatible with the Arcade1UP Tron cabinet? The DOT Flightstick is compatible. However, the push-pull spinner is not.
- How can I get the base for the Tron Stick? At the present time, Glen is selling the DOT Flightstick as an upgrade to the original Tron stick. Therefore, you’d have to buy the Tron stick also to get the base. Hopefully, the DOT Flightstick will see a bundle that includes the base soon.
Links
- GRS Push & Pull Arcade Spinner [ Amazon ]
- GRS DOT Flightstick [ Amazon Upgrade Kit] – Keep in mind, you’ll need the base to install this stick. If you don’t already own one, you’ll need the GRS Tron Arcade Flight Stick (below) also.
- GRS Tron Arcade Flight Stick [ Amazon ]
If you want to see everything available from Glen’s Retro Show, check out his on-line store (on Amazon).
GRS Arcade Flight Yoke
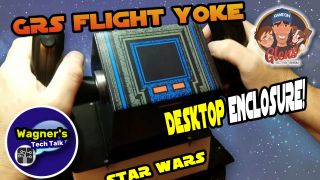
In this video, we will build a 3D Printed STAR WARS enclosure for the Glen’s Retro Show GRS Yoke! We’ll create a single base with side panels, a custom control panel and demonstrate how to assemble it.
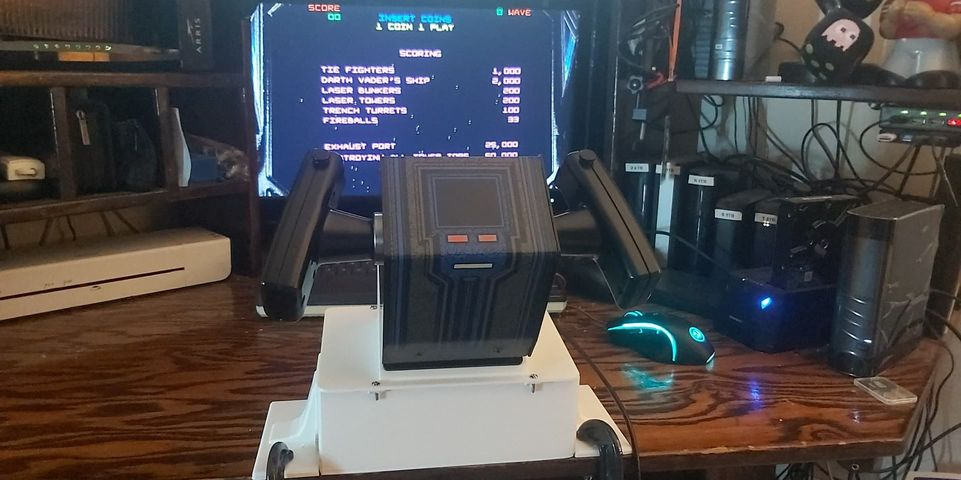
Have you ever wanted to own your very own Star Wars Flight Yoke and use it on your PC, Mac, Linux, Raspberry Pi, Arcade1Up, AtGames Legends Ultimate (ALU) or original Arcade cabinet? Well, you certainly can with the GRS Flight Yoke. Another option is to create a 3D Printed box (i.e. OpenCADE) that will allow you to secure it to your desk and play all those games via USB to whatever machine you want to use. Let’s face it, not everyone has the room for a full-size Arcade cabinet or even the 3/4 size Arcade1UP. But everyone can clear off a little desk space to make room for some fun –right?
More Videos
Here are some additional videos on the GRS Flight Yoke that you may also enjoy watching to get a better idea of it’s capabilities:
Glen’s Retro Show (YouTube channel / website)
- Some GRS Star Wars Yoke Gameplay with more then Star Wars
- GRS ATARI Star Wars Arcade Yoke Controller, Save the Galaxy!
- GRS Star War’s Flight Yoke test with the Sega Star Wars Trilogy Arcade
CoolToy (YouTube channel)
Things You’ll need
” GRS Flight Yoke (NOTE: May show unavailable on Amazon, should be re-stocked soon)
” Moukey 2 PCS C Shape Desk Table Mount Clamp – needed to secure your build to the desk and includes padded clips. You can use other clamps, these are what I recommend (small and padded).
” OpenCADE Base – You can pick a base with no front hole cutouts or one with two front hole cutouts.
” M3 Screws – Needed to secure the control panel to the base.
” M3 Nuts – Needed to secure the control panel to the base.
Assembly Instructions
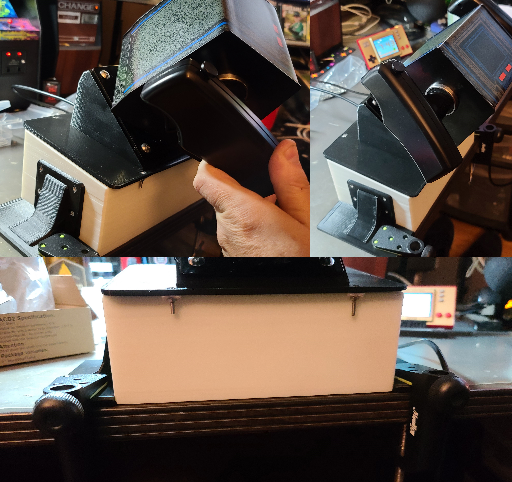
WARNING – The GRS Yoke is top-heavy and can easily be tipped over. Until secured to your desk, use extreme caution to eliminate the possibility of it tipping over and falling off your desk.
- Download the Thingiverse models for the Flight Yoke here.
- Remove the loose metal plate from the GRS Yoke.
- Using the large screws included with the GRS Yoke, slide the screws through the top of the GRS Yoke into the control panel and use the included nuts to secure (*NOTE: rotate the yoke for easier access to the screw holes).
- Mount the left+right supports to the OpenCADE base using the M3 screws+nuts.
- Route the USB cable out the top of the OpenCADE base and bundle all other cables for the yoke inside the base (cable tie, electrical tape, etc.)
- Wrap some electrical tape or cable tie around the USB cable to keep it from sliding out the back of the OpenCADE base/notch at the top. This is to prevent stress on the internal wiring.
- Using the M3 screws + nuts, secure the control panel to the Base.
- Use the clamps mentioned above (or use your own) to clamp the assembly to your desk.
- Plug it into your Computer (PC/Mac/Pi, etc.)
TRON Control Panel
A new control panel is available in the link below, it will allow you to add a GRS spinner and a Tron Joystick controller to OpenCADE! You can use this with a Raspberry Pi or a PC via USB with MAME. In the video above, I created a separate enclosure and connected it to an existing OpenCADE Console. Of course, I can just as easily attach it to an additional base with Joystick+buttons as well. Build it the way YOU want!
To build this, you will need the following:
Please see the video for details on how to build your own! But, you can now download and 3D print the control panel from thingiverse here. It’s all still free to print, so no worries there. In addition to the above, here are the screws that worked well for my build:
- M5 screws + nuts for the Flight Stick (x4)
- M3 screws + nuts for the panel & base (x8)
- M2 screws for the PCBs (x6)
- Rubber Bumpers (feet)
Speaking of which, you may be interested to see what Glen had to say about OpenCADE and it’s support of his Arcade products!
Add a Trackball and Spinner to OpenCADE
Check out our new video (below) to help you get started building your own Trackball+Spinner OpenCADE Solution:
The instructions below will assist you in acquiring the parts and assembly of your own Trackball and Spinner for your OpenCADE running RetroPie! What does this mean? It means you can play Tempest the way it was meant to be played as well as many other games such as: Arkanoid, Golden Tee and so many others! Adding a trackball will allow you to play Centipede, Millipede, Marble Madness and so many more – just like you remember them back in the day!
The following instructions assume that you are familiar with OpenCADE and have already assembled a console with at least one Joystick+buttons and added a USB extension. The USB extension will be necessary for the configuration for RetroPie and will require a keyboard. You’ll only have to do this once. Let’s get started!
Parts Needed
The following components are needed to build the control panel for the Spinner & Trackball:
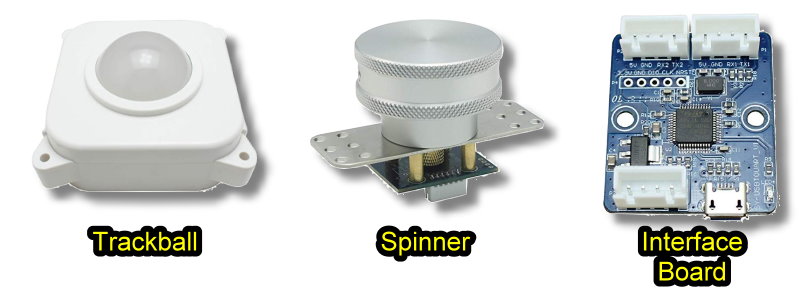
- ThunderStick LED Arcade trackball (TS-UTB01)
- Arcade Spinner for Arcade1Up (or RetroPie)
- Arcade1Up 12 in 1 Interface Board (also works with RetroPie)
- micro USB to USB cable (for interface board to Raspberry Pi)
- OpenCADE Base – You’ll want to 3D Print a base to house the trackball and spinner, details here.
- OpenCADE Glen’s Retro Show Trackball and Spinner Control Panel (3D Printed) – link to the model may be found here.
- M3 Screws – Same used in the instructions for OpenCADE. You’ll need x8 for the trackball and spinner.
- M3 Nuts – Same used in the instructions for OpenCADE. You’ll need x8 for the trackball and spinner.
- M2 screws to screw the interface board to the base (included in the M3 screws link above).
Control Panel Assembly Instructions
- 3D Print the OpenCADE base (instructions here)
- 3D Print the GRS Trackball+Spinner Control Panel from here.
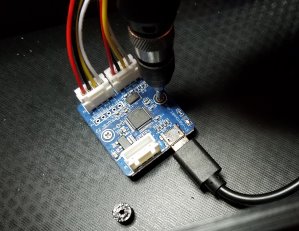
- Use x2 M2 screws and screw the Interface board into the OpenCADE base.
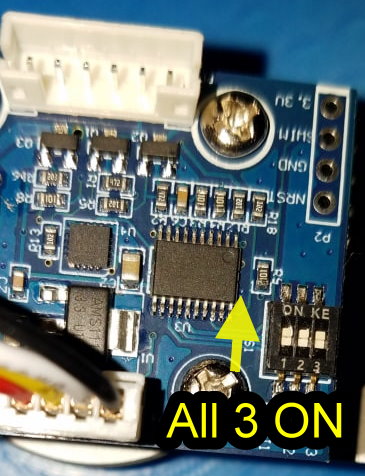
- Set the dip switches for the GRS Spinner all in the ON position. *NOTE – you may need to remove some plastic film, use a small flat head (jewelers) screwdriver from your local dollar store.
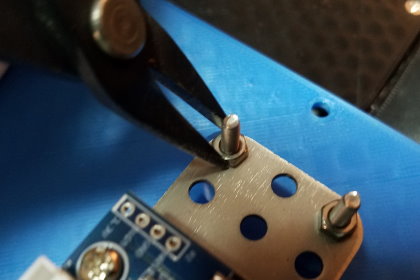
- Install the GRS Trackball to the control panel using x4 (long) M3 screws and x4 nuts. The cable coming out of the Trackball should be towards the top of the control panel (important, otherwise you’ll have to do it again). It can be a little tricky placing the nuts on the bottom of the control panel, for that I recommend using some needle-nose pliers.
- Install the GRS Spinner using x4 (long) M3 screws and x4 M3 nuts.
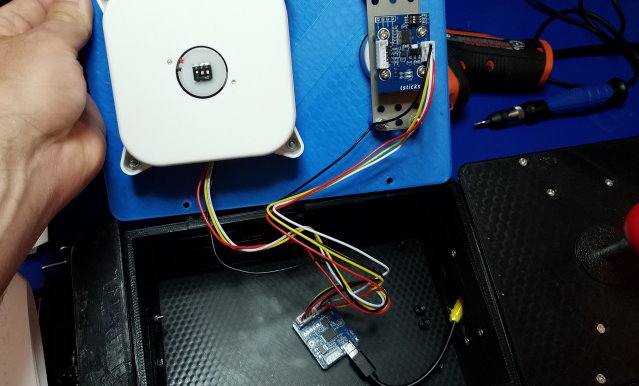
- Connect both interface cables from the trackball and spinner to the interface board per the manufacturers instructions.
- Connect the microUSB connector to the Interface board. Route the other end (standard USB) through the hole in the side of the OpenCADE base to the base which contains the RPi and Joystick encoder. Plug the USB cable into the Raspberry Pi.
- The Trackball should now light up, you can adjust the dip switches according to the manufacturers instructions to change the color of the trackball. The Assembly should look like the following:
- Screw both base sides together to make one complete control panel. *NOTE – you may optionally install a cover plate, arm rests, etc. from the expansion pack as well.
- You are now ready to setup RetroPie and start playing games!
RetroPie Configuration (AdvancedMAME)
- Install a USB keyboard to the external USB port on the OpenCADE.
- Install AdvancedMAME (from Retropie Setup), if not already installed. If AdvancedMAME is not already installed, please see this.
- Copy AdvancedMAME roms to \\retropie\roms\mame-advmame (Centipede, Tempest, Arkanoid, Marble Madness, etc.)
- Restart Emulation Station
- To set the Emulator, press ENTER on the keyboard after launching the game (using the Joystick/Controller)
- Set the Emulator+ROM for ‘Advanced MAME 1.4’.
- Select Launch.
- In AdvancedMAME press the TAB key.
- Set Sensitivity for each game according to your preferences. For the Anaolog controls for Tempest (using the Spinner), I set the following:
- Dial Digital Speed 20
- Dial Autocenter Speed 20
- Dial Reverse Off
- Dial Sensitivity 27%
- ESC out of the configuration
- Start the game, should be good to go!
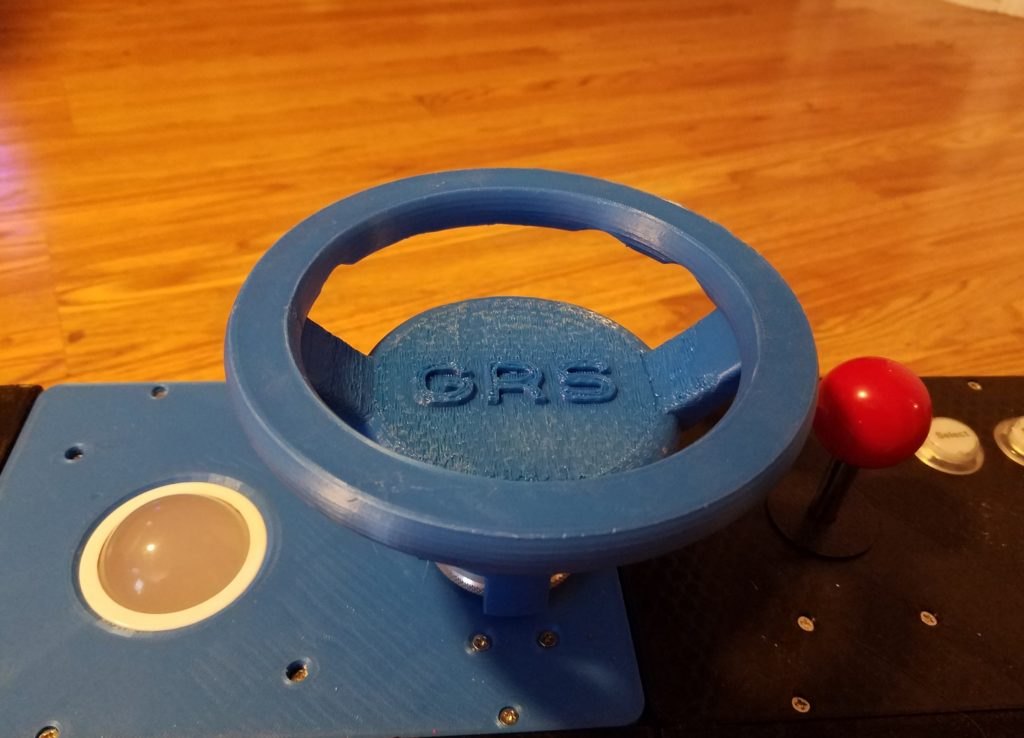
Steering Wheel for GRS Spinner
The GRS Steering wheel is now available! This new attachment will allow you to more easily play many racing games on your Arcade1UP, OpenCADE or custom build!
It was designed to fit the Glen’s Retro Show (GRS) Arcade Spinner. To use this, you’ll need the Arcade Spinner and 12-in-1 Interface board listed below:
- Arcade Spinner for Arcade1Up (or RetroPie)
- Arcade1Up 12 in 1 Interface Board (also works with RetroPie)
- You’ll also need x1 M5 screw @ 12mm length – The link here is overkill, you only need 1 but this is what I bought so I’ll have some for future projects. I’d recommend trying your local hardware store instead.
Download Links
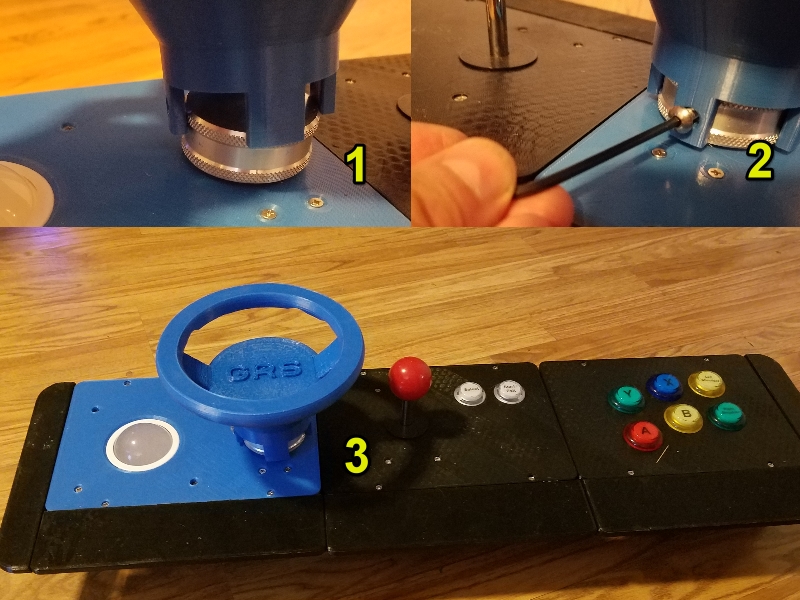
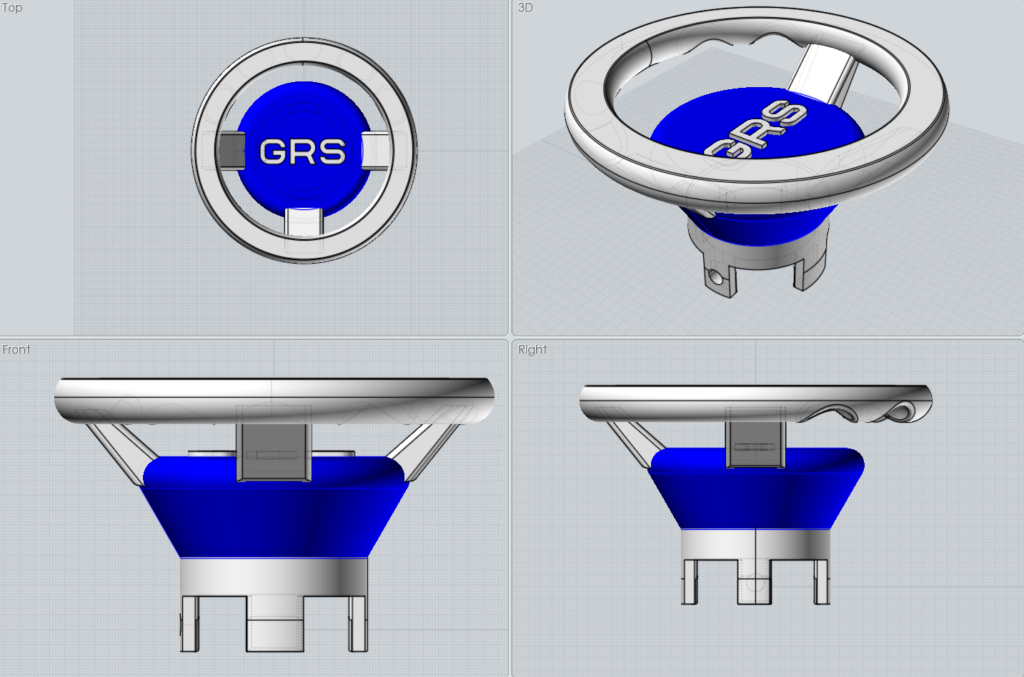
GRS Steering Wheel .STL file (~896KB) or from Thingiverse here.
The one shown below was printed with 15% infill and supports (for the middle section). After 3D Printing the Steering wheel and removing the supports, it’s as easy as 1-2-3 to use it. If you’d like to build an arcade console like the one shown in step 3 – the models for that are free also!
Notice: Some artwork on this page is copyrighted (c) work from Glen's Retro Show. All artwork/branding used here was done so with authorization from the content owner.
Change Log
- 2025-07-04 – Added the GRS Viper to this page.
- 2022-02-18 – Updated with Glen’s new Push-Pull spinner and DOT Flightstick.
- 2021-08-07 – Minor edits in preparation for new content.