AtGames Legends Pinball Mod Series: Season 1
Last Update: 7/7/2022
Back to the Legends Pinball Guide
Welcome to the AtGames Legends Pinball (ALP) Modding Series! In the following chapters we’re going to take on the exciting task of not only setting up our AtGames Legends Pinball machine but expanding and enhancing it with more pinball tables connected to a PC and Arcade Games. Within this series, I will reference existing content as well as provide new content and information to help guide you along the way. Any links referenced below will open in a new tab so you won’t lose your place.
I want to thank AtGames for not only creating an impressive product that is open enough to allow this expansion, but also for helping bring this series to fruition. The goal is to step you through the process of expanding and setting up your ALP. Allowing you to play those pinball tables and games you want to play, let’s get started!
Best Deals on AtGames Products: Twice a year, AtGames hosts a New Owner’s Day (or NOD). This typically occurs in February and September of each year. If you’re interested in picking up some of the AtGames products below, you can find the best available prices during NOD.
Table of Contents
Prerequisites

The following are a few items that you may want/need to follow along with this series:
- AtGames Legends Pinball – We’ll talk more about this in Chapter 1, however it should come as no surprise that you’ll need the machine. The AtGames Legends pinball may be found locally in some stores such as Sam’s Club, Best Buy and Kohl’s or ordered directly on Amazon.
- USB Thumb drive – A USB Thumb drive is necessary to download and install additional pinball tables to your machine. It is also needed should you choose to install CoinOpsX (we’ll cover that in Chapter 3). The size of the drive is up to you, this link will take you to the USB drive I use in all my machines and has been very reliable and a low-profile stick.
- VIBS Board (not required, but highly recommended)- The VIBS or Video Input Backglass Switchboard is useful for connecting a PC (or other HDMI source) to the backglass on the ALP. The VIBS board is available on Amazon which includes free shipping with Prime. We’ll discuss this further in Chapter 6.
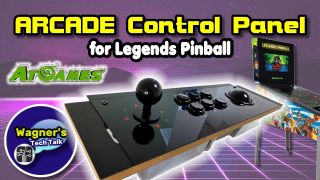
- Arcade Control Panel (not required, but highly recommended) – This accessory can be easily added to your ALP and will add a Joystick, 6 action buttons and a trackball. This is great if you want to play Arcade games on your ALP. In addition, the joystick does make navigating the menu options and settings much easier. You can find the Arcade Control Panel on Amazon with free shipping, with Prime. We’ll discuss this further in Chapter 3.
- Pinball FX3 Cabinet Code – One of the first things you’ll want to do is request a cabinet code for Pinball FX3, if you plan on using this software on your ALP. This code is free and sent to you by Zen Studios. You will need to take a picture of your ALP which may take 24 hours (or so) for them to send your cabinet code. It’s a good idea to do this early-on and why I’m mentioning it here.
Preface
Throughout the following chapters, you’ll find links that direct you to specific areas on this site (and others) that will provide further details and resources. This guide is mean to be read from top to bottom, but of course if you’re already familiar with some of the earlier sections, feel free to skip ahead. The goal is to make this an easy and fun experience. I welcome your feedback and suggestions. Now, let’s get started!
Chapter 1: Getting Started
The AtGames Legends Pinball machine will allow playing well over a hundred tables natively on the machine without ever having to connect a PC or any other machine to it. The Legends Pinball includes a 32″1080p playfield running at 60 frames-per-second (fps) and a 15.6″ LCD backglass for displaying your score and table art (full specifications). When the unit ships, you’ll typically have 22 built-in Gottlieb tables. In addition to the built-in tables, you may have received codes for additional sets of downloadable table volumes. These volumes may contain 4-20+ individual pinball tables per volume. For more information on available Volumes, please see here.
If you haven’t decided if the AtGames Legends Pinball (ALP) machine is right for you, I can understand. It was a decision I didn’t take lightly either. While it’s cheaper than the typical new laptop or latest large-screen TV, it is a sizable investment. Every individual has unique financial situations and justifications for picking one machine over another or none at all. I would recommend watching several YouTube videos from different content providers to get their opinions on the ALP (some suggestions here).
I have my own videos as well and some I will be sharing below. However, don’t base any decisions on a single persons opinions. I too was worried if I would like the machine, had barely enough money saved up to buy one and basically just watched all the YouTube videos I could find. My wife wasn’t too thrilled at first, until I set it up and she played her first game. At that point, I received the nod of approval. Here were my reasons for considering the ALP, some may/may not be important to you. My unit was purchased from Sam’s Club and it is an exciting journey! It was also my first AtGames purchase, which then led to a few more (See the AtGames section on the guide page).
If you have a Sam’s Club nearby, picking one up from there may be faster/easier. Should any exchange be necessary, it’s much easier to return it to the store. You can find all locations that sell the ALP here.
In the next chapter, I’ll assume that you’ve made your decision and now own an ALP or have one on the way. If you’re still on the fence, I understand. If you want more information before proceeding, please see the AtGames Legends Pinball Guide. This guide will provide you with additional details, resources and information to help you determine if the machine is right for you. If you haven’t decided, let’s just pretend you have and continue our adventure.
Chapter 2: An Out of Box Experience
After I ordered my unit from Sam’s Club, I was obsessed with the idea of having a virtual pinball machine. Several years ago I had set out to build one myself and had a number of technical issues working against me. Long story short, it didn’t work out and decided to wait until a viable commercial option was available. Fortunately, today we have that commercial option that brings Virtual Pinball to the home at a reasonable price. My unit shipped from Sam’s Club in two boxes, today they ship the machine in a single box.
In the video below, I’ll share with you my early experiences with the ALP. It covers the features, unboxing, game list (which has expanded greatly since this video was created) and of course some game play. Some key points to take away from the video below:
- Understanding of the assembly process.
- Understanding of how the controls work (haptics, accelerometer).
- Adding additional table volumes.
- Using Flash Drive X (FDX) to install pinball tables.
So go grab your favorite beverage and kick back and see what your first experience with the ALP should be like.

Chapter 3: Arcade Gaming on the ALP
In addition to being able to play 145+ pinball tables natively on the machine, you may be surprised to learn that the ALP can also play Arcade games! There are a number of ways to play the classic Arcade games you enjoyed growing up and we’ll cover some of them here. Obviously, due to the way in which the screen is oriented, vertical games such as Galaga, Ms. Pac-Man, Donkey Kong, etc. will fit nicely on the 32″ display. However, that doesn’t mean you can’t play the horizontally-oriented games as well, just that they will typically use less of the display for the game.
If Arcade gaming is something you’re interested in on the ALP, you’re not going to find the d-pad on the top of the ALP panel a good experience for that. While it will work, albeit a bit problematic, you’ll be limited to using the side buttons (flipper/nudge) of the machine for the action buttons to jump, shoot, etc. The d-pad is designed for navigating the menu system, not for playing games with it.
However, AtGames released the Arcade Control Panel for the ALP. This device makes it much more fun to play Arcade Games on the ALP! If you want to play Arcade Games on the ALP, this will likely be one of your first must-have upgrades. The Arcade Control Panel is also now available on Amazon. The good thing is, it’s very easy to install. If interested in how this works, please see the video below.
Now that you’ve seen the Arcade Control Panel in action, let’s discuss some of the various ways you can play Arcade Games on the ALP:
- CoinOpsX (Guide on this site) – CoinOpsX is a great way to play thousands of Arcade classics on your ALP. When playing on the ALP, the new CoinOpsX Vertical (WOPR w/Cheese) looks the best for the vertically-oriented display. However, please read the first paragraph with the disclaimer on why there are no download links for the games on the guide. If you’re wanting to play vertical Arcade classics on your ALP, this is currently the best way to do it. Classics like Galaga, Ms. Pac-Man, Time Pilot and so many more can be played using CoinOpsX.
- ArcadeNet (link to AtGames website) – AtGames provides 3 tiers of pricing for ArcadeNet. Don’t be to concerned with that, a Free/Basic subscription is available so don’t think that you must pay a monthly fee to play arcade games –you don’t! An ArcadeNet account is needed to upload your high-scores to their servers, but again you can pick the free account. The advantage to the paid account is unlimited play (vs limited play time), 1080p/60fps streaming (vs. 720p/30fps on free) , 4 multiplayer voice chat (vs. 2) and limited game selection vs. a larger library of over 80+ available games. Keep in mind, if you intend to use ArcadeNet for streaming games, adding an Ethernet cable to your ALP will provide the best experience.
- BYOG (Bring Your Own Game) – With BYOG, you can add additional games to your ALP by installing them to a USB flash drive. The process can be a bit time consuming depending on the number of games you want to add. If you’re interested in this option, please see the MAME Guide. Keep in mind, this guide discusses the use of x2 USB drives (one for arcade games, the other for Flash Drive X). However, it is possible to do both with a single USB drive as well using the method shown for CoinOpsX (above).
The above should give you a good jump-start on how to get started playing Arcade Games on your ALP. However, I will admit, often when I play arcade games I mostly do so on the AtGames Legends Ultimate (ALU). Navigating the CoinOpsX menu on the ALP is faster and more responsive than the ALU due to the faster processor in the ALP. However, the games themselves look good in both horizontal and vertical orientations on the ALU instead of horizontal games being in the middle of the display on the ALP. However, they are both great solutions for playing retro arcade games!
Chapter 4: PC-Based Virtual Pinball (Overview)

This section is titled PC-Based Virtual Pinball due to the fact that the vast majority of pinball games available are PC-only. For example, you may have heard of Zen Studios. They have been making pinball games on many different platforms for several years. My first experience with Zen Pinball was on an XBox 360. Years ago, I recall many late nights playing Wolverine, Empire Strikes Back and Ghost Rider pinball tables on that platform. I’ve always had a love for pinball, wanted to own a pinball machine but the cost and lack of available space made it far out of reach –at the time. Fast forward 15 or so years, all that has changed.
There are three primary software packages that we’ll be discussing in this series for installation to your PC, these are:
- Pinball FX3 – There are a number of high-quality pinball tables available for FX3. Pinball FX3 is downloaded and installed using Steam. To install the tables, you’ll need to install the Steam client, purchase and install the tables. Don’t worry if this sounds confusing, it isn’t and I’ll step you through it. All the games are organized in bundles and each is priced separately. You’ll also need a cabinet code to allow using the ALP backglass, more on that in the FX3 chapter. Sometimes you can find some good sale prices on various volumes, so keep an eye on them if you’re hoping to pick up all titles. I paid, ~$250 for all the available FX3 tables over the course of a few weeks watching for sales. I would recommend starting with the included free table, get it setup and working before considering adding more to your collection.
- Visual Pinball X (VPX) – We will install both VPX and Future Pinball (FP) using a single tool called PinUP Popper Baller Installer (official guide). Many contributed freely to the development of the components, including NailBuster who made all of these components easy for the rest of us to install (trust me, it was really a painful process before Baller Installer). This package will assist us with the installation and setup of both. It will also install two original pinball tables to allow us to test out the setup. There are hundreds if not thousands of community-developed pinball tables you can install and run on your PC connected to the ALP. All of these tables, as far as I know, are freely available to the community. Keep in mind, some of these tables may require original pinball machine roms. I am not able to provide links links to roms (read why here). For those tables that require roms, you may find google to be your friend.
- Future Pinball (FP) – As mentioned above, we will be using PinUP Popper Baller Installer (official guide) to install Future Pinball. The installation process will be the same for both, though there will be minor customizations that can be made to each set of tables. More on that later. All of these tables, as far as I know, are freely available to the community. None of the Future Pinball tables require nor use original rom dumps from the actual pinball machine. All tables are original re-creations of the physical machines or completely original tables.
You should now be familiar with the packages we will be installing in this series. Keep in mind if there is a package that you don’t want to install you can certainly skip it or come back to it later. You may find it easier to start with FX3 and that’s the sequence we will cover in the following chapters. However, I would recommend reading/watching the PinUP Popper Baller Installer section as well. You’ll see there are some amazing tables available to you that are super fun to play.
As mentioned at the beginning of this chapter, all of these packages will require a PC to run them. Now you may be asking: what kind of PC do I need? How powerful should it be? Do I need anything else? Those questions will be answered in the next two chapters.
Chapter 5: PC Requirements
To install Pinball FX3 or Pinup Popper Baller Installer, you’ll need a PC. There are so many models to consider, it can be a bit daunting. In this section, we’ll break it down a little to help you make a decision you’ll be happy with. There are a few general considerations to keep in mind :
- Dedicated PC – You may want to dedicate the PC exclusively for pinball. Installing additional applications/background services is likely to impact performance of the machine. Performance is important for a great pinball experience. If you wind up using your main PC as your ALP PC, at some point you’ll likely wish you hadn’t.
- Upgradable/Replaceable GPU – Avoid any PC’s where the GPU (Graphical Processor) cannot be upgraded/added in the future -including most laptops. The reason I mention this, I initially started with a mini-PC thinking the internal Vega 10 GPU should be sufficient. It wasn’t, there was screen tearing and performance issues in-general (among others). I returned that machine and picked up a Desktop PC with a GTX 1650 Super GPU included which worked out well. Speaking of which, the prices of GPU’s are outrageously high right now. You’re likely to find that buying a PC which includes the graphics card will be much cheaper than buying a PC separately and adding the GPU. Your mileage may vary, especially if you get lucky on ebay or other discount sites. But in-general, if buying a new machine, you’ll get more bang for your buck with a bundled solution.
- Graphics Cards (GPU’s) – NVIDIA Graphics cards will work better with the VIBS board (more on that in the next chapter) than an AMD GPU. The vast majority of users that use a recent NVIDIA GPU should have an overall good experience. When the VIBS board was initially released, there were a number of people having trouble (including myself) getting an AMD-based GPU to work with the backglass. This resulted in an extended Troubleshooting section here. For the least amount of hassle, the above is my recommendation.
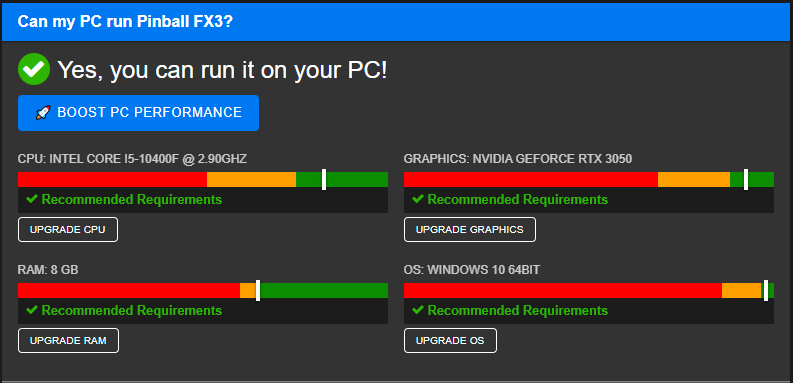
NOTE: I recently came across a handy tool to help you determine if the PC you’re considering will work well with Pinball FX3. Click here to open the tool, then enter the CPU, Graphics (GPU), RAM and OS and see if what you’re considering will run it well. If so, it should work equally well with PinUP Popper Baller Installer also.
Now that some of the more general considerations have been mentioned, lets discuss some specifics:
- Operating System – All of my testing has been with Windows 10, at this point. Windows 11 was released in Oct. 2021, however unsure if Windows 11 will work just as well. Once I have more information regarding Windows 11 this will be updated.
- CPU / Processor – An Intel I5-4590 (or AMD equivalent) or higher is recommended. The faster the processor the better the performance. Look for a machine that is within your budget.
- Graphics Card: NVIDIA GTX 970 (or faster) €“ In my opinion, you may wish to avoid an AMD GPU with the ALP and consider an NVIDIA card instead, if it is a new purchase. The reason for this, most AMD GPU’s will have problems with the VIBS Board, should you consider adding a VIBS Board (more in the next section). For my setup, I went with an NVIDIA GeForce GTX 1650 Super and it has performed well for both Pinball FX3 and PinUP Popper Baller Installer.
- Multiple HDMI Ports €“ You’ll need enough HDMI ports coming out of the PC to support the number of screens you want to display content on your ALP. Obviously, at least x1 will be needed for the playfield. However, if you want to use the VIBS/Backglass with a PC, you’ll need another HDMI port. If the PC doesn’t have enough HDMI ports, I found the HDMI Adapter mentioned here worked just fine.
- Storage €“ This will vary depending on what package you wish to install, number of tables, etc. I personally would recommend at least a 250GB drive, preferably an SSD drive (NVMe / M.2 or SATA III 2.5€³). On my machine, the boot drive is 250GB and added a 1TB SSD for the pinball tables.
- RAM – 16GB is what I would recommend, though 8GB may be ok.
- Cables / Adapters – You will likely need two HDMI cables (male-to-male connectors). One HDMI cable will connect from your PC’s GPU to the main playfield port on the top of the ALP. The 2nd HDMI cable will go from a 2nd HDMI port on your PC to the VIBS board. The length of the cable is up to you, however I would recommend a 6-10ft. cable at most. You will also need an OTG (or On the Go) cable to connect from an available USB port on your PC to the USB 2.0 port (white port) on the top of the ALP. If you have any difficulties with the OTG cable, some, including myself, needed a powered USB hub. I’ve listed all the cables that I personally use and work well here.
The above information should be helpful in determining a PC that will work for Pinball FX3 and PinUP Popper Baller installer. You can find more detailed information on the ALP Initial PC Setup / Preparation Guide. Now, let’s talk about another important aspect of the build, the VIBS board.
Suggestions
I’ve been asked to provide some suggestions on a PC that should work well with FX3/VPX/FP. One thing I want to point out, the prices of GPU’s (Graphical Processing Units) are very high at the present time. In many cases, it may be advantageous to purchase a PC with a bundled GPU rather than building your own. For example, the 2nd PC mentioned below uses an RTX 3050 GPU which sells for around $400-450 on Amazon –just for the GPU. That’s nearly half the cost of the entire machine. But of course, if you have most of the parts already available to build your own, that may be fine as well.
My initial thought would be, if you don’t need a new PC to wait until prices drop. However, that may not be the best advice. The machine I’m using for FX3/VPX/FP was a little over $1000 when I first purchased it in May 2021 (nearly a year ago at the time of this writing). Now, it sells for $1.3k for mostly the same specs. Keep in mind I only have the one PC connected to my ALP that I’ve personally used/tested. The first recommendation below is similar to the one I ordered. I hope the options below are a helpful starting point :
*Note – Machines listed below may be of limited quantities and may show unavailable at any time.
System: DELL G5 Gaming Desktop PC
My Notes: This is similar to the machine I ordered. The actual machine I purchased only had a 256GB drive (I added a 1TB). At the time, the price was also lower (I paid around $1000). While I’m pleased with the machine, shop around for better prices, if you can find them. The 2nd machine mentioned below may be a better overall value.
| Detail | |
| Price | $1,349 |
| CPU | Core i5 10400F 2.9 GHz |
| GPU | NVIDIA GeForce GTX 1650 4GB GDDR5 |
| RAM | 16 GB DDR4 |
| Hard Disk Size | 512 GB |
| Operating System | Windows 10 Pro |

System: Skytech Shadow Gaming PC Desktop
My Notes: I do not own this PC, but the specs./reviews look good and a better price than the Dell. One area that may need to be upgraded is RAM, this machine has 8GB (16GB would perform a bit better). Adding additional RAM is easy to do. If I were buying a PC today, I’d likely choose this one.
| Detail | |
| Price | $999 |
| CPU | Core i5 10400F 2.9 GHz |
| GPU | RTX 3050 |
| RAM | 8 GB DDR4 |
| Hard Disk Size | 1 TB |
| Operating System | Windows 10 Home |
Chapter 6: VIBS -Do I need it?
For the best experience playing PC-based Pinball tables on our ALP, the VIBS board is highly recommended. The VIBS (or Video Input Backglass Switchboard) will allow Pinball FX3, VPX or Future Pinball tables to utilize the backglass on your ALP. The VIBS board is something you’ll have to install yourself. Some are going to be fully comfortable with installing the board, others not so much. While it’s relatively easy to do and should take less than 30 minutes, I can understand if it’s not something you are comfortable doing. You can find more information about the VIBS board here.
To better understand what is needed for the VIBS board installation, the following video from AtGames explains the process very well. I recommend watching this video before ordering the VIBS Board so you have a clear understanding of the installation steps.
There is one other aspect of the VIBS board installation that you will need to consider, that is, where to mount the VIBS switch button. I initially drilled a hole in the bottom-left of the cabinet to install the button on the bottom of the machine. Later, I designed a 3D printed mount that could easily attach anywhere underneath the cabinet. If you don’t have access to a 3D printer, no worries. In this video, I’ll explain where you can possibly have one printed cheaply (or free) and locally. There are also some stores on Etsy that sell them as another option.
It’s your machine, mount the button however you wish. Some simply attach the switch to one of the legs with some tape. If you’re considering the 3D printed mount, you can find all the details and files you’ll need here.
Now that we’ve covered the installation of the VIBS Board and Switch Button, it’s time to discuss how to physically connect the PC. Please see Chapter 7 for the OTG Setup.
Chapter 7: OTG & Display Setup
*NOTE: It is possible to connect more than two displays to your ALP. However, for this series we will cover the base setup only (playfield and backglass). If interested in seeing how to setup a 3rd display as a DMD, comment in any video in this series. It may be considered for the next season, if there is interest.
As mentioned in Chapter 5, you will need an OTG (on-the-go) cable which is simply a USB Type A male-to-male cable connected between your PC and your ALP. The cable plugs into the white USB port on the top of the ALP (the USB 2.0 port). Additionally, you’ll want one HDMI cable going from your graphics card on the PC to the top ALP HDMI input port. The 2nd HDMI cable will connect to the VIBS board. Once all cables have been connected, you’re now ready to setup the main playfield and backglass monitors.
After connecting the PC to your ALP, you’ll want to switch the HDMI Input to the PC to be able to view the PC video signal on the main playfield. To do that see the following steps:

- Press the Channel button on the top-middle panel of your ALP, check that each of the settings are assigned as.
- Control Mode to OTG.
- Display set to Main display.
- Degree set to 90.
- Then press/select the OK button
- If you have installed the VIBS board, press the button to switch the VIBS Input to the secondary HDMI coming from your PC.
You should now see the Windows HDMI output appear on the main playfield on the ALP. It may be asking you to login to Windows. If you haven’t already done so connect a USB keyboard+mouse to your PC and login (if needed). If you’ve connected the VIBS board, press the switch button to enable the secondary HDMI output from the PC to go to the backglass display.
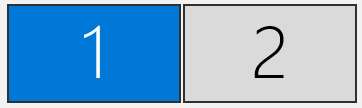
Right-click on the Desktop and select Display Settings. Position the VIBS display (the backglass) to the right of the playfield display (display 1) within Windows Display Settings (make sure display 1 & 2 are lined up perfectly (as shown here), playfield on the left/backglass on the right). Playfield should be set as the Primary display by checking Make this my main display. Both displays should be set to 1920—1080, scaled at 100% and Display orientation in Landscape Mode. Keep in mind, Windows may scale one (or both displays) to 150%. If so, you’ll need to change this setting to 100% for the following settings to work properly. Simply click each display and verify any needed changes.
Now that you have setup the displays, you should see the main playfield in landscape mode taking up the full screen. The backglass should also show up in the correct orientation. If you have any trouble with the backglass such as flashing colors or no display, please see the VIBS Troubleshooting section on the main ALP guide.
In the next Chapter, we’ll setup the Pinball Controls so that the pinball buttons on your ALP will work with your PC. Pat yourself on the back, you’re very close to playing PC-based pinball tables on your ALP!
Chapter 8: Control Mapping & Remote Connect
In the previous sections you setup and connected all the cables and hardware that you will need. In this section, we’ll focus on a few software aspects that allow you to utilize the buttons on the ALP with Pinball FX3, Visual Pinball X (VPX) and Future Pinball (FP). I’ll also briefly touch on a software package that will allow you to remote-connect to your ALP for the initial setup. I found the ability to remote-connect to the ALP to be extremely helpful in that it allows setup of your Pinball PC from a remote computer in a more comfortable location of the house. Let’s start with the button mappings.
There are a number of ways to configure the buttons on the ALP to work. These are:
- JoyToKey (free) – This is what we’ll be using in this series.
- Xpadder (free) – I’ve not personally tried it (yet).
- Directly within Steam (for Pinball FX3 only).
While all of the above options will likely work fine, I found JoyToKey to be the easiest and quickest route to getting the ALP up and running. That’s not to say the other options mentioned above are better/worse, just that JoyToKey (or j2k) is what I prefer at the moment as it works with Pinball FX3 and PinUp Popper Baller Installer (VPX/FP tables). Configuring the button mapping through Steam may provide slightly better performance with FX3, however that won’t help with VPX/FP as they will be using an entirely different front-end. JoyToKey can be used with both packages and why I prefer to use it. Though, don’t hesitate to experiment if you’re not happy with j2k. What works fine on my machine, may not work equally well on yours.
I already have step-by-step instructions on how to setup JoyToKey. Please see the How to Setup JoyToKey section on the ALP PC Setup guide. Once setup, please return back here.
Great, now that you have j2k setup, let’s look at one way to remotely connect to your ALP. If you don’t have a 2nd computer that you would want to use to configure your ALP remotely, you can certainly skip this step. I began the setup entirely on the ALP and it’s a bit awkward and time consuming to set it up in the game room. It’s for that reason that I started looking for software packages that would allow me to easily remote connect to the machine and set it up. I started with Remote Desktop Connection (RDC) which is included with Windows. Unfortunately, that didn’t work out because it creates a non-visible session on the ALP. Then, it was recommended I try Team Viewer. This package worked out great! It’s free for home use and will allow you to see both displays at once or switch to any of the other displays easily.
As with JoyToKey, I already have some basic instructions for how to setup Team Viewer. It can be uncomfortable leaning over the pinball machine and setting up a lot of tables. Using Team Viewer made it a much more pleasant experience. See the Remote Desktop Connection section on the PC Setup guide. You’ll install the software on the PC connected to your ALP and the remote computer (the comfortable area). Go ahead and test out the connection. Notice the top toolbar which allows you to switch displays and get a little familiar with how the software works. Now, you can setup your ALP easily which will be the next steps much more pleasant.
Now you’re very close, we’re moving on to setting up Pinball FX3! This is where all the hard work you’ve put into this project begins to pay off.
Chapter 9: Pinball FX3 Setup
One of the first things you’ll want to do is request a cabinet code for Pinball FX3. This code is free and sent to you by Zen Studios. Without this code, you will be limited in how the display can be viewed on your PC. A detailed guide and video may be found on the ALP Pinball FX3 Setup Guide. This guide will step your through the entire setup process from beginning to end. There is also a Troubleshooting section should you run into any issues.
The guide mentioned above is easy to follow and it doesn’t make sense to duplicate everything found there. My recommendation would be to start with the video so you can see how it all works (with some game-play examples). Then return to this section. The entire setup process will likely take less than 30 minutes, you’ve already setup JoyToKey and have everything connected at this point. It will mostly be a matter of:
- Installing the Steam Client
- Install Pinball FX3
- Apply your cabinet code
- FX3 Cabinet mode Option Setup
You can skip over the first two bullet points under the Software Considerations (JoyToKey Setup and Display Settings, you’ve already done that here). However, the 3rd bullet point demonstrates how you can download the backglass artwork which you’ll likely want to do. If you run into any issues and you’re not sure what to do, definitely check out the FX3 Troubleshooting section on that guide. Whenever I hear of an issue that someone has had, I update the guide accordingly.
Awesome, now that Pinball FX3 is up and running, are you ready to take on PinUp Popper Baller Installer? This one is, honestly, a little more involved but definitely worth the effort. At this point, you should be feeling pretty good about your skills and have a better understanding of how all of the pieces are coming together. Let’s press forward with the next chapter!
Chapter 10: PinUP Popper Baller Installer
There are well over a thousand community-created pinball tables just waiting to be played on your ALP! Many of which are faithful re-creations of the original pinball tables and in other cases even use some of the original code from their Arcade counterparts (i.e. roms). Roms may be needed for some VPX tables. If you skipped Chapter 4, you’ll want to backtrack a bit before continuing here.
PinUP Popper Baller Installer does make installation easier, but it’s not just a simple process of running an installer and everything is 100% ready to go. There will be some customizations that will need to be made, depending on what tables you will be installing, recording/importing artwork, etc. If you will be running FX3, you’ll also want that media to appear during table selection and more.
There are a couple of ways you can download the Baller Installer package, those are mentioned here. Download the installer and return here. The developers have requested that no-one re-host the installer. I’ve honored their request by not adding a download link but instead point you to their official site.
For PinUP Popper Baller Installer, there is a more recent update to the JoyToKey profile which you can find here if you’ll be using it with the Arcade Control Panel. If you’re not using the Arcade Control Panel on your ALP, there is another community developed JoyToKey profile mentioned here that you can use.
I recommend watching the video below first, then follow the steps in the ALP PinUP Popper Baller Installer Setup Guide. This way, you’ll have seen how to configure and setup everything and the guide will make more sense.
Once you’ve downloaded the installer and have setup the JoyToKey profile, you are ready to run the installer and configure the software. For that, you can find full detailed step-by-step instructions on the guide linked below:
ALP PinUP Popper Baller Installer Setup Guide
Key Steps from the above guide:
- Install PinUP Popper Baller Installer
- Initial Configuration
- Configure Displays
- Add FX3 tables to the PinUp Popper Front End (useful if you want to launch FX3, VPX & Future Pinball from the PinUP Popper Front End)
- The PinUp Popper Front End
- Installing new VPX Tables
- Installing Future Pinball Tables
- Media Customization
There are sections which cover not only the basics such as adding artwork, Future Pinball and Visual Pinball X tables, but also how to add your FX3 tables to the Front End. There is also a Troubleshooting Section that should help you in resolving most of the more common issues that you may encounter.
There is a lot to explore, learn and experiment with. Take your time, don’t get frustrated and first and foremost, have fun!
Chapter 11: That’s a Wrap
We’ve covered a lot of material in this series. I hope that you have found it helpful, enjoyable and rewarding. At this point, you should have a PC connected to your Legends Pinball running either Pinball FX3, PinUP Popper Baller Installer or both! You’ve installed a few FX3, VPX or Future Pinball tables and know how to add new tables.
There are, of course, plans for additional ALP content in the future and hope you’ll consider subscribing to the Wagner’s TechTalk YouTube channel for the latest available how-to details. All of the information on this site is freely available to the community, to benefit the community and is updated frequently.
If you want to see a season 2, please like/comment in the introductory video above and share your thoughts. I read every comment, appreciate your time providing feedback and respond frequently. Thank you for being a part of this journey and I look forward to what the future has in store!
Change Log
- 2022-07-07 – Added some additional links.
- 2022-03-09 – Added a PC Suggestions section.
- 2022-03-05 – Updated to add the new CoinOpsX Vertical (WOPR w/Cheese) build which is ideal for the ALP.
- 2022-02-11 – Released.
- 2022-01-20 €“ Initial guide creation.