ROG Ally SSD Upgrade Guide
*NOTE – This guide is in-development and not ready for use.
Last Update:8/15/2023
The internal 512GB NVMe SSD on the ROG Ally is fine for many, it will allow you to install many games/applications just fine. That combined with adding a microSD card can further expand it’s storage capacity. I recently filled up my 1TB microSD with games and was concerned about the 2-300GB free on my internal SSD. It would only take a few AA titles to fill that up. For that reason, I decided it’s time to upgrade the internal SSD. I chose to upgrade to a Micron 2TB 2400 M.2 2230 NVMe PCIe 4.0×4 SSD. There are many options available when it comes to SSD upgrades. I chose to purchase mine from Amazon, should there be an issue, it can be easily returned. However, you may find cheaper options with a higher capacity on AliExpress or other on-line retailers. If you get a dud, it can be a hassle trying to return it. I had previously tried a Sabrent 2TB SSD (purchased from Amazon), but it failed shortly after setup and was returned.
In the guide below, we’ll clone the existing 512GB SSD to a new 2TB SSD. If you perform the steps below, I recommend a minimum of 1TB capacity on the new SSD. That is, we’ll have an exact copy of everything installed on the 512GB SSD that shipped with the ROG Ally duplicated to the new 2TB SSD. This will eliminate the need to re-install games/applications, update, etc. It will resize the partition to utilize the full-capacity of the installed SSD. This will save hours of downloading/reinstalling. However, to do so you may need to acquire some of the hardware listed in the Parts List (below). Your original 512GB SSD will remain fully usable and can be re-installed in the ROG Ally, should you have any issues with the SSD upgrade.
I tried a few other disk cloning options, some seemed like they would work only to find out they don’t allow cloning over USB. I’ve used Macrium Reflect in the past and was a good option that worked out well.
I hope you find the information below helpful and that it steps you through the upgrade process clearly and concisely. Should you have trouble with the steps mentioned, drop a note in the video comments and I’ll be happy to assist. If you want to support my work, I hope you’ll consider subscribing to theWagner’s TechTalk YouTube channel.
All the Best,
Jon
How-To link to a specific section on this Guide: go to theTable of Contents(below)and click a section to reference. Copy the URL from the address-bar of your browser and paste in your video description/post/blog. This will direct a viewer to a specific section in any of the guides you find on this site.
Table of Contents
Parts List
Below are the items I used to upgrade my ROG Ally from a 512GB NVMe SSD to a 2TB drive.

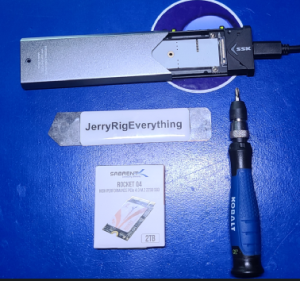
- Micron 2TB 2400 M.2 2230 (2TB) – Micron 2TB 2400 M.2 2230 NVMe PCIe 4.0×4 SSD MTFDKBK2T0QFM-1BD1AABYYR
- SSK Aluminum M.2 NVME SATA SSD Enclosure – Needed to temporarily install the new SSD and connect to the ROG Ally for cloning.
- JerryRigEverything Metal Pry Tool – You can also use a credit card, guitar pick, etc. Something thin to pry the two sides of the case apart. This is just something I had on-hand and used for previous projects. It worked great and made it very easy to pry the Ally’s shell apart.
- #1 Phillips Head Screwdriver – A #1 Phillips head screwdriver, preferably one that has some magnetization will make removing the screws a little easier.
- Docking Station – I used the docking station linked here so I could connect a keyboard and mouse. As the cloning process will take about 1hour 20min., you’ll want to also connect the power adapter to the dock also.
- USB Keyboard and Mouse (Optional but recommended) – While not required, it will make setup easier to have a keyboard and mouse available. Any will work, the link here is what I used.
Installation
*NOTE:When handling sensitive equipment, such as the ROG Ally/SSD, do not touch other areas. Only touch the components for installation as instructed. To prevent electrostatic discharge (or ESD – zapping chips) when handling the components, I personally recommend using a ground strap and being properly grounded.
Below are the steps take to install a 2TB NVMe SSD in the Asus ROG Ally:
- Insert the power USB-C cable that came with your ROG Ally into the USB-C port on the back of the dock. This will provide power to the ROG Ally during the cloning process.
- Connect the USB-C cable from the dock to the top port of the ROG Ally.
- Take the new SSD you plan to use and insert it into the SSD Enclosure. Insert it at a slight 40° angle into the connector in the enclosure. Then gently press down on the drive so it’s flush to the back of the enclosure and slide the cover over the drive.
- Plug the SSD Enclosure (with the new SSD) into an available USB-A 3.x port on the back of the dock.
- If you have a microSD card installed in your ROG Ally, eject it now. *NOTE: This is to prevent any possible confusion during the upgrade process.
- To clone the ROG Ally 512GB SSD to the new SSD (recommended 1TB or higher), we’ll use a 30-day evaluation copy of Macrium Reflect Home. You can certainly register your copy, if you prefer or plan to use it beyond the 30-day trial, totally up to you.
Download Macrium Reflect Home:- Visit the Macrium Reflect Home page.
- Click the blue button for Download a 30-Day Trial.
- Enter your e-mail address to receive the download link, click the blue Download Reflect Trial for personal use button.
- Check your e-mail and download the installer, ReflectDLHT.exe. If your e-mail is on a separate computer, copy the downloaded file to a USB stick and plug it into the docking station on your ROG Ally. Also, make note of the Registration Code as it will be needed for the installation.
- Double-click the ReflectDLHT.exe file that you downloaded from your e-mail link.
- Accept the defaults and click the Download button.
- If you’re prompted if you want to allow this app to make changes to your device?, click the Yes button.
- Click Next to continue, Next again.
- Review the License agreement, click “I accept the terms…” click Next.
- Leave the option for the 30 day trial checked and click the Next button.
- You’ll then be notified when the trial will expire, click the Next button.
- Enter the e-mail you used when downloading and the Registration Code received from the same e-mail, then click Next.
- You can uncheck the option for Install Image Guardian, click Next.
- Click the Install button.
- The application will now be installed, click the Finish button.
- You’ll then be prompted to reboot, close any important Windows/save any files needed and click the Yes button to reboot.
- Proceed to the next section, Clone your Drive.
Clone your Drive
Great, you have everything connected and the software installed at this point. This step will be pretty easy, we’re just going to take the contents of the internal 512GB SSD and make a copy of it on the new SSD. There is only one little thing we’re going to do differently, that is to expand the drive to utilize the full storage capacity of your new drive. We’ll explain further in the steps below:
Change Log
- 2023-08-08– 2023-08-15– Start to this guide.