NESPi 4 Case Guide
NOTICE: From what I understand from a few who have let me know, there may be a newer version of the NESPi 4 case from the one I reviewed/documented below. Depending on your specific model, it may not be necessary to upgrade the firmware as shown below. As I learn more, I’ll update accordingly.
Last Update: 6/11/2022
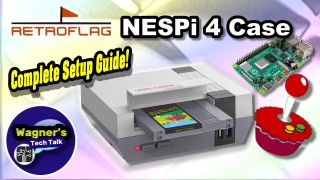
This page has information dedicated to the Retroflag NESPi 4 case. Here we will cover two methods of setting it up, the first is to boot from a microSD card running RetroPie. All the games will be installed on the SSD.
The second option is to install RetroPie and games all on a single SSD (i.e. cartridge) in the slot with no microSD. This video covers the first scenario. For booting from the SSD see this video and this section for the documentation.
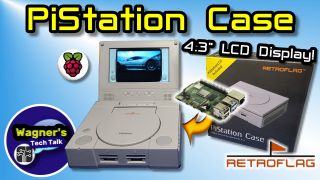
Another case you may be interested in is the RetroFlag PiStation. This case looks like a Playstation, depending on the model you get may have a 4.3″ LCD display (there is a version without). It’s a pretty cool looking case, check out the review video.
It is a lot of work creating and maintaining the guides on this site. I appreciate any support from the community by subscribing to the YouTube channel. commenting on/and liking the videos all help tremendously in growing the content you’ll find here. –Jon
Table of Contents
Helpful Links
The following links will be helpful during the setup process:
- Retroflag’s website
- Official Retroflag Instruction Manual
- Github link for the NESPi 4 Case Safe Shutdown and Safe Reset scripts
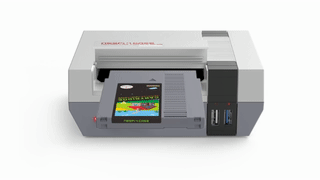
- Official RETROFLAG Cartridge cases – Retroflag has begun selling their own cartridge shells which also includes the ability to easily connect them to your computer.
- 3-D Printed case (and optional label) for your NESPi 4 case/SSD Drive by DiniertoDesigns. If you don’t have a 3D Printer and want a case pre-printed, this may be an option for you. This option may be a bit cheaper than the official cartridge shells mentioned above.
NESPi 4 Setup Guide
Setting up your NESPi 4 case is pretty straight-forward depending on whether you would like to boot from SSD or not. For those not very tech-savvy, you may want to curtail the SSD boot option as MicroSD setup is the easiest method of getting your NESPi 4 case up and running. The video to the right will step you through the entire process of unboxing, assembly and script installation.
RetroPie Setup
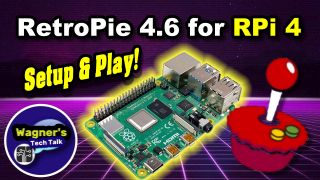
If you have never setup RetroPie before, then you’ll likely want to watch the video to the left and view this page. The video and the RetroPie 4 Gaming page has a lot of information on how to get started with RetroPie.
It’s a good idea to review that page, particularly the RetroPie Tips after you have it up and running on your NESPi 4 Case. Those 10 tips will cover some great ways to customize the look and operation of your RetroPie gaming rig.
Product Links
- RETROFLAG Raspberry Pi 4 Case NESPi 4 (Amazon)
- USB 3.0 SATA III Hard Drive Adapter Cable (Amazon)
- Raspberry Pi Official Keyboard and Mouse Value Pack (U.S. Version Red/White) – *NOTE – Any USB Keyboard & mouse should work.
Booting from SSD
After making the NESPi 4 video above, many have asked if I can show how to boot the NESPi 4 from SSD rather than microSD. I wasn’t successful, at first. I then reached out to Retroflag with a number of questions and they were extremely helpful and responsive. As a result, I was able to get the NESPi 4 Case to boot from SSD and it turned out to be very easy. However, before we begin it’s important to note that you will need a Windows 10 computer to update the NESPi 4 SSD firmware.
SSD Setup
The following will step you through how to get your NESPi 4 case to boot from SSD. If you decide not to install the firmware update mentioned below, boot time will be very slow (~3min). After applying this SSD Firmware update, boot time will be about 40 seconds.
If you have not yet setup your NESPi 4, please see the instructions from this video. Once the video gets to the point where it discusses screwing in the NESPi 4 cover (5 min. mark), stop and follow along below :
** WARNING ** – The instructions that follow will wipe the contents of your SSD drive. If you are ok with that or are using a new SSD, please continue.
Step 1: Flash RetroPie to the SSD
Before starting these instructions, you may want to watch the SSD Boot video here first. This will install RetroPie to the SSD.
- Make sure your SSD Drive is plugged into the NESPi 4 cartridge+case and remove the entire top cover (with the SSD installed) and unplug the USB cable from the NESPi 4 case.
- Plug the USB cable from the NESPi 4 top cover into your computer/PC running Windows.
- Download and install the Raspberry Pi Imager (link here).
- Launch Raspberry Pi Imager and click the Choose OS button.
- Select RetroPie –> RetroPie 4.x.x (RPI 4/400)
- Select Choose SD Card.
- Select the SSD drive from the list, should state something like the following (JMicron Generic USB Device- … ):

- After you’re sure you have selected the correct SSD drive, click the Write button. Then, click Yes. *NOTE – Do not remove your SSD from your PC, it is needed in Step 2 (below).
- After the RetroPie installation to the SSD is complete, click the Continue button and exit the Pi Imager.
Step 2: Update NESPi 4 SSD Controller Firmware
*NOTE – There has been one report from a viewer stating that a Seagate 2TB SSD would not boot when installed in the NESPi 4 case. He tried a Samsung SSD and it worked just fine using the instructions below. Not going to say don’t buy a certain brand SSD, but if you have similar issues, there might be an incompatibility between the case and certain manufacturers.
This step will flash the firmware for the USB-to-SATA adapter, it does not write to the SSD drive itself.
- Download and unzip the Boot from SSD Firmware from the Retroflag website (*NOTE: Their link appears to be down, I’ve temporarily re-hosted it here – right-click and Save link as) . If you don’t have an unzip utility, 7-zip is free and may be downloaded here, if needed.
- Double click the Method 2 update firmware sub folder.
- Launch the WfUpdateTool_v1_19_16_24.exe, you should now see the following dialog (Notice the USB Disk states “<<USB>> JMicron Generic”).
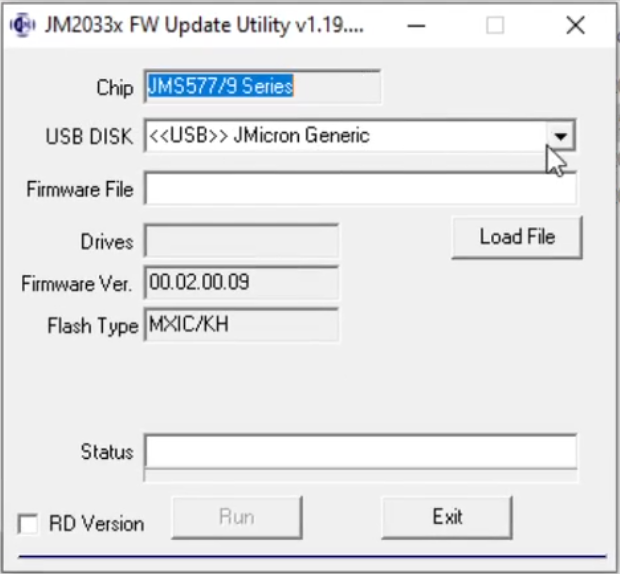
- Click the Load File button and select JMS578_STD_V00.02.00.09_NO_UAS.bin from the \Firmware sub folder and click the Open button.
- Now click the Run button to update the NESPi 4 SATA controller firmware. The flash process should take just a couple of seconds. Once done, click the OK button and close the Update Utility.
- Now, safely eject/disconnect the NESPi 4 assembly from your computer.
- Re-attach the USB connector and top cover of the NESPi 4 case to the bottom half of the NESPi 4 case.
- You may then re-install the screws to the NESPi 4 case, if you want. However, I tend to do that once I know everything was working first 🙂
*NOTE – Should you ever wish to revert back to the original firmware, repeat the above but select JMS578_STD_v00.02.01.04_UAS.bin instead.
Step 3: Try it out!
- Connect a Joystick/Controller & USB keyboard to the NESPi 4 case and Power on the NESPi 4 case with the SSD (Cartridge) installed. To setup your WiFi, see this.
- Your NESPi 4 case should now boot RetroPie from the SSD!
- My initial NESPi 4 video discusses how to setup WiFi, Safe Shutdown scripts, etc. I’ve fast-forwarded that video here if you’d like some assistance setting that up.
- For assistance with RetroPie itself (including 10 tips that you’ll want to know), see this page.
Installing Safe Shutdown Scripts
After setting up the NESPi 4 for booting off the SSD (or microSD), you’ll also want to install the Safe Shutdown/Reset scripts if you’re running RetroPie (not necessary with Recalbox as it is pre-installed). This will safely shutdown or restart your NESPi 4 when the front buttons are pressed. The following will help with that:
*NOTE – If you have trouble typing in a double-quote (“), press ALT+SHIFT+” to enter the keystroke. Also, make sure there is a space between the ” -O – ” (a few issues I ran into while writing these instructions)
Easiest method
Easiest, if you have the patience to type this all out manually.
- Once RetroPie boots, press F4 to exit to the console. Then type the following command and press ENTER:
wget -O - "https://raw.githubusercontent.com/RetroFlag/retroflag-picase/master/install.sh" | sudo bash
Fastest method
Fastest if you have WiFi setup and know how to use PuTTY already.
- You’ll first need to have WiFi setup under RetroPie and connected to your network. If you haven’t done that or know how, please see this section.
- Once WiFi has been setup, you’ll want to enable SSH so you can easily enter the commands from your PC. To do that, see this section.
- You can use PuTTY to remotely connect from your PC to your Raspberry Pi and simply copy/paste the following command and run it on your Pi. To do that, please see this section.
- After connecting to and logging into your NESPi 4 case running RetroPie, copy/paste (after copying the following, right-click in the terminal window) the following command into the terminal window and press ENTER (the Pi 4 will reboot after installation):
wget -O - "https://raw.githubusercontent.com/RetroFlag/retroflag-picase/master/install.sh" | sudo bash
Speed Tests
In terms of best boot-time performance, they were all within 1 second of each other. Therefore, if you’re looking at an SSD to improve boot time, you will likely be disappointed. The SSD’s definitely performed better in terms of read/write performance, however. The chart below compares the following storage devices (links for full specifications of each):
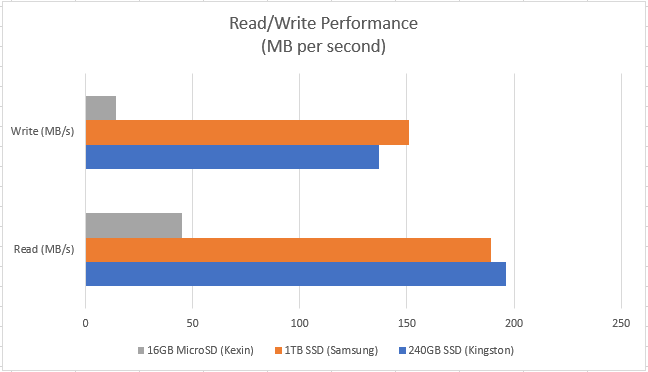
Write Test
240GB Kingston SSD
5+0 records in
5+0 records out
104857600 bytes (105 MB, 100 MiB) copied, 0.766756 s, 137 MB/s
1TB Samsung SSD
5+0 records in
5+0 records out
104857600 bytes (105 MB, 100 MiB) copied, 0.693702 s, 151 MB/s
Kexin 16GB MicroSD
5+0 records in
5+0 records out
104857600 bytes (105 MB, 100 MiB) copied, 7.32275 s, 14.3 MB/s
Read Test
240GB Kingston SSD
5+0 records in
5+0 records out
104857600 bytes (105 MB, 100 MiB) copied, 0.53468 s, 196 MB/s
1TB Samsung SSD
5+0 records in
5+0 records out
104857600 bytes (105 MB, 100 MiB) copied, 0.553577 s, 189 MB/s
Kexin 16GB
5+0 records in
5+0 records out
104857600 bytes (105 MB, 100 MiB) copied, 2.33834 s, 44.8 MB/s
Boot Time
SSD (240GB Kingston) : 39.49s
SSD (1TB Samsung) : 40.51s
microSD (not branded 16GB) : 40.24s
*NOTE – Also tried the 1TB Samsung drive using the original SSD firmware with RetroPie. Boot time was really bad, right at 3 min. For better performance, using the NO_UAS firmware outlined above should bring it down to 40 seconds.
Write Command:
dd if=/dev/zero of=./speedTestFile bs=20M count=5 oflag=direct
Read Command:
dd if=./speedTestFile of=/dev/zero bs=20M count=5 oflag=dsync
Official Cartridge Shells
RETROFLAG has recently begun selling their own cartridge shells. These are pretty cool in that the cartridge protector has the ability to connect to your PC’s USB 3.0 port on your computer. This makes it very easy to connect your SSD to your computer to transfer data. They currently offer the shells in Gold or Grey:
- RETROFLAG NES Cartridge Style 2.5-Inch SATA to USB 3.0 (Grey)
- RETROFLAG NES Cartridge Style 2.5-Inch SATA to USB 3.0 (Gold)
3D-Printed Cartridge Shell

I was considering designing a 3D Printed shell for the NESPi 4 case, however looks like someone already has! Check out DiniertoDesigns 3D Printed case here. If you don’t own or have access to a 3D Printer, you can pick one up for a fair price on their Etsy store.
I did a print test as shown in the video above and it turned out nicely. This print provides us with an excellent option for having multiple NESPi 4 cartridges! In fact, I ordered one more SSD to be used in an upcoming video and ordered a gold case + label from their store. You can check that out in the video below.
Cartridge Labels
I didn’t spend much time on these, but if you would like to print them you’re more than welcome to download them here. It’s the same set of labels shown in the SSD Boot video (the PDF is set for Landscape print mode intentionally).
If you prefer a more professional label, the designer of this 3D-Printed case has several available. I have no affiliation with the creator nor do I own any labels created by the designer, at this point. But, DiniertoDesigns Etsy store has several available labels. I’m adding this section for their outstanding 3D design that was mentioned in this video. I’m sure it was a lot of work and looking forward to receiving an order placed with them soon.
Troubleshooting
The following are some issues that you may encounter and some possible solutions.
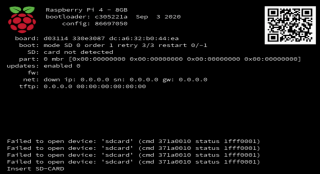
- Question: I attempted to boot from the SSD, however I am seeing the screen the right and won’t boot. Why?
Answer: Make sure that the SSD is fully seated into the SATA connector in the NESPi 4 case. - Question: If I update RetroPie, will it break connectivity to the SSD boot?
Answer: When I made these initial instructions, I performed a full PiOS update (sudo apt update / sudo apt full-upgrade / sudo reboot). Then updated RetroPie using the update facilities within RetroPie Setup, updated all packages, etc. Neither of these activities broke the installation. I can’t say for certain that future updates won’t as I have no inside knowledge, but as of 1/28/2021 the answer is updates should work fine for you. - Question: I have tried the above and still can’t boot from the SSD, any other suggestions?
Answer: try the following command into the console to (potentially) downgrade PiOS the firmware : sudo rpi-eeprom-update -d -f /lib/firmware/raspberrypi/bootloader/stable/pieeprom-2020-09-03.bin After typing the above, press ENTER. This will set the EPROM in the Pi 4 to the version from 2020-09-03. Restart the Raspberry Pi by typing: sudo reboot - Question: I’m using PiOS firmware prior to 2020-09-03, can I use the case?
Answer: Yes, when RetroPie boots from a microSD, press the F4 key to exit to the console. Enter the following command and press ENTER:
sudo -E rpi-eeprom-config –edit
Scroll to the bottom of the file (arrow keys), type the following line (double-check it’s correctly typed and all upper-case): USB_MSD_PWR_OFF_TIME=0
Press CTRL+X to Save the change and press ENTER on Yes. Type the following and press ENTER: sudo shutdown now
- Question: Does the firmware update for the SATA adapter fix the issues with WIFI and Bluetooth not working with SSD installed?
Answer: I have read about the issue, but I personally could not reproduce the problem. I transferred 500GB of Data (including a number of very small files) over WIFI (802.11 AC/5Ghz) to the 1TB SSD you saw in this video, it stayed connected copying for the entire transfer without issue (several hours). Regarding BT being an issue, I had tested this after my first NESPi 4 video and created this follow-up video to demonstrate – No issue for me. Perhaps it was earlier units that had these problems, I can’t honestly say. All I can say, I can’t reproduce the issues.
Change Log
- 2022-06-11 – Add notice at top.
- 2022-01-10 – Minor edits.
- 2021-06-03 – A viewer confirmed an issue using a Seagate SSD with this case; adding info. on that issue.
- 2021-05-21 – Added video of the Grey+Gold cartridge shells from Retroflag.
- 2021-05-10 – Added Grey and Gold cartridge shells from Retroflag.
- 2021-03-13 – Added the Update Video to the 3D Printed Cartridge Shell section as an option for getting an extra shell + label.
- 2021-02-19 – Minor edits.
- 2021-02-07 – Added a statement regarding the NESPi 4 case + Recalbox and potential WiFi connectivity issues.
- 2021-02-01 – Added additional question to the Troubleshooting section.
- 2021-01-30 – Updated video link to new version which shows 3D Printed cartridge and added a link to the cartridge labels.
- 2021-01-30 – Added NESPi 4 SSD Boot Video
- 2021-01-29 – Added Performance tests and 3D Printed Cartridge shell.
- 2021-01-28 – Initial instructions created.