Batocera PC Retro Gaming Guide
Batocera is a popular retro gaming operating system that is available for a number of different devices and platforms. This guide will focus primarily on using Batocera on a PC. We’ll write the image to a USB Stick/Flash Drive that can be run on any x86 64-bit PC. Running Batocera on a PC is a great solution if you want to keep your Retro Gaming separate or want to create a single boot image that will run on any 64-bit PC. That is, you can setup Batocera exactly how you want it with your games, favorite themes, etc. running exclusively from a USB stick and simply insert/boot it from any PC.
In the sections below, the guide is designed to be read from top-bottom. However, after installation you can easily skip around to sections of most interest to you. If you’re unfamiliar with Batocera, the Q&A section will answer questions you may have as well as questions I receive once this guide+video has been released. The Installation section will get you up and running as quickly as possible. Additional sections will be added/update as-needed and I welcome your feedback in the video comments on how this guide may be improved.
If you find the guide helpful, please support future content creation by subscribing to our YouTube channel and become part of the WTT community. If you would like to see continuous improvements to this guide, your support helps with future updates and grow the content you find here and is always appreciated! -Jon
How-To link to a specific section on this page: go to the Table of Contents (below) and click a section to reference. Copy the URL from the address-bar of your browser and paste in your video description/post/blog. This will direct a viewer to a specific section in any of the guides you find here.
Table of Contents
Q&A

This section will help answer some of the common questions you may have about this guide/Batocera:
- What is Batocera? Batocera is a Linux operating system that has been designed from the ground up to provide an efficient Retro Gaming experience. It supports over 220 systems/emulators on multiple platforms. This guide will focus on using Batocera with a PC.
- What do I need to install Batocera for use with my PC? At a minimum, you will need a USB Stick, the Batocera operating system (download), bios and games (roms) will all reside on this stick. For this video, I used a Samsung 256GB low-profile USB 3.1 Flash Drive. You can choose another brand, different capacities or use an SSD if you prefer. I’ve purchased this drive and used them in multiple machines and they work very well.
- What kind of PC do I need? Any x86 PC that has a 64-bit processor. As a rule of thumb, most any machine that can run Windows10 or Windows11 should work fine in-general. However, if you’ll be running higher-end emulators such as PS2/PS3/Switch, then a gaming PC with a decent graphics card (GPU) will be needed.
- Can I update Batocera after the initial install? Yes. Now that Batocera 36 has been released, you can now update using the STABLE channel.
- I’ve installed Batocera to a USB stick and created the image just how I want it. Is there a way to make a backup (copy) and restore it to a larger USB Stick or SSD? Yes, you can backup your existing image and then resize it on the target drive(must be the same capacity or larger). Here are some instructions on how to do it exactly.
- Can I simply insert the USB Stick with Batoceara into my Windows PC and copy games? If you try to read a USB stick created by Batocera, you’ll only see one partition within Windows. However, there is a second partition (userdata) that contains the bios/roms subfolders (among others) and not natively readable by Windows. To read the USB stick within Windows you’ll need a 3rd-party utility, such as :
- Paragon Software Linux File Systems for Windows
- Disk Genius (30% Off Disk Genius Pro code: DG30-YUTE-STPR ) – My preference – Pro version is needed to write to the partition.
Resources

Below are various resources and links that you may find helpful related to Batocera.
- Official Batocera Documentation – Official Batocera Documentation from the Batocera wiki.
- Batocera Download – The most recent version of Batocera (currently 36), may be downloaded on this page for a number of different devices and chipsets.
- Batocera Discord – The Batocera Discord for discussing Batocera, future suggestions, etc.
- Emulator Compatibility Information – Listing of emulators and system compatibility.
- Batocera Subreddit – This reddit community has over 6.4k members and growing.
Comparison
In the chart below, we’ll compare some of the main features of Batocera with RetroBat:
| Feature | RetroBat | Batocera |
|---|---|---|
| Runs within & Requires Windows (8.1/10/11) | X |
|
| Stand-alone operating system (must boot from the installed image) | X |
|
| Available on multiple computing devices (i.e. Raspberry Pi, various handheld devices/chipsets, etc.) | X |
|
| Utilizes the Emulation Station front end | X |
X |
| Easily portable to another computer, if installed to an external drive | X(PC must be running a supported Windows version 8.1/10/11) |
X(may need to enter BIOS and disable secure boot) |
| Supports most popular emulators | X(many will require an internet connection for a one-time install on first launch of a game) |
X |
Accessories
Below are various accessories either shown in the video or that you may find helpful for your Batocera installation.
- Samsung 256GB Flash Drive – This is the USB Flash Drive I used in this video. Amazon shows I’ve purchased this 7 times, I’ve never had one fail. You can, of course, use any capacity or brand Flash Drive that you prefer.
- Wired Controller for Xbox 360/Clone – For the initial setup, having a wired controller makes the setup process easier. This is the controller I used in this video.
Installation

In this section, we will install Batocera to a USB stick for use on any PC capable of running Windows 10/11 (i.e. x86 64-bit). Below we’ll use Balena Etcher from within Windows to burn the Batocera image to a new USB Flash drive.
Install Batocera to a USB Stick
Video: See how
You will need a PC, Mac or Linux machine to install Batocera directly to a USB Stick. In the steps below, we’ll assume you have a Windows 10/11 PC and will be using it to create the Batocera image. Not necessarily a requirement, just an assumption.
*NOTE: You could also use a Raspberry Pi 4, with Pi imager, to do the same (see here for steps).
Below are the basic steps:
- Insert the USB stick/SSD into an available USB port on your computer.
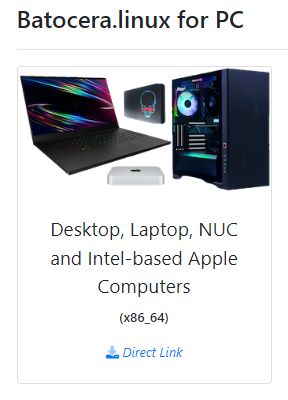
- Visit batocera.org/download and click the download link under Desktop, Laptop, NUC and Intel-based Apple Computers (x86_64). The image is around 2.5GB and will take a few minutes to download.
- Open another tab and visit www.balena.io/etcher.
- Click the Download Etcher button beside the option ETCHER FOR WINDOWS (X86|X64) (INSTALLER).
- Launch the balenaEtcher-Setup-1.xx.xx.exe that you downloaded and follow the prompts to install Etcher.
- The Etcher user interface will now appear. Click the Flash from file button.
- Select the batocera-x86_64-36-xxx.img.gz image file that we downloaded earlier and click the Open button.
- Click the Select target button and click the checkbox to the left of your USB Stick. *NOTE: Verify that the drive selected matches the size of the USB stick installed.
- Once checked, click the Select 1 button, then click Flash!
- Depending on the size of your USB Stick, you may see a warning stating: You are about to erase an unusually large drive. Are you sure the selected drive is not a storage drive? Verify that you’ve selected the correct USB Stick. Then, click the Yes, I’m sure button.
- Batocera will now be written from the image file to the stick. This process may take a few minutes, just wait for it to complete.
- Once complete, you can click the close button on the balenaEtcher window.
- Safely eject the USB stick from your computer and install into your PC.
- Proceed to the next section, Boot Batocera from USB Stick.
Enter the Boot Menu
When the PC is powered-on, you’ll press one of the following keys to enter the boot menu. Many modern BIOS implementations will not boot from a USB Stick unless you turn off secure boot in the PC’s BIOS settings. Keep in mind, once you’re done playing Batocera, you’ll want to re-enable secure boot (most likely) to be able to boot back into Windows.
| Computer Manufacturer | Boot Menu Key | Enter BIOS |
|---|---|---|
| Acer | F12 | F2 or DEL |
| ASUS | F8 or ESC | F2 |
| DELL | F12 | F2 or F12 |
| HP | ESC (or ESC & F9) | ESC or F10 |
| Lenovo | F12 / Fn + F11 / F8 / F10 | F1 or Enter+F1 |
| Various Motherboards | Asus F8, GIGABYTE F12, Asrock/MSI F11, Intel F10 | Asus F2 or DEL |
| MSI | F11 | DEL |
| Samsung | ESC or F12 | F2 |
| Toshiba | F12 | F2 |
Boot Batocera from USB Stick
Video: See how
To boot Batocera from the USB Stick , you’ll need to enter the boot menu and select the USB stick. Please see below on how to do this:
- Be sure your PC is shutdown.
- Insert the USB Stick containing Batocera into an available USB Port, preferably one that is blue in color (USB 3.x ports are faster).
NOTE: Many modern BIOS implementations will not boot from a USB Stick (UEFI) unless you turn off secure boot in the BIOS settings (see this table for assistance). Keep in mind, once you’re done playing Batocera, you’ll need to re-enable secure boot (most likely) to be able to boot back into Windows. For more information, please see the Batocera website BIOS Settings section.
- Depending on your model PC/Laptop, you’ll need to press one of the keys from this table on boot up to enter the Boot Menu. The option to select will vary based on the manufacturer. If you don’t see yours listed in the table, search for your PC motherboards manufacturer and “Boot Menu” (i.e. “HP Laptop boot menu”).
- You’ll then see the Boot Manager menu.
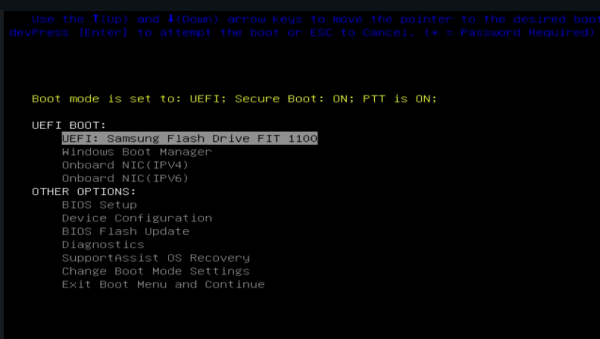
(boot menus will look different depending on the manufacturer)
- Highlight the option UEFI: Samsung Flash Drive FIT 1100 (or similar) using the arrow keys on the keyboard and ENTER to select it. In some BIOS implementations, you may need to change the Boot Mode settings to disable secure boot.
- The USB Stick will then be re-sized, you’ll see a blue screen visible briefly.
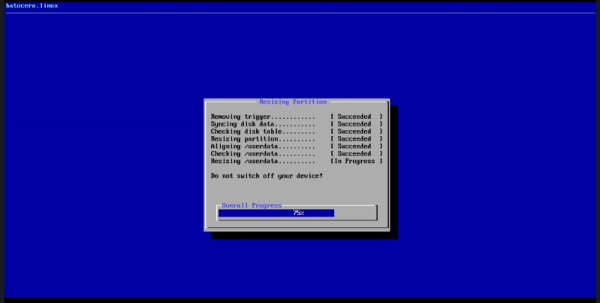
- Batocera will now continue booting from the USB Stick. You’ll then see the screen below once Batocera is up and running.
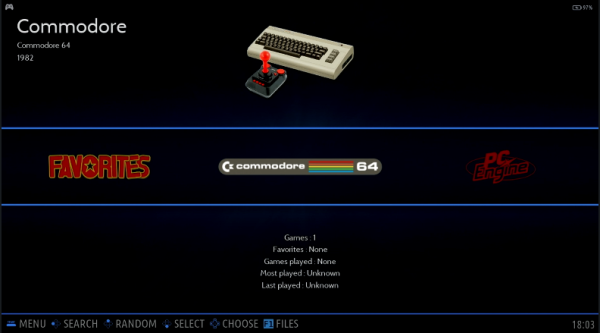
Navigating Batocera
Now that Batocera is installed and running, below are a few usage tips to assist in navigating the system. Plug in a wired gaming controller, I prefer using a wired xbox clone controller. This type of controller will typically be automatically configured for you and ready for use.
- Enter Main Menu – Press the Start button to enter the main menu. From here, there are a number of options and settings you can change. Of those that may be of key interest:
- QUIT – Allows you to Restart, Suspend or Shutdown Batocera.
- SCRAPER – Allows you to scrape artwork and meta data for selected systems.
- NETWORK SETTINGS – Allows connecting to your WiFi network, this is useful for updating Batocera as well as network file transfers. See here for more.
- More options – will be discussed later in this guide.
- Load a Game – Navigate the list of systems using the d-pad or left joystick (move left-right). Once the system is highlighted, press A to select it. Use the d-pad or left joystick to highlight the game and press the A button to load the game.
- Exit a Game – Press SELECT + START at the same exact time to Exit a game.
- Jump to Location – After selecting the System/Emulator, press the SELECT button. Move down to JUMP TO GAME BEGINNING WITH THE LETTER and use the left/right stick/d-pad to change the letter. Then press A and the list will jump to games starting with the letter entered.
- Filter Games by Text – After selecting the System/Emulator, press the SELECT button. Move down to FILTER GAMS BY TEXT. Enter some text, i.e. MARIO and press the START button. You’ll now only see games that include Mario in the name.
The following options are available while in-game:
- Enter RetroArch Menu – Many of the emulators/cores utilize RetroArch. To enter the RetroArch menu press SELECT+A.
- Change current State – SELECT + DPAD UP/DOWN.
- Save current State – SELECT + X.
- Load current State – SELECT + Y.
- Insert Arcade Credit – In an Arcade game, press SELECT to insert a credit.
- Start Arcade Game – In an Arcade game, press START to start a 1 player game.
- Change Shader – SELECT + R2/L2.
- Screenshot – SELECT + L1.
Quick How-Tos
Below are some helpful How-to procedures that you will want to become familiar with. These how-tos will be referenced in various sections of this guide.
Connect to WiFi Network
Video: See how
The following describes how to connect Batocera to your WiFi Network.
- Press the START button.
- Move down to NETWORK SETTINGS and press A.
- At the bottom, if ENABLE WIFI is off, press A on this option to turn it on.
- Select WIFI SSID (this is your WiFi Name) and highlight your SSSID and press A.
- Select WIFI KEY to enter your WiFi Password (or key). Use the on-screen keyboard to enter the key. You can use the d-pad, joystick or the touch-screen to enter the password. Once done, press A on the Enter icon (or the Start button).
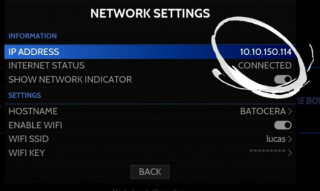
- Press the B button to back out of Network settings, you should see WIFI ENABLED and an icon in the upper-right. Press A to clear the dialog.
- Go back into NETWORK SETTINGS, you should now see the IP ADDRESSS of your PC running Batocera and an INTERNET STATUS of CONNECTED. If not, double-check that your passphrase was entered correctly and that your WiFi network is available.
- That concludes this section on connecting to your WiFi network.
Update Batocera
Video: See how
Below is how to update to the latest stable version of Batocera on your PC:
- Make sure you have already connected Batocera to your WiFi Network or via an Ethernet cable before proceeding.
- Press the Start button.
- Select UPDATES & DOWNLOADS.
- Under SOFTWARE UPDATES → UPDATE TYPE, make sure the UPDATE TYPE is set to STABLE.
- Move down to START UPDATE and press A to begin the update process.
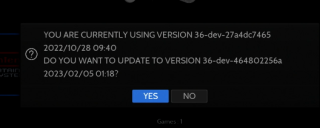
- You’ll be prompted with the current version of Batocera you’re running and ask if you want to update to the latest version. If so, select YES.
- The latest update for Batocera will be downloaded and applied. You’ll need to restart Batocera to complete the installation.
- Press the B button to go back, move down to QUIT and select SHUTDOWN SYSTEM. Select YES to confirm.
- Boot Batocera from the USB Stick as described here.
Update Game List
Video: See how
After adding additional games to your PC, you’ll need to update the Game List for them to become available to play. Here’s how:
- Press the START button.
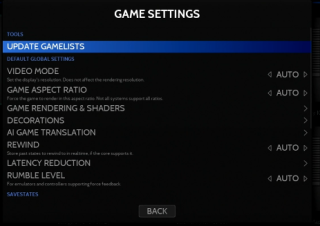
- Select GAME SETTINGS and press A on UPDATE GAMELISTS.
- Press A on YES to confirm REALLY UPDATE GAMELISTS?
- Any newly copied games will now be updated and available within Batocera.
Swap between Windows and Batocera
Swapping between Windows and Batocera is very easy, to make this process more clear, please see below:
Boot into Batocera
- Shutdown the PC
- Press the Windows Start button.
- Select the Power icon.
- Select Shut Down.
- Once powered off, insert the USB Stick containing Batocera (see here if you haven’t installed Batocera to a USB Stick yet).
- Enter the Boot menu of your PC (See here for some possible methods). Depending on the BIOS of the PC, you may also need to temporarily disable secure boot to allow booting from the USB stick.
- Select the USB Stick containing Batocera from the Boot Menu.
- That’s it, Batocera should now begin to boot.
Boot into Windows
- Shutdown Batocera
- Press the Start button
- Select Quit / Shutdown
- Once Batocera shuts down and powers off the PC, remove the USB Stick containing Batocera.
- If you had disabled secure boot in the PC’s BIOS, re-enable secure boot.
- Power on the PC by pressing the Power button.
- That’s it!
Connect a Bluetooth Controller
- Press the START button.
- Select CONTROLLER & BLUETOOTH SETTINGS.
- Select PAIR A BLUETOOTH DEVICE MANUALLY.
- Make sure your Bluetooth controller is in “Pairing Mode“. How to do this will vary, see the documentation included with your controller.
- Select the controller from the list of found.
- After a short delay, the controller should pair with the PC and can now be used!
Transfer BIOS and ROMs
Video: See how
There are two types files typically needed to play many of the games with an emulator, these are:
- BIOS File(s) – BIOS Stands for Basic Input/Output System. A BIOS is the firmware used to provide runtime services for a given operating system/console and to perform hardware initialization during the boot process. For example, this is the code within a gaming console that tells it how to be a PlayStation, Dreamcast or any other system.
- ROMs – ROM stands for Read-Only Memory and is the game or program dumped to a file. These may have originated from classic cartridges, floppy discs, cassette, CD/DVD’s, etc. Essentially, it is the game-specific code.
Due to the fact that both BIOS (system firmware or system files) and ROMs (the games themselves) are copyrighted material, I’m unable to provide direct links to any such files. If you’re unsure what I mean, you can read a bit more about my take on the subject here. I can say, that both BIOS and some games can be found organized in archived packs. For example, if you search archive.org for “FULL PACK BIOS BATOCERA V 35” you’ll find a great BIOS pack for Batocera with much of what you’re likely looking for. Using your favorite search engine, you may also be able to find additional bios files you may want by searching bios archive or [game/system] pack archive or something similar using some of these terms.
Another option, if you are unable to locate bios+rom files, is to purchase a hard drive that already has everything pre-configured for you. You can then transfer what you want (just the bios+rom files) from the hard drive to the PC or just use this drive as-is. There are a few options mentioned here. I personally tried this approach and it worked out well. I’m not necessarily recommending this option, just that it is an option if you don’t have the time to DIY.
Once you’ve found what you’re looking for and have downloaded/extracted those files, they are likely on your primary computer and not on your USB Stick. If that’s the case, below are a few tips to help you copy them to your USB Stick. I’ll cover two different methods below, copying from a USB connected drive and across the network.
Copy over the Network
Video: See how
Copying files across your WiFi network may not be the fastest option, but certainly will be the easiest if you have a separate computer to use for the transfer process. If the files you want to copy exist on a physical USB Flash Drive, HDD or SSD then the fastest method of copying to the USB Stick will be to copy from a USB Connected Drive. However, let’s assume that you prefer the quick and easy route here and transfer those files over the network to your PC running Batocera.
- Be sure that Batocera has been installed and is currently up and running on your PC.
- You will also need Batocera connected to your WiFi Network.
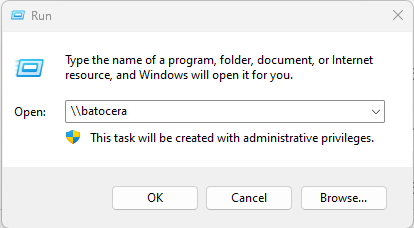
- From a Windows PC on the same network, right-click on the Windows icon and select Run.
- Enter \\batocera (or \\[ip address] ) and press ENTER.
- If you are prompted for a login, the user is root and the password is linux.
- You will then see a single shared folder, called share.
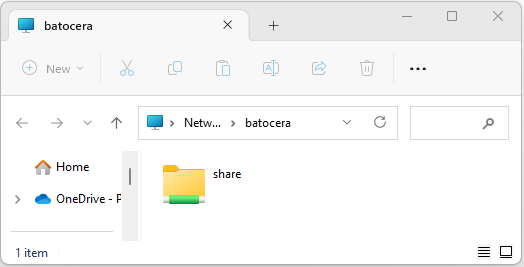
- Double clicking on the share folder will reveal a number of additional sub folders. Of the two we will be most interested in, in this guide, is \bios and \roms. For more information on BIOS & ROMs, see here.
- The roms subfolder will contain the games. Under the roms subfolder, you’ll find a number of additional subfolders organized by the game system/emulator (175 as of the time of this writing).
- Open a separate instance of File Explorer and navigate to the location where your bios\roms exist.
- You will copy the game roms (contents) from your PC’s storage device (USB Thumb drive, SSD, HDD, etc.) into the corresponding folders on the Batocera share (i.e. \\batocera\share\roms or \\batocera\share\bios).
- Once your bios and roms have been copied, Update the Game List for them to be available within the Batocera interface.
Copy from a USB Connected Drive
Video: See how
If your bios and games exist on an external USB drive (thumb drive, HDD, SSD, etc.) and you want to copy them directly from this media to the USB Stick running Batocera on the PC, you can rather easily.
The following steps will help with the file transfer process:
- Connect your USB drive (thumb drive, HDD, SSD, etc.) to an available USB 3.x port on your PC. USB 3.0 ports will typically be blue/black ports (white is typically a slower USB 2.0 port).
- Press F1 on the keyboard to open the Batocera file management application.
- On the left, you’ll see a heading for Places. Under the heading, you should see a drive for SHARE (your Batocera USB Stick ) as well as the connected hard drive.
- Under SHARE, you’ll see a sub folder for bios and roms. Using the Batocera file manager, you can copy files from your source drive to the Batocera USB Stick by selecting the files (i.e. CTL+A), right-click and select copy, then navigate to the destination location and right-click and paste the files into the sub folder.
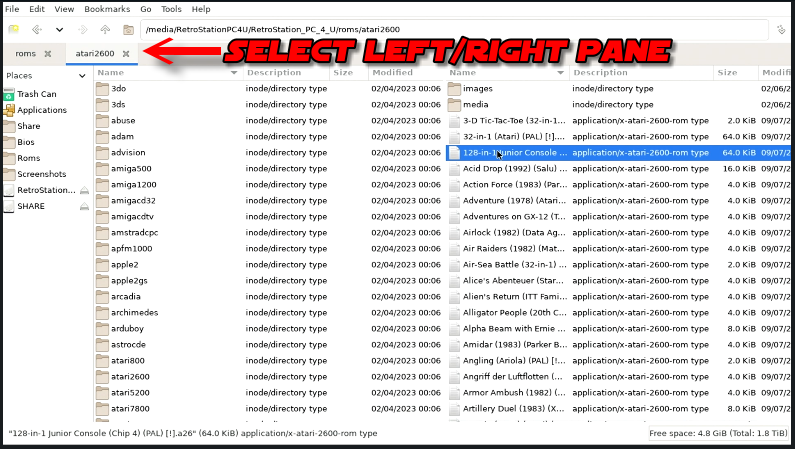
- If you prefer to be able to see two different folder locations (panes) at the same time, you can do that also. Here’s how:
- Select View → Dual Pane Mode.
- On the top-left, you’ll see two folder locations (roms and atari2600 from the screenshot below) and on the right you’ll see two groups of files. To select one or the other, click the small folder icon panes in the upper-left to toggle between the two.
- I recommend clicking the far-left small tab (roms, in the screenshot below) as the destination location (i.e. SHARE/roms) and the other small tab as the source location of the files you want to copy. You may also select View → Detailed List View if you want to make the lists a little easier to navigate (you can do this for both sides by selecting the appropriate right/left pane).
Emulator Details
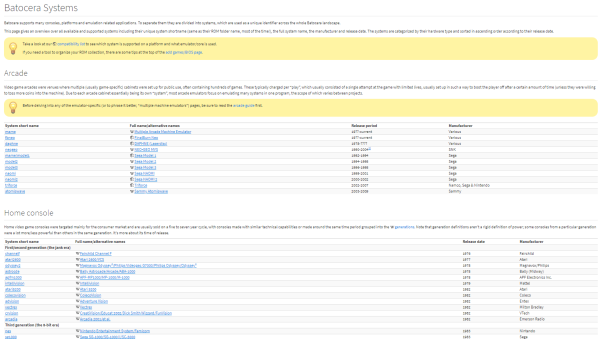
The Batocera team has provided an excellent reference for all the supported emulators within Batocera. For specific questions or details on a given system/emulator, locate the system in questions from the Batocera Systems Wiki and click the link to reveal more details about the emulator, troubleshooting and related detailed documentation.
MAME Aspect Ratio
Video: See how

One of the primary reasons why I was interested in installing Batocera was to play classic arcade games like Galaga, Ms. Pac-Man, Asteroids, 1943, etc. However, the MAME emulator doesn’t properly configure the aspect ratio out of the box. Below are some steps to help you fix this issue, if you encounter the same.
- Select MAME from the emulator list.
- Press and hold the A button for a few seconds until you see a menu appear on the screen.
- Select ADVANCED GAME OPTIONS.
- Select GAME ASPECT RATIO and change the value to CORE PROVIDED (towards the bottom).
- Press B to back out.
- Now, when you launch a MAME game, the aspect ratio will be set properly!
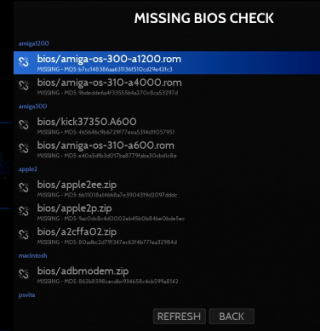
Check for Missing BIOS Files
Video: See how
If a game you’re trying to play won’t start normally, it’s likely missing the BIOS files. Batocera has an included utility for checking what emulators are missing BIOS files, below is how to perform that check:
- Press the Start button.
- Select GAME SETTINGS.
- Scroll towards the bottom under SYSTEM SETTINGS → MISSING BIOS CHECK and press A.
- Use L1/R1 to scroll through the list until you find the emulator you’re attempting to launch. Make note of the missing BIOS file(s) and copy them to the \SHARE\BIOS subfolder (more details here).
Batocera Customization
There are a number of ways you can customize your experience with Batocera. Themes, for example, allow changing the overall user interface with additional artwork, wheel interfaces and more. In addition to themes, you can also change the layout of the game list view and more. See below for details on each.
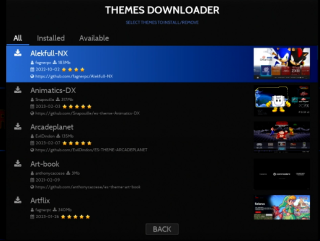
Download New Themes
Video: See how
Downloading new themes is a great way to improve the look and feel of Batocera. Below is how to download / install new theme:
- Make sure you have already connected Batocera to your WiFi Network before proceeding.
- Press the Start button.
- Select UPDATES & DOWNLOADS.
- Under DOWNLOADS select THEMES.
- Scroll through the list of Themes you wish to download, press A and INSTALL to begin the download of the selected theme.
- Once done, press B a few times to go back.
Apply Theme
Video: See how

After you’ve downloaded some new themes, below describes how to apply the theme.
- By default, only one theme is installed, ES_THEME_CARBON. If you haven’t already installed any new themes please see the Download New Themes section.
- Press the Start button.
- Select USER INTERFACE SETTINGS.
- Select THEME SET.
- Select the theme you want to apply and press A.
- Once done, press B a few times to go back.
Change GameList View
Video: See how
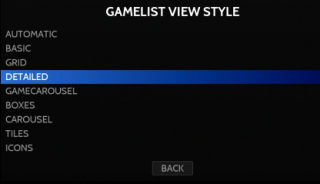
Depending on the selected theme, the list of games may show large images of each game or perhaps a list. See below for how to change the game list view:
- Select an emulator that contains at least one game in the list.
- Press the Start button.
- Select USER INTERFACE SETTINGS.
- Select THEME CONFIGURATION.
- Using the d-pad or left Joystick to change the GAMELIST VIEW style, example:
- Basic
- Grid
- Detailed
- GameCarousel
- Boxes
- Carousel
- Tiles
- Icons
- Automatic
- After selecting the GAMELIST VIEW STYLE (i.e. DETAILED), press B a few times to return to the game list. Your change will now be reflected when showing the list of games.
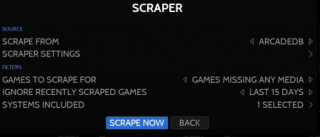
Scraper
Video: See how
You can use the Scraper to download artwork and other metadata for an emulator. This will make navigating the list of games a bit nicer and provide a more clear indication of the game available. In the steps below, we’ll cover how to scrape the artwork for a given emulator.
- Navigate Batocera to the emulator you want to scrape.
- Press the Start button.
- Select SCRAPER from the list.
- Moving the d-pad/joystick left to right, you can change the SOURCE for the artwork on the SCRAPE FROM option. Examples: SCREENSCRAPER, THEGAMESDB, HFSDB, ARCADEDB, etc. NOTE: For additional features and more downloads, some of the sources allow creating an account which is typically free.
- Under SCRAPER SETTINGS, you can adjust the IMAGE SOURCE, BOX SOURCE, LOGO SOURCE and any additional SCRAPE FOR options you prefer.
- Under FILTERS → GAMES TO SCRAPE FOR you can select GAMES MISSING ANY MEDIA, GAMES MISSING ALL MEDIA or ALL.
- You can IGNORE RECENTLY SCRAPED GAMES as well, this is handy if you need to resume scraping a large list of games.
- Within SYSTEMS INCLUDED, you can place a checkbox beside any systems you want to scrape. There are buttons on the bottom to SELECT ALL or SELECT NONE, if you want to quickly set several.
- Once all options have been set, select the SCRAPE NOW button. Scraping will now begin.
- Scraping artwork / data for a large list of games may take awhile.
- That concludes this section on the Scraper!
Batocera Drive
Explosion of fun has released the RetroStation Deck 4TB hard disk drive. This drive includes over 31k games for a number of systems. There is no need to download games or bios
Batocera Platforms
This guide is not the first time Batocera has been covered here at Wagner’s TechTalk. It has been used in the past on other hardware. If you’re interested in seeing some related, yet prior content, please see the links below
- Batocera Steam Deck Guide – Much of the content from this guide is similar this one, however there are subtle differences between the two. Enough to warrant each having it’s own separate guide.
- Batocera on the Raspberry Pi 4 (or 400) – One of my first experiences with Batocera was running it on a Raspberry Pi 4. Since that time, I’ve been impressed with how well it performs and try to test it on those devices that are capable of running it.
- Running Batocera on an OLD PC – In this video and guide, we install Batocera to a Dell D620 manufactured in 2006 and run a surprising number of games rather well.
- ODROID-Go Super Guide – Running Recalbox, EmuElec & Batocera on the ODROID-Go Super. Spoiler: Guess which of the 3 ran the best? Yes, Batocera.
Troubleshooting
- Problem I have isn’t listed below, now what? Answer: You can ask/search any additional questions on the Batocera Discord, or Batocera Forums. You’ll find far more answers to issues/questions in those areas. See below for the most common issues that others have mentioned in the video comments.
- How do I Save/Load Game States? Answer: See the Navigating Batocera section for details.
- Where can I find the BIOS and ROM files? I can’t provide links, please don’t ask. However, read this section carefully for recommendations. Pay particular attention to quoted sections.
- I’m trying to play a game and it states there are missing files and won’t start, how can I fix this? Make sure that you have the correct BIOS files copied for the emulator you’re trying to run. See this section on how to check for missing BIOS files.
- The Aspect Ratio for MAME games isn’t correct, how do I fix this? Answer. See the MAME Aspect Ratio section.
- After updating Batocera, using an UPDATE TYPE of Beta, when I reboot all I get is a black screen. What can I do? This is a known issue that has only affected about 3 individuals and the developers are working on a solution. If you’re interested in helping resolve this issue, please join the Batocera Discord and let them know that you’ve encountered the problem and interested in helping debug it. They are very eager to talk with you and to resolve the problem.
- I’m getting no sound in Batocera, is there a solution to this? The following is from a viewer that had this issue and the comments that were received on how it was resolved: I went into Kodi/audio and selected the right HDMI output. Switched in passthrough (same hdmi output). Then in Batocera I had audio output to “auto” and audio profile set to the correct HDMI. Hope this can help others in the future.
Change Log
- 2024-03-28 – Minor updates.
- 2024-01-08 – Updated the Troubleshooting section (#7), based on feedback.
- 2023-12-15 – Updated the Q&A section
- 2023-08-01 – Added comparison with RetroBat.
- 2023-05-13 – Minor updates.
- 2023-04-05 – 2023-04-09 – Initial Guide development.