Pi 4 / 400 Retro Gaming Guide
Last Update: 3/18/2022
The Raspberry Pi 4 / 400 is a powerful single board computer (SBC). The CPU is a Quad core 64-bit processor running at 1.5GHz (1.8Ghz on the Pi 400). It comes in configurations of 2GB, 4GB and 8GB of RAM. It has many more features, including:
- x2 USB 3.0 ports
- x2 USB 2.0 ports
- x2 micro HDMI ports
- Wi-Fi
- Bluetooth
- Gigabit Ethernet
- and more. To read more about the Raspberry Pi 4 Model B itself, please see this.
The content below will assist you on how to quickly get started Retro Gaming on the Raspberry Pi 4. We’ll cover RetroPie, Recalbox and Batocera each with at least one video to demonstrate how to set it up and some game-play. If you have questions, please comment in the videos and I’ll do my best to answer them (or point you in the right direction for an answer).
It is a lot of work creating and maintaining the guides on this site. I appreciate any support from the community by subscribing to the YouTube channel. commenting on/and liking the videos all help tremendously in growing the content you’ll find here. –Jon
Table of Contents
Common Questions
Below are a few questions that I’ve received and my answers/recommendations. I’ll expand on each of these in a later video but for now wanted to help try to answer them:
- Should I get a 2GB, 4GB or 8GB Raspberry Pi 4? Answer: For the emulators, CPU performance is more important than RAM. If you plan on using your Raspberry Pi 4 as a Linux desktop and RetroPie on occasion, a 4/8GB Pi 4 may be ideal. However, if you’re only planning on using it for RetroPie, 2GB is plenty. You might also find the Pi 400 an attractive option, the CPU is a bit faster but currently the RAM is 4GB (only). More on the Pi 400 here.
- Do I need a case for my Raspberry Pi 4? Answer: IMO, yes for a couple of reasons: 1) The Raspberry Pi 4 can get hot and active cooling (a fan) is a good idea. In addition, you’ll want heat sinks to dissipate the heat away from the chips. 2) If you drop something on it or spill something, you will likely damage it quicker than if you had installed it in a case. There are a number of options for a case, including some that look like retro consoles (see below). If you don’t care for a retro-style case, I do recommend the CanaKit Starter Kit but don’t forget to pick out a controller or two.
- What size microSD card should I get? Answer: Really depends on the type of games and number of games you want to run. microSD cards are pretty cheap these days, my recommendation for most would be a 64GB–128GB microSD card. If you want to install a lot of PS1, Dreamcast, PSP or CD/DVD-based games then I would recommend 256GB–512GB microSD cards or perhaps even an SSD.
- Does RetroPie update the firmware on the Raspberry Pi 4 automatically? If not, how do I update it? Answer: Yes, the underlying OS (PiOS formerly known as Raspian) will update the firmware on the Raspberry Pi 4 automatically. You can use the following command to check the version of the firmware that your Pi is currently running if you want to check (from a shell/SSH): sudo rpi-eeprom-update
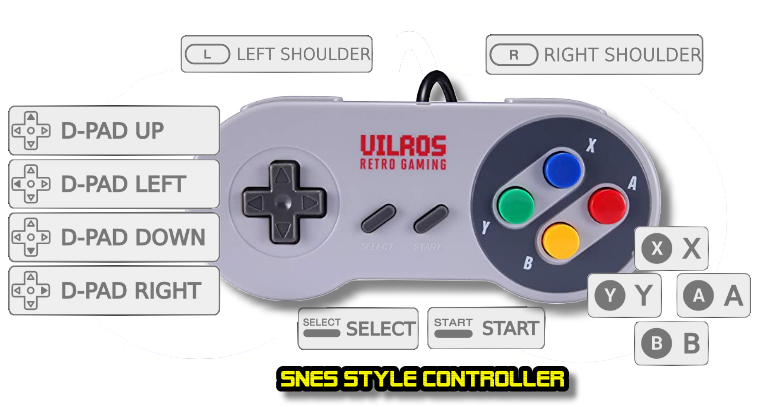
- Should I get an SNES style controller or an Analog controller? Answer: Both work, it depends on the type of games you want to play. If you don’t care about playing N64 or Dreamcast, then the SNES style controllers will work fine for most emulators. You can add a different controller at any time if you change your mind. Here is one kit that you may prefer that includes the Pi 4 (4GB) and Analog controllers (See description for coupon codes to save even more).
Hardware
The first thing you’ll need is the hardware. By hardware, I don’t mean just the Raspberry Pi 4 Model B itself, but everything that goes along with it.
Such as :
Links added for reference, may find better prices with other options or bundles.
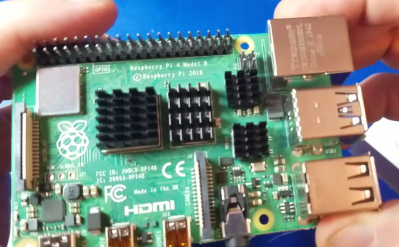
- Raspberry Pi 4b (2/4/8 GB of RAM) *NOTE: The image here includes a 2GB Raspberry Pi 4 Model B.
- Heat sinks & fan
- Power Supply
- Micro SD Card (128GB or higher is what I recommend)
- micro HDMI to HDMI Cable (to your TV)
- Case – A number of cases that have been reviewed here that may be helpful.
- Gamepad / Joysticks (controllers) – very basic controllers.
- USB Keyboard (for WiFi setup – first-time setup)
- A TV or HDMI monitor
NESPi 4 Case
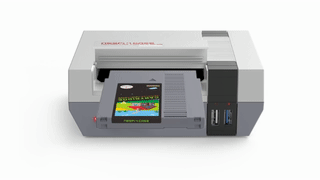
If you would like a case that looks like the classic NES, the NESPi 4 case may be a good option for you. It has a very interesting feature which allows you to insert an SSD into the case in a cartridge form. You can also buy or 3D Print your own cartridge shells here. There is no power supply, Pi 4, controllers typically included with this case so you’ll need to pick those up. For much more details and videos on the NESPi 4 case please see this page.
Kits with SNES-Style Controllers & NES-Style case
Analog Controller
If you want to be able to play N64 or Dreamcast, you’re going to need an analog controller. There are plenty of options available to choose from, Below are a few I’ve used and like:
- SQDeal 2 Pack USB Joystick Gamepad Gaming Pad Wired Controller with Double Vibration Feedback – very cheap price and the quality is so-so. You can certainly do better in terms of build quality, but for the price it’s a decent deal.
- There are many other choices.
Software
When it comes to retro-gaming on the Raspberry Pi 4, you have a lot of options. RetroPie is certainly the most popular, it has a lot of features and the most emulators available either come with or can be added easily to RetroPie. The easiest one to install and get setup is by-far Recalbox. For more on Recalbox, please see this section. Batocera is another great option for Retro-Gaming on your Raspberry Pi 4.
We’ll cover each of the above below. The videos will provide you with a good understanding of each, so you may want to check them out before diving in.
Operation
The following are some operational tips that are generally the same for all distributions below.
- Exit a Game – Press SELECT+START buttons at the same time, assuming SELECT was mapped as the hotkey. If you see a message in the lower-left stating to press it again to exit, press SELECT+START again to exit.
- Insert Credits in Arcade/MAME Games – Press the SELECT button.
- Start a game – Press the START button. Some emulators/consoles may require pressing other buttons to start the game.
- Shutdown – To properly shutdown your Pi, press START and move down to Quit and select SHUTDOWN. Your Pi 4 will now be properly shutdown. You may then safely power off your Pi 4.
Official RetroPie
The following section will guide you through the installation of RetroPie on your Raspberry Pi.
Important links
- Download for RetroPie – Click the button for Raspberry Pi 4. The size is ~826MB.
- RetroPie Forums – Great place to get answers to questions or interact with the Retro gaming community.
- RetroPie Subreddit – A great forum for discussing/sharing RetroPie questions, tips and information.
Software Setup
The Raspberry Pi foundation has made it much easier to install operating systems to the Raspberry Pi / 400 using the Raspberry Pi Imager tool. In this section, I’ll show you just how easy it is.
- Download and install Raspberry Pi Imager from here.
- Insert your microSD or SSD drive you want to use into your PC running Windows, your macOS, Ubuntu computer or even a Raspberry Pi 4 running PiOS/TwisterOS (for installation to a Pi, you’ll need to execute sudo apt install rpi-imager in a terminal window).
- Click the CHOOSE OS button.
- Select Emulation and game OS –> RetroPie –> RetroPie 4.x.x
- Click CHOOSE SD CARD and select your microSD card or SSD drive.
*Helpful Tip: If you press Ctrl+SHIFT+X, a dialog will appear which provides an option for Configure wifi. Using this, you can enter (or verify) that the SSID and Password for the WiFi connection is correct. You can also set the Wifi country and Time zone. Making these changes here will save a few steps rather than configuring the WiFi setup directly in RetroPie.
- Click WRITE.
- Once the write has completed, exit Raspberry Pi Imager, remove the microSD from your computer and install it into the Raspberry Pi.
- Power-on the Raspberry Pi 4.
- The RetroPie image should begin to boot!
Software Setup (not using Pi Imager)
*NOTE – The method shown here was once the easiest method burn RetroPie to the microSD card, however that is no longer the case. Please see the section above using Raspberry Pi Imager.
The following will describe how to install the image to a micro SD card. It is recommended that you use a microSD card larger than 16GB. Otherwise, you won’t have much room for games. See Hardware Setup (above) if your Raspberry Pi 4 has not yet been setup.
- Download ~826MB image from here.
- Unzip the archive using a zip utility, such as 7-zip.
- Download/install balena etcher from here.
- Install the microSD card into the SD sleeve and into your computer.
- Launch etcher and click the Select image button.
- Select the location of the extracted retropie-buster-4.x-rpi4.img file.
- Click the Select target button and select the microSD card by clicking the checkbox associated with the correct drive letter. Then click the Continue button (*NOTE: Make sure you selected the correct drive, everything on it will be erased in the next step!)
- Flick the Flash! button to burn the image to the microSD card.
- Once complete, eject the micro SD card from your computer and install it into the Raspberry Pi 4.
- Power-on the Raspberry Pi.
- The RetroPie image should begin to boot!
Controller Setup
- After the image boots, if you haven’t done so already, insert the USB controller you wish to use into the USB 2.0 port on the Raspberry Pi 4.
- You will be prompted to setup the controller, press and hold a button for a few seconds.
- Press the corresponding buttons for up / down / left / right / start / select / A / B / X / Y / L / R (more buttons may be available for different controllers) and then hold down any button for a few seconds when asked for buttons that you don’t have on the controller unless your controller includes analog buttons. Once you see HOTKEY ENABLE, press the Select button for that. Then press the A button on the OK.
- Your controller is now setup!
Wi-Fi Setup
The following will assist if you need to manually setup WiFi within RetroPie. Using Raspberry Pi Imager, it’s possible to configure the WiFi settings using Pi Imager.
- Using the controller, select the RetroPie tile. Then, press the A button.
- Press the down button and highlight RASPI-CONFIG from the menu.
- Using the arrow keys on your keyboard, move down to Localization Options and press the ENTER key.
- Select I4 Change Wi-fi Country and select your country using the up/down arrow keys and press tab to the OK button.
- Select Localization Options again and then Change Timezone (this is optional). Select the area where you live and press TAB and enter.
- Next, select your timezone. Then TAB and ENTER.
- Press TAB and then arrow to the right to the Finish button and press ENTER.
- Using your controller, move down to the WIFI option and press the A button.
- Using the keyboard, press enter on Connect to WiFi network.
- Select your network name or SSID and press ENTER.
- Enter the password for your network.
- Make note of your IP Address, so that you may easily transfer games to your RetroPie image.
- To exit the sub menu, press the ESC key.
- Press the tab key twice to highlight Finish and press ENTER.
- Your Wi-Fi is now setup!
Troubleshooting
- I have no video or audio, what’s wrong? Double check that you have the HDMI cable on the Pi connected to the port nearest the power (i.e left port).
- I have video during startup, shows the RetroPie screen and then it goes black – why? One viewer informed me that it turned out his microSD was corrupt. Re-flashing it fixed the problem.
- I still have no audio, help! Please see this from the RetroPie team.
- Whenever I click anything after the RetroPie configuration, the screen blacks-out. Why? If you are using a 144Hz monitor, try one that is ~60Hz instead.
- I can’t get the WiFi to connect, why? Could be a number of reasons, make sure you’re using the correct passphrase for the SSID (WiFi Name). If you are, I’ve found at least with my router, that including any special characters such as “!@$%” as part of the passphrase wouldn’t allow me to connect from the Pi. Changing it to a passphrase that doesn’t include special characters worked for me.
Installing BIOS Files
To play games on some systems/consoles, you may need a BIOS file (or files). For example, to play Dreamcast, NeoGeo, etc. those files need to be downloaded and installed into their respective locations. I’m unable to provide links to those files, they are copyrighted material. However, you can learn more about which systems require them from the RetroPie docs here.
Installing ROMs
First, please don’t ask me or anyone where to get ROMs. We can’t, or shouldn’t answer you. It’s not an appropriate topic for discussion. There are places where you can download legal ROMs for installation to your Raspberry Pi 4. My recommendation is to search google (or your favorite search engine) and locate whatever it is you want to install. Once you do that, here are some basic instructions:
- Once your Raspberry Pi 4 has been connected to your network, you can open File Explorer on your computer and type “\\[your ip address here]” or “\\retropie” (for RetroPie) to access the Raspberry Pi 4. From here, you can double click on the roms share and copy/paste the files to the appropriate sub-folder.
- For NeoGeo games, make sure you also copy the neogeo.zip file in the same folder as your games.
- After you’ve copied the roms to the appropriate location, then press the Start button on your controller and move down to Quit and press the A button. Select the option to Restart Emulation Station, the emulator should show up in the list now with the games you’ve added.
- Most of the problems users have installing ROMs has to do with the fact that the ROM they downloaded didn’t match the correct emulator version they tried to run it under or the rom copied is dependent on another file that was not copied/missing. For example, there are many different versions of MAME and the roms/romsets you use must match the emulator version. Otherwise, when you start the game it may return back to the RetroPie menu.
- This is the most help I can provide on this topic.
More RetroPie Tips

RetroPie Tips page is now available! There you will find many more tips to help improve and enhance your experience with RetroPie 4.6. This page complements the video to the right.

Recalbox Install on a Raspberry Pi 4

Recallbox for the Raspberry Pi 4 is easy to setup and offers some impressive features such as: easy access to roms on the microSD/SSD, Recalbox Manager and more. We’ll set up Recalbox from beginning to end, no need to watch multiple videos to setup your Pi 4!
Helpful Links
Software Setup
Within the past several months, the Raspberry Pi foundation has made it much easier to install operating systems to the Raspberry Pi / 400 using the Raspberry Pi Imager tool. In this section, I’ll show you just how easy it is.
- Download and install Raspberry Pi Imager from here.
- Insert your microSD or SSD drive you want to use into your PC running Windows, your macOS, Ubuntu computer or even a Raspberry Pi 4 running PiOS/TwisterOS (for installation to a Pi, you’ll need to execute sudo apt install rpi-imager in a terminal window).
- Click the CHOOSE OS button.
- Select Emulation and game OS –> Recalbox –> Recalbox 7.x.x-Reloaded (Pi 4/400)
- Click CHOOSE SD CARD and select your microSD card or SSD drive.
- Click WRITE.
- Once the write has completed, exit Raspberry Pi Imager, remove the microSD from your computer and install it into the Raspberry Pi.
Recalbox 7.2.x RELOADED with Lightgun support on the Raspberry Pi 4
In this video, we’ll setup the Mayflash Dolphin Bar + Wii Remote to a Raspberry Pi 4 Model B running Recalbox 7.2.1 RELOADED. We’ll go through the setup, button mapping and play some lightgun games!
Hardware
- Mayflash W010 Wireless Sensor DolphinBar for Wii
- Wii Remote Plus – White
- Wii Gun (set of 2)
- RETROFLAG NESPi 4 Case Kit With RPi 4 4GB Motherboard (includes Raspberry Pi 4 + Controllers, more)
- Kingston 240GB A400 SATA 3 2.5″ Internal SSD
Official Batocera
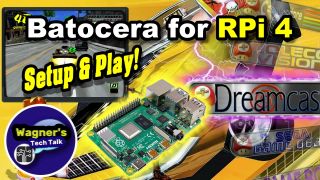
In this video, we’ll setup the OFFICIAL image of Batocera on a Raspberry Pi 4 along with a few helpful startup tips! I’ve been testing this build for a little while and really enjoying it. It’s a great option for Retro-Gaming enthusiasts. The games all play well, setup is simple and well… it’s Fun!
Big thank you for the recommendation from LIAC that I should give Batocera a try!
Helpful Links
Controllers Shown
Kits to Consider
These are some great kits that include the Raspberry Pi 4, though without a controller.
- CanaKit Raspberry Pi 4 8GB Extreme Kit – 128GB Edition (8GB RAM)
- Vilros Raspberry Pi 4 Complete Desktop Kit with Keyboard and Touch-pad Hub Case (4GB)
Building a Modern Retro Console (MRC)

If you’re interested in building your own Modern Retro Computer, you may want to visit this page.
Light Gun Support with Mayflash DolphinBar & Wii Remote

In this section, we’ll discuss how to setup the Mayflash W010 Wireless Sensor Dolphin bar to a Wii Remote on our Supreme Pro RetroPie image (the official release of RetroPie wasn’t available at the time of filming this video). This allows you to play light-gun games on your Raspberry Pi 4. If you already have a Wii remote available, adding this setup to your existing Raspberry Pi 4 setup will be pretty inexpensive. Let’s first go over the hardware you’ll need:
In this section, we’ll discuss how to setup the Mayflash W010 Wireless Sensor Dolphin bar to a Wii Remote on our Supreme Pro RetroPie image (the official release of RetroPie wasn’t available at the time of filming this video). This allows you to play light-gun games on your Raspberry Pi 4. If you already have a Wii remote available, adding this setup to your existing Raspberry Pi 4 setup will be pretty inexpensive. Let’s first go over the hardware you’ll need:
- Mayflash W010 Wireless Sensor DolphinBar for Wii – This bar plugs into a standard USB port, like the one on your Raspberry Pi 4 and pairs to a Wii Remote. The documentation may be found here.
- Wii Remote Plus – White (Renewed) – If you don’t have a Wii Remote, you can pick up a renewed (refurbished) Wii Remote on Amazon. Also, you might be able to find them on ebay or elsewhere.
- Wii Gun – Ideally, you may want to try to find a Wii Gun that has dual trigger buttons. I wasn’t able to find one with with 2 buttons, so opted instead to buy 2 guns with a single trigger. Some games may require 2 triggers, so something to keep in mind.
Hardware Setup
- Setup your Raspberry Pi 4 with RetroPie (instructions here)
- Plug in the Mayflash Wireless Dolphin bar into an available USB port on your Raspberry Pi 4.
- Set the mode on the sensor bar to 2.
- Sync the Wii remote to the Sensor bar by pressing the Sync button on the sensor bar, then remove the battery cover to your Wii Remote and press the red sync button. The two will be paired after this step. Once paired, you’ll see LED’s 1 & 4 light up on the Wii Remote.
- Insert the Wii Remote into the Wii Gun.
- Set the sensor bar above/below your TV/Monitor. If you set the sensor bar below the TV, be sure to flip the back switch to Bottom or Top if it will be positioned on top of the TV/Monitor.
- That’s it for the hardware!
Game Install
I used the MAME 2003 0.78 Romset for the following instructions. At this time, I don’t think this setup will work on other emulators. If I find out differently, I’ll update this statement.
- Copy your light-gun games to the Raspberry Pi 4. To do this, make sure your RPi 4 is connected to your network. If it isn’t, see this.
- On a PC right-click the Windows icon (lower-left) and select Run.
- Type \\retropie and press ENTER.
- Select the roms share, followed by mame-libretro.
- Create a sub folder called GunGames or similar.
- Copy /paste all light gun games in the GunGames sub folder as well as any directories and/or .chd files required by the game(s).
- On the Raspberry Pi 4, press the Start button on your controller and select quit.
- Select Restart Emulation Station.
- You should now see a GunGames subfolder when you select the option for MAME.
- That’s all for this section!
Software Setup – Wii Remote
- On a secondary controller, press the Start button.
- Move down and select Configure Input and select Yes.
- On the Wii remote, hold down the Home button.
- Now press the up/down/left/right d-pad buttons on the Wii Remote.
- Start button to button 2 on the Wii Remote, Select to button 1.
- Map the A button to the Home key on the Wii Remote.
- There will be no B (or Back) button, so hold down the Home button and repeat for all until you get to the Hot Key Select (button 1).
Software Setup – In-Game
You may want to do the following for all of your light-gun games at one time, so you won’t need the keyboard later.
- After launching a game, press the TAB key to bring up the MAME menu.
- Using the keyboard, move down to Input (this game) and press ENTER.
- This step only needed if nothing happens when you press the trigger button: Move down to P1 Button 1 and press the trigger button (repeat if you have a P2 button).
- Select Player 1/2 Coin and map it to the “-“ button.
- Select Player 1/2 Start and map it to the “+” button.
- You can also press the ESC key on the keyboard to go up one level and move down to Analog Controls.
- Within the Analog Controls sub-menu, you can also adjust the sensitivity and speed to your preference.
- Press TAB to hide the menu and return to the game to check it out!
General Light gun Tips
- Use a second controller to Start/Exit a game rather than rely on the Wii remote for that. The reason is that you’ll have to remap the UI Quit setting in-game which can easily become problematic.
- If you change the light-gun mode in-game, the light gun will stop functioning until the game is restarted.
- Keep a distance of 3-8 feet away from the sensor bar for optimal performance.
- For games that require re-loading of ammo, I’ve found moving the light gun to the left/right of the screen sometimes works better than pointing down. Really depends on the game and some games seem to have a delay in picking up the reload (Area 51, as an example).
Troubleshooting
- I’ve completely hosed up the mapping for my Mame 2003 light gun game(s), how do I fix it? Answer: If you used the above instructions on your PC, navigate to the \\retropie\roms\mame-libretro\GunGames\mame2003\cfg and delete the problematic .cfg files and then re-map the buttons. The [gamename].cfg file will be re-created the next time you launch the game.
- I pressed the Mode button on the Sensor bar, now my game isn’t responding, how do I fix it? Answer: Toggle the mode setting back to 2, exit and restart the game. Should work now.
- Wiimote will not sync as a mouse. It will only show 1 light, but wont show light 1…4 on the Wiimote to make it a mouse, why? Answer (Thank you to Paul P for this tip): If you have more than one mouse device connected (i.e trackball connected to the cabinet) then you MUST change the mouse index value in retroarch from 0 to either 1,2 or 3 etc… until it starts working (go to settings->Input-> Port Bind 1) while in the game. This can then be saved permanently through changing the .cfg file for that game in the emulator you are running by adding input_player1_mouse_index = “x” where x is the mouse index that works for your gun.
- There is a lag/delay when moving the light gun that makes the game difficult to play, can I fix this? Answer: Maybe. For testing, I used a John Will portable 1080p monitor and it did great, very responsive. I moved the setup to our game room which had an older Vizio TV (~2007) and the lag was so bad I scrapped using that TV. If the TV has a “Game Mode”, try setting it to on. Otherwise, you may find that some TV’s just aren’t going to work well.
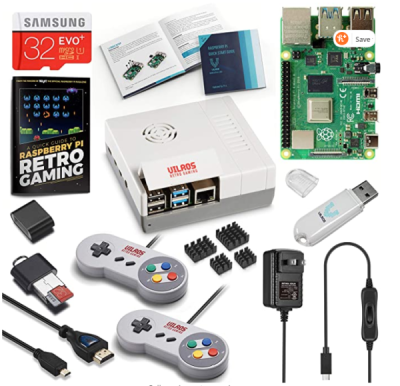
Raspberry Pi 4 Gaming Kit (by Vilros) + Setup of Lakka and Supreme PRO RetroPie controllers & Wi-Fi

In this video, we’ll check out the Vilros Raspberry Pi 4 Retro Gaming kit and fully set it up. We will then install the recommended Lakka distribution, setup one of the controllers as well as connect to our WiFi network, then copy a few games. After that, we’ll check out a more impressive Raspberry Pi 4 image by the Supreme Team and configure that too!
*NOTE – now that the RetroPie team has officially released RetroPie 4.6 (beta), I recommend installing that image. You can find full instructions here.
Hardware Setup
- Install the 4 heat-sinks to the Raspberry Pi 4 Model b. Remove the backing to the heat-sink and align to the appropriate chip. The two smaller heat-sinks should be applied to the two chips near the USB 3.0 ports. See below.
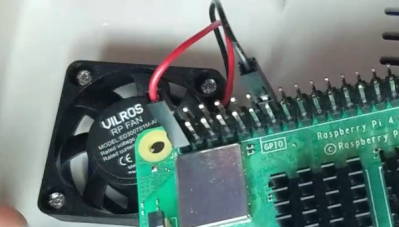
- Insert the black wire from the fan into pin 14 (GND) and the red wire into pin 1 (3.3v). See below.
- Place the Raspberry Pi 4 Model B into the case and make sure all screw holes line up. Apply the other half of the case on top of the Raspberry Pi.
- Install the 4 small screws and tighten using the screwdriver included with the kit.
- Insert the Micro SD card into the slot. If you use the micro SD card that came with the kit, it has NOOBS pre-installed. You can use this to install Lakka for Retro gaming.
- Make sure the power switch is off on the power cord, attach the USB-C cable to the power port on the Raspberry Pi. Plug the other end into a power outlet.
- Connect the USB Controller and Keyboard to the USB 2.0 ports (left ports).
- Attach the micro HDMI cable to the port near the power input on the Raspberry Pi. Connect the other end to your HDMI input on your TV/Monitor.
- Power on the Raspberry Pi 4.
- See Software above. There are two options, currently. They are: Official RetroPie or Supreme RetroPie (Facebook group).
LABISTS Raspberry Pi 4 4GB Retro Gaming Kit: Play your favorite Retro Games!
*NOTE – This kit appears to be unavailable.
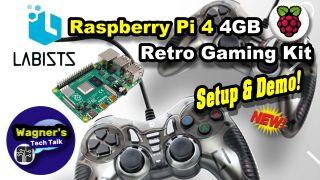
In this video we’ll take a look at the LABISTS Raspberry Pi 4 (4GB of RAM) Retro Gaming Kit! We will unbox, assemble and check it out by playing a few quick games running RetroPie. At the end, I’ll let you know what I like about this kit and things that could be improved.
Items shown in this video
- LABISTS Raspberry Pi 4 4GB Retro Gaming Kit (Amazon)
- Raspberry Pi Official Keyboard and Mouse Value Pack (Amazon)
- AUZAI Portable Monitor – 15.6-Inch USB-C Portable Display, 1080P Full HD IPS Panel (Amazon)
Change Log
- 2022-03-18 – Updated with the latest RetroPie 4.8 Setup video.
- 2022-03-16 – Minor edits; remove outdated links.
- 2021-05-23 – Added the Operation section to assist with general button operation information.
- 2021-02-27 – Significant re-working of the page with the most recent information.