Steam Deck with Legends Pinball
Two of my favorite topics have finally converged, Virtual Pinball and Handheld Gaming! What do I mean by this? First off, to play Virtual Pinball tables via OTG on the AtGames Legends Pinball machine, or ALP as it is often referred, you had to have a decently powerful PC. There are well over a 100 pinball tables you can play directly on the machine without connecting a PC or Steam Deck. Though, that is not the focus of this guide. If you want to learn more about Legends Pinball, this guide can assist.
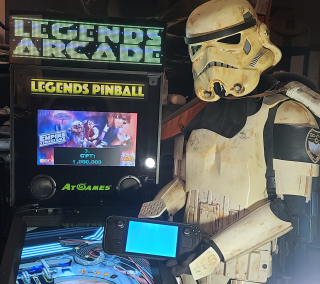
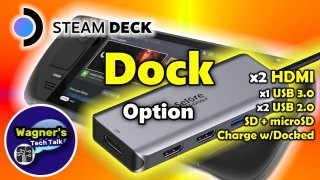
The AtGames Legends Pinball has an impressive feature called OTG or On-The-Go which is simply a USB-A and HDMI connection to the PC (or Steam Deck in our case). Additionally, if you want to utilize the backglass on the ALP, you’ll need what is called the VIBS board installed in the ALP. VIBS stands for Video Input Backglass Switchboard, which is yet another HDMI connection to allow displaying video content from a PC, or in our case the Steam Deck, on the backglass. To utilize both the playfield and the backglass, you’ll need a solution that provides two HDMI output ports for the Steam Deck. We’ll discuss the Dock more below, if if interested this is what I’m currently using.
There are 2 (actually a 3rd, I’ll cover in the future) primary Virtual Pinball solutions that we’ll discuss in this guide. The first is Pinball FX3 and PinUP Popper Baller Installer. Pinball FX3 is a commercial product, the tables themselves may be purchased on Steam. PinUP Popper Baller Installer is a simplified installer for installing the software components needed for community-developed Pinball tables. It installs a number of applications, including Visual Pinball X and Future Pinball. There are literally thousands of community-developed pinball tables available freely for download. Most are very high-quality and several are accurate re-creations of the original pinball machines.
PinUP Popper Baller Installer will ONLY run on Windows. It’s not available on Steam or any other operating system. Therefore, in the following guide we’ll focus the entire installation on getting these components working under Windows on the Steam Deck. Also, much of the information needed to get this working already exists on this website, below I’ll simply reference existing content and fill in the blanks. As a result, I will link to each guide as-needed below. This will maintain consistency, eliminate duplication and simplify the setup. The Steam Deck is a PC in a handheld form-factor, albeit a bit larger than most –yet more powerful than most too!
That said, there are some things I will recommend that you own before you begin. This will allow you to more easily follow-along in this guide. Are they all required? No, I’ll identify what is/isn’t. The requirements section will discuss this in further detail.
Let’s get started on our journey of setting up our AtGames Legends Pinball over OTG on the Steam Deck!
Table of Contents
Additional Resources

- PinUP Popper “Baller” installer – Where to go for additional details on Baller Installer. Nailbuster has done an amazing job with this package. Huge thank you to the community for all of their contributions!
- Virtual Pinball Chat (Discord) – Where to download PinUP Popper Baller Installer and interact with the virtual pinball community.
- TerrryRed (YouTube) – Terry has created some of the most amazing tables available. He’s very active in the Virtual Pinball community and you’ll definitely want to check out the videos available here.
- NailBuster Software (YouTube) – More information and videos on PinUp Baller.
Why use the Steam Deck for Pinball?

If you’re wondering what the benefits of using the Steam Deck are vs. a dedicated PC, here are a few that come to mind.
- You already own an ALP but not yet have a dedicated PC for OTG – If you already own most of the equipment mentioned here, you may enjoy the convenience of using your Steam Deck for OTG.
- Price– in May 2021, I spent $1,080 on a new Dell PC that would be dedicated for Virtual Pinball on my Legends Pinball machine. Today, the Steam Deck is ~$400-600. While a dedicated PC with a high-end GPU is sure to perform better, the Steam Deck is a reasonable option.
- Flexibility – When you’re done playing Virtual Pinball on the ALP, simply shutdown Windows and disconnect the single USB cable going to the Steam Deck and enjoy all your favorite Steam games on the go. When you want to play pinball, just plug it back into the Dock and boot. Recommended sequence here.
- Easy Backup – Since this guide covers the setup of Windows running directly from the microSD card, you can easily backup/restore the microSD image in the future. How? Please see here.
- Free up a PC if yours is already dedicated for Virtual Pinball – If you’ve already invested in a PC for Virtual Pinball, well now you may have an extra PC. You can use the extra for gaming in another room, kids room, game room, etc.
- More? There are likely more reasons, but this is what I came up with so far.
Why not to use the Steam Deck for Virtual Pinball?

The following are some reasons why you may not want to consider the Steam Deck for your OTG PC on the ALP:
- Frame Rate – The frame rate for many tables is good, but may vary particularly with Future Pinball tables. Of the Pinball FX3 and VPX tables I’ve tested so far, they play good overall. Some Future Pinball tables exhibit some obvious low frame rates. This has to do with the rendering that Future Pinball is performing and may very well require a higher-end PC to play the more complex tables. This may be partially attributed to the current Windows display drivers that Valve provides. Thanks to Terry Red’s recommendations here, the performance can be slightly improved for use on the Steam Deck. Until then, I just want to make you aware that your mileage may vary, depending on the table.
Requirements
If you want to follow along exactly with this guide, below are the items that would be needed. Keep in mind, it’s not a cheap solution. However, if you already have some/most of the components below then you may find this option cheaper than a dedicated PC for Virtual Pinball.
- Steam Deck – Obviously this will be needed to follow along in this guide, but not a requirement to use the Legends Pinball machine with it’s built-in tables, add-on table volumes, etc. You can learn more about the Legends Pinball machine on the main ALP Guide.
- AtGames Legends Pinball – If you’re following this guide, you’ll definitely want the Legends Pinball machine to play FX3/Visual Pinball X (VPX) or Future Pinball (FP) with your Steam Deck.
- VIBS Board (Optional) – this is a board that you install into the Legends Pinball machine which allows you to utilize the backglass of the pinball to display the scoreboard, artwork, etc. While technically optional, I can’t see why anyone wouldn’t consider adding it.
- Arcade Control Panel – (Optional) The Arcade Control Panel makes navigating the pinball machine much easier. It also allows you to play Arcade Games via CoinOpsX on the ALP.
- USB-C Dock (dual HDMI) – You may be able to use another dock with dual HDMI ports, but this is the only one I own and have tested. In fact, I ordered a 2nd one. One that will stay connected to the ALP and another that I use on my workbench for recording footage of the Steam Deck.
- HDMI Cable (you’ll need two) – This is the cable I’m currently using, I like it because it rotates at a 90 degree angle.
- USB-A to USB-A cable (OTG) – This cable has worked perfectly for me. Keep in mind, other cables may work just as well. However, others have told me they bought an Insignia brand (from Best Buy) that did not work with the ALP. So, do keep that in mind.
- microSD Card (for a Windows Installation) – you’ll want a U3 A2 microSD card for best performance. 256GB should be enough for most, though you can use a 512GB or 1TB if you prefer.
- Windows License for the Steam Deck – As you will be installing a new copy of Windows, you will need a Windows license. I’ll link to a section here where I discuss one option. You can also pick one up at other retailers for much more if you prefer.
- FX3 Tables – I purchased all the FX3 tables available on Steam. Roughly, paid about $240 for all of them. Some I picked them up during sales. You don’t have to go all-out and buy them all. Keep an eye on those sales.
Q&A
Below you’ll find some common questions and answers regarding the Steam Deck used for Virtual Pinball:
- Can I use these steps with another pinball machine? Perhaps, though the Legends Pinball is the only virtual pinball machine I own and can document. Other commercial offerings may not support OTG functionality, please don’t assume that they will work.
- Can I use an existing PC instead of the Steam Deck? Depending on the PC and if it is a new Windows installation and reasonable CPU/GPU. Please see this chapter for additional recommendations/details.
- How good is the Steam Deck for Virtual Pinball? For the most part, Pinball FX3 plays very well. I initially noticed some slight screen tearing, but this was fixed by enabling the VSync On option within FX3. Ball movement and flipper response time seems good, in my opinion. For VPX/FP, some will play just fine, others may exhibit low frame rates. It really depends on the table. As the Windows drivers for the Steam Deck mature, I’m hopeful this will become an even better platform for virtual pinball.
- Does [insert table name] table work on the Steam Deck? I can’t possibly setup every table ever created to assist (there are thousands available). I’ve tried many, but far from all. If the table isn’t working for you, or at a frame rate you would hope, please reach out to the location where you found it for more information. If the table is a Future Pinball table, then this section may be helpful here.
- Can I play all these tables on the go without the ALP? The setup for VPX/FP isn’t conducive to playing on the go. Here we’ll be configuring the playfield to HDMI 1 (not the Steam Deck display) and a backglass which you won’t have with you on-the-go. If you go that route, you may want to clone your microSD and re-run the Popper Configuration for an on-the-go/desktop virtual pinball version. You won’t want to go through the configuration on the ALP each time you want to swap between away and on the pinball machine.
Hardware Setup
For each of the items below, if you already own or have setup the associated hardware, simply skip over the item. I have to assume everyone is starting from the beginning.
Setup the Legends Pinball Machine
The first thing you’ll need to setup is the AtGames Legends Pinball machine. For detailed assembly instructions, please see the included User’s Guide included with the ALP. For a quick assembly guide, please see here. If you prefer to see a video of the assembly process, you can find it here which will also cover the main features of the ALP with the exception of an OTG discussion. We’ll discuss that more below.

Install Accessories
If you will be installing the Arcade Control Panel and VIBS board (both highly recommended), do that now. For more details on the VIBS board and installation, see here. For the Arcade Control Panel, see here.

Connect ALP to the Steam Deck
Now it’s time to connect the Steam Deck to the ALP. Below you will find all the connections that should be made to follow along with the rest of this guide:
- Connect one HDMI cable from the top port of the ALP to the Dock (HDMI 1).
- Connect a 2nd HDMI cable from the VIBS board to the Dock (HDMI 2).
- Connect a USB-A to USB-A (OTG cable) from the top USB 2.0 port on the ALP to an available USB port on the Dock.
- Connect the power cable for the Steam Deck to the dock to allow charging the Steam Deck while playing.
- Plug the single USB-C cable from the Dock into the top USB-C port on the Steam Deck.
Software Setup
In this section, we’ll discuss the primary components needed to setup the software on the Steam Deck.
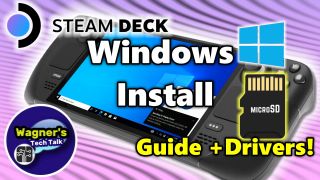
Install Windows
First, you’ll need Windows 10 installed on a microSD. It may work equally well with Windows 11, however in the steps below I use and recommend Windows 10.
IMPORTANT UPDATE: The latest APU drivers provided by Valve do not allow extending displays, which is a must. Instead, you’ll need to use this driver, APU_220520a-377788E-2206021014.zip. Keep in mind, this driver may crash the first time it’s installed (under Windows 10), but should work after reboot. This driver also seems to work so far in my testing under Windows 11. Use the above link for the APU instead of the one mentioned in the guide below, if you intend to use the Steam Deck with your Legends Pinball (or Micro). The current APU driver dated Nov. 8th, 2022 will only allow mirroring a display -not extending.
For a detailed guide and video for installing Windows 10 to a microSD card for use on the Steam Deck, please see here.
Remote Connect to your Steam Deck
You will likely prefer a 2nd PC to remote-connect to your Steam Deck to setup the display and install/configure the software. You can certainly do it all on the machine itself, but it’s going to be uncomfortable that way. I used Team Viewer, a free download that allows you to easily connect to the Steam Deck and swap to any of the displays during setup.
Enter OTG Mode from the ALP
With the ALP and Steam Deck connected, you can now enter OTG Mode on your ALP. OTG mode will allow your PC displays to show up on the main playfield and the backglass (VIBS). After entering OTG mode, don’t forget to push the VIBS Switch button to make sure that display is visible. All of this is documented here.
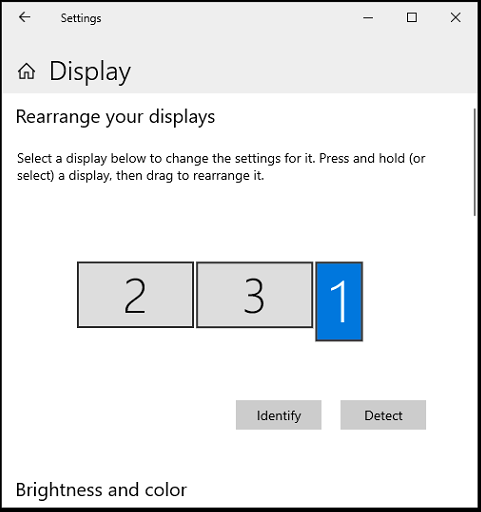
Arrange Displays
Arranging the displays properly is a very important aspect of your setup, infact perhaps the #1 most important aspect. Your main playfield should be on the far-left, the backglass in the middle and your Steam Deck display on the far right. Be sure to align all evenly at the top. Here’s how:
- Right-click on the Desktop and select Display Settings.
- Position the Playfield display to the far-left.
- Position the VIBS display (the backglass) to the right of the playfield display within Windows Display Settings. Make sure all displays are lined up perfectly (as shown), playfield on the left/backglass at the right of the playfield.
- Playfield should be set as the Primary display by checking Make this my main display.
- Both displays should be set to 1920×1080, scaled at 100% and Display orientation in Landscape Mode. Keep in mind, Windows may scale one (or both displays) to 150%. If so, you’ll need to change this setting to 100% for the following settings to work properly.
- Simply click each display and verify any needed changes, both should be set identically.
- The Steam Deck display doesn’t matter, so long as it’s at the far-right.
- Once properly arrange, they should look like the following image.
Pinball FX3

Now that you have Windows installed, if you’re planning on installing Pinball FX3, do this first. It’s much easier to setup! For a detailed guide on setting up Pinball FX3, please see here. All the settings used in that guide will still apply to installing Pinball FX3 on the Steam Deck.
A few pointers:
- Even if you don’t plan on installing right away, register for the cabinet code right away. It may take a few days to receive it from Zen. That way, you’ll have it when you’re ready to get started.
- Pinball FX3 tables are not free and are purchased from your Steam account. I recommend starting with a handful of tables and pick up more as sales occur.
- In the Pinball FX3 Guide, it states to turn VSync Off. However, on the Steam Deck you’ll want to leave VSync On. It will greatly improve the transition smoothness within Pinball FX3 if left on.
PinUP Popper Baller Installer

This package is super-helpful, it was developed by Nail Buster. While this package makes the installation of all the components much easier than it used to be, it’s not what I would consider easy. It’s going to take a bit of time, perhaps a little frustration your first time also, but once setup it’s great!
For a full detailed video and guide on installing and setting up PinUP Popper Baller Installer, please see this guide.
A few pointers:
- I recommend watching the video first (here) to understand what is involved and if you want to proceed.
- Follow the guide, the only differences are noted above regarding Arranging the Displays.
- It’s time consuming, plan some extra time to get familiar with the package and install a few tables.
- After installing PinUP Popper Baller Installer, you may hear audio stuttering when you launch the Popper Front-End the first time. Reboot the Steam Deck and it should be cleared up upon reboot. If not, see the Troubleshooting section for additional assistance.
Swapping from ALP to Deck
I initially had some issues if I left the ALP in OTG mode, then used the Steam Deck disconnected from the ALP (to play Steam games), then came back to the ALP. For a better experience, please consider the following:
- When you’re done playing pinball tables on the Steam Deck, shut it down (Start/Windows icon → Power Icon → Shutdown).
- Power off your ALP.
Now, when you’re ready to play virtual pinball on the ALP with your Steam Deck, here are the steps that should assist:
- Power on your ALP.
- Press the VIBS switch button.
- Connect your Steam Deck to the dock with the Windows+pinball microSD card installed.
- PRESS+HOLD the volume down button and quick-press the power button.
- Select your microSD with Windows to boot.
- Everything should look just as it did the last time you played with all monitors arranged correctly.
Drawer for Steam Deck
*NOTE – As you may know, cable management is NEVER my thing 🙂 I’m sure anyone could do a better job than what you see below. However, it fit just fine. I do recommend having two people install it. My son helped guide me to make sure the drawer would open as I installed the screws.
As mentioned in the video, I didn’t like that I had the Steam Deck sitting on the floor. The original drawer I ordered arrived but unfortunately didn’t fit. I didn’t give up and found one that fits perfectly at the back of the ALP. I put it at the back, instead of either side, due to having previously installed the bass shaker in the middle of the ALP (from the Deluxe Haptics Kit). Check out this YouTube short that quickly explains what was done.

Parts used
- VIVO 16 inch Under Desk Mounted Sliding Pull-out Drawer – This is the drawer that was used. I used the rubber spacers (below) to drop it down a little to fit over the lip of the cabinet.
- 4-Pack – Premium Quality Multi-Purpose Rubber Spacer 1″ – I placed these between the drawer and the bottom of the ALP cabinet. It’s just about the perfect distance for easy access. I’m also not hearing any rattling of the drawer from the bass shaker using these rubber spacers.
- I used x4 M6 x 40mm wood screws that I had on-hand (The exact link is no longer available). However, these look close.
- x3 3/16 washers for each side (to make sure the screw doesn’t penetrate through the wood). I picked the washers up at my local Ace Hardware store. However, these look like they should work also (I ordered a set, always needing different sizes).
Troubleshooting
- Extreme lag on any table – Re-run the APU/Video driver installer. The Steam Deck may reboot during installation. It did for me on two occasions. However, afterwards this cleared up the issue.
- Audio Severely Choppy – Change audio quality of audio output driver to something other than it’s current setting and click the Test button to verify the sound is correct. Here’s how:
- Press Start/Windows button, type “Control Panel”
- Select Hardware and sound → Sound and select your audio device.
- Click Properties → Advanced tab. Press the Test button. The audio will still sound wonky.
- Now, change the audio to CD/44k Hz (something different) press the Test button. Audio should sound fine then.
- Click OK. *NOTE – I think this is an issue with their audio driver and hope it will be fixed. After performing the above, it was fine for me after that and several reboots.
- Transitions within FX3 are not smooth, why? Turn VSync On when using the Steam Deck. This will greatly improve the transition smoothness.
- No Audio going to the ALP – In the lower-right on the taskbar, click the speaker icon. Make sure the audio selection is for your primary HDMI (main playfield) audio device. If the Steam Deck or Backglass display is selected, you will not hear any audio going to the ALP.
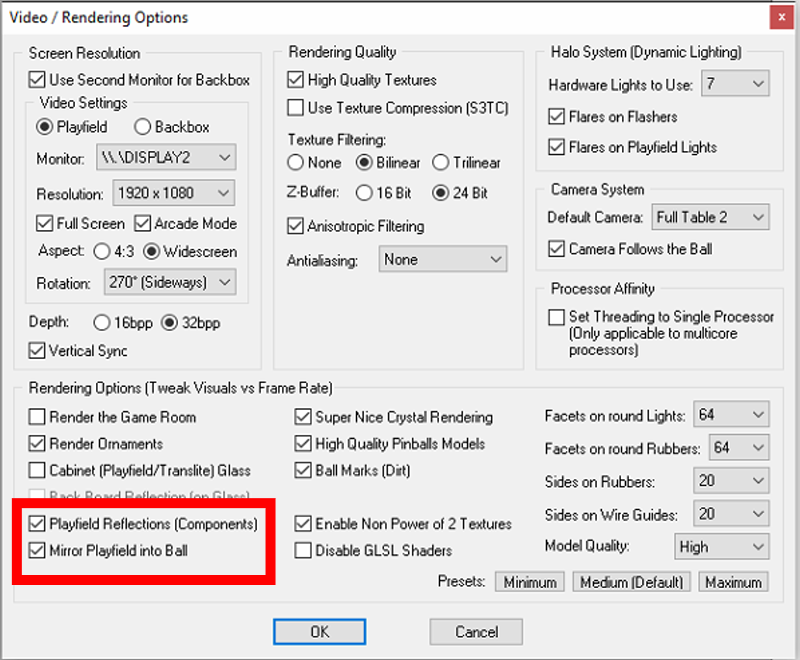
- Improve Future Pinball Performance – This tip from Mr. Terry Red:
- AMD = problems in-general for drivers ¦ not just with FP. The latest drivers causes issues for some people on the latest tables. Newer FP tables are more demanding because they use modern full 3D dynamic lighting / shadows, etc. whereas VP just uses textures for its lighting, so its not as demanding.
- Disable reflections in FP video settings. Make sure SSAO is not on in BAM settings (off by default). Be sure ray cast ball shadows are not enabled in Table Options in the tables script (my newer releases) and also not enabled in BAM menu.
- Make sure you are using the same video settings as below. If it can’t run smoothly with that, then changing anything else will cause crashes, or lighting problems.

Based on the above, changing the two highlighted options below to off (unchecked), helped significantly. Here’s how:
- Using File Explorer, navigate to [drive]:\vPinball\FuturePinball
- Launch the Future Pinball.exe.
- Select the menu option Preferences → Video/Rendering Options…
- Uncheck the following options:
- Playfield Reflections (Components)
- Mirror Playfield into Ball
Change Log
- 2023-06-23 – Corrected a link that was going to the wrong location.
- 2023-04-16 – Minor correction, mention of Steam Deck display should have been arranged on the far right, not left. Thanks Riemer!
- 2022-12-26 – See the orange highlighted section for an important update under the Install Windows. The most recent APU driver from Valve will not allow extending the display. This (older) driver will and is necessary for the playfield and backglass display to work.
- 2022-08-22 – Finally found and added a drawer to hold the Steam Deck under my ALP. See here.
- 2022-08-09 – Expanded the Sound Troubleshooting section.
- 2022-08-08 – Publicly released.
- 2022-08-05 – 2022-08-07 – Continuation.
- 2022-08-03 – Start to this guide.