Steam Deck Windows Setup Guide
Last Update: 5/17/2023
*NOTE: Official Dual-Boot with SteamOS is not yet available. Please read the section Dual-Boot with SteamOS is not yet available here. In addition, drivers for WiFi, Bluetooth and Audio drivers for the Steam Deck OLED are NOT YET AVAILABLE. the following will describe how you can install Windows to your Steam Deck on a microSD card.
Is running Windows on the Steam Deck for everyone? No, of course not. I love the SteamOS as it is and the Desktop Mode is a great feature. However, the Steam Deck is a PC and as such some are going to want to use it as a full blown Windows PC – even just to take it for a test drive. I have certain reasons why I want to use it as a PC, as you may as well. SteamOS works well, has a great compatibility layer (Proton) and can run many Windows PC games just fine. But, there are also many that it can’t and require Windows. You may also just want to pop in a microSD, boot into Windows and do some other non-gaming related tasks. I get it, that’s why the instructions below have been added to this guide.
There are unofficial procedures for dual-booting Windows + SteamOS on the Steam Deck. However, I personally prefer not to have the dual-boot option on the Steam Deck and instead run Windows from its own microSD. The obvious caveat with this method is that you will need two separate microSD’s (one for your typical SteamOS games and a 2nd for Windows). If you also prefer this approach, the instructions below will guide you through the process. When Valve releases their official method for dual-booting, I’ll document it as well. Until then, here’s how to install Windows to a microSD card.
If you find the below helpful, I appreciate your support by subscribing to my YouTube channel. It helps grow the content you find here -now including, the Steam Deck!
–Jon
How-To link to a specific section on this Guide: go to the Table of Contents (below) and click a section to reference. Copy the URL from the address-bar of your browser and paste in your video description/post/blog. This will direct a viewer to a specific section in any of the guides you find on this site.
Table of Contents
Q&A
This section will help answer some of the common questions you may have about this guide/process:
- Does this setup replace SteamOS? No, Windows runs from the microSD and the internal SSD remains untouched.
- How do I swap between Windows and Steam OS? Please see here.
- I don’t have a USB port for a keyboard and mouse, how can I add one? There are a couple of options I tested here. Scroll down to the orange table to see a summary of all 3. Using a keyboard & mouse isn’t required, but definitely makes it easier to setup Windows.
- Can I use a single microSD for Windows and SteamOS both? No, in this guide we will install Windows (exclusively) to a single microSD card. You also won’t have direct access to the Steam Deck’s internal SSD after booting into Windows (again, the Steam Deck’s internal SSD remains untouched). I recommend having two dedicated microSD cards (at least). One for Windows, the other for SteamOS. See the next question for recommendations on the card itself.
- What kind of microSD card should I get? For best performance you’ll want to consider a U3 A2 card. A2 represents the Application Performance Class and a class of 2 will provide better performance over A1 cards. A U3 card provides faster write speeds over that of U1 cards, 30MB/s vs 10MB/s. I chose this card (512GB), but pick one that is a capacity right for your situation.
- What if my PC doesn’t have an SD/microSD Reader? You can easily add a USB Card Reader, such as this one. I’ve been using it for a couple of years now and has never failed me.
- How does running from the microSD compare to the SSD? An SSD is always going to be faster. Load times for large games will take longer to start up from a microSD. However, once loaded performance is typically fine.
- I’m having trouble, please help! Start by looking for your issue in the Troubleshooting section. As I receive feedback and issues arise, I add them to this section to help the next person. There is a good chance your issues has already been discussed.
- Can I use this setup with Non-Steam Games? Yes, please see this excellent information I received from a viewer about a tool called SWICD.
- Is a license key needed for Windows? Yes, a little more information here.
- I’m completely new to the Steam Deck, where should I start? A more general Steam Deck guide may be found here. It covers a bit of information that will be helpful for new Steam Deck owner’s including: Resources, how-to’s, Tips and accessories. After taking a look around and getting more familiar with your Steam Deck, you’ll find a link on that page to bring you back here –when you’re ready.
- How durable is it to install Windows to a microSD card? That is a very good question and one I also researched before releasing this video. The answer, however, isn’t straightforward. The reality is, we don’t know. There haven’t been any actual studies (that I could find) that can answer that question. So, I looked to the SD Card foundation, the closest answer was this statement:
“What is the service life of an SD memory card? This depends on how your product in manufactured. SD standards-based memory cards, like most semiconductor cards, store information in flash memory. The current technology along with normal usage typically gives the card a lifespan of 10 years or more, allowing consumers to upgrade their devices for many years and reduce consumer electronic waste.”
But, what is “normal usage”? That isn’t clearly defined, is running Windows from an SD card normal? Possibly not, though unknown. There are many factors that come into play in this scenario, I’m sure we’ll find some SD card brands outlast others. When might we expect to have issues with an SD card used in this manner is really anyone’s guess and why this statement was added to the guide under the Prerequisites section *NOTE: It has been mentioned that performance/reliability may be a concern when installing Windows on a microSD card. While I’m not experiencing any issue, the topic requires further investigation. Until we know, we don’t know. Great question and I’ve answered as best I can.
Prerequisites
*NOTE: It has been mentioned that performance/reliability may be a concern when installing Windows on a microSD card. While I’m not experiencing any issue, the topic requires further investigation.
- Windows 10/11 PC – Needed for creating the Windows ISO image.
- MicroSD (128GB or larger) – how large of a card you need will largely depend on what you plan to install under Windows. In my opinion, a 128GB (or larger) card is recommended. I tested both a 128GB and 512GB microSD Samsung card, both worked out well. A microSD card that is a U3/A2 (such as the 512GB card mentioned) will perform better than an A1 card.
- Download 7-zip – If you don’t already have 7-Zip installed, you may want to download/install it here.
- Steam Deck– Obviously, but added for the sake of completeness.
- USB-C Dock, USB Keyboard & Mouse (recommended) – You can use the D-Pad and buttons on the Steam Deck, if needed. However, it’s much easier with an external dock connected, such as this one (there are other solutions available, this just happens to be one I tried, works well and recommend).
Create the Windows ISO file
This section describes how to create the Windows ISO file needed in the next step.
Video: See how
- You’ll first need to generate a Windows ISO image. To create the image from a Windows computer, click the link for Windows 10/11, then click here. Under the Create Windows 10 installation media section click the Download Now button.
- Launch the MediaCreationTool21H2.exe.
- Accept the License agreement by clicking the Accept button.
- Select the option Create installation media (USB flash drive, DVD, or ISO file) for another PC and click the Next button.
- Under the Select language, architecture, and edition, nothing needs to be changed, click the Next button.
- Select ISO file when prompted to Choose which media to use.
- Select a folder to create the image, i.e. your Downloads folder is fine. I named the download file Windows10.iso, then click the Save button.
- The image creation process will take a little time.
- Once complete, click the Finish button.
Create Windows MicroSD Image
In this section, we’ll create the Windows microSD image. If you currently have any additional external storage devices connected, I recommend disconnecting them before continuing to avoid accidental imaging to the wrong drive.
Video: See how
- We now need to make the microSD card bootable. To do that, we’ll use Rufus v3-19 (not the most current). Some have been having difficulty with the latest Rufus version that may be found here (A free utility that helps format and create a bootable flash drive). Download and install Rufus, preferably v3.19, the first link above.
- Insert the destination microSD card you want to use for Windows into your PC.
- After launching Rufus, select your microSD card under the Device heading. If you don’t see the microSD, try pressing ALT+F and see if it shows. If not, check the Rufus Troubleshooting section here for additional suggestions. WARNING: Be cautious and make sure the correct microSD drive is selected.
- For the Boot selection, click the SELECT button and select the location for the Windows ISO that was generated earlier in this procedure.
- Under the Image Option, select Windows to Go.
- Click the START button.
- You will then be prompted for the version of Windows to install. It’s up to you, I chose Windows 10 Pro. Then click the OK button.
- Only if installing Windows 11 – Check the option for the following:
- Disable data collection (Skip privacy questions)
- Prevent Windows to go from accessing internal disks
- Remove requirement for Secure Boot and TPM 2.0
- You will be warned that the contents on the microSD will be destroyed. If you’re sure you have the correct drive selected, click the OK button.
- This process will take a long time. Let’s use some of it to download the drivers we’ll need after the image creation has completed.
- Download the drivers listed under the Windows Drivers section here. *NOTE: If there are new drivers added which do not appear in the list below, download those also.
- APU driver – IMPORTANT NOTE: If you want the ability to Extend your Steam Deck display in Windows 10/11, the current APU driver (released Nov. 8th, 2022) doesn’t appear to support Extending, only mirroring a display. There is an older driver, APU_220520a-377788E-2206021014.zip, that does allow extending your desktop displays. I’ve used this one on Windows 10/11 for connecting multiple displays and should work. Keep in mind, this driver may crash the first time it’s installed in Windows 10 (Windows 11 seems fine), but should work after reboot.
- Wi-Fi driver
- Bluetooth driver
- SD Card reader driver
- Audio drivers (1-2)
- After downloading, the file names of the drivers should look like the following:
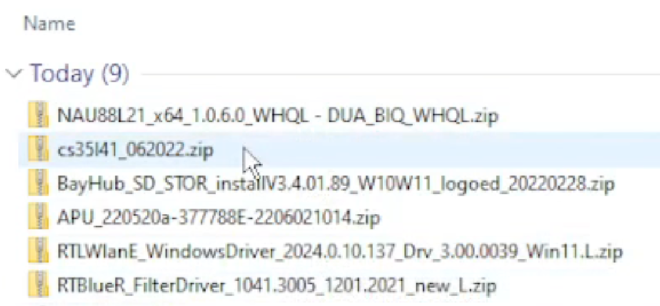
- Once the Windows image creation has completed, click the CLOSE button.
- Now highlight the list of drivers you downloaded (from image above), right click and select Copy.
- Select the microSD drive letter, at the root of the drive right-click and select New → Folder. Enter a name for the folder of drivers.
- Right-click on the drivers folder and Paste the files into the folder.
- Select all the .zip files from the download, right-click and select 7-zip → Extract Here. *NOTE – If you haven’t installed 7-Zip, you may want to download/install it here.
- Safely eject the microSD card from the Windows PC.
- Shut down/power off your Steam Deck (Press the Steam button, select Power → Shutdown).
- If there was a prior microSD in the Steam Deck, remove it and insert the new Windows microSD card you just created above.
Boot Windows
After having created the Windows image in the above step, the following will walk you through the setup process for Windows.
Video: See how
- If you have a dock and keyboard/mouse, you may want to connect it at this time for an easier setup experience. If you don’t and are looking for one, please see here.
- When turning on the Steam Deck, hold the Volume down and then press the Power button.
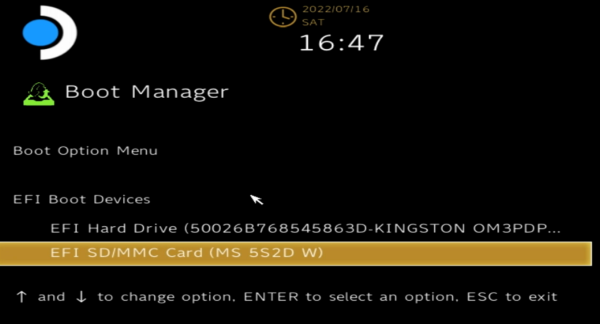
- From the Boot Manager, use the d-pad/keyboard arrow keys to highlight the microSD and A/Enter to select it.
- Windows will begin to boot up. Notice, the display will be sideways on an actual Steam Deck (we will fix this shortly) and in Landscape mode if you have it connected over HDMI.
- After Windows boots, answer the following, if prompted:
- Region → Your Region → Yes
- Keyboard layout → Your layout → Yes
- Add a second keyboard layout → Skip
- Connect you to a network → I don’t have internet (until we install the driver, you won’t have internet access. In Windows 11, internet will be available. Connect to your Wi-Fi, but still install the drivers at that step in this guide)
- More to discover → Continue with limited setup
- Windows License Agreement → Accept
- Enter a name for the user → Next
- Enter a password and Confirm → Next
- Enter Security Q/A→ Next
- Choose privacy settings (I set all to unchecked) → Accept
- Cortana prompt → Not now
Windows 10 has now been installed, however, there is no internet (on Windows 11, there is internet), Bluetooth drivers or sound. We need to install the drivers next. You’ve already copied the files to the \drivers subfolder off the root. In the following, we’ll install each of them individually.
Install Drivers
On the Steam Deck, after booting into Windows, perform the following steps to install the drivers for Windows.
Video: See how
- Open File Explorer and browse to C:\drivers where all the drivers were copied above.
- WiFi
- Open the folder RTLWlanE_WindowsDriver_2024.0.10.137_Drv_3.00.0039_Win11.L which contains the WiFi drivers for the Steam Deck.
- Double-click the Setup icon to start the installer.
- When installation completes, click the Finish button.
- Click the network icon on the Taskbar, click your SSID/Wi-Fi network name and enter your passphrase to connect.
IMPORTANT – After installing the WiFi drivers (above), run Windows Update before continuing with the remaining driver install below.
- Bluetooth
- Open the folder RTBlueR_FilterDriver_1041.3005_1201.2021_new_L which contains the Bluetooth installation script.
- Double-click the InstallDriver icon.
- APU/Video
- Open the folder \Aerith Windows Driver_2209130944\220913a-383120E-2209130944 which contains the video drivers for the Steam Deck.
- Double-click the Setup icon to start the installer.
- Click the Install button.
- When a dialog appears, again click the Install button.
- If running with an HDMI output connection, the screen will rotate. Drag the top of the AMD Software window to the left so you can see the Finish button and click it.
- You may want to right-click on the Desktop and select Display Settings. Then change the Display Orientation to Landscape.
- Then press Keep changes (if everything looks fine).
- You may also want to change the Scale and layout option from 125% to 100%.
- Audio Drivers (1/2)
- Select the menu option View → and the option File name extensions (to show file extensions). More details here.
- Right-click on cs35141.inf and select Install to install the driver. *NOTE: for the .inf files, if installing Windows 11 you’ll need to right-click and select Show More Options to see the Install option.
- Audio Drivers (2/2)
- Open the folder NAU88L21_x64_1.0.6.0_WHQL – DUA_BIQ_WHQL.
- Right-click on the file NAU88L21.inf and select Install to install the driver. *NOTE: for the .inf files, if installing Windows 11 you’ll need to right-click and select Show More Options to see the Install option.
- SD Driver
- Open the folder BayHub_SD_STOR_ installV3.4.01.89_W10W11_logoed_20220228 containing the SD Storage drivers.
- Double-click the setup.exe icon.
- When prompted, click Next.
- When prompted to reboot, make sure the Yes option is selected and click the Finish button to reboot.
Windows is now fully installed with the official Steam Deck drivers! At this point, you’ll want to do the usual things such running Windows Update and installing all patches, etc. However, you can now install any additional applications you want – in Windows on your Steam Deck!
Usage Tips
Below are a few usage tips while running Windows on your Steam Deck. It’s far easier to use a Bluetooth/USB keyboard, but often times that may not be practical. Therefore, the information below should be helpful in those instances.
Video: See how
| Function | How-To |
| Move Mouse | On the right-touch pad, you can easily move the mouse cursor. |
| Right Mouse Click | Right trigger button |
| Left Mouse Click | Left trigger button |
| Virtual Keyboard | Tap Settings → Devices → Typing → Enable the option Show the touch keyboard when not in tablet mode and there’s no keyboard attached (btw-The virtual keyboard is not that great) NOTE: May need to use the touch screen to bring up the keyboard rather than the touchpad+click. |
- Auto Login in Windows – You can find a good article here from Microsoft on how to enable automatic login in Windows. It should work fine using Windows on your Steam Deck, if you prefer.
Swap between SteamOS and Windows
Swapping between SteamOS and Windows is very easy, to make this process more clear, please see below:
Boot into Windows
- Shutdown the Steam Deck
- Press the Steam button.
- Select the Power option (bottom of the list).
- Select SHUTDOWN.
- Once powered off, insert the microSD card containing Windows (see here if you haven’t installed Windows to a microSD yet).
- Press+HOLD the Volume down button, press the power button and release.
- Select the microSD containing Windows from the Boot Manager (EFI SD/MMC Card option, or similar).
- That’s it, Windows should now begin to boot.
Boot into SteamOS
- Shutdown Windows
- Press the Start/Windows icon on Taskbar
- Press the Power icon
- Select Shutdown
- Once Windows shuts down and powers off the Steam Deck, remove the microSD with Windows. If you have a microSD formatted for use with the Steam Deck, insert it now.
- Power on the Steam Deck by pressing the Power button.
- That’s it!
Windows License
You will need a license key to activate Windows 10/11 on your Steam Deck. One place that I have used to purchase discounted OEM codes is Vipkeysale.com. I’ve purchased about 4 times, each time the keys have worked. However, I can’t verify their authenticity –I have asked, they claim they are authorized. Whether or not you choose to use them is ultimately up to you, of course.
Steam Deck Accessories
If you enjoyed this guide, there is much more to explore on the main Steam Deck guide including these Steam Deck Accessories that I think you’ll enjoy!
Troubleshooting
- I’m getting a blue screen when installing the cs35I41 audio driver in Windows 11, why? This issue appears to have been corrected by a new driver released by Steam on Oct. 10th 2022. The following should no longer be an issue but will be kept here temporarily as a precaution: Microsoft released, on 9/20/2022, an update for Windows 11. This update doesn’t play well with the current cs35141.inf audio driver (1/2) provided by Valve. Until the driver is updated, skip over this one (for now), if installing Windows 11 to the microSD.
- I want to use multiple displays, but the current APU/GPU driver doesn’t allow it. What can I do? There is an older driver, APU_220520a-377788E-2206021014.zip. I’ve used this one on Windows 10 for connecting multiple displays and should work. Keep in mind, this driver may crash the first time it’s installed, but should work after reboot.
- Reboot when installing APU/GPU Drivers – With the recent SteamOS 3.3 update, installing the APU/GPU drivers in Windows may result in the Steam Deck rebooting during the driver install process. The driver install seems to complete ok prior to the reboot, so just continue with the remaining driver installs. Hopefully Valve will correct this issue soon. *NOTE: Created this thread to make sure Valve was aware of the issue and to hopefully get this issue resolved.
- Black Screen after installing the APU Drivers – Make sure the Steam Deck is on the latest stable channel. Install the Wi-Fi and Bluetooth drivers, then update Windows to the 22H2 update. Then, install the APU drivers. This tip from MastaGambit
- Bluetooth not finding any Devices – You may encounter the InstallDriver.cmd doesn’t work correctly. Manually go into the x64 folder, right-click on the .inf file and click Install and reboot. This should resolve the issue.
- Difficulty with Rufus – Please see the following suggestions if you’re having difficulty with creating the Windows image:
- If you don’t see the microSD – Try pressing ALT+F and check if it shows then.
- Try a different microSD-USB card reader – There is one confirmed report that using a different reader corrected the problem of receiving an error while using Rufus. Thanks to viewer Ramble for this tip!
- Temporarily Disable your Antivirus – If you don’t have a different microSD-USB card reader, you can try disabling your antivirus to see if it’s interfering with the write process. Definitely re-enable it when done, infact you may want to disconnect from the internet during that time just to be safe.
- I’m getting an error that states “Error: [0xC003045D] The request could not be performed because of an I/O device error” – check that the write-protect notch on your SD/microSD adapter isn’t in the locked position.
- If all else fails, try the install from a different computer – I’ve had one report where one PC worked and the other didn’t. It might have been the SD card reader that was the problem. At any rate, another option to try.
- MicroSD card not showing in Rufus’s Device Listing – Try selecting Advanced Drive Properties and then select List USB Hard Drives. This may then show the microSD card. Thanks to Nirmanakaya for this tip!
- Windows is slow/sluggish or overall poor performance, is there a fix? Typically, if you’re using a U3 A2 card as mentioned in the Q&A section above, it will be fine. However, one viewer mentioned his issues were related to the clock not being set properly in Windows. It’s certainly something easy to adjust and see if it corrects the problem.
- XBox Game Pass isn’t working from the SD card, why? This tip from DerelicMan: XBGP games will not start if your clock is not set correctly.
- [Mac only] I’m getting a Missing Drivers error on a Mac, why? If the Windows .iso file is on a shared drive and you try to create a boot disk, it will create an installer disk instead. Move the .iso to your virtual machine’s C: drive instead, then follow along above. *NOTE: This tip is from a Mac user, I don’t own a Mac.
Viewer Recommendations
The following recommendations are from viewers that have provided some exceptional information that you may find helpful. The information here was found in the video comments and copied to this guide to make it easier to find. Some grammatical and formatting changes were made but largely remain identical to the original. Thank you to everyone who has provided additional information/recommendations to help the community!
*NOTE: I may not have personally tried what is mentioned below at this time.
Miketheratguy Gaming
- If you install Windows on your Steam Deck, you can then install the SWICD driver to make Windows treat your Deck as a game controller without the need to use Steam at all [Credit: Miketheratguy Gaming] – I found something great and want to stress it: The SWICD driver. It’s a new driver that makes the copy of Windows that you’ve installed onto the Deck treat the Deck as an actual gaming controller without any need for Steam or other third-party programs.
I’ll explain: Say you want you play RE7 (Resident Evil 7) but have a Windows copy (legit or otherwise), not a copy purchased through, and thus recognized by, Steam. Normally, if you’ve followed this excellent tutorial and installed Windows onto your Deck or Micro SD card, what you’d have to do (which is also demonstrated in this video) is install the Windows version of Steam, tell it to add your RE7 executable as a “non-Steam game”, then run it THROUGH Steam to play it. That’s because Windows does not natively recognize that it’s being run on the Steam Deck, it doesn’t know what a Steam Deck is. Windows thinks it’s being run on a physical computer, so unless you’ve plugged a controller into this “computer” Windows will just assume that anything you play will be operated through mouse and keyboard. Steam tries to take care of that with its built-in (if somewhat confusing) virtual controller overlay which tells Windows that the buttons on your Steam Deck are actually the keyboard keys needed to operate the game.
SWICD does away with all of that. Once you’ve installed Windows, you then download and install the SWICD driver msi here. While it’s running, Windows will be tricked into thinking that you’ve physically plugged an actual Xbox 360 controller into the “computer” that it’s running on. Now, you just launch your Windows copy of RE7. No adding to Steam, no playing through Steam, no need to even install Steam. You just launch the game. The game, like Windows, now recognizes the Deck in your hand as an actual gaming controller. Instead of saying something like “press ESC to exit”, the game will now say “press the B button to exit”.
SWICD can be turned on or off at any time, and you can customize its layout to whatever you want (including saving specific layouts for specific games, if you want). You can switch the L and R triggers, assign functionality to the STEAM and back buttons (for example I have the STEAM button act as the Windows key, meaning that if a game freezes or something I can always hit a physical button to go back to the Windows desktop rather than restarting the device). Whatever you want. The config is saved in your documents folder. Just make sure to switch “disable lizard mode” (look it up if you like) to TRUE in order to avoid virtual keyboard conflicts, and you shouldn’t have much trouble.
Toasted Synapse Gaming
[Credit: Toasted Synapse Gaming] – After following your tips to the letter and getting my own installation of Windows 10 + Drivers (mini-tip: you can totally do it all through touchscreen – no keyboard required) I spent a couple of days looking for more useful stuff and here’s what I came up with.
I’m just hoping this post helps people (as well as you, Wagner, if you want to further expand your article):
- Use a good quality/speed microSD card – I though I would cheat a little and use an old U1 SD that I bought for a phone a way back. Well, things went relatively fine (although they took like 5 times more) but Windows kept freezing when I was navigating the folders to install my drivers. The card just couldn’t handle it. Then I got a SanDisk Extreme Pro U3 and A2 (Extreme without the Pro also works fine, I just found mine that had a discount and it was only a few bucks more for the Pro version so why not). You definitely need the U3, but for a bit more you can search for the A2 label which (from what I’ve heard) allows the card to read/write simultaneously (2 lanes or whatever technical jargon applies). Definitely not necessary for storage on your phone, but you can imagine that it’s important for an Operating System that reads and writes constantly (and simultaneously). So it doesn’t have to wait for itself to finish writing before it starts reading and vice-versa.
- Sleep/Wakeup – It’s cool when SteamOS sleeps and wakes up seamlessly when you press the power button. You can have a similar experience in Windows if you do the password trick in the article + going into Sign in options and tell it to Never ask for a password when waking up from sleep (of course have the power button toggle Sleep – which should come as default in the Power Options). Haven’t tested it in many games, but for other applications it works great.
- Click to open On-screen Keyboard – Your article had a nice tip for Windows to open the onscreen keyboard when a text field is detected, but this doesn’t always work (I guess some programs forget to send the info that they have a text field where you clicked). Not a problem, very easy:
- Long press (or right click) on your clock bottom right and enable Touch Keyboard.
- An icon will be placed next to your clock on the start bar and it’s there for whenever you need it.
- If a program doesn’t pop it up automatically, just click the icon and it works.
- SWICD – This is a program that makes it so that your Steam Deck controls actually register as a controller. Just like if you plugged in an Xbox controller right now in your PC. A little chime will sound and you can now see your Controller and test the inputs in the Game Controllers in Control Panel. This is great for games, but to get a full experience you will need to install the Steam client for Windows. Steam will see that you have a controller plugged in and will offer you some options that you can tweak. I won’t go into much detail, because you’ll definitely need an article to follow with links and stuff (don’t worry there are like 5-6 steps and once you do this, as long as you have both SWICD and Steam open at Windows Startup you will be golden). Bottom line is that games that support a controller will immediately recognize it and display the proper prompts on screen.
- You even get the Xbox Game bar when pressing the Steam button. Actually useful for alt-tabbing out of games since you don’t really have alt+tab without a keyboard (by opening the GameBar and tapping settings up top which will have a button below for Windows Settings, effectively alt+tabing you).
- Furthermore (I haven’t experimented a ton with this) you can get the Steam onscreen keyboard while you’re in a game that will require you naming something. Same as with SteamOS, just press Steam+X since they are linked, it works. You do have to press Steam again right after that to get rid of the Game Bar that pops up, but now you can double finger type on the trackpads. I think it only works if your games are in Borderless Window and not Exclusive full-screen. Windows will treat that additional window (the steam keyboard) as something it wants to ALT+TAB to, not have above the game. That’s not helpful. Again€¦ haven’t tried this out with every Windows game I have, but as far as I know, the only option of actually typing something into a text field from a game that is played with a controller (except of course having a Bluetooth keyboard near you all the time).
- Fun fact: Before SWICD the method for making this work was to install a program and tell it to see notepad (yes, Windows notepad) as a game. Then add notepad in Steam and make sure you always open notepad from Steam before starting any other game. It’s much more elegant with SWICD that just starts and is ready when Windows starts.
- Antimicro (Windows’ version of Steam Controller Layout) – So you’ve added SWICD and enjoy your games that have controller support, but what about games that don’t and were designed for mouse/keyboard? You could go into the guts of SWICD and Steam and try and rebind stuff, but it’s best to leave them as they are, because this method is easier and much nicer. You bind your controls further with Antimicro (a free and powerful program with a nice interface). Reminiscent of how you would go about customizing your Steam Deck while playing games on SteamOS: You’ll see your controller laid out with each button interactable. Click a button and bind it to whatever keyboard key or mouse movement/key you want (there are even some presets for W/A/S/D + shooting and others). You can even create action sets that you can switch between (so you can basically play MMOs that require 60 buttons if you want). It has custom 8 axis deadzones that you can apply to your sticks (like at what point does W and A become W+A pressed together) and many more. It’s fun to explore (I haven’t even scratched the surface). Of course, as you press the buttons and move the sticks it tracks it and shows you live how it treats the input and you can save multiple profiles to be used in different scenarios/games.
- Tablet Mode – This is actually the last thing I’m testing right now (after I’ve done everything else), but yeah, basically in the Win10 right sidebar where you have your brightness, nightlight, Bluetooth toggles, you also have Tablet Mode (you can also hold click on it to bring you to the options where you can set it to start in tablet mode when Windows boots up). Basically gets the Windows experience to look more like a console experience. If you right-click and Pin to Start everything that you find important in your daily Windows usage then all those shortcuts will appear there. And you can even customize them in categories. It’s much nicer to single click or “tap” (like on a tablet, lol), no double-clicking required. It’s easy to get used to and I find it nicer for the Steam Deck (although that’s just personal taste I guess). You can always toggle it on or off. Important tip → Long press (or right click the bottom taskbar) and Show all notification icons, because for some reason it simplifies them and doesn’t hold the same icons you’ve set while not in Tablet Mode. You will want to see if SWICD/Steam are running.
- Steam and Big Picture options (for Desktop navigation just like in SteamOS Desktop mode) – I don’t know about you, but when I first entered desktop mode in SteamOS’ Linux I wanted to personalize my experience. Have mouse click for both the left and the right bumper/trigger, customize my scrolling, A/B/X/Y for YouTube full-screen/pause/etc. (you can find videos online – best done in Big Picture since it’s nicer to work with). Well, there’s basically nothing stopping you from doing the same within Windows. If you have SWICD and Steam setup properly, then Steam will see your controller as viable and give you the option of customizing it. It’s even able to search the cloud for the config you did in SteamOS if you exported it there so navigating Win10 won’t seem so different from Steam Linux Desktop mode. It’s in Big Picture → Settings (cogwheel) → Controller Base Config → Desktop.
- Reboot in whatever OS you want if you’re somewhere you’re afraid you might drop your SD and lose it – There’s no need to take your Win10 SD out if you want to swap back to SteamOS. Just shut down Windows, then press VOL Down+Power (just like you did for the install process). You will see Windows as the first option and SteamOS as the second, navigate to it and press A. Keep your SD safe inside (option won’t probably apply to people that have their SteamOS games on another SD and they have to indeed swap it after shut down).
- Fun tip – SteamOS Desktop mode can access and read fine from your Win10 SD. Maybe helpful if you have some files that you want to transfer over from Steam internal to Win10 or vice-versa.
[ Toasted Synapse Gaming ] Hope this was helpful. I just though of it as my way of giving something back after you’ve helped me start on this Win10 path in the first place 🙂
[ Wagner’s TechTalk / Jon] Very helpful, thank you TSG! I think that many using the guide will find your additional tips extremely valuable. I’ve only made slight edits to your original video comment above and formatting to clarify certain points for this guide.
Mac Setup
First, I don’t own a Mac [WTT] and unable to assist any further beyond what is written below. However, the information was received from a viewer that has allowed me to post what they did to follow the instructions above on a Mac. All credit goes to vadim s for this helpful information:
Well, that took a bit more time than I expected but I got it to work. My setup: Parallels 17.1.4 + Windows 11, M1 MacBook pro (16-inch, 2021), Monterey 12.2, SanDisk ultra 512gb A1 microSD card. Following your directions, I made a windows 10 iso file but ran into the iso image extraction error right away. I thought it was a problem with the card, as I had some problems detecting it and had several crashes (which has never happened on this m1 doing anything). Thought I bricked it, but got it re-initialized on the mac. Then I finally figured out I had to use an earlier version of Rufus and got it to work with 3.18. After that, everything else went well according to your instructions. I installed Steam and my test case was GTA5. It took a considerable amount of time to download/install and verify but finally got there after a couple of crashes. The game looks great and seems to be running well. The only thing I’m a little lost on right now is how to configure the steam deck controls for the game, since its set up for keyboard/mouse out of the box.
[WTT] The above information should help Mac owners. In regards to the last point on how to configure Steam Deck controls for the game, this may help.
Change Log
- 2024-05-17 – Additional edits regarding Steam Deck OLED drivers not yet available.
- 2023-12-24 – Minor edits.
- 2023-02-08 – Additional troubleshooting item added relating to the clock.
- 2023-01-31 – Minor updates and corrections.
- 2022-12-25 – Updated Troubleshooting section with an APU driver that should work for multiple displays (older driver).
- 2022-12-13 – Updated SWICD link.
- 2022-12-03 – Updated the APU Driver driver name that was changed.
- 2022-11-15 – Updated the Troubleshooting with a new potential issue.
- 2022-11-06 – Minor edits; additional Q&A added.
- 2022-10-16 – Removed mentions of the cs35l41.inf driver causing a blue screen in Windows 11. A new driver was released by Steam that appears to have corrected this issue.
- 2022-10-09 – Added an additional Mac issue reported in the Troubleshooting section.
- 2022-09-28 – Q&A section updates.
- 2022-09-27 – Added Mac Setup section.
- 2022-09-21 – Added information regarding Windows 11 22H2 update.
- 2022-09-19 – Added additional Q&A point regarding the durability of using a microSD card or running Windows.
- 2022-09-17 – Added additional points to the Viewer Recommendation section.
- 2022-09-14 – Added a new Q&A section; updated some sections to clarify for Windows 11 installations.
- 2022-09-12 – New trick learned for Rufus and added.
- 2022-09-05 – Minor edits/clean up.
- 2022-08-31 – Added an additional Usage Tip, for automatic login, as requested.
- 2022-08-28 – Updated the Troubleshooting section with additional feedback; Added the Viewer Recommendations section.
- 2022-08-25 – Minor updates.
- 2022-08-23 – Updated the Driver Install section to recommend updating Windows after installing the Wi-Fi drivers.
- 2022-08-21 – Updated the Troubleshooting section with additional feedback.
- 2022-08-13 – Added APU/GPU Reboot issue to the Troubleshooting section. Added additional Rufus solution to the Troubleshooting section.
- 2022-08-09 – Moved the Windows install to a microSD to it’s own guide.