AtGames CoinOpsX Guide (saUCEy Edition)
Last Update: 3/1/2023

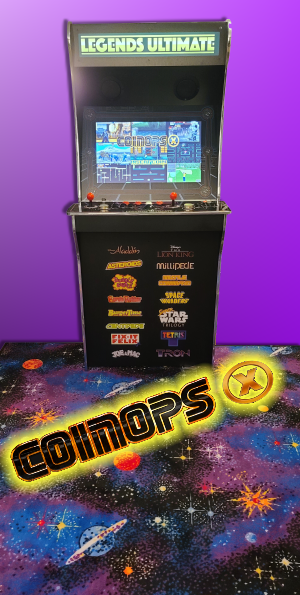
CoinOpsX is a great way to play even more of your favorite Arcade classics on the AtGames Legends Pinball (ALP) and AtGames Legends Ultimate (ALU). This guide will step you through the setup and installation of CoinOpsX. However, by “saUCEy” edition, that means it includes roms. I can’t provide any links to roms, bios, etc. (see why here).
How-To link to a specific heading on this page: go to the Table of Contents and click a section to reference. Copy the URL in the address-bar and paste in your video description/post/blog. This will direct a user to a specific section.
Table of Contents
Prerequisites
The following are some things you’ll need before you can begin:
- USB Stick – You can use any 128GB (or larger) USB stick you prefer. I ordered the SAMSUNG FIT Plus 256GB USB 3.1 Flash Drive primarily due to it’s low profile form-factor and Samsung reliability.
- Download the AddOnX tool – You will need to download the AddOnX tool to setup CoinOpsX. This link will take you to the AtGames release notes, look down a little ways for the AddOnX tool link.
- Download Coinops X Arcade Version 5 Is Alive (Saucey Edition) – You’ll have to locate the download yourself. As a hint, using your favorite search engine you may be able to locate it using “Coinops Arcade V5 download”. The main download is ~65GB in size, you may get better speeds by downloading it via a torrent client. Make sure you also download the fixes as indicated with “Add items…” at the start of the filename.

- Download and Install 7-zip – You can use this free application to unzip the archives, if needed.
Resources
- Fans Of SaUCE Subreddit – Subreddit for discussing CoinOpsX and related information.
- AtGames Legends Pinball Product Page – Product information for the AtGames Legends Pinball.
- AtGames Legends Ultimate Product Page – Product information for the AtGames Legends Ultimate.
Prepare USB Drive
The following will assist you with the steps for setting up CoinOpsX Arcade Version 5 to a USB drive :
- Download & copy the following files to a subdirectory on your PC (Example: [drive:] \CoinOpsX )
- CoinopsX Arcade Version 5 is Alive Saucey Edition.zip
- Add items inside to cox-custom folder_New Cab Art 4_20_21.zip
- Add items inside to cox-custom folder Updated Cabs Arts 4_20_21.zip
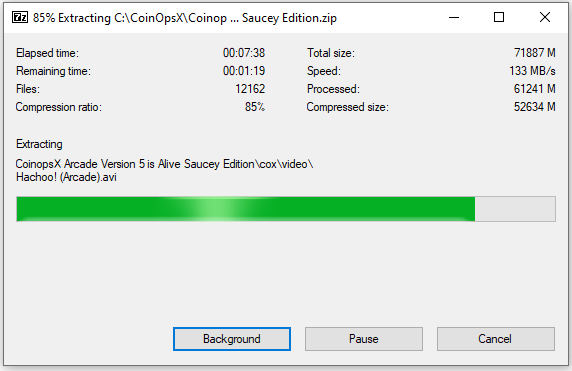
- Right click the largest of the files, CoinopsX Arcade Version 5 is Alive Saucey Edition.zip, using 7-zip and select Extract Here. *NOTE: This may take 20-30 min. to extract, so go ahead and begin the unzipping!
- Insert your USB stick / flash drive into an available USB port on your PC (3.x port if you have one).
- Click the Windows 10 Start button and type Disk Management and then click the result for Create and format hard disk partitions.
*NOTE: Be very careful and follow these steps exactly. If you format the wrong drive, you can lose everything on your PC!
- Locate your USB drive, should state Removable … GB, the size will depend on the size USB drive you’ve attached to your PC. I recommend not having any other USB storage devices connected to your computer during this step to avoid any confusion/mistakes.
- Right-click on the drive, and select Delete Volume… and click Yes (again, triple-check it’s the correct drive!)

*NOTE: If you will be using a Legends Pinball 1.1, Legends Ultimate 1.2, Legends Ultimate Mini 1.1, Legends Pinball Micro 1.0 or Legends Core Max, you only need a single partition created for CoinOpsX. If you are not sure what version device you have, see here to identify the UUID (device id) of your machine. That is, skip the FAT32 partition creation mentioned below and only create a single exFat partition for those machines. The reason, these machines already have flash storage and the Flash Drive X application isn’t necessary.
- Next, we’ll create two separate partitions on this drive (see NOTE above, only one exFat partition is needed for more recent devices). The first will be for Flash Drive X, the other for the CoinOpsX (the games).
- Right-click in the Unallocated section of the USB drive and select New Simple Volume…
- Click Next.
- For the Simple volume size in MB, enter 16384 (to create a 16GB partition) or 32768 (to create a 32GB partition). I created a 32GB partition for use with a 256GB USB stick (32768). However, if you’re using a 128GB USB stick, to go with 16GB (16384). This partition will be used for running applications such as: CoinOpsX, PixelcadeX, Pinball Tables, etc.
- Then click Next (no need to change anything on the Assign Drive Letter or Path dialog).
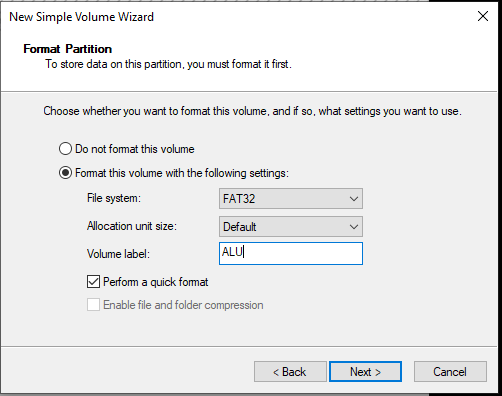
- Now on the Format Partition dialog, select FAT32 for the File system.
- Click Next.
- Double-check the settings are correct, click the Finish button to the Completing the New Simple Volume Wizard.

- For the remaining Unallocated space, right-click in that box and select New Simple Volume…
- Click Next (dialog states Specify Volume Size – no changes here).
- Click Next (Assign Drive Letter or Path – no changes here)
- Click the drop-down under File system and select exFat. You can assign a Volume label if you prefer, such as “ALP”, “ALU” or leave it as “New Volume”. Doesn’t matter.
- Click Next.
- Double-check the settings are correct, click the Finish button.
- Take note as to which drive letter is the exFat partition (NOT the FAT32 partition). That is the drive letter you’ll want to use to copy the CoinOpsX files to.
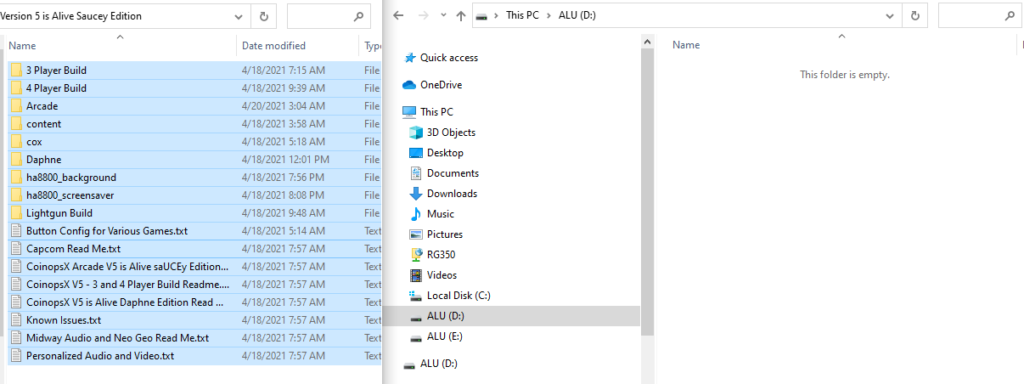
- Select all (CTL+A) of the files from the [drive:]\CoinOpsX\CoinopsX Arcade Version 5 is Alive Saucey Edition sub folder and copy them (drag and drop) to the root of the exFat drive letter. This step may take ~40 minutes, go grab your favorite beverage and come back later.
- For the files that begin with “Replace these items…”, copy the contents of those folders over the files on your USB drive. For example:
- Replace these items in cox-logo folder → go to [USB Drive:]\cox\logo
- Replace these items in cox-marquee folder → go to [USB Drive:]\cox\marquee
- Replace these items in cox-video folder → go to [USB Drive:]\cox\ video
- For the files that begin with “Add items inside…”, first extract those archives using 7-zip. Then copy them to the associated location on your USB drive. For example:
- Add items inside to cox-custom folder Updated Cabs Arts 4_20_21 → go to [USB Drive:]\cox\custom
- Add items inside to cox-custom folder_New Cab Art 4_20_21\New Cab Art → go to [USB Drive:]\cox\custom
- That completes this section. You may delete or back up the source files from [drive:] \CoinOpsX which was used to prepare the USB drive, if you wish. At this point, you’re done with this step and may close out of any open explorer windows.
- See the next section, Run the AddOnX tool.
Run the AddOnX Tool
Now that your USB stick has been prepared with the needed files, you’ll run the AddOnX tool against USB drive.
- If you’ve not already done so, download the AddOnX Tool from here.
- Launch AddOnX Tool.
- Click the Choose button and select the USB drive which contains the files you just copied (the exFat partition).
- Click the Build button.
- The build process will take a bit of time (~40-90 minutes), so go grab another drink or hit the restroom from your last one.
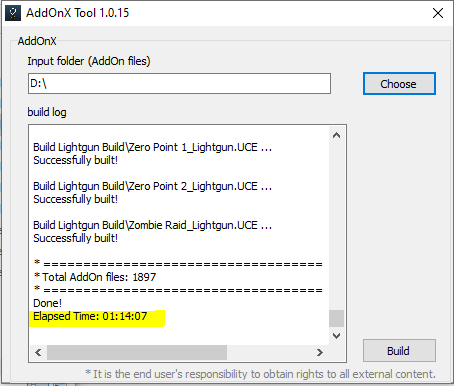
- When complete, click the exit button in the upper-right and proceed to the Setup Flash Drive X Step below.
Setup Flash Drive X
*NOTE: If you will be using a Legends Pinball 1.1, Legends Ultimate 1.2, Legends Ultimate Mini 1.1, Legends Pinball Micro 1.0 or Legends Core Max, you only need a single partition created for CoinOpsX. If you are not sure what version device you have, see here to identify the UUID (device id) of your machine. That is, skip the FAT32 partition creation mentioned and only create a single exFat partition for those machines. The reason, these machines already have flash storage and the Flash Drive X application isn’t necessary.
The following will step you through the setup on your AtGames Legends product:
- Insert the USB drive into the USB 3.0 port on your machine (the USB port that is blue in color).
- Watch the upper-right of the main display and make sure the USB stick is a solid image (not flashing).
- Navigate to the Settings tab (top of the screen) and locate/launch the Flash Drive X tile.
- Once loaded, you’ll want to select the Format button. It will know to format the first partition you created (the 16/32GB FAT32 partition). The files that you copied and built using the AddOnX Tool will remain intact.
- After selecting Format, select Yes.
- When done, click on Dismiss.
- Now click the Mount button to activate the USB drive on the arcade platform.
- Click Yes to mount.
- When done, click on Dismiss.
- Back out of Flash Drive X.
AppStoreX
After performing all of the steps above, make sure you are logged in to your Arcadenet account. Then proceed with the following:
- Navigate to the AppStoreX tab at the top.
- At this point, you can download any applications such as pinball tables (assuming you have purchased and applied the redemption code – see here for assistance with redeeming a code), pixelcade, etc.
- At this point, Select CoinOPSX and click on Install.
- Once installed, click Close.
- Now turn the power off to your machine and back on. *NOTE – If you skip this step, you will get an error.
- Once powered back on, return to the AppStoreX tab and launch CoinOpsX.
- Now, have fun playing CoinOpsX on your AtGames product!
Basic Operation
The following will assist you with navigating games once the USB stick has been installed in your ALP/ALU. Also, see the .txt files included with the download for more details.
CoinOpsX Reference Card
Click the image below to download a PDF file to allow printing a CoinOpsX Reference Card. Cards included: Legends Pinball (with Arcade Control Panel), Legends Ultimate and Legends Ultimate Mini (vertical).
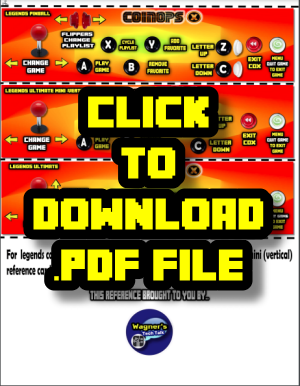
Tip: on the Legends Ultimate Mini, you may be able to slide the reference card between the Marquee and the cabinet (fits well here).
*NOTE: I would like to credit skyler on this thread for the awesome idea of creating reference cards for each device.
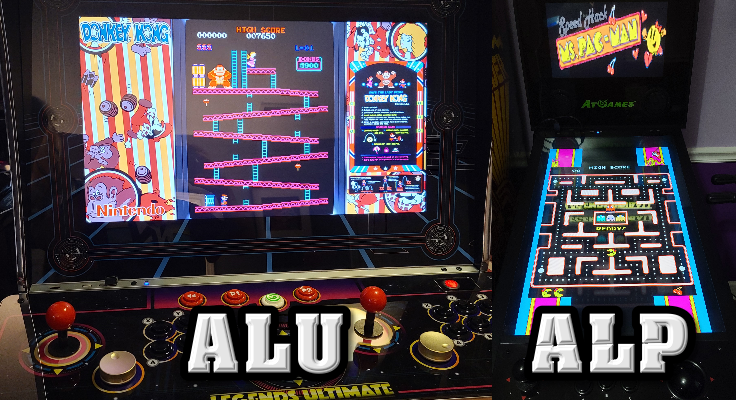
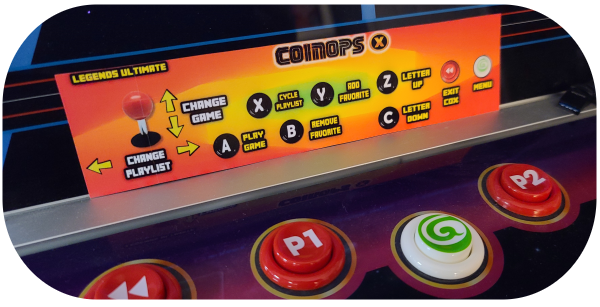
ALU
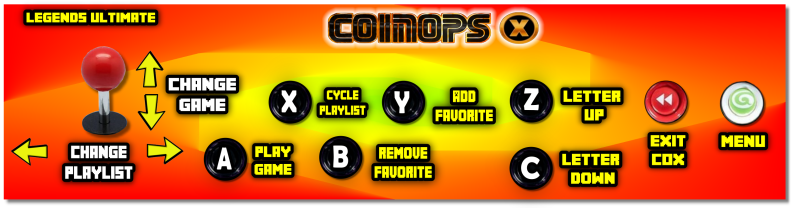
- Exit CoinOpsX – From the game list, press the REWIND button.
- Exit a Game – Press the Menu (or AtGames) button and select Quit Game.
- Page a letter at a time – Press Z / C on the ALU.
- Start a 1 Player Game – On the ALU press the P1 button twice (insert a credit and start the 1P game).
- Start a 2 Player Game – On the ALU press the P2 button.
- Scroll through game list – Press (or hold) the Joystick ↕ (up/down).
- Scroll Categories of games – Press (or hold) the Joystick ↔ (left/right) – See list of categories below.
ALP (with Arcade Control Panel)
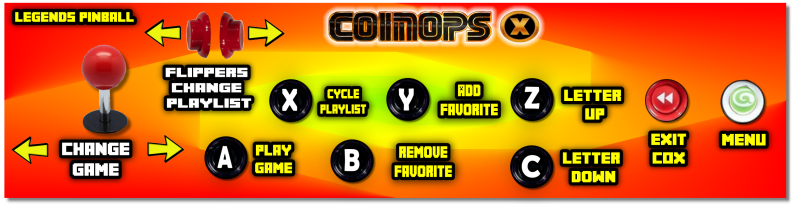
*NOTE: For some games such as Donkey Kong, Donkey Kong Jr. you’ll need to hold the Joystick in the down position and press Play to start the game (at the same time) on the ALP.
- Exit CoinOpsX – From the game list, press the REWIND button.
- Exit a Game – Press the Menu (or AtGames) button and select Quit Game.
- Page a letter at a time – Up = Right Flipper / Down = Right Nudge
- Start a 1 Player Game – Press the Play (Select) button twice (insert a credit and start the 1P game).
- Scroll through game list – Press (or hold) the Joystick ↔ (left/right)
- Toggle Game Categories – Press the X to toggle categories. It’s not always obvious on the ALP what category you have selected (may want to avoid pressing X). You may see Light Gun, 3 Player, etc. at the top but not in all cases. If you see “005” when changing categories, you’re likely at the All Games listing. Try paging (Right Flipper / Right Nudge) to see if there are any letters being skipped, if so then press X until you see “005” again. *Note – On the ALU the category is visible at the bottom, but not as clearly visible on the ALP.
ALP (no Arcade Control Panel)
My control panel is installed, please let me know if any of the following is incorrect here. I’ll update this section with your findings. I am making an assumption below:
*NOTE: For some games such as Donkey Kong, Donkey Kong Jr. you’ll need to hold the DPad in the down position and press Play to start the game (at the same time) on the ALP.
- Exit CoinOpsX – From the game list, press the REWIND button.
- Exit a Game – Press the Menu (or AtGames) button and select Quit Game.
- Page a letter at a time – Up = Right Flipper / Down = Right Nudge (or Z / C)
- Start a 1 Player Game – Press the Play (Select) button twice (insert a credit and start the 1P game).
- Scroll through game list – Press (or hold) the DPad ↔ (left/right)
- Toggle Game Categories – Unknown.
Game Categories
When pressing the Joystick ↔ (left/right), you can scroll through the following categories. You’ll see the category listing in the lower-middle of the screen. The table below includes all categories in CoinOpsX (arranged left-right in the table).
| All Games | Favorites | Last Played | What’s New |
| Arcade Classics | Old School | Co-Op | 3-Player |
| 4-Player | Daphne | Beat ‘Em Up | Fighting |
| Light Gun Games | Maze | Platform | Puzzle |
| Racing | Run ‘N Gun | Shoot ‘Em Up | Spinner |
| Sports | Trackball | Twin Stick | Vector |
| Vertical | Ball & Paddle | Atari Classics | Capco Classics |
| Cave Classics | Data East Classics | irem Classics | Konami Classics |
| Midway Classics | Namco Classics | NeoӢGeo | Nintendo Classics |
| SNK Classics | Sega Classics | Taito Classics | Williams Classics |
Animated BitPixel (LED) Artwork
While BitPixel LED Artwork will be available after installing PixelcadeX, few of them are animated. If you would like to add additional animated artwork to your BitPixel LED (i.e. NOT BitLCD), check out this page from the Pixelcade team.
Clone an Existing USB Stick
Recently I wanted to clone my existing ALU USB stick for use with a new Legends Gamer Mini. Below are the steps I used to accomplish this, it was a bit easier than going through all the steps above a 2nd time. While it may not appear that way given the sub-steps shown, it actually is less effort and faster.
- Unmount the USB stick/thumb drive from your ALU/ALP, etc.
- Remove the USB stick from the machine and insert it into your PC.
- Now Create the Backup image of the USB drive.
- Once the backup is complete, you may then Restore the Backup image to the new USB stick.
- If the new USB stick is a larger capacity than the original, you can Expand the CoinOpsX partition to make use of the additional capacity.
- Remove the new USB drive from your PC and insert it into your new ALP/ALU/Gamer Series device, etc.
- Setup Flash Drive X (FDX) as described here.
- Power off the machine and power it back on.
- Now, simply re-install any additional pinball tables, applications (CoinOpsX), etc. to your USB drive as normal.
Troubleshooting
This section will cover issues that are identified and how to resolve them.
- Can’t start certain games on the ALP – For some games such as Donkey Kong, Donkey Kong Jr. you’ll need to hold the Joystick/DPad in the down position and press Play to start the game (at the same time).
- Are AtGames Flash Drive X drives interchangeable? In short, No. The Flash Drive X partition is tied specifically to each machine, the games partition isn’t. To move the games from machine-to-machine you could re-run Flash Drive X, re-install CoinOpsX anytime you want to swap machines. However, that may be a bit of a pain. It would be ideal to have a dedicated USB drive for each machine.
- When running CoinOpsX I don’t see any artwork, why? Make sure when you extracted the archive that there are no sub-folder names repeated. If you see duplicated folders within folders such as: \cox\cox … [files]. Move the duplicated sub folders up to the root and re-run AddonX Tool.
- AddonX Tool terminates before completing, why?I ran into this issue as well. In my case, disabling my Antivirus and re-running took care of the issue. Just remember to re-enable virus scanning once complete.
Credits
- Credit for much of this guide goes to the PattonPlays YouTube channel (video here).
Change Log
- 2023-03-01 – Added some troubleshooting items.
- 2023-01-01 – Formatting updates, added BitPixel LED Pixelcade animated artwork section.
- 2022-09-20 – Updated guide to reflect newer devices with built-in flash storage.
- 2022-07-08 – Minor edits.
- 2022-03-12 – Added printable CoinOpsX Reference cards here.
- 2022-02-22 – Mention of the WOPR guide availability.
- 2021-09-21 – Added how to clone an existing USB Drive (make a copy for use on another AtGames device).
- 2021-08-14 – Preparation for the new ALU guide.
- 2021-08-10 – Minor updates. Troubleshooting updates.
- 2021-08-02 – Broke out the ALU / ALP+Control Panel / No Control Panel into separate sections based on feedback.
- 2021-08-01 – Added the Basic Operation section and Game Categories.
- 2021-07-31 – Initial page creation.