ALP Pinball FX3 Setup
*NOTE– Zen has released Pinball FX (latest version), you can find the Pinball FX guide here. If you’re installing FX3 to your Legends Pinball 4K, please see this section for 4K-specific settings.
All AtGames Guides
Main Legends Pinball Guide
Last Update: 3/3/2024
This guide will assist you in setting up Zen Studios Pinball FX3 games on your AtGames Legends Pinball (ALP). I’ve been playing Zen Studios pinball games for many years and on many different devices. My first experience with Zen tables was on an XBox 360. I purchased many tables on that platform, including Star Wars, Marvel and most of the Zen titles as well. However, none of those prior purchases can be transferred to the PC (no cross-buy).
That said, I was happy to learn that using a PC/Laptop with the ALP will allow you to play those games on a virtual pinball cabinet. While I did have to re-purchase those games in Steam, it was worth it to me to be able to play those games on a virtual pinball cabinet. Below is a guide to help you get setup with FX3 on your ALP!
It is a lot of work creating and maintaining the guides on this site. I appreciate any support from the community by subscribing to the YouTube channel. Commenting on/and liking the videos all help tremendously in growing the content you’ll find here. –Jon
How-To link to a specific section on this page: go to the Table of Contents (below) and click a section to reference. Copy the URL from the address-bar of your browser and paste in your video description/post/blog. This will direct a viewer to a specific section in any of the guides you find here.
Table of Contents
Resources
- All Pinball FX3 Games Available on Steam – Downloadable Content (DLC) Pinball games from Zen Studios.
- Cabinet Code Request Form – Fill out this form to request a cabinet code.

Own a Steam Deck?
See: Steam Deck with Legends Pinball Guide

Ever since receiving my Steam Deck, I’ve been interested in finding out if it can be used with the AtGames Legends Pinball with two monitors connected. Here you’ll find a guide and video have been developed to show you how you can use your Steam Deck with Pinball FX3, Future Pinball and Visual Pinball X (VPX) running Windows from the microSD on the Steam Deck.
Request Cabinet Code
Before installing FX3 to the machine, I completed the Pinball Cabinet Support Request here. You’ll need a code from Zen Studios to allow setting up your FX3 installation in Cabinet mode. Cabinet mode basically means that you’ll have additional settings which will allow FX3 to run in a vertical orientation as well as support a backglass display (VIBS) and simulated DMD (Dot Matrix Display). Without this code, you’ll be limited in how the display can be viewed on your PC.
The code is free, there is no additional charge for it. Complete the form and check your e-mail. You will be required to send a picture of your physical pinball table, this is to verify that you actually own a Virtual Pinball cabinet (i.e. an AtGames Legends Pinball machine or ALP). Once your license has been received, you’ll be able to set up FX3 in cabinet mode. It’s a good idea to perform this step early-on as it may take a day or two to get the cabinet code. Once you do, put it in a safe place as the code will be tied to your Steam account and will be needed for the initial installation on any current/future PC you plan to use with your ALP.
Getting Started
The first thing you’ll need is a Windows 10 PC/laptop with a decent GPU for smooth game-play/performance. If you don’t already have a machine, you may want to check out the guide on the Initial PC Setup / Preparation. From this point forward, I’ll assume you have a machine capable of running FX3 smoothly, the VIBS Board installed in your ALP and all additional hardware mentioned in the aforementioned guide.
After opening the box to the PC, the first thing I did was to create an image backup of the 250GB NVMe SSD. While this may seem unnecessary to many, I like to be able to revert back to a clean installation of the machine before any updates are applied and any changes that I may make during setup. I consider it a form of insurance, should anything go wrong. After making the image backup, I then setup Windows 10 in the typical fashion. Then ran Windows update and brought the operating system to the very latest version of Windows.
Install Steam & FX3

Zen Studios FX3 platform runs under Steam. If you don’t already have an account, you’ll need to create one and then purchase any pinball tables that you want to play on your ALP. You’ll want to make sure that the e-mail account you use for steam is the same one you used to request the cabinet code (above).
Keep in mind, you can often find some pretty good sales (up to 75% off or perhaps more) on certain tables/volumes if you’re patient and watch for them. So, initially you may opt for a handful of tables or volumes of tables. I went ahead and bought all FX3 tables over a period of 1.5 weeks. The cost was over $200 of all tables, so be picky and watch for those sales! I recommend installing FX3, then purchase the games from within the main Zen Pinball UI. It was just easier for me to identify what tables are included with each volume as opposed to browsing the Steam store.
To install Steam/FX3, please see the following:
- Download Steam from here.
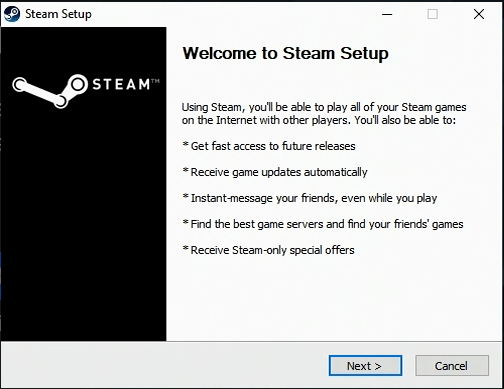
- Click Next > to begin the installation of the Steam client.
- Select your Language and click the Next > button.
- Select the Destination Folder (default is c:\Program Files (x86)\Steam )
- Click the Install button.
- Once installed, the Run Steam checkbox will be selected for you. Simply click the Finish button.
- You’ll then be prompted for your Steam Login. If you already have a Steam account, enter your existing Account name and Password. If you don’t already have an account, click the CREATE A NEW ACCOUNT… button in the lower-right.
- After successfully logging in, you will be prompted with Steam Guard which will be used to verify your account information. You’ll receive an e-mail to your Steam e-mail account with a code. Select the “I’ve received the message from Steam Support” option and click the Next > button.
- Enter your Special access code from the e-mail you received from Steam. Make sure Remember this computer? is checked. You can also change the friendly name for the computer if it’s something you aren’t likely to recognize/remember. Then, click the Next > button.
- You’ll then see a prompt indicating Success! and you’ll have access to your Steam account on this computer. Click the FINISH button.
- If you haven’t installed Pinball FX3 previously, click the Store tab at the top and search for FX3. Then, click the button to INSTALL Pinball FX3.
- You will then see a checkbox to create a desktop & start menu shortcut, leave both checked and click the NEXT > button.
- Click I AGREE on the End User License Agreement (after reading, of course) and the installation of FX3 will be queued for download.
- Now, click the FINISH button.
- This completes the initial Pinball FX3 Installation process. Please see the next section for more FX3 Setup information.
Connect the PC to the ALP
If you haven’t already done so, connect the PC to your ALP. Including the HDMI connection from the top-left HDMI (input) connected to the HDMI Output on your PC (your primary HDMI Output for the playfield). Also, connect the secondary HDMI Output from the PC to the VIBS board (backglass). Lastly, the USB Type-A to Type-A (male to male) cable from the right-most USB port (OTG port) to the PC.
For more information on the initial PC Setup and connectivity needed, please see the Initial PC Setup / Preparation Guide. If you’re mostly familiar with the setup, you can likely follow-along easily by reviewing the Quick Setup.
IMPORTANT: After connecting the PC to your ALP, you’ll want to switch the HDMI Input to the PC as shown.
Apply Cabinet Code
This section will assist you in applying your FX3 Cabinet code. If you haven’t already requested a code, please see this before proceeding. The following assumes that you have already requested the code and have received it via e-mail.
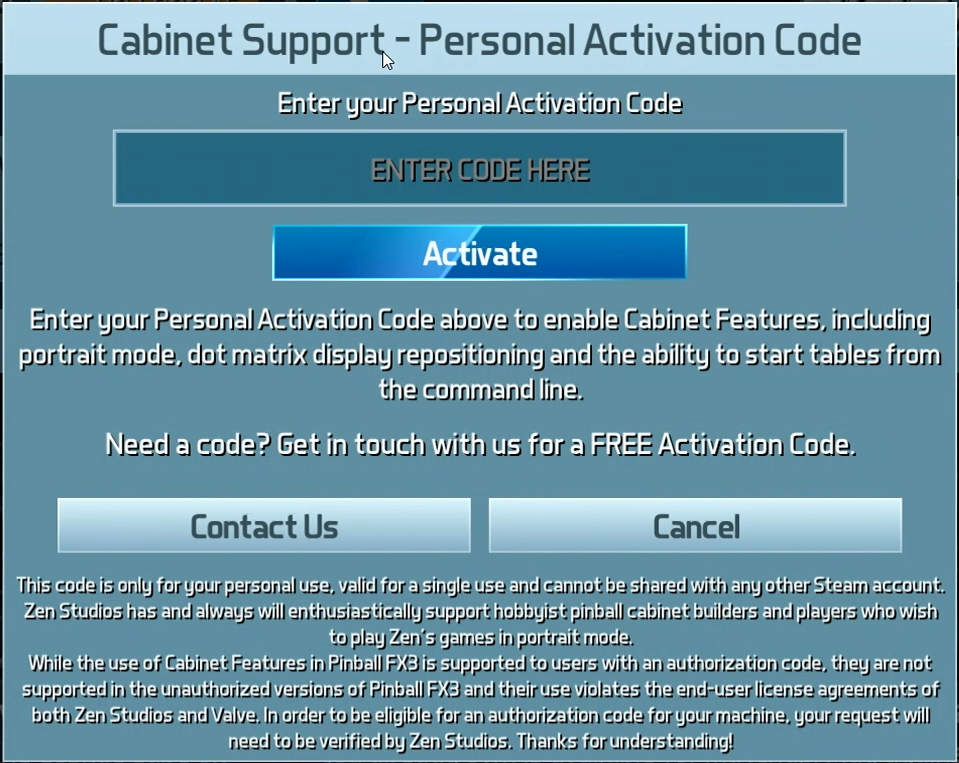
- Once you have received your cabinet code from Zen, look in the middle-right of the Pinball FX3 UI and you’ll see an icon that resembles a pinball table (below). Click that icon.

- After clicking the icon, enter your code and click the Activate button.
- At this point, press the ESC (Escape key) and exit out of FX3. We will first setup a few software components below that will make your experience with the FX3 and the ALP much smoother.
Software Considerations
For the following setup, you’ll want to plug in a USB keyboard and mouse into the USB hub or directly into your PC. Then, follow the instructions below. Alternatively, you can remote-connect to the PC using TeamViewer.
- Follow the instructions to setup JoyToKey. These instructions include a sample configuration (.cfg) file for the ALP which will make controlling the PC/FX3 from the ALP a more pleasant experience and save a lot of time trying to figure it out yourself.

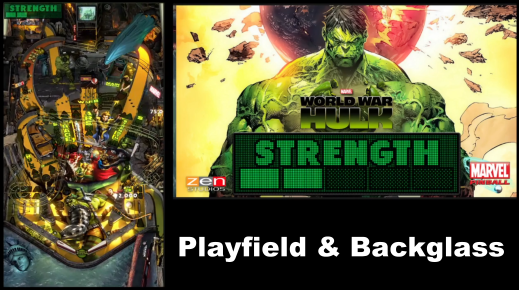
- Right-click on the Desktop and select Display Settings. Position the VIBS display (the backglass) to the right of the playfield display (display 1) within Windows Display Settings (make sure display 1 & 2 are lined up perfectly (as shown to the right), playfield on the left/backglass on the right). Playfield should be set as the Primary display by checking Make this my main display. Both displays should be set to 1920×1080, scaled at 100% and Display orientation in Landscape Mode. Keep in mind, Windows may scale one (or both displays) to 150%. If so, you’ll need to change this setting to 100% for the following settings to work properly. Simply click each display and verify any needed changes.
- Next, I copied some backglass artwork to [Your Steam installation directory]\steamapps\common\Pinball FX3\data\steam (using instructions found here, this facebook thread or this archive). This will be useful if you want some nice artwork to appear when selecting a table. If you want to add your own default backglass artwork (image that appears on the backglass when starting FX3), create/download an image that is 1920×1080 and save it to the steam folder mentioned above. Make sure the filename is PinballFX3.jpg and it will show up when FX3 is launched.
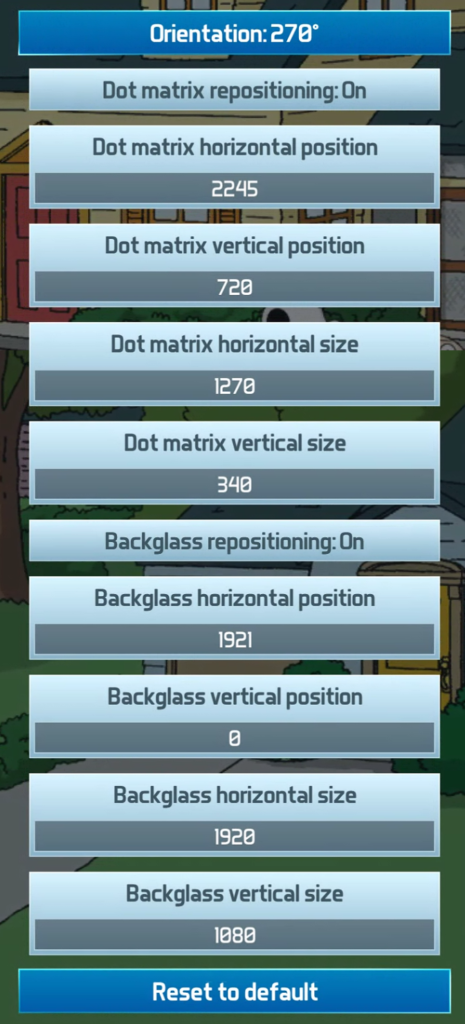
- The following are the settings that worked for me within the FX3 Cabinet mode options (backglass in Display Settings set to 1920×1080 scale 100% for both displays) :
- Launch Pinball FX3 from the desktop icon.
Select Options. - Select Cabinet (if you don’t see this option, select a table and then select Options †’ Cabinet for the table).
- Orientation: 270 °
- Dot matrix repositioning: On
- Dot matrix horizontal position = 2245
- Dot matrix vertical position = 720
- Dot matrix horizontal size = 1270
- Dot matrix vertical size = 340
- Backglass repositioning: On
- Backglass horizontal position = 1921
- Backglass vertical position = 0
- Backglass horizontal size = 1920
- Backglass vertical size = 1080
- Launch Pinball FX3 from the desktop icon.
- To improve the performance within FX3
- Launch Pinball FX3 from the desktop icon.
- Select Options
- Press the left/right-Shift key to select Video.
- Set Vsync to Off (default is On)
Remove Playfield DMD
If you’d like to remove the small DMD in the upper-left of the Playfield, the solution is below:
- Start Pinball FX3.
- Select the Options menu.
- Use the left/right shift keys and navigate to the UI / Streaming option.
- Toggle the Dot Matrix Size: Off
- Start/Resume your game. No mini DMD on the playfield!
-Thanks to Joe L. for this tip!
Let’s Play
After making the changes above, you should be all-set to play FX3 Tables on your ALP. Here’s how:
- If you haven’t already, you’ll want to switch the HDMI Input to the PC as shown.
- Launch Pinball FX3 from the Desktop shortcut / Start menu. Keep in mind, if you’re using the .cfg file for JoyToKey, you can minimize JoyToKey and if you are using the Arcade Control Panel you can use the trackball to select the Pinball FX3 icon and double-tap the A Button on the control panel to launch FX3 (no need for the mouse/keyboard for this).
- Press the ENTER key or Forward Nudge button on the ALP to enter FX3.
- Select Yes / No by pressing ENTER key or Forward Nudge button.
- Select Single Player by pressing ENTER key or Forward Nudge button.
- Select (or purchase) a table from the list and press ENTER key or Forward Nudge button.
- Repeat the above until the game is loaded.
- Press ENTER key, Forward Nudge button or the Plunger to launch the ball.
- Use the Flippers/Nudge buttons during game-play.
- To adjust the view angles, press the Play/Select button on the front of the ALP.
- To Exit a table, press the REWIND button (Red) on the front of the ALP.
- This should get you playing on your ALP!
BitPixel HV with FX3
*NOTE: During National Owners Day (NOD), you will have the opportunity to reserve the BitPixel HV at 60% off. See the AtGames News Page for more information.
If you’re looking for general information on how to use the BitPixel HV with the Legends Pinball or have questions about the product in-general, please see here (stock Pinball tables and CoinOpsX).
Pixelcade has provided a listener service which is able to integrate Pinball FX3 to the BitPixel HV. This allows the BitPixel HV to display animations, scoring and everything you would see on the virtual DMD on a real DMD. In order to utilize this service, you’ll first need to setup the Steam version of Pinball FX3 (as described above). I also recommend checking out the official Pixelcade guide, not only does it describe the steps you’ll find below for Pinball FX3 but also the steps for setting up Visual Pinball.
Setup
The steps below will assist you with the installation of BitPixel HV/DMD support in Pinball FX3.
- Plug the BitPixel HV into an available USB port on the PC.
- Download the Pixelcade PinDMD Installer (large green button, or direct link here) from the Pixelcade page. Launch the executable and follow the prompts.
- If you have previously installed PinUP Popper Baller Installer the default file location for the installation will be the location of your vPinMAME sub folder. Using this path is fine, or you can change it, if you wish.
- During the installation process, Device Manager will pop up as well as a separate window titled One Time Pixelcade COM Port Setup. Expand the Ports (COM & LPT) section in Device Manager and identify the port number used by the BitPixel HV.
- Enter the number (only) into the text field prompt at the bottom of the One Time Pixelcade COM Port Setup window. For example, if you see USB Serial Device (COM3), type 3 into the field and click the OK button.
- You will then see a dialog that states COMx will be used for Pixelcade Pinball DMD. Simply click the OK button.
- The Pixelcade Model Selection dialog will be displayed, select the first option by clicking the Yes button.
- A browser window will pop up, feel free to review it if you wish. Then close out of the remaining windows.
- Click the Windows button in the lower-left of the screen and click the Pixelcade for Pinball FX3 icon. This will launch the dmdext.exe (listener service) as a minimized window and then launch Pinball FX3. As long as the dmdext.exe service is running, the BitPixel HV will be able to display the DMD images.
- See the next section for some additional tweaks you may wish to consider.
BitPixel HV FX3 Tweaks
- Turn off Virtual DMD – Select the cabinet icon at the top of the Pinball FX3 interface.
- Move down to the option Dot matrix repositioning and set it to Off. This will turn off the virtual DMD display.
- DMD Color Change (See Note below) – At the bottom of the main screen, select Options.
- Using the L/R shift keys (on a keyboard) or the L/R flipper buttons, switch to the UI / Streaming tab.
- Towards the bottom, there is an option to change the Dot Matrix Color. *NOTE: at the present time, this option does not appear to have any impact on the DMD color being shown on the BitPixel HV. If this changes in the future, I’ll update this statement.
FX3 Troubleshooting
The following will assist with any issues you may encounter and solutions.
- Add a default PinballFX3 backglass image – When you first start FX3, you may notice a black screen. This is because there is no default PinballFX3.jpg image. Here’s one I created that you’re welcome to use on your cabinet. You’ll want to copy this file to: [Your Steam installation directory]\steamapps\common\Pinball FX3\data\steam .
- Sticky Keys – If you get a popup or Sticky Keys dialog (may occur when holding down the flipper buttons), here’s how to stop it from popping up:
- Click the link for Disable this keyboard shortcut… in the dialog. You’ll then see a new window appear.
- Under Use Sticky Keys, uncheck the option to Allow the shortcut key to start Sticky Keys.
- Under Use Toggle Keys, uncheck the option Allow the shortcut key to start Toggle Keys.
- Close out of the dialog and return to your game. You should now be able to hold down the flipper buttons without any further distractions.
- ALP Buttons not working with FX3 (OTG)- Launch JoyToKey and select the menu option Settings †’ Configure Joysticks. Then click the Configure Game Controller Property button. At this point, you should see ATG Control Deck, if you don’t make sure you’ve plugged the OTG Cable (USB-A to type A) in the far-right USB (2.0) port on the ALP and the other end into your PC or Powered USB Hub. If this doesn’t correct the issue, you may need this Powered USB Hub (for more on this hub and my experiences, please see this).
- Screen Tearing with FX3 – If you find the animations in FX3 don’t run very smooth (you see screen tearing), it could be a few things. It might be that the GPU in the Computer/Laptop needs updated display drivers or that the GPU itself is not adequate. Another thing you can try is the following:
- Launch Pinball FX3 from the desktop icon.
- Select Options.
- Press the left/right-Shift key to select Video
- Set Vsync to On
Change Log
- 2024-03-03 – Updated the note at the top with information on Pinball FX and Pinball FX3 settings for the Legends Pinball 4K.
- 2022-12-20 – Minor formatting edits.
- 2022-08-08 – Added Steam Deck Guide Reference.
- 2022-05-10 – Minor updates/corrections.
- 2022-04-09 – Added Modding Series reference.
- 2022-02-04 – Added BitPixel HV with FX3 section.
- 2022-01-10 – Minor edits/corrections.
- 2021-08-10 – 2021-09-22 – Minor updates/corrections.
- 2021-08-05 – Added a section to remove the playfield DMD.
- 2021-07-18 – Added a default backglass artwork for the main FX3 menu here.
- 2021-06-27 – Added some additional Troubleshooting steps.
- 2021-06-23 – Added disable of Sticky Keys in FX3 Troubleshooting section.
- 2021-06-20 – Added an FX3 Troubleshooting section, any issues identified will be documented there and their solutions.
- 2021-06-17(-19) – Resuming work on this guide. Had to wait until the replacement PC arrived to fully document.
- 2021-05-22 – Start to this guide.