CrowPi2 Review & Guide
Last Update: 4/6/2025

You may also be interested in the new CrowPi L. Check out this video for more information on this new product!
The Crow Pi L includes these impressive features:
- 11.6-inch 1366×768 display
- External HDMI Connector
- Built-in 5000mAh battery
- Integrated Camera & Mic.
- Switchable microSD Adapter
- 40pin GPIO Connector
- Built-in fan
- 96 programming courses

I backed a kick-starter from Elecrow for the CrowPi2. This device isn’t just a Raspberry Pi 4 Laptop, yet can be used as one. It arrived on my doorstep on 10/28/2020 and I was extremely excited to get it setup and running. I’ve had this machine on my mind for months. It was very easy to setup and I did start by making an image of the original microSD as a precaution and also to restore the image to a larger-capacity microSD card.
This unit may very well may be the ultimate solution for those that love to tinker with single board computers (SBCs), programming and electronics. It has many built-in sensors and lessons that will teach you AI (Artificial Intelligence), vision systems/face detection, Python, Scratch, Minecraft modding and much more. There are also a number of pretty cool demos that you’ll enjoy trying out.
My initial impression is that this is a very impressive piece of tech. However, initial impressions can be misleading so definitely check back here as I learn more about this device. I will let you know the good and the bad. The video above is the first of likely several CrowPi2 videos. As I tinker and learn more about it, this page will receive updates. My goal is to remain fully transparent as I learn more and document it here. If you have suggestions or information you would like to see added, please e-mail me at jon [at] wagnerstechtalk.com. I want to know what you would like to see added to this site/page!
I ordered x2 Space Grey units and x1 Silver (x1 for my kids, x1 for the channel and x1 to donate to their school). In case you were wondering, I paid the Kickstarter price for all 3 units. I was not asked to review the product nor create this page. As with everything on my website, all opinions are 100% my own. This was exactly the kind of product I dreamed of for Raspberry Pi projects and based on everything I know currently-Elecrow delivered.
The kits I ordered were the CrowPi2 Deluxe Kit, which includes everything you see below:
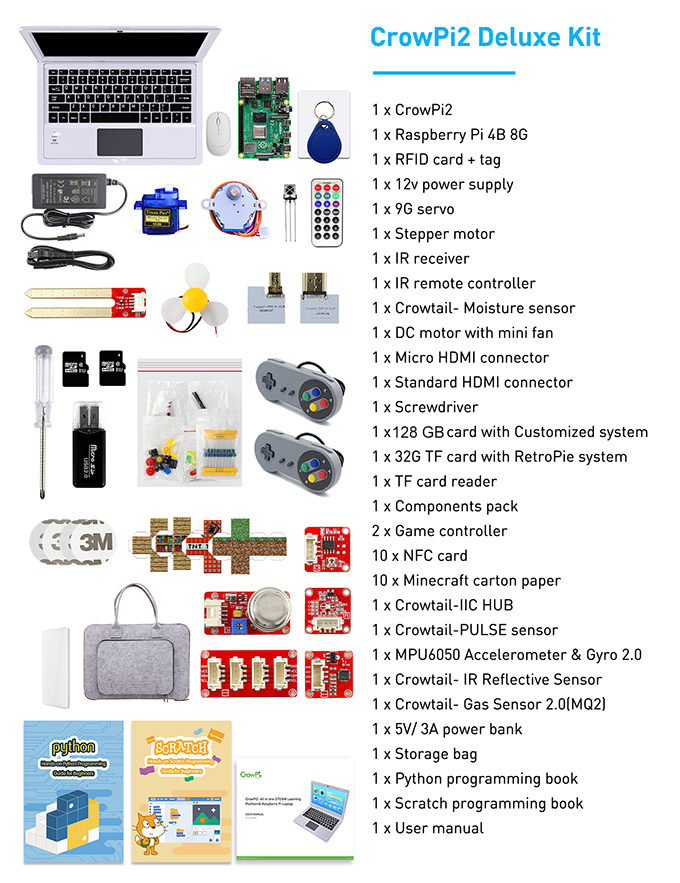
Table of Contents
Where to get a CrowPi2
- Amazon – Same version as shown in the video above.
- Elecrow’s website
NOTE: For the month of June 2020, Elecrow has provided the following 15% off coupons to the first 10 people that apply them (each code below can be used only once). If one doesn’t work, try another. This is for the CrowPi2 Basic Kit from Amazon only.
- GELG-FF44D5-7S94AD
- GEHW-5HB3YE-YDURAS
- GESR-E3KU2P-8RTWAL
- GEKZ-QMERGH-7C3SAG
- GEJU-PFUBC4-4D4MAD
- GEYT-S4DSVE-LAHRAX
- GE8X-DNA36R-CV5CAM
- GETG-ARLCDW-6GPLAX
- GEWD-QS9XMT-CVLXAP
- GELE-5ZBPGA-ATZUAP
CrowPi2 Resources
- Comments from backers – Comments from other CrowPi2 customers/backers.
- CrowPi2 Corrections and Updates – This page is maintained by Elecrow and will provide some additional information, updates and bugs identified in some tutorials.
- CrowPi2 Support Forum – Not 100% sure if this is CrowPi 1 & 2 but some comments on the CrowPi2 are appearing.
- CrowPi2 User’s Manual – Link to the CrowPi2 User’s Manual on Elecrow’s website.
Reported Issues
- Updating Learning Material – The CrowPi2 team should provide an icon on the Desktop to allow updating the installed lessons, learning material and future enhancements. There are likely going to be improvements in the future and making it as easy as possible for users to upgrade should be a priority.
- microSD Card issues – There have more than a few reports of included microSD cards (System & RetroPie) having issues. In some cases the cards can’t boot. The latest image from Elecrow should fix this problem. If you use this image, I recommend imaging to a new microSD card and follow these instructions.
- Keyboard issues – Again, I have not experienced this issue myself but there are a multiple reports regarding the keyboard having phantom key presses, bent/warped chassis, etc.
Specifications
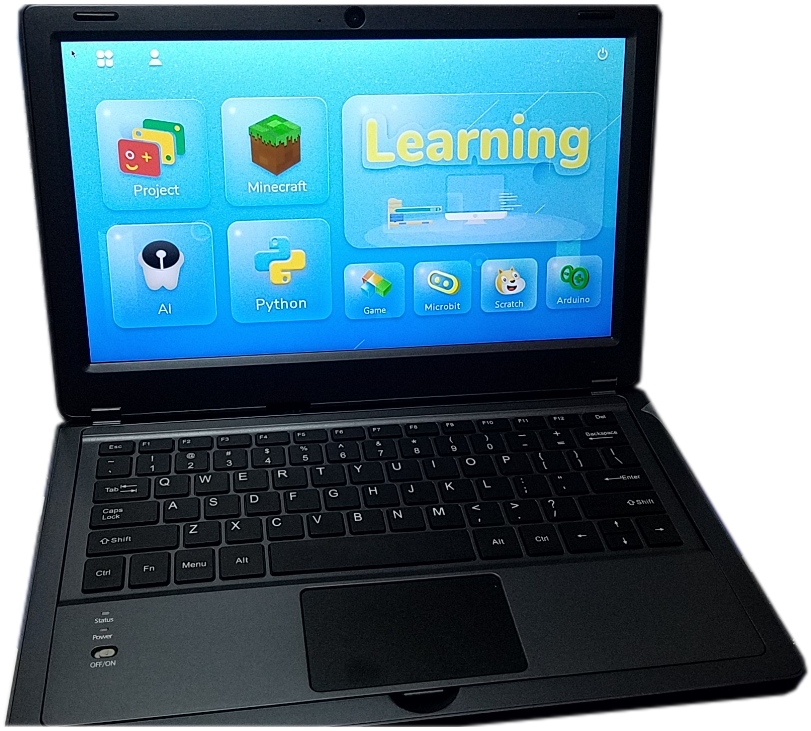
- 11.6-inch 1920×1080 IPS screen
- Wireless keyboard detaches from the body or stays connected via magnets
- Convert between playing and learning in seconds (microSD card is easily accessible on the bottom slide compartment).
- Easy installation of Raspberry Pi 4B
- 22+ onboard sensors and modules
- 128GB System microSD card and a 32GB microSD card with RetroPie pre-installed.
- 2MP camera, microphone, and stereo output built-in
- Switch between projects using one button and get creative using Raspberry PI GPIO pins, all of which connect to the onboard sensors or function as independent outputs
- All-in-one board includes all necessary sensors for learning hardware and software
- Custom-developed software for learning Scratch, Python, AI, and Minecraft step-by-step via an engaging dialogue teaching mode (*NOTE – This really is very well done from what I’ve seen so far)
- Offline account management for saving your learning progress and achievements and conveniently resume where you left off.
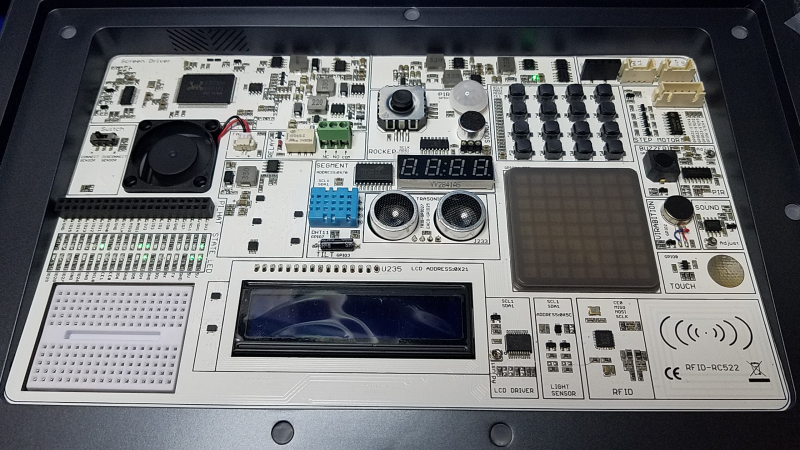
Here’s a closer look at the internal sensor/module PCB, it sits below the keyboard+trackpad.
CrowPi2 Setup
The initial setup went pretty smooth. I started by making a backup copy of the included System microSD. That way, should anything go wrong, I can restore the machine back to the way Elecrow sent it to me. After getting the machine powered up, next I needed to create an account. This was very easy to do. The account you create is a local off-line account and simply used for keeping the progress of each individual separated. This allows you to pick back up where you left off very easily.
After the initial quick setup, I then wanted to connect the CrowPi2 to my WiFi network to provide access to the internet, YouTube, etc. Once this was done, it was time to start learning!
Accessories
With everything that came in the kit, this may seem a bit absurd to list accessories here but yeah… I’ve added a few. You may not need these, so please read the description along with each:
- SAMSUNG EVO Select 512GB microSDXC – While the included System microSD card may have plenty of storage space for most, I decided to upgrade the card to a 512GB Samsung microSD card instead. Totally up to you what you want to use, just keep in mind you may want to make a backup copy of your microSD card before you first boot it up. This will make sure you have a clean image that can be easily re-imaged in the future. Ideal for classroom situations as well as for home use.
- GANA Micro HDMI to HDMI Adapter Cable, Micro HDMI to HDMI Cable (Male to Female) – As a guy who makes YouTube videos, I needed a way to send the HDMI Output from the CrowPi2 to my studio equipment. I removed the included adapter from the Pi4 (ribbon cable micro HDMI), attached this adapter and used an HDMI cable to my video capture card. This allowed me to capture the video directly off the CrowPi2. However, the display on the CrowPi2 won’t receive any signal if you use this adapter (it doesn’t mirror, just sends it somewhere else), so you would need an external TV/Monitor with the CrowPi2. Also, if you do the same, make sure the CrowPi2 is powered off when you attach this adapter, then power on the CrowPi2. If you hot-swap, you’ll likely see no signal at all going to your TV/Monitor.
- Travel Laptop Backpack Water Resistant Anti-Theft Bag with USB Charging Port and Lock 14/15.6 Inch Computer (Medium-Size pack for the CrowPi2) – I was hoping the bag included with the Deluxe Kit would be sufficient to hold all the accessories and protect the CrowPi2. Well, honestly if you’re looking for the Deluxe kit for the included bag – don’t! It’s dollar-store quality. Instead, I decided to go with this one. I purchased this bag and it arrived on 11/3/2020. It seems to be a more modest fit to the contents included with the CrowPi2 Deluxe kit. I paid ~$22 for this bag, so it wasn’t expensive and actually a better fit for the kit overall.
Procedures
The following are a series of procedures that will help you get the most out of your CrowPi2 or help resolve some common issues that you may encounter.
WiFi Connection
I assume some receiving a CrowPi2 may be new to Raspberry Pi’s. These steps will show you how easy it is to get connected to your WiFi network:
- Click the icon in the upper-left (3 squares and a diamond), this will take you to the PiOS Desktop. You can return back to the Elecrow Desktop by clicking the Blue/Cyan/Yellow/Green circular icon in the upper-right.
- Next, click the icon in the upper right that shows two X’s.
- Select your WiFi SSID or Network ID.
- When it asks for the Pre Shared Key, enter your WiFi password and click the OK button.
- You should shortly see the two X’s icon appear as a blue WiFi connection symbol.
- Your CrowPi2 is now connected over WiFi! You can open the Chromium Web Browser (icon on the desktop), if you want to browse the internet.
- Again, to return back to the Elecrow Desktop, click the Blue/Cyan/Yellow/Green circular icon in the upper-right.
Make a backup of your System Software
In the event something goes terribly wrong such as your microSD gets corrupted, an update breaks things, etc. you may want a way to revert back to the way the CrowPi2 was received. The following assumes you have a Windows 10-based machine:
- Download, install and open Win32 Disk Imager (link here)
- Insert the System microSD that came with your CrowPi2 into a USB reader or SD card sleeve into you your computer.
- Click the Folder icon (browse) and select the location where you want to create the backup image. Then, give it a filename such as CrowPi2_OriginalSystemImage.img.
- Make sure the correct device is selected (upper-right of the application).
- Click the Read button.
- The backup will likely take some time, the microSD card is 128GB so took around 30 min. to backup.
- Once completed, you may want to copy the CrowPi2_OriginalSystemImage.img to somewhere safe where it won’t get accidentally deleted (i.e. another external drive, NAS, etc.)
Now, should anything go wrong with your original microSD you can restore the original image back to the microSD card. You can also restore it back to a different microSD card. However, if you intend to use a larger capacity microSD card you’ll need to resize the partition after restore to take full advantage of the extra space. I may cover that at a later time if there is interest in doing so.
Restore Backup to higher-capacity microSD
I decided to replace the included microSD with a larger size. The CrowPi2 system microSD that I received was 128GB which is likely plenty for most people. However, I plan on using this machine for a lot more Raspberry Pi projects in the future and wanted to use a faster microSD with 512GB of storage (a SAMSUNG EVO Select 512GB microSDXC).
The section below assumes you’ve already made a backup copy of your original image using the above instructions. To restore the image to a new microSD, here are those steps:
- Download, install and open Win32 Disk Imager (link here)
- Insert the new microSD card you want to image into the SD card sleeve or USB microSD reader (if you don’t have one, something like this would work).
- Click the folder icon in the upper-right and select the image file you created during the backup step (i.e. CrowPi2_OriginalSystemImage.img ). Alternatively, you can also restore the latest image from Elecrow.
- Make sure you select the correct Drive under the Device heading.
- Next, select the Write button to write the image to the new microSD card.
- Make sure your CrowPi2 is powered off.
- Insert the new microSD card into the CrowPi2 and power it on. Now we need to expand the file system to make full use of the size of the new microSD card.
- Click the icon in the upper-left of the CrowPi UI (in the shape of a square).
- Click the Terminal icon to open a terminal.
- Type sudo raspi-config
- Select Advanced Options, then Expand File System.
- You will be prompted to reboot to expand the file system, select the option to reboot.
- Your microSD card will now be expanded to the full size of the card. You can return to the Terminal window and type df – h [Enter] if you want to verify the disk as been expanded.
Create a Multi-Boot SD card using PINN
The following guide was created by Blind Freddy and is a tremendous contribution to the CrowPi 2 community! The following guide will demonstrate how to Create a Multi Boot SD card (or SSD) out of 2 existing OSes using PINN.
Blind Freddy edited this document to include instructions for using a Raspberry Pi 4 to make multi-boot disk with choice of Twister OS or CrowPi2 OS for use with a CrowPi2 laptop. My thanks to procount (and lurch) for all their wonderful work. The PDF document may be downloaded from the following link:
NOTE: Procedures offered here for using Pi will only work with 2 partition OSes. Raspbian based seem to work fine, but others are untested. It has to do with BSD tar and GNU tar and their implementations. It has only tested on Twister OS V2.0.2 and CrowPi2 OS V1.2.0
Mouse not working
If the mouse is not working, it may just needs pairing. After installing the AA battery and flipping the small power switch to the on position, you should see the red LED turn on briefly and then shut off. If you do and it doesn’t work after installing the dongle, it may need pairing to the dongle, here’s how:
- Power on the CrowPi2.
- Power off the keyboard and the mouse.
- Power on the mouse and quickly plug in the receiver into an available USB port on the CrowPi2.
- Move the mouse, if you did this quickly enough you should see the mouse pointer begin to move. Once it does, it has successfully been paired.
Keyboard not working
If you are having problems with the keyboard not working, first make sure it is fully charged. That is, use the microUSB cable and plug it into a USB port until charged. Then, use the dongle (which is installed in the mouse compartment) and plug it into an available USB port on the CrowPi2. Flip the switch to on on the keyboard. If the keyboard still does not work, it likely needs to be paired, here’s how:
- Unplug the receiver (included inside the mouse cover, this one receiver handles mouse and keyboard)
- Power off the keyboard and the mouse.
- Plug the receiver into the CrowPi2, then power on the keyboard. You’ll see a red LED light on the keyboard, press the ESC and Q key at the same time until the red LED begins to blink.
- When the blue LED begins to blink, flip the power off on the keyboard and back on.
- The keyboard should now be paired.
System MicroSD Card Image
You may now find the official CrowPi2 microSD image here. Huge thank you to Elecrow for making it available for CrowPi2 owners!
Troubleshooting
The following are some troubleshooting issues and solutions that you may encounter.
| Issue | Solution |
| RetroPie won’t start – When inserting the RetroPie microSD and power-on the CrowPi, it shuts down automatically and won’t boot. How do I fix it? | Make sure you disconnected the USB cable from the CrowPi2’s camera before powering up the CrowPi2 with the RetroPie microSD installed. If the USB cable to the Camera is plugged in, RetroPie won’t start normally. |
| Mouse not working – The first Space Grey unit I unboxed had a problem. The keyboard+trackpad worked fine but the mouse was unresponsive. | The solution was that the mouse did not get paired properly at the factory. If you have this issue, here is how to fix it. |
Tips and Tricks
The following are some tips that I’ve found that may be helpful to you.
- Swapping DC / Battery Power – When swapping between the power brick and the battery power, first shutdown the CrowPi2. Then attach the USB-C to microUSB cable to the battery back and then into the right-side of the CrowPi2. Then, power on the CrowPi2. If you attach the battery pack, then remove the power adapter the unit will just shutdown which may cause file corruption on your microSD card.
- RetroPie – a RetroPie microSD card is included with your CrowPi2. However, if you’ve never used RetroPie before you may not be sure what to do with it. For that, I have a page dedicated to Retro Gaming on your Raspberry Pi 4 Model B here. It will step you through how to get it setup with a new image (which you can likely gloss-over since you have the microSD already), as well as how to copy your games, etc. Once setup with RetroPie, you may want to check out the 10 RetroPie Tips video to take the experience a bit further, including how to update to the latest image and learn a few more advanced techniques.
The Lessons
In the following sections I’ll discuss the various lessons and things you won’t want to skip. At this point, I’ve only gone through a few and was impressed how easy they were. I like how Elecrow was able to integrate their learning system with the ability to get instant results by running the code and seeing the output immediately. They truly have done a great job with their learning material, thus far.
Getting Started
The first thing you want to do is create an account to tracking your progress in the lessons. It’s very easy to do, no internet connection is required for this step. Here’s how:
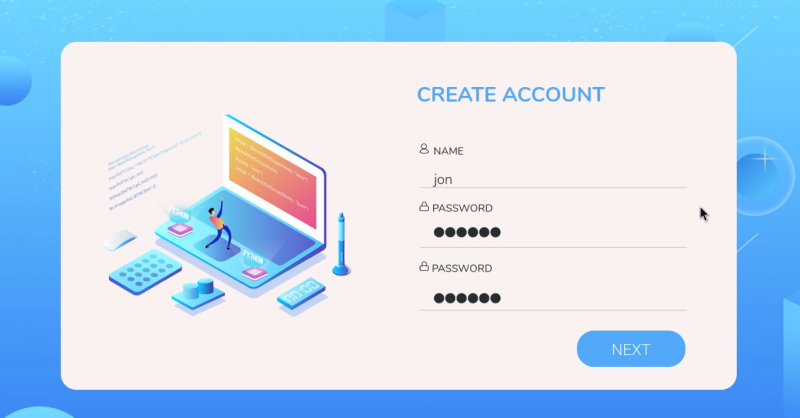
- Click the big Learning image.
- Click the Create Account link.
- Enter a name and password and click Next. I simply used my first name.
- Select a security question (don’t pick “how old are you”, not a good question as it will change next year lol)
- Enter a simple answer for the security question.
- Click the Create button to create your account.
- You should now see Create Successful!
- Now, login with your new username and password and you’re ready to start the courses. Repeat the above to create more accounts for family members, students, friends, etc.
If you’re new to programming, you might start with Scratch. Otherwise, I would recommend using Python.
Python
When it comes to Python programming, I am what you would consider a newbie to the syntax of the language. However, I am knowledgeable of programming methodologies in-general. It didn’t take long to learn the basics of this language and to crank out some useful code. For example, I used Python here to solve a real-world problem in being able to generate a custom game-list and box-art for the Powkiddy A12 (Arcade gaming machine). I spent time over one weekend to write/test the code. Python is a great language and one I plan to use whenever I get an opportunity.
Using Python on the CrowPi2 is very easy, the learning material has been excellent thus far. It steps you through the process, how to access the GPIO pins (General-Purpose Input/Output) and includes the ability to quickly copy/paste the code from the learning material to see what it does. This makes it easy to try things out and experiment. The only down-side is if you’re not typing in the instructions yourself, you can easily overlook the syntax used to perform the function. So take it slow and learn not only what the commands are doing, but how they are structured. This will make it easier to apply what you learn to future projects on the CrowPi2.
Scratch
Let me know if you want to see content on this (comment in the video above).
MicroBit
While the CrowPi2 arrived after receiving the Maqueen Plus Robot, you can also do everything on this page using the CrowPi2 along with the Maqueen Plus Robot.
Arduino
The Arduino IDE is pre-installed on the CrowPi2. It’s certainly not difficult to install it yourself, but nice that it comes pre-installed. You can also install the IDE under your current operating system (Windows/Mac/Linux), so you don’t have to do so exclusively on the CrowPi2.
An Ardunio is a small micro-controller, it comes in various sizes and shapes. Some boards are about the size of the Raspberry Pi (Arduino UNO, for example), but there are smaller variations that are equally powerful (nano). I’ve used Arduino’s in some custom Robotics projects such as this one (among several others). I have not yet used Arduino’s with my CrowPi2 and this is something I want to change in the very near future! I could make an entire video just on this subject alone.
How I use the CrowPi2
Let me know if you want to see CrowPi2 project ideas (comment in the video above). Otherwise, I’ll just surprise you in the future 🙂
Change Log
- 2025-04-06 – Minor updates.
- 2021-06-19 – Added an excellent community contribution by Blind Freddy on how to Create a Multi Boot SD card (or SSD) out of 2 existing OSes using PINN for the CrowPi2. If you own a CrowPi2, his document will guide you through the process of setting up a multi-boot microSD/SSD for use with the CrowPi2.
- 2021-06-01 – Elecrow sent us 10 15% off coupons for the CrowPi 2 Basic kit which will expire after June 2021. See here for the codes.
- 2021-04-14 – Additional link to order the CrowPi 2 added.
- 2021-02-03 – Minor edits and page refresh. All kick-starter backers should have received their units by now so removed some now unnecessary sections.
- 2020-11-06 – Minor edits include: Add 512GB microSD card link (will be in the upcoming video), Added Troubleshooting section, other minor edits.
- 2020-11-02 – Added RetroPie in the Tips and Tricks section. Uploaded a copy of my original CrowPi2 System image here.