
Legends Pinball 4KP Settings

Last Update:1/20/2024

In the following sections, we’ll discuss some of the more common settings and how they function. The Legends 4K series of machines introduced a new User Interface (UI) that is easier to use and aesthetically a much cleaner interface. This new interface is called CE-4K and utilizes the left/right flippers for navigating the menu system, however you can also use the d-pad or optional Arcade Control Panel (ACP).
Table of Contents
Settings
In the following sections, we’ll discuss some of the more common settings and how they function. The Legends 4K series of machines introduced a new User Interface (UI) that is easier to use and aesthetically a much cleaner interface. This new interface is called CE-4K and utilizes the left/right flippers for navigating the menu system, however you can also use the d-pad or optional Arcade Control Panel (ACP).
Account
The Account option provides the ability to Sign In or Create a Legends Account:
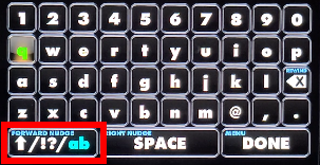
*NOTE – To alternate between upper-case, symbols and lower-case characters, press the forward nudge button or the button in the lower-left of the on-screen keyboard.

- SIGN IN WITH LEGENDS ID – If you already have a Legends ID, you can use this option to enter your Legends ID and password. Use the on-screen keyboard to enter the values, then click the SIGN IN button.
- SIGN IN WITH A QR CODE – You can use the camera in your mobile device to login. Simply open the camera application on your device and point it towards the barcode. Then, follow the on-screen instructions to sign in.
- CREATE LEGENDS ID – If you don’t already have a Legends ID account, you can create one with this option. Enter a Legends ID, e-mail address and create a password and click the SUBMIT button.
After having logged in with your Legends ID, you’ll have the following options:
- CHANGE PASSWORD – Allows changing the password associated with your Legends account.
- CHANGE AVATAR IMAGE – Provides a number of avatars that you can use to customize your account.
- SIGN OUT – Signs out of your Legends ID account.
Attract Mode
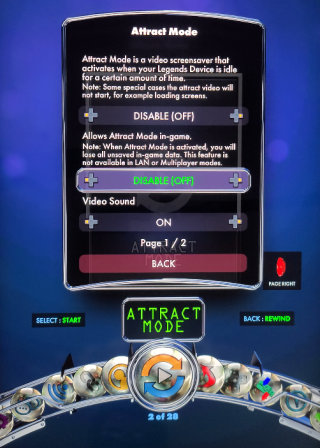
Attract Mode will display a video screen saver when your device is idle for a specified amount of time. This option may be set to 60 / 90 seconds, 3 / 5 / 10 minutes or DISABLE (OFF). The default is DISABLE (OFF).
You may optionally allow the screensaver to appear while in-game. If enabled, you will lose any unsaved in-game data once the attract mode starts. This option may be set to 60 / 90 seconds, 3 / 5 / 10 minutes or DISABLE (OFF). The default is DISABLE (OFF).
- Video Sound – You can enable or disable the audio when attract mode is running. The options include: ON/OFF.
- Video Source – This identifies the source of the video to be played, while in attract mode. Options include:
- SERVER – Allows downloading attract mode videos from the AtGames servers.
- LOCAL – If Local is selected, you can browse a USB stick for the local .MP4 or .MOV video file to appear for playback. Each video file is limited to 50MB and must reside in a subfolder called ha8800_screensaver on an attached USB stick. You can optionally Shuffle videos to be played when attract mode is running.
- APPSTOREX – Allows playing videos downloaded from the AppStoreX menu. You may optionally Shuffle videos to be played while attract mode is running.
- USB LIST – You can browse a USB stick for the local .MP4 or .MOV video file to appear for playback. Each video file is limited to 50MB and must reside in a subfolder called ha8800_screensaver on an attached USB stick. Backglass and Playfield videos can be defined as two unique videos. They would both need to be named the same, however with a suffix of “_portrait” or “landscape” added to the end of the filename. You can optionally Shuffle videos to be played when attract mode is running.

Back
This option simply returns back to the table selection menu.
Controller Settings
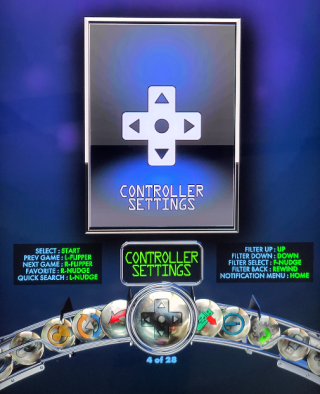
If you need to test that all of the buttons on the machine are responding properly, you can select LAYOUT TEST. From here, you can sequence through all the buttons and an on-screen indicator will identify which button is being pressed. To exit the layout test, press and release the HOME and FORWARD NUDGE buttons at the same time.
- Gamepad Key Mapping – If any devices are available for mapping, they will appear in the list. Otherwise, you’ll see a message indicating No available device.
Data Manager
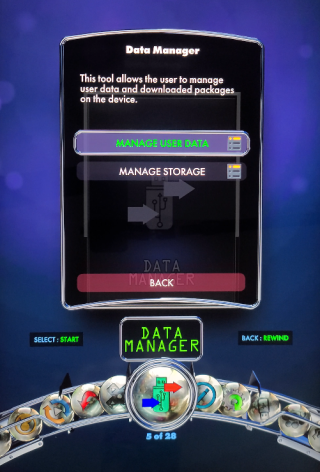
The Data manager allows you to manage user data and packages downloaded to the device. There are two primary options:
- MANAGE USER DATA – Indicates the amount of user storage used and provides options to IMPORT, EXPORT or CLEAN UP (remove) user data.
- MANAGE STORAGE – Allows viewing what packages are installed on the device and available for deletion. Select a package to be prompted to MOVE or DELETE it.
Device Info
The Device Info option provides the following information:
- Model Number
- UUID (Unique device ID)
- Software Version
- Kernel Version
- Firmware Version
- Wireless MAC (address)
- Ethernet MAC (address)
- IP Address for Ethernet (if connected)
- Wi-Fi MAC (address)
- IP Address for Wi-Fi (local network IP Address)
- Wi-Fi Strength (1-4, 4 being excellent signal strength)
- Total Memory
- MCU Version
- System Storage
- User Storage
- Internal Storage
- FDX (Flash Drive X) Storage
Device Update
Within this option, you can choose which Legends device you want to update and check if an update is available for it. Options available, include:
- SYSTEM UPDATE – This option will allow checking online for any updates. You may alternatively check for updates that exist on a USB drive.
- LEGENDS CONTROLLER UPDATE – Here you can select the Legends GamePad or Control Panel/Deck you wish to update.
- INTERNAL COMPONENT UPDATE – Allows you to check if there are updates available for internal components such as: applications or built-in games. If any updates are available, you’ll have the option to update them.
FDX / Flash Drive X
The following will step you through the Flash Drive X setup on your Legends device. Flash Drive X (or FDX) provides a method of expanding the storage capabilities of your machine. You will first need a USB Flash Drive. You can use any USB drive you prefer ranging in capacities from 8GB-2TB.
Below is how to prepare your USB Flash Drive:
- Insert a new USB drive into the USB 3.0 port on your machine (the USB 2 port on the back which is blue in color).
- Launch the Flash Drive X application.
- Once loaded, select the Format button (this only needs to be done once).
- After selecting Format, select Yes.
- When done, click on Dismiss.
- Now click the Mount button to activate the USB drive on the arcade platform.
- Click Yes to mount.
- When done, click on Dismiss.
- Back out of Flash Drive X.

Friends
The friends setting will allow viewing your friends list, searching for friends, identifying potential friends, viewing invited friends and block those that you no longer want to be notified from. The options include:
- FRIEND LIST – Displays a list of friends.
- FIND FRIENDS – Find a friend by entering a friend name and click the SUBMIT button for a list of matches.
- POTENTIAL FRIENDS – This option will display a list of potential friends.
- PENDING INVITES – If you have previously requested a friend invitation, you can see those who have not yet responded to your friend request.
- BLOCK LIST – List of accounts that you have identified as being blocked.

Haptic Feedback
The Haptic Feedback option enables or disables haptic feedback everywhere on your Legends Pinball machine, except while in pinball games. The following options are available:
- ENABLED ON / DISABLED OFF – Enables or disables the haptic feedback.
- Solenoid Strength – This option allows you to control the strength (how strong) the solenoids are when engaged. Options include: WEAK, MODERATE and STRONG.
*NOTE – To test the solenoid strength, select an option, move down to TEST SOLENOID to feel/hear the strength.
HDMI Settings
The HDMI Input option allows you to connect a PC, Steam Deck, ROG Ally or other similar device to your Legends Pinball 4KP to play games on other platforms (i.e. Visual Pinball X, Future Pinball, Pinball FX3, Pinball FX, etc.) The Legends 4K supports three(3) different inputs supporting the playfield, backglass and DMD displays. The option here may also be found by pressing the Channel button in the top-right corner of the machine. Those options include:
- Control Mode – Identifies the type of input being received, options include:
- OTG – Control the buttons using an OTG cable (i.e. USB-A to USB-A cable) connected between the input device and the Legends 4K. Additional settings may be made for the:
- HDMI AUDIO PREFERENCE – Options available include AUTOMATIC, HDMI IN 1, 2 or 3.
- INCOMING DISPLAY ROTATION – With this option, you can change the display orientation for each of the three(3) displays from the default of LANDSCAPE to PORTRAIT, FLIPPED LANDSCAPE or FLIPPED PORTRAIT. Each option will rotate the display to the selected orientation.
- Once all settings have been made, select the START option to enter OTG mode. Keep in mind, any HDMI IN x displays that are showing Disconnected will not appear on the Legends Pinball displays.
- OTG – Control the buttons using an OTG cable (i.e. USB-A to USB-A cable) connected between the input device and the Legends 4K. Additional settings may be made for the:
- OTG Wireless – Allows a wireless connection for OTG.
- ARCADE PLAY LINK (APL) – This option is used with other AtGames devices and allows using a single HDMI cable to carry both the video signal and data (controls) through a single HDMI connection. When this mode is selected, you can indicate which display should render the incoming video signal (i.e. Playfield, Backglass or DMD). Then, select the START button.
- WIRELESS CONTROL DECK – Select this option when using a wireless control deck.

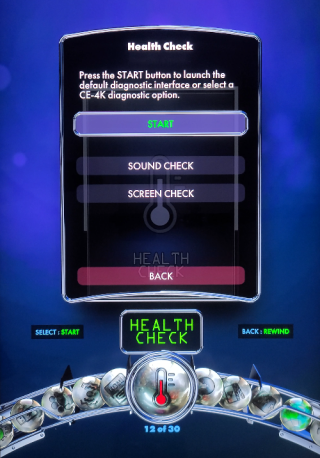
Health Check
The Health Check option is useful if you want to make sure everything is functioning properly with your machine. Selecting the START button will perform a series of device checks. Follow the on-screen prompts.
In addition, you can perform the following additional checks:
- SOUND CHECK – Please see here for more on the Sound Check option.
- SCREEN CHECK – This option will allow cycling through the various colors and patterns to identify any dead pixels in any of the 3 displays.
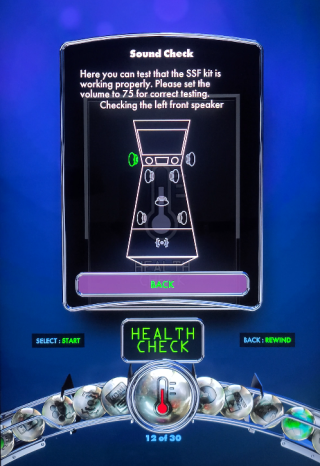
Sound Check
Under the Health Check setting, you’ll find an option, SOUND CHECK. This option is ideal for verifying the Surround Sound Feedback (or SSF kit) has been properly installed. After selection of the SOUND CHECK option, you’ll hear a voice playing from the front speakers, each of the four corners and the bass shaker. The recording will repeat until all speakers are indicated and shown in the image (see below). This makes it an ideal option to ensure all speakers are functioning properly.

Help Desk
The Help Desk setting provides pages of additional help information directly on your machine. If you need further assistance or explanation of specific features, this option may be selected for further reading.

Live Streaming
You can live stream directly to various social media platforms directly from your Legends 4K device. You can configure your Live Streaming credentials to allow you to live stream to Facebook, Twitch or YouTube. After assigning your account credentials from the QR code, you can select the associated Stream button under the platform you wish to stream to. While streaming, you’ll see a red indicator when the stream begins.
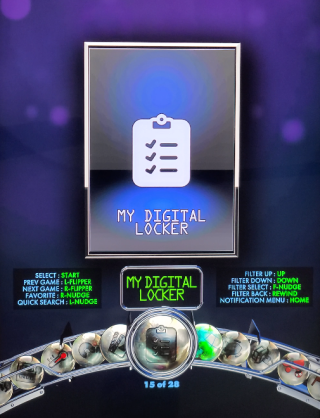
My Digital Locker
My Digital Locker allows you to check your Game Packs, Subscriptions and Redeemed code history. Once you’ve made a purchase from your Legends ID account, you can review and apply any table volume licenses. You have the option of applying the license to the Device or to your Account.
It’s debatable as to which option is best. I personally recommend applying the license to your Legends ID account. If you apply it to the device and later get a new machine, you can’t transfer the purchased tables to the new machine. However, if you associated the license to your Legends ID account –you can. Totally up to you how you decide to apply your license.
The Options include:
- NEW CODE – Provides a list of new codes available to be redeemed. Once selected, you can REDEEM CODE ON ACCOUNT which is your Legends ID account or REDEEM CODE ON DEVICE.
- SUBSCRIPTIONS – Identifies what subscriptions you are entitled to. Subscriptions include: ArcadeNet, BYOG Premium and Legends Platinum Owner Membership.
- REDEEMED CODES – List of all codes redeemed against your Legends ID account.
- GAME PACK – Lists any available Game Packs.

Network Test
The Network Test setting, once launched, will first identify your approximate location and display a small map. Select the TEST button to begin the network test. The test will begin with a network latency test, then measure the Download and Upload capabilities of the network. Once complete, the following results will be reported:
- Suggested Bandwidth
- Server IP Address
- Server Time
- Latency Time
- Upload Speed
- Download Speed
If you want to repeat the network test, you’ll need to wait about 20 seconds.
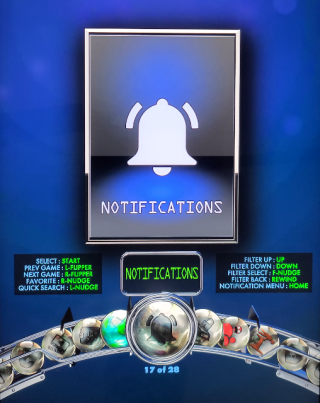
Notifications
Notifications may occur based on various activities such as:
- Events related to a purchase within AppStoreX
- System Updates that are available
- USB Drive Mounted/Unmounted
- many more
If you’ve received a notification, select it and press the Start/Play button to view the message. Use the d-pad up/down to read the notification message and press the Rewind button to go back.
Offline Mode
Offline Mode allows you to choose selected games or game packs and play them offline. That is, an internet connection will not be required to play those tables that you take offline. However, you’ll also not be able to play the tables or game packs on other devices until you reinstate the games or game packs to online mode. To take games or game packs offline:
- MANAGE – Select the Manage option, select the game or game packs you wish to take offline. The number of licenses for each pack will appear on the far-right. It is possible to purchase more than one pack, and take them offline on as many machines as you have licenses. After selecting the game pack(s), press the Rewind button to go back.
- ENABLE OFFLINE MODE – Select this option to take the selected games or game packs offline.
Parental Controls
You can use the Parental Controls to create up to 4 sub-accounts under the parent’s ArcadeNet account. Each sub-account can have its own settings to enable/disable access to the settings and games. The parents account password is required to make changes to any of the sub-accounts.
Pinball Game Settings
Within the Pinball Game Settings (Global) option, you can perform the following Pinball Game Setting changes across all tables:
*NOTE – Use the Left/Right flipper buttons to change the page.
- Master Volume – This option will allow changing the main volume for all tables.
- FX Volume – This option allows changing the Sound Effects volume for all tables.
- Music Volume – This option adjusts the Music Volume for all tables.
- Display Mode – This setting will typically be set for CABINET but may be changed to CLASSIC.
- Flipper Mode (Gottlieb tables only) – Available options are COMBINED and SEPARATE.
- Swap Flipper and Nudge Buttons – If you prefer the nudge to be the red buttons and the flipper to be the white buttons, you can change this setting from the default of STANDARD to SWAPPED. Setting to STANDARD will allow the Red button to act as the flipper and white as the nudge buttons.
- Back Box Style – The default option is BEST FIT. However, you can also change the backglass image to STRETCH or BEST FIT.
- Accelerometer Sensitivity – The accelerometer is the ability to physically shake the cabinet to nudge the ball. This may be set to ZERO (Off), LOW, MEDIUM or HIGH sensitivity.
- RESET ALL SETTINGS – This will reset all settings to the default values.
- RESET ALL TABLES – This will reset all tables to the default values.
Privacy Policy
Allows reviewing the ArcadeNet Privacy Policy directly on the device.
Settings Lock
The Settings Lock will allow you to enable or disable access to the Settings option. This is handy if you have small kids that like to get into your machine settings and change them. If the option is enabled, to disable, it will require you to enter your ArcadeNet password.
Time Settings
When connected to the Internet, you can only change the time zone. The date and time will be synchronized automatically. If you are not connected to the internet, you can change the date and time manually.
- TIME ZONE – Select the appropriate location, such as: UNITED STATES, GREENWICH MEAN TIME or OTHER TIME ZONES. Then select the appropriate time zone for your location and select CONFIRM.
- DATE / CLOCK – You can adjust the clock displayed in 12 or 24 Hour mode.
UI Settings
*NOTE – Use the Left/Right flipper buttons to change the page.
- BACKGROUND AUDIO – With this option selected, you can change the background audio played while in the menus to:
- DEFAULT (pre-set audio music),
- CUSTOM
- NONE
- Choosing SELECT AUDIO will allow you to pick from various pre-installed music tracks, including: CHILL COSMOS, FUTURE FLUX, FRESH NOSTALGIA, CLAPPING CRAZE and COSMIC DREAMWEAVERS.
- BACKGROUND MOOD – This option changes the colors of the animated background, a number of mood settings are available.
- SCREEN BRIGHTNESS – You can adjust the Brightness Intensity level of all three displays easily by selecting pre-defined options of: MODERATE, DIM or BRIGHT. To customize the brightness of each display, select the CUSTOM option. Using the d-pad or optional Arcade Control Panel joystick, move down to the Playfield screen, Backglass screen or DMD screen and adjust the levels by moving the control left/right to change the intensity.
- Table View Mode – Within this option you can choose from the following options:
- LIST – This is the default mode which provides left/right scrolling navigation of options, tables or games.
- TILED – Tiled mode provides an alternate User Interface allowing navigation of settings by providing tiled or rectangular options. This option provides an interface that is reminiscent of the interface which existed on the Legends Pinball HD.
- Scrolling Speed – This adjusts the speed of scrolling while in the LIST Table View mode. Options include: BALANCED or FAST.
- Pinball Playfield Preview – Allows you to enable or disable the table preview.
- Backglass High Score – The SHOW option will display the high scores for a selected table on the backglass display. HIDE will not show the high scores on the backglass display.
Voice Chat

To use the Voice Chat feature, you will first need to pair a Bluetooth wireless headset to the machine. See Wireless Pairing for details on how to do that, if not done already. Once paired, you can click the Start/Play button to create a chat room. Once created, you can then invite your friends into the room. If they accept and join the room, you’ll be able to chat with them in real-time. Options available, include:
- Chat Volume – Press left/right to adjust the chat volume.
- Game Volume – Press left/right to adjust the game volume.
- Stream Mic Audio – This option may be ON/OFF.
- CREATE CHAT ROOM – Creates a chat room to allow inviting friends into the room.
Wi-Fi
You can use the Wi-Fi option to connect to a wireless network. Upon launching the tile, it will begin searching for available wireless networks.
- Select the Wi-Fi network name (or SSID) that you want to connect to and press the Start/Play button.
- Then, select the option Enter Wi-Fi Password. Using the on-screen keypad, enter the network password.
- Select the CONNECT button and press the Start/Play button.
*NOTE – Use the Left/Right flipper buttons to change the page to view more Wi-Fi networks.
Sign out of Wi-Fi Network – If you’ve already connected to a Wi-Fi network and wish to sign-out:
- Select the connected Wi-Fi network (denoted with a star beside the network) and press the Start/Play button.
- Select the option, FORGET IT, to disconnect from the Wi-Fi network.
Wireless Pairing
Wireless pairing allows you to pair the device to additional bluetooth-enabled devices, such as external control decks or wireless headphones.
Legends Gamepad Pairing
- Press and hold the HOME and X buttons for 2 seconds.
Legends Quadplay Pairing
- Power on the device
- Press and hold the P2 button (if not available, press P1) for 5 seconds.
Other devices
- Follow the instructions included for other devices on how to enter pairing mode.
Change Log
- 2024-1-5 – Extracted the Settings from the main Legends Pinball 4KP Guide.