Virtual Machine (VM) Guide
Last Update: 3/26/2023
Virtualization opens up a world of possibilities for anyone interested in running a different operating system on their current computer. For decades, virtual machines have been a cornerstone of Information Technology (IT) infrastructure, empowering users to seamlessly run multiple operating systems within a single host environment. I’ve personally used this technology for years, running various operating systems as guests alongside my primary computer system. With some additional projects that will be forthcoming on the channel, it’s a good time to share how to utilize this technology.
Virtualization liberates users from the constraints of traditional hardware configurations and partitions, offering a dynamic approach to operating system management. With virtualization software such as ORACLE VirtualBox, VMWare Workstation, etc. there’s no need to partition drives or modify physical hardware to accommodate different operating systems. Instead, users can effortlessly spawn virtual machines, running them alongside their primary host operating system without the hassle of rebooting. This flexibility proves invaluable for experimentation, enabling users to explore various operating systems from Linux to Windows to their heart’s content. Even running older operating systems such as IBM OS2/Warp, Windows 95, XP, etc. are easily possible using virtualization.
In this guide, we’ll embark on a journey into virtualization, initially, with a focus on ORACLE VirtualBox as our primary tool. While there are other virtualization packages available, we’ll delve into VirtualBox to kickstart this journey as it’s a free to download/use. Stay tuned for future expansions covering additional virtualization platforms like VMWare Workstation and beyond.
Table of Contents
Virtualization Explained
Virtualization, in essence, is the ability to use a software layer running on your existing computer which abstracts the physical machine-components from the host operating system (the OS you’re currently running). This abstraction is called a hypervisor. It may seem like a scary word, but it’s really not and there are two main types of hypervisors:
- Type 1 (or “bare metal”) – this type acts as it’s own operating system and runs directly on the hardware. We won’t be covering this type of hypervisor in this guide.
- Type 2 – This is the type we’ll focus on primarily in this guide, it’s essentially a software layer that sits on top of another operating system. Just like any other program on your computer.
Every computer has certain basic resources available to the machine. A Virtual Machine, commonly referred to as a VM, requests those resources from the host computer (CPU, RAM, etc.) and the virtualization software allocates those resources to the machine. Let’s take a quick pause and review some of the basic resources needed by the Virtual Machine (or VM) :
- CPU (or Central Processing Unit) or GPU (Graphical Processing Unit) – The “brains” of the computer which perform all the calculations, processing, etc. needed to fulfill one (or more tasks).
- RAM (Random Access Memory) – RAM is the short-term memory of a computer. The more RAM available to a system, the faster the performance. The reason is, the CPU is able to access the data stored in RAM much faster than that on other forms of media, such as: Hard Disk Drives (HDD’s), Solid State Drives (SSD’s), micro SD’s, etc. RAM is short-lived. That is, when you unplug the computer the contents stored in RAM is not persisted and would need to be re-loaded from Storage when powered back on.
- Storage – Storage is considered, more or less, “longer-term” storage of data. Storage is where read/write access is provided through some means which isn’t as fast as RAM but is held for some longer duration dependent on the life span of the media used. For example, if you power off your computer and then power it back on, the data found on the storage device may be loaded back into RAM (i.e. loading/booting Windows). A few examples of common storage devices are: Hard Disk Drives (HDD’s), Solid State Drives (SSD’s), micro SD’s, etc.
- I/O (Input and Output) – I/O can mean any number of different types of devices, for example a keyboard and mouse are common forms of input devices. However, there are thousands more examples that can also be included such as: Webcams, Temperature Sensors, Printers, Network Adapters (Wi-Fi, Ethernet, etc.), USB devices, Monitors/displays, etc. Essentially any device that can receive data from and/or send data to some external device.
Now that we have identified the basic resources of a computer, we can better understand how Virtualization fits into the picture. Let’s assume that your main computer is running a popular operating system, such as Windows. Let’s ignore the various versions of Windows that are available (i.e. Windows XP, 10, 11, etc.). It’s not important for understanding what virtualization is, at this point. We’ll just say, we’re running some flavor of Windows.
Now, imagine that you want to run a totally different operating system (OS) within Windows. That OS may be Linux, earlier versions of Windows, etc. or any number of different flavors or variations of each operating system –or a totally different OS. The way this can be accomplished is through an abstraction of our resources (above) from the host operating system (Windows) that we are currently running. That is, we will need some piece of software available which can make use of our existing resources and translate the internal calls from the host operating system (Windows) to our target (guest) operating system.
The manner in which this abstraction takes place is in the form of virtualization. Where access to any of the above resources are intercepted, translated and handled by our “Guest” operating system. There are a number of different virtualization technologies available today. However, in this guide we’ll use VirtualBox as it is free to download/install and works pretty well.
Benefits of Virtualization
The following are some reasons why Virtualization may be important to you or why you may want to consider it.
- Cost Savings: Virtualization reduces the need for multiple physical machines, saving on hardware costs, power consumption, and space requirements. You can consolidate several servers or workstations onto one powerful machine, reducing overall expenses.
- Security: Virtualization provides an additional layer of security by isolating VMs from the host system and each other. If one VM is compromised, it’s less likely to affect other VMs or the host OS, reducing the risk of spreading malware or unauthorized access.
- Compatibility: Virtualization enables you to run legacy or incompatible software by creating VMs with older operating systems or different configurations. This ensures compatibility with older applications or hardware that may not work natively on newer systems.
- Disaster Recovery: Virtualization simplifies disaster recovery by enabling you to replicate VMs and store backups in a centralized location. In the event of a hardware failure or data loss, you can quickly restore VMs to another host, minimizing downtime and data loss.
- Flexibility: Virtual machines (VMs) are highly portable and can be easily moved between physical hosts. This flexibility makes it convenient for testing, development, and deployment across different environments.
- Snapshotting: Virtualization platforms like VirtualBox offer snapshot functionality, allowing you to capture the current state of a VM at any point in time. Snapshots can be invaluable for troubleshooting, testing software updates, or rolling back to a previous configuration if something goes wrong.
- Training and Education: Virtualization is an excellent tool for learning and teaching IT concepts, as it allows students to experiment with different operating systems, networking configurations, and software setups in a controlled environment.
Virtualization is NOT Emulation
We should make it clear that virtualization is not emulation. Emulation involves mimicking the functionality of one system on another, typically to enable running software or operating systems designed for one architecture on another. In emulation, the software or hardware of the emulated system is recreated in software or firmware. This often involves translating instructions meant for one architecture to another, which can incur significant performance overhead. Emulation is commonly used for running legacy applications or games on modern hardware, or for cross-platform development and testing.
On the other hand, virtualization involves creating virtual instances of entire computer systems within a single physical machine. Virtualization allows multiple operating systems, known as virtual machines (VMs), to run simultaneously on a single host system, each with its own isolated environment. Unlike emulation, virtualization typically does not involve translating instructions between different architectures, leading to better performance. Virtualization is commonly used in data centers to consolidate servers, optimize resource usage, and facilitate flexible deployment and management of IT infrastructure.
Resources
Below are some links to various virtualization software packages. This by far not a complete list, just a few that we’ll use to begin our discussions.
- VirtualBox – A free general-purpose Virtualizer for x86 hardware. Not necessarily the fastest package, but it’s certainly one of the easiest to use.
- QEMU – A generic and open source emulator and virtualizer. Performance is better with QEMU than that of VirtualBox. However, it’s a bit more involved to get up and running. We may come back to this at a later time.
- VMWare – VMWare Workstation is a paid-for platform which is very popular in the business world/software development. It allows the creation of new virtual machines and many advanced features. VMWare Player is does not allow the creation of new Virtual Machines (VM’s) but allows running images created by VMWare Workstation, see here for a comparison of the two versions.
VirtualBox (in Windows)
VirtualBox is an open-source virtualization software package that allows users to create and run multiple virtual machines on a single physical computer. With VirtualBox, users can run different operating systems simultaneously, such as Windows, Linux, macOS, and more. It offers an intuitive interface for creating, configuring, and managing virtual machines, allowing users to allocate resources like CPU cores, memory, and storage according to their needs.
Popular among developers, testers, educators, and IT professionals, VirtualBox provides features like snapshotting, enabling users to capture and revert to previous states of virtual machines, and virtual networking for seamless communication between VMs and the host system. Available for various host platforms, including Windows, macOS, Linux, and Solaris, VirtualBox is widely accessible and continuously improved by an active community of contributors as open-source software.
In the following sections, we’ll install VirtualBox and install a popular Linux operating system called Ubuntu into a virtual machine.
VirtualBox Installation
In this section, we’ll install VirtualBox:
- Visit the website virtualbox.org.
- Click the Download VirtualBox button.
- If you’re running Windows, select Windows hosts. If you’re using a different host operating system, select the package for your host computer.
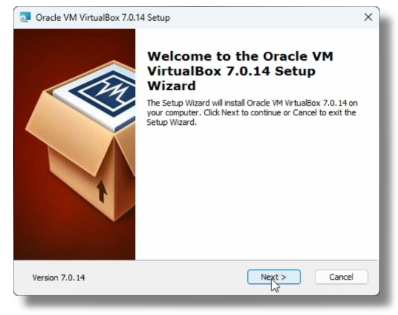
- Launch the Virtualbox installer.
- On the Welcome screen, click Next.
- For custom options, there is nothing that needs to change. The location for the installation will default to the C: (in Windows), if that’s fine click the Next button or change the installation drive.
- You’ll be warned that there will be a temporary network disruption during the installation. If you’re ok with that, click the Yes button.
- If prompted for Missing Dependencies (Python Core / win32api), click the Yes button.
- Click the Install button to proceed.
- Click the Finish button to complete the installation and start VirtualBox.
- Proceed to the next section(s) to setup your first virtual machine!
Getting Started
In the sections below, we’ll discuss setting up specific operating systems within VirtualBox. Initially, we’ll discuss installing Ubuntu 22.04.4, but in the future we may expand this guide to include other operating systems such as IBM OS/2 Warp, Windows 3.11, Windows XP, Linux Mint, etc. If there are operating systems that you would like to see discussed on this guide, comment in the video above and let me know.
Ubuntu Installation
Below we’ll discuss how to install Ubuntu within a VirtualBox virtual machine.
Download Ubuntu
- We’ll start by downloading the Ubuntu .iso image. The .iso contains the operating system that will be used by VirtualBox to install the operating system, visit ubuntu.com .
- Select the option at the top of the page for Get Ubuntu.
- From the sub menu, select Ubuntu Desktop.
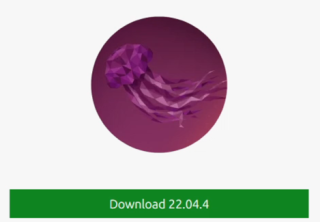
- The version of Ubuntu you wish to install is up to you. At the time of this writing, version 22.04.4 LTS is recommended as it has long-term support (LTS) through April 2027. Click the Download 22.04.4 button. *NOTE – The download is nearly 5GB, depending on your internet connection it may take some time to complete.
- Once downloaded, we’ll install Ubuntu in the next section.
Create the Ubuntu Virtual Machine
- If VirtualBox isn’t already running, start it by double-clicking the Oracle VM VirtualBox icon on the desktop.
- Click the New icon to create a new virtual machine (icons on the top-right).
- Click the drop-down for ISO Image and select Other…
- Browse to the location where the Ubuntu .iso image was downloaded.
- Select the image.
- Click the Open button.
- If you’re fine with the default location for creating the virtual machine images (i.e. \Users\[login]\VirtualBox VMs), you can skip the sub steps here. However, I prefer to use a different location, here’s how:
- Click the drop-down for folders.
- Select Other…
- Browse to the location where you would like to create the virtual machines. In my case, I created a sub folder on D:\VirtualBox.
- Double-click the location you’ve selected and click the Select Folder button.
- Enter a Name for the virtual machine, in this case perhaps Ubuntu-22-04-4 (some characters aren’t allowed here, I used the minus character as it is allowed).
- Click the check box for Skip Unattended Installation (we don’t want an unattended installation).
- Click the Next button.
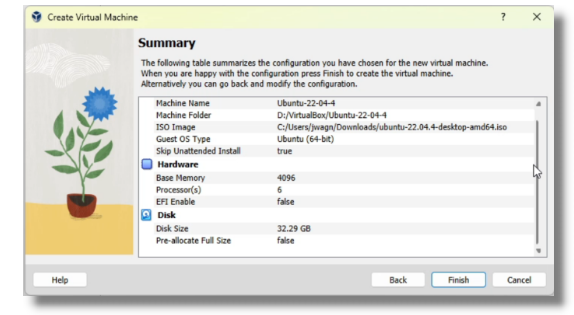
- Next we’ll assign the Base Memory and Processors to be used by the virtual machine. These options will depend on the available resources on your PC. Typically any value within the green area of the sliders will be ok. However, you’ll want to be conservative. The more Base Memory and Processors you assign, the greater the likelihood that it will impact overall performance. For each slider, I’d recommend somewhere near the 1/3rd part of the green areas for both. Below are some examples that I used during installation:
- Base Memory: 4096 MB (on a machine with 64GB of RAM)
- Processors: 6 (on a machine with 28 CPUs)
- After making the Hardware assignments, click the Next button.
- For the Virtual Hard disk, a recommended size will be defaulted for you. That may be fine, but you can increase/decrease it as desired. The value set here is entirely up to you, however I wouldn’t make it much larger than the defaults. In my case, 25 GB was defaulted and I set it to 32GB in size. I don’t expect to need more than 32GB but you may have different needs/requirements. Keep in mind, the value you specify here creates an image file during virtual machine creation or a .vdi (virtual disk image). Everything you install to the virtual machine is written to this .vdi image and completely isolated from your main PC. However, the size you set will consume the disk resources you specify. That is, if you allocate 32GB, it will consume up to 32GB of disk space on the drive.
- After making your Virtual Hard Disk selection, click the Next button.
- You’ll be presented with a Summary of the installation. Review it and if everything looks good, click the Finish button.
- Proceed to the next section to boot and setup Ubuntu.
Setup the Ubuntu Virtual Machine
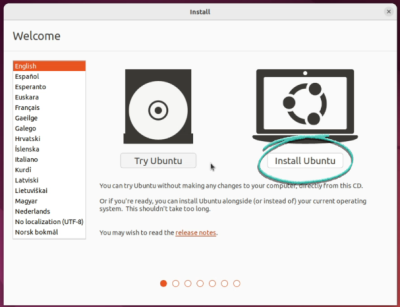
- When Ubuntu first boots, you’ll see an option to Try or Install Ubuntu. Press ENTER to proceed with the installation. If you see a notification overlay on the right, click the blue icon in that window to hide it.
- On the Welcome screen, make sure your preferred language is set (i.e. English) and click the Install Ubuntu button.
- Choose your keyboard layout (i.e. English US) and click the Continue button.
- For the Updates and other software option, the defaults here are typically fine (i.e. Normal installation and Download updates while installing Ubuntu), click the Continue button.
- The Installation type default is Erase disk and install Ubuntu. This may seem a little scary at first, but remember the disk it’s erasing is the virtual disk image (vmi) and not your physical hard drive. Click the Install Now button.
- A prompt will appear requesting to Write the changes to disks?, click the Continue button.
- Typically the time zone will be set correctly for you here, if not click on the map to select your time zone and click the Continue button.
- At the Who are you? screen, enter a user name you’d like to use for logging in to Ubuntu (i.e. ‘jon’ in my case). You can leave the defaulted computer name, or change it. Also, enter a password twice. If you’d like Ubuntu to start up without requiring a password (a potential security risk), you can also select Log in automatically. Once done, click the Continue button.
- The installation of Ubuntu will proceed, copying files and preparing the operating system for first-use. This process may take several minutes, please be patient.
- Once the installation is complete, click the Restart Now button.
- Ubuntu will restart, in the next section we’ll cover a few post-installation steps.
Ubuntu Post-Installation
There are a few more steps to complete after Ubuntu reboots, we’ll cover them below.
- If you had setup Ubuntu to require a login, enter your password and press ENTER.
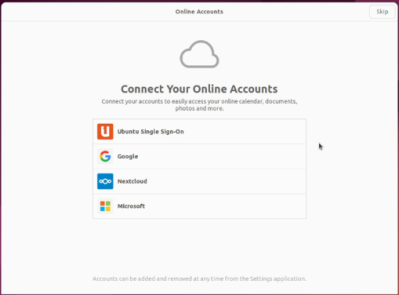
- If you want to connect your Online Accounts, you can or click the Skip button.
- You can upgrade to Ubuntu pro, if you prefer, or click the Next button (you can change this later, if you want).
- If you want to send system information, you can leave the option checked or select No, don’t send system info. Then, click Next.
- If you want to send location information, click the switch. Otherwise, just click the Next button.
- You can download/install additional applications by clicking the Open “Software” now button or click Done.
- That completes the post-installation steps.
Ubuntu Mini-Tutorials
Below we’ll go through some common operations that you may find helpful after installing Ubuntu.
Update Ubuntu
- Update from the User Interface
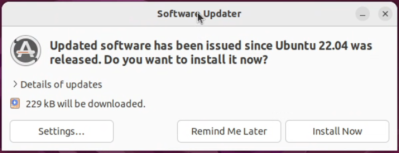
- After the Ubuntu installation completes, you may be prompted with the Software Updater.
- If so, you can can click the Install Now button to update Ubuntu with the latest software.
- Once the update completes, restart the virtual machine by clicking the icon in the upper-right.
- Select Power Off/Log Out
- Select Power Off…
- Update from the Terminal (command line)
- In the lower-left, click the Show Applications icon.
- Select the Terminal icon.
- Type: sudo apt update
- Press ENTER.
- Type in your password and press ENTER.
- Type: sudo apt upgrade
- Press ENTER.
- Any packages that have updates will be downloaded and installed.
Install Guest Additions
Guest Additions will provide improved integration with the host operating system. To install it, see below:
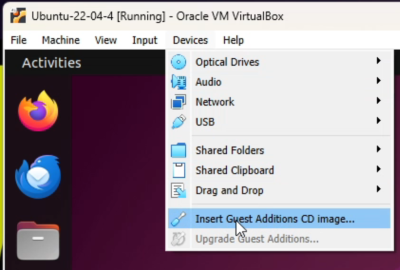
- From the VirtualBox menu, select Devices → Insert Guest Additions CD Image…
- From the Launcher (on the left), click the CD icon.
- Right-click the autorun.sh file and select Run as a Program.
- Enter your password.
- Guest Additions will now be installed.
- Once complete, press ENTER in the terminal window.
- Restart the virtual machine by clicking the icon in the upper-right.
- Select Power Off/Log Out
- Select Power Off…
- After the reboot, you can remove the Guest Additions image:
- From the VirtualBox menu, select Machine → Settings
- Select Storage
- Under Controller:IDE, select the VBoxGuestAdditions.iso image.
- Click the CD icon and select Remove Disk from Virtual Drive.
- Click the OK button.
Enable Clipboard Sharing
To share the clipboard between the Ubuntu (guest) and the Windows (host), you must first have installed the Guest Additions. Once done, proceed with the following:
- Click Settings (from the menu or from the VirtualBox launcher).
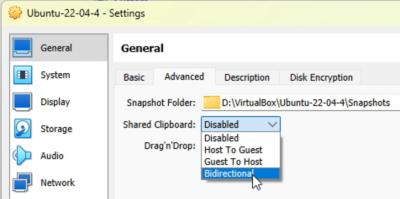
- Under General, click the Advanced tab.
- Set Shared Clipboard to Bidirectional (you can repeat the same for Drag’n Drop, if you prefer).
- Click the OK button once done.
- The clipboard can now be shared between Ubuntu and Windows.
Enable File Sharing
You can share a folder on the host operating system with Ubuntu. To do that, please see below:
- From the VirtualBox menu, select Machine → Settings
- Select Shared Folders.
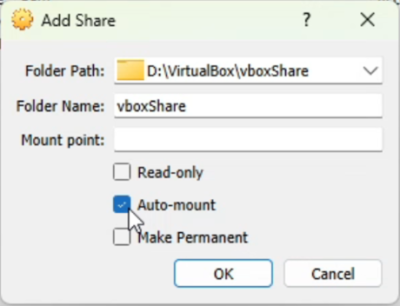
- On the Windows (host) operating system, create a folder you would like to share (i.e. [drive:]\VirtualBox\vboxShare).
- In Ubuntu, from the Shared Folders selection, click the folder (+) icon.
- Click the drop-down on Folder Path.
- Select Other…
- Browse to the folder you would like to share and click Select Folder.
- Click the checkbox for Auto-mount.
- Click OK and OK again.
- Open a Terminal window
- In the lower-left, click the Show Applications icon.
- Select the Terminal icon.
- Type: whoami (we’ll use the result in the next command, [name] will be the value returned by the whoami command)
- Type: sudo adduser [name] vboxsf
- Enter your password and press ENTER.
- To access the shared folder
- Click the Files icon on the launcher.
- Select the sf_vboxShare folder (near the bottom)
- Any folders or files created here are saved/shared to the host operating system.
Change Log
- 2024-03-26 – Minor updates/corrections.
- 2024-03-20 – Public release of this guide and companion video.
- 2024-03-13 – 2024-03-19 – Resumed work on this guide.
- 2022-03-03 – Start to this guide.