
AtGames ATARI Flashback Gold Guide
My first-ever exposure to gaming / computers was the ATARI VCS/2600. Out of the blue, my parents brought home this little machine for the family to play. My sister and I spent countless hours playing the included cartridge, Combat. It was a simple tank game that was designed for two-players only. You would navigate the course to shoot your opponent. We did collect a number of cartridges and remember some of the best titles were from Activision, Imagic and Parker Brothers. While the graphics on the 2600 were simple by today’s standard, they were amazing in the late 70’s and early 80’s. The ATARI 2600 wasn’t the first home gaming console, but it was certainly one of the most iconic of the time period.
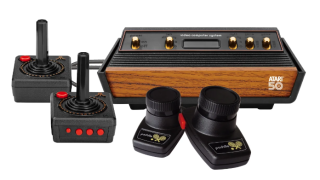
Fast forward 40ish years later and AtGames has released a modern version of the ATARI 2600 with 130 licensed games built-in, two joysticks (look very much like the original), two paddles and an adorable little ATARI 2600 console with HDMI output to easily connect to your modern HDTV/Monitor. The game selection is pretty impressive as well. It has many classic Atari games as well as others from Activision (Pitfall!, River Raid, Kaboom!, Freeway, etc.), Imagic (Demon Attack, Dragonfire, Moonsweeper, etc.), Mattel (Burgertime) and many more!
The information you find on this guide will help you get the most out of your Flashback, tips, expandability and more may be found on this page. I hope you enjoy the content below and find it helpful. If you do, I appreciate your support by subscribing to the Wagner’s TechTalk YouTube channel. Here, you’ll find videos on a number of technology topics – now including, the ATARI Flashback Gold!
-Jon
How-To link to a specific section on this Guide: go to the Table of Contents (below) and click a section to reference. Copy the URL from the address-bar of your browser and paste in your video description/post/blog. This will direct a viewer to a specific section in any of the guides you find on this site.
Table of Contents
Where to Buy?

Below are locations that sell the ATARI Flashback Gold Edition:
- ATARI Flashback 12 Gold [ Amazon | AtGames Site ] – This is the most recent model of the ATARI Flashback Gold. NOTE: does not mention the 50th Anniversary Edition on the packaging as it is no longer available. However, it is functionally the same console.
ATARI Flashback Gold 50th Anniversary Edition [ Amazon | AtGames Site | newegg ] – Purchase links for the ATARI Flashback Gold.NO LONGER AVAILABLE (See above links instead)
Resources
- Atari 2600 Subreddit – Great resource for all things Atari 2600 releated.
- Atari Subreddit (thread) – Thread created to mention the firmware release.
- Atari Flashback Gold Console 50th Anniversary Edition (AtariAge) – Excellent information on this great little Atari console.
- Atari Flashback Firmware Updates – Download page for all available firmware updates (ATARI Flashback Gold 50th Anniversary edition not yet listed).

Specifications
- 720p HDMI Video Output (HDMI cable included)
- MicroUSB power cable (with adapter)
- x2 wired Atari Joysticks
- x2 wired Atari Paddles
- Atari Flashback Gold Mini Console (Model: AR3080)
- The included wired controllers are compatible with the original Atari Joysticks and Paddles.
Quick How-To
- How do I check the firmware version? Answer: Navigate down to the About selection and look towards the bottom-middle for Firmware version (in the grey box). If you see AR3080_V1.0.0, you may want to update your console to the latest firmware (fixes paddle movement inconsistency and the ability to return back to the main menu from a selected paddle game).
- How should I connect the Joysticks? Answer: If you’re playing Joystick-only games, look at the lower-right corner of the Joystick and you’ll see either P1 or P2. Plug P1 into the left port on the Flashback Console and P2 into the right port.
- How do I Start a Paddle Game?
Answer:- Plug the P1 Joystick into the right port. Plug the paddles into the left port.
- Select the Paddle game you want to play using the P1 Joystick. You can then select another paddle game by moving the Joystick left-right or right-left or return to the main menu by pressing the Menu button (*NOTE: updating the firmware may be necessary for this to work).
- Once the game has opened, use the Game Select switch if you want to change the game (The 2600 often had several versions of the same game for 1, 2 or more players, varied options, etc.).
- Press Game Reset on the console. You may also need to press the fire button on the Paddle(s) to begin the game.
- How do I Exit a Game? Answer: Press the Menu button on the P1 stick and select Quit Game.
- How do I Switch to a different Game?
Answer:- Leaving a Joystick Game – While playing a Joystick-based game with the P1 Joystick in the left-port, when you exit a game you’ll return to the main game list. From there, you can select a different game.
- Leaving a Paddle Game – While playing a Paddle-based game, from the P1 Joystick in the right-port press the Menu button and select Quit Game. You can then select another paddle game by moving the Joystick left-right or right-left or return to the main menu by pressing the Menu button (*NOTE: updating the firmware may be necessary for this to work).
- How do I Rewind a Game? While in-game, press the Rewind button on the front of the P1 Joystick.
- How do I mark a game as a Favorite? Select a game, then press the GAME SELECT switch on the console to toggle a game as a favorite (or not).
The Console
The table below identifies the location of all the ports available on the Flashback Gold.
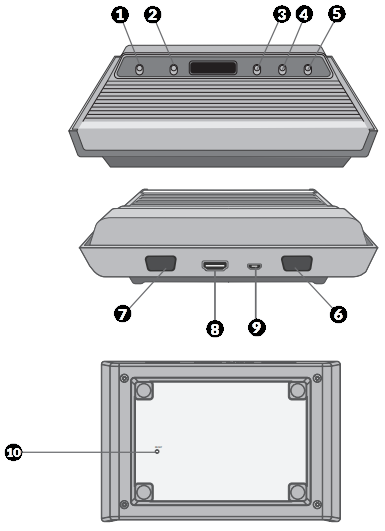
| Item | Option |
|---|---|
| 1 | Power Switch |
| 2 | Difficulty Switch (Left Player) |
| 3 | Difficulty Switch (Right Player) |
| 4 | Game Select |
| 5 | Game Reset |
| 6 | Controller Port (Left Player) |
| 7 | Controller Port (Right Player) |
| 8 | HDMI Port (Connect to TV / Monitor) |
| 9 | Micro USB Port (for Power and Expandability) |
| 10 | System Reset (Bottom of the console) |
Controls
In the following sections, we’ll take a look at the controllers used by the Flashback Gold. There is one Joystick marked as P1 (see etching in lower-right of the stick), one as P2 and a set of two paddles connected to a single connector.
Paddles
When playing paddle-based games, you will want to plug them into the LEFT port and the P1 Joystick in the RIGHT port. See How do I Start a Paddle Game for additional details on starting a Paddle-based game.
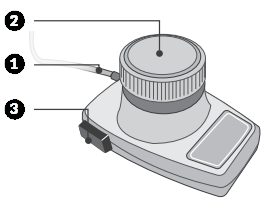
| Item | Option |
|---|---|
| 1 | Controller Cable |
| 2 | Paddle knob |
| 3 | Fire Button |
Joysticks
There are two Joysticks included, one has buttons on the front (P1) the other does not (P2). When playing exclusively Joystick-enabled games, plug the P1 Stick (see etching on the bottom-right of the stick) into the LEFT port on the back of the Flashback Gold. The seconds Joystick is P2 (no buttons on the front) should be plugged into the RIGHT port on the back of the Flashback Gold.
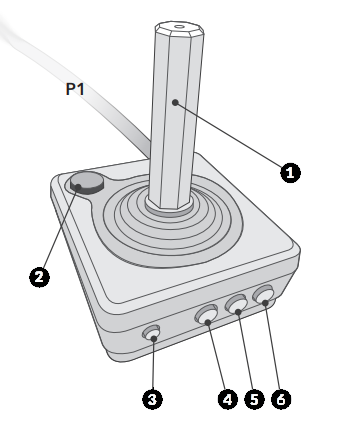
| Item | Option |
|---|---|
| 1 | Joystick (8-way) |
| 2 | Fire Button |
| 3 | Menu Button – Returns to the main menu or dialog while in-game. |
| 4 | Select Button |
| 5 | Start Button – Starts a game. |
| 6 | Rewind Button – Rewinds the current game-play while the button is being held. |
Basic Operation
Below are few things you’ll need to know to start using the Flashback Gold:
- Using Joysticks – The two Joysticks are not identical. You’ll see P1 and P2 etched in the bottom-right of the controller. P1, in-general, should be plugged into the left port and P2 in the right port of the console, unless you’re using paddles. For Paddles, see the next item.
- Using Paddles – If you’ll be playing paddle games, see the following:
- Plug the P1 Joystick into the right port. Plug the paddles into the left port.
- Select the Paddle game you want to play using the P1 Joystick. You can then select another paddle game by moving the Joystick left-right or right-left or return to the main menu by pressing the Menu button (*NOTE: updating the firmware may be necessary for this to work).
- Once the game has opened, use the Game Select switch if you want to change the game option (The 2600 often had several versions of the game for 1, 2 or more players, varied options, etc.).
- Press Game Reset on the console. You may also need to press the fire button on the Paddle(s) to begin the game.
- With the paddles connected, you can return to the main menu if you are running firmware AR3080_v1.1.1 or higher. If you aren’t, please see here. Otherwise, you won’t be able to return to the main menu with the P1 Joystick until you plug it back into the Left port. However, if you’re in the Paddle games menu, you can move the joystick left or right to select a different paddle game.
Main Menu
In this section we’ll talk about the various menu options provided with the ATARI Flashback Gold.
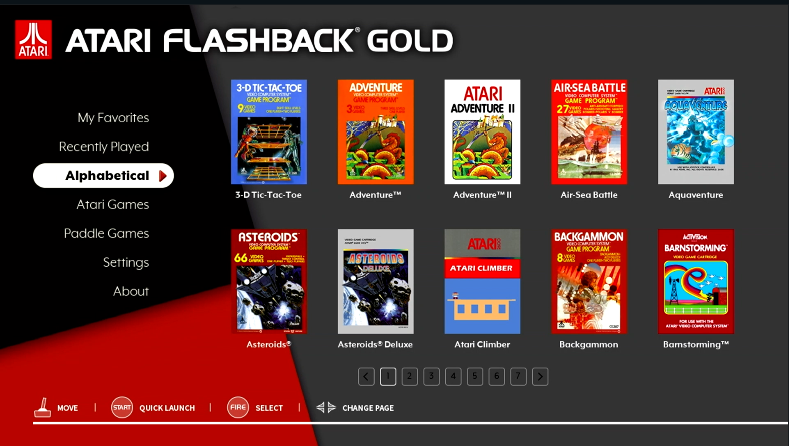
- My Favorites – After selecting a game, you can then press the GAME SELECT switch on the console to toggle a game as a favorite (or not).
- Recently Played – A listing of your most recently played games.
- Alphabetical – An alphabetical listing of all games included on the machine, both those controlled by Joysticks as well as paddle games not developed by Atari (i.e. Activision, Imagic, etc.)
- Atari Games – Only original Atari games will appear in this category.
- Paddle Games – Paddle games-only will appear in this category.
- Settings – Under the Settings category, you can select a different Bezel (5 to choose from), Delete all Save States and turn on/off the Background Music.
- About – Identifies the Firmware version installed and displays two QR codes for additional information and product registration.
To page through the game list or background (under Settings), move the joystick down to the small squares below the listing. Then, move the Joystick (P1) right or left to page through the game list.
In-Game Menu
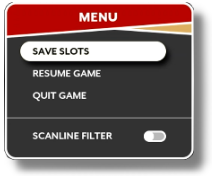
While in a game, you can press the menu and will be provided with the following options:
- Save Slots – Selecting this option will allow you to save the current state of the game by pressing the fire button on a selected tile (5 slots are available per game). Additionally, you can load a previous game state by selecting the tile and pressing up on the Joystick. You can delete a previously saved game state by selecting the tile and pressing down and confirming Yes to delete it.
- Resume Game – Returns back to the current game in-progress.
- Quit Game – Exits the current game.
- Scanline Filter – Allows toggling Scanlines on/off.
Connect to the Legends Devices
The ATARI Flashback Gold 50th utilizes a technology called APL or Arcade Play Link to allow connecting the console to the AtGames Legends Ultimate (or other Legends devices). This is done exclusively using an HDMI cable from the Flashback to the Legends Ultimate. No need to connect any other cables as both the video signal and the data lines (to handle the controls) are sent through the single HDMI cable.
*NOTE: Joystick-enabled games will work fine via APL (HDMI from Flashback Gold to the Legends Ultimate) with the Stock Legends Ultimate Control Panel. However, Spinners and Trackball aren’t currently being recognized by the Flashback Gold (not sure if there are plans to support them). The QuadPlay is not currently working with the Flashback Gold, but a future Firmware update may allow it to work.
Connecting via APL
If you’re using the stock Legends Ultimate control panel, proceed with the following:
- Power off the Flashback Gold.
- Connect the HDMI cable from the Flashback Gold to the HDMI port on the Legends Ultimate (or other supported Legends device).
- Press the Channel button.
- Turn on the Flashback Gold.
- That’s it, you can now use the Arcade Joysticks from the Legends device with the Flashback Gold!
Expandability
It is possible to add your own games to the ATARI Flashback Gold. For example, if you want to add the Coleco Donkey Kong, Atari Pac-Man and thousands of other games to your Flashback, you can with a connected USB thumb drive. In the sections below, we’ll talk about what you’ll need and what’s involved.
What you’ll need
- An OTG and Power Cable – With this cable, your Flashback Gold will have a USB 2.0 port for connecting a USB stick with your own games. You’ll plug in the power for the console in the female connector, the microUSB connection into the console.
- USB Stick – A smaller capacity stick will be fine, if you have one. The link here is for a 5-pack of 32GB sticks which is the exact one shown in the video above.
Adding More Games
- Insert your USB Stick into an available USB port on your PC.
- Format the USB stick as FAT32 (Windows will allow formatting a USB stick 32GB or less, however you can also use Pi Imager here, if you prefer).
- Create a subfolder called Game off the root.
- Copy your ATARI 2600 games into the Game folder. *NOTE-Make sure there are no spaces in the filename, filename is less that 13 characters or this won’t work.
- Power-off the Atari Gold Flashback.
- Remove the power cable from the Flashback and plug it into the OTG Adapter (mentioned above).
- Plug the power from the OTG Adapter into the power on the Flashback.
- Plug in the USB Thumbdrive into the female USB port on the OTG Adapter.
- Power on the Flashback.
- You’ll now see an option on the bottom-left of the menu that states Ext. USB Drive. Navigate here and you’ll see the games you added listed to the right.
- Select a game and play!
Firmware Update
The following procedure will describe how to update the firmware in the Atari Flashback gold. To complete this process you’ll need the following items:
- Atari Flashback Gold Edition (if you don’t own one, you can find them here).
- USB-A to microUSB data cable for connection between a PC and the Flashback. If you don’t have one, here’s an example.
- A Windows 10/11 PC.
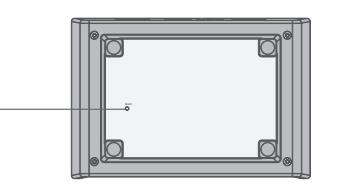
- Small jewelers flat-head screwdriver, 1.5 Allen wrench or paperclip to press and hold the reset button on the bottom of the Flashback Gold.
- Download and install 7-zip – link to 7-zip here. You’ll need 7-zip to extract an additional archive with a .rar file extension.
Firmware Update Steps
*NOTE – Some have had difficulties getting the Android Tool to work properly with their PC’s. If you have this problem or need an easier way to update the firmware, please see the Alternate Firmware Update method.
- First verify a firmware update is needed, see the first point here.
- You’ll need to download two files below to a new folder (i.e. \AtariFBGold) the needed files are:
- atari_update.img (Latest AR3080_v1.1.1) – Scroll towards the bottom of the page, login to the portal and click the Download button for the ATARI FLASHBACK® GOLD 50TH ANNIVERSARY EDITION (MODEL NO: AR3080). *NOTE: The actual filename may differ from ‘atari_update.img’ and may instead be AR3080_V1.1.1.img. You can rename AR3080_V1.1.1.img to atari_update.img, if it makes it easier to follow along.
- AndroidTool.zip (~108MB)
- Extract the AndroidTool.zip. Right-click the AndroidTool.zip, then Extract All… and click the Extract button and follow the prompts. If another explorer instance pops up, you can close it.
- Right-click on the DriverAssistant_v4.6.zip and select Extract All…, click the Extract button and follow the prompts.
- Navigate to the \AndroidTool\DriverAssistant_v4.6\DriverAssistant_v4.6 sub folder and double click DriverInstall.exe.
- Now click the Install Driver button to install the driver for the Atari Flashback Gold.
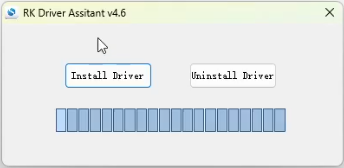
- Once installed, you’ll see a dialog that states: Install driver ok. Click the OK button and close out of the Driver Assistant tool.
- Navigate to the \AndroidTool\AndroidTool sub folder and right-click the AndroidTool_Release_v2.69.rar file. Using 7-zip, right click the .rar file (in Windows 11, you’ll need to click the Show more options option), then select 7-zip and Extract to “AndroidTool_Release_v2.69\”
- Navigate to the /AndroidTool/AndroidTool/AndroidTool_Release_v2.69 sub folder.
- Double-click the AndroidTool.exe.
Hold Reset Switch while switching the power to the ON position- The next part can be a little tricky, so we’ll break it down a bit:
- Connect a USB-A to microUSB cable to your PC.
- Make sure the Atari Flashback power switch is in the OFF position.
- On the bottom of the Atari Flashback, you’ll see a small Reset hole. You’ll need to use a jewelers screwdriver (flat-head), 1.5 Allen wrench or a paper clip (extended) to hold down this button. THEN, flip the power switch on the front to the ON position.
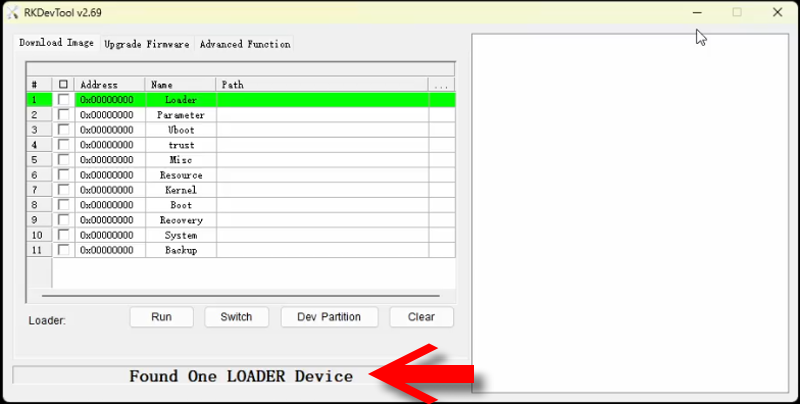
- Once the AndroidTool is communicating with the Flashback, you’ll see “Found One LOADER Device” at the bottom of the window. Image for reference below:
- Select the Upgrade Firmware tab.
- Select the Firmware button.
- Select the firmware file atari_update.img and click the Open button.
- Next, click the Upgrade button. The firmware update will then begin and takes less than a minute.
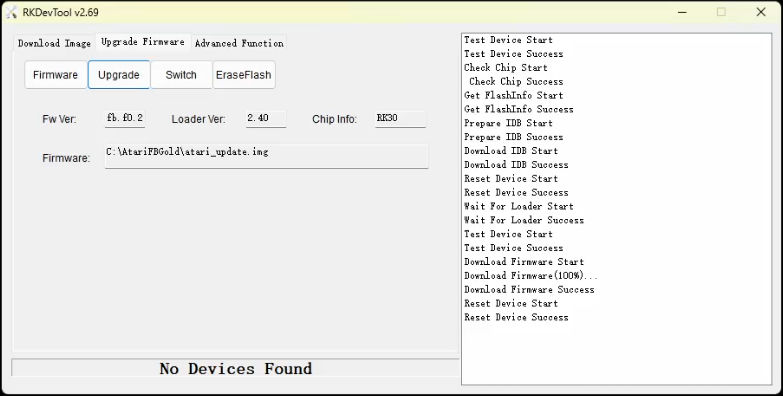
- Once the firmware update is complete, you’ll see on the right panel all the actions that were performed. See the image below for reference:
- You can now disconnect the microUSB cable from the Atari Flashback and close out of the AndroidTool.
- Plug in the Atari Flashback into the included power-supply, connect the controllers and you’re now running the latest Firmware!
Alternate Firmware Update Method
There is another method of updating the firmware but requires this OTG Power Cable. If you have this and a FAT32 formatted USB stick, please proceed with the following:
- Power off the Atari Flashback Gold.
- Plug in the P1 Joystick (the one with buttons on the front) into the port labeled LEFT.
- Plug the OTG cable microUSB connector into the console (male end of the OTG cable into the console).
- Plug the power into the female end of the OTG adapter.
- From a computer, download atari_update.img (Latest AR3080_v1.1.1) – Scroll towards the bottom of the page, login to the portal and click the Download button for the Flashback model you will be updating (i.e. Flashback Gold 50th, Flashback 12 Gold, etc.). *NOTE: The actual filename may instead be atari_update_1.1.1.img.
- Rename atari_update_1.1.1.img to atari_update.img
- Copy the atari_update.img file to the root of the USB stick.
- Plug your USB stick containing the atari_update.img file into the female USB 2.0 port on the OTG adapter.
- Power on the Atari Flashback Gold.
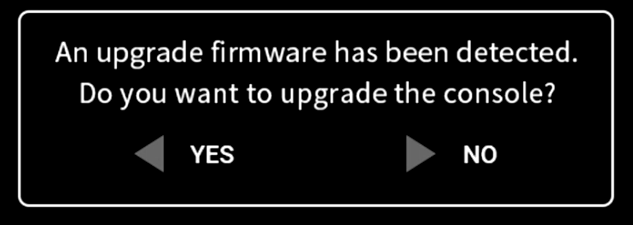
- When you see the firmware update dialog (below), move the joystick to the left (Yes).
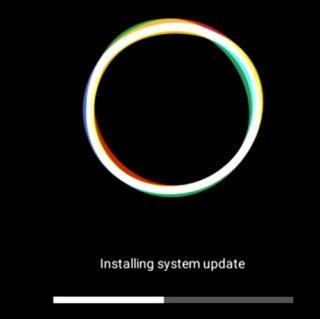
- The firmware update will now begin, you’ll see the following during the update process:
- Once updated, power off the console and remove the USB stick.
- Delete the atari_update.img file from the USB stick to prevent it from auto-updating in the future.
- Verify that the update was successful by reviewing the first point here. It should report V1.1.1 (or higher).
- That’s it!
Game List
Below is a full listing of all the 130 included ATARI 2600 games. Titles below include: Atari, Activision, Imagic, Mattel, M Network and many more. If the ones you’re looking for aren’t below, you can easily add your own!
| 3-D Tic-Tac-Toe | Adventure® | Adventure® II | Air-Sea Battle |
| Aquaventure® | Asteroids® | Asteroids® Deluxe | Atari Climber |
| Backgammon | Barnstormingâ„¢ | Basketball | Beamriderâ„¢ |
| Black Jack | Bowling | Boxing | Breakout® |
| Bridge | BurgerTimeâ„¢ | Burnin’ Rubberâ„¢ | Canyon Bomber® |
| Centipede® | Championship Soccer | Chopper Command™ | Circus Atari® |
| Combat® | Combat® Two | Cosmic Commuter™ | Crackpots™ |
| Crystal Castles® | Decathlon | Demon Attack™ | Demons to Diamonds |
| Desert Falcon | Dodge ‘Em | Dolphinâ„¢ | Double Dunk |
| DragonFire | Dragster | Enduro™ | Fatal Run® |
| Fishing Derbyâ„¢ | Flag Capture | Football | Freewayâ„¢ |
| Frog Pond | Front Lineâ„¢ | Frostbiteâ„¢ | Fun with Numbers |
| Golf | Grand Prix™ | Gravitar® | H.E.R.O.™ |
| Hangman | Haunted House® | Home Run | Human Cannonball |
| Ice Hockey | Indy 500 | Jungle Huntâ„¢ | Kaboom!â„¢ |
| Keystone Kapersâ„¢ | Laser Blastâ„¢ | Lock ‘n’ Chaseâ„¢ | Maze Craze |
| Megamania™ | Millipede® | Miniature Golf | Missile Command® |
| Moonsweeperâ„¢ | MotoRodeo | Night Driver | Off The Wall |
| Oink!â„¢ | Outlaw | Pitfall II: Lost Caverns | Pitfall!â„¢ |
| Plaque Attack™ | Polaris™ | Pong® (Video Olympics) | Pressure Cooker™ |
| Private Eye™ | Radar Lock | Realsports® Baseball | Realsports® Basketball |
| Realsports® Boxing | Realsports® Football | Realsports® Soccer | Realsports® Volleyball |
| Return to Haunted House | River Raidâ„¢ | River Raidâ„¢ II | Robot Tankâ„¢ |
| Saboteur® | Save Mary | Seaquest™ | Secret Quest |
| Skiing | Sky Diver | Sky Jinksâ„¢ | Slot Machine |
| Slot Racers | Solarisâ„¢ | Space Invadersâ„¢ | Space Raid |
| Space War | Spider Fighterâ„¢ | Sprintmaster | Stampedeâ„¢ |
| Star Ship | Starmasterâ„¢ | Steeplechase | Stellar Track |
| Street Racer | Submarine Commander® | Super Baseball | Super Breakout |
| Super Football | Surround | Swordquest® Earthworld | Swordquest® Fireworld |
| Swordquest® Waterworld | Tempest® | Tennis | Video Checkers |
| Video Chess | Video Pinball | Warlords® | Wizard |
| Yars’ Return | Yars’ Revenge® |
Troubleshooting
- I’ve tried updating the firmware, but I’m having difficulty applying the firmware update. Is there another method? Yes, it’s a bit easier though requires an additional cable. Please see the Alternate Firmware Update Method.
- The Flashback console is not powering on, why? Be sure that you’re using the power adapter provided with the unit. It requires 5V/1A to work properly.
- How do I connect the Paddles to play a game? See the section How do I Start a Paddle Game.
- How do I connect the Joysticks? See the section How should I connect the Joysticks?.
- The issue I’m having isn’t on this guide, what do I do? If the above Troubleshooting information did not help resolve the issue, you can also contact AtGames for assistance by visiting here.
Change Log
- 2023-12-23 – Minor updates to the firmware update procedure (method 2).
- 2023-11-12 – Updated the links for the ATARI Flashback Gold to match current availability.
- 2023-08-08 – Minor updates.
- 2023-07-28 – Updated version referenced in the guide, AtGames corrected an issue with the Bridge game in ver. 1.1.1.
- 2023-07-24 – Minor updates to make the Alternate Firmware section a bit more clear.
- 2023-07-23 – Added Alternate Firmware Update section.
- 2023-06-21 – Fixed a dead link to check the version in the firmware update section.
- 2023-06-17 – Added Atari 50th Review video. Corrected one minor statement regarding marking a game as a favorite. Corrected invalid link to USB sticks.
- 2023-06-15 – Public release of this guide.
- 2023-03-11 – 2023-06-15 –Start to this guide.