
Last Update: 1/5/2023
CoinOpsX is a great way to play even more of your favorite Arcade classics on the AtGames Legends Pinball (ALP), Legends Ultimate Mini (ALUM) and the Legends Core/Max in portrait/vertical mode. This guide will step you through the setup and installation of CoinOpsX for a vertical build using the CoinOpsX Vertical WOPR SaUCE Edition. However, by “saUCE” edition, that means it includes roms. I can’t provide any direct links to roms, bios, etc. (see why here). However, it’s easy to locate and some of the information below may assist.
Huge thank you to lilalien, TechZombie and The Chefs at the FansofsaUCE that worked hard putting this vertical CoinOpsX build together. Their announcement of the CoinOpsX Vertical “WOPR With CHEESE” build may be found here.
How-To link to a specific heading on this page: go to the Table of Contents and click a section to reference. Copy the URL in the address-bar and paste in your video description/post/blog. This will direct a user to a specific section.
Table of Contents
Prerequisites
The following are some things you’ll need before you can begin:
- USB Stick – You can use any 64GB, 128GB (or larger) USB stick you prefer. I often use the SAMSUNG FIT Plus 256GB USB 3.1 Flash Drive primarily due to it’s low profile form-factor and Samsung reliability/speeds. Also, some other manufacturers make their sticks out of plastic and I’ve seen at least one report where this has caused problems when the plastic broke off inside the USB port. Just a recommendation to consider Samsung.
- Download the AddOnX tool – You will need to download the AddOnX tool to setup CoinOpsX. This link will take you to the AtGames release notes, look down a little ways for the AddOnX tool link.
- Download CoinOpsX Vertical “WOPR With CHEESE” – You’ll have to locate the download yourself. As a hint, using your favorite search engine you may be able to locate it using “CoinopsX Vertical WOPR SaUCE”. The main download is ~12.2GB in size and the WOPR With Cheese (update pack 1) is ~4.2GB. You may get better download speeds by using a torrent client.
- Download and Install 7-zip – You can use this free application to unzip the archives, if needed.
It is a lot of work creating and maintaining the guides on this site. I appreciate any support from the community by subscribing to the YouTube channel, commenting / liking the videos all help tremendously in growing the content you’ll find here. Thank you –Jon
Known Issues
There are a few known issues that will hopefully be corrected by AtGames (or the community) soon to make this build even better:
- High-score saving may not work on some devices (ALP, ALUM, LC, LCM).
- Haptics on the ALP with CoinOpsX seem extremely high. See the Troubleshooting section for a possible fix.
- The startup video doesn’t play back properly on portrait (vertically oriented) displays.
- I have encountered some instances where exiting CoinOpsX exits and re-launches. Only solution I’ve found is to power-cycle the machine when that happens.
- See the Known_issues.txt file within the main CoinopsX_Vertical WOPR saUCE edition archive for additional known issues.
Differences from Previous Build
The following are the changes from the previous WOPR Build and the recent WOPR /w Cheese build. To apply this update to an existing WOPR build, please see the instructions here.
- 41 new games
- Couple game fixes (Centipede, Millipede, etc)
- Vertical video format fixes (consolidated into one format, fixes issues with Arcade Legends Pinball backglass)
- Countless new marquees, replacement logos
- New pinball playlist
Helpful Tips
The following are some tips you may find helpful.
- On the Legends Ultimate Mini, there is no P2 button to start a 2-player game. However, a handy tip from Dave K. is that you can plug in a USB controller into the USB 2.0 port, add enough credits for a 2-player game and press Start on the controller to start the 2-player game. An example game that works well is Xevious. Once started, use the Legends Ultimate Mini stick and buttons to play the game, but you’ll notice the P1/P2 swapping as it should.
Resources
- Fans Of SaUCE Subreddit – Subreddit for discussing CoinOpsX/SaUCE and related information.
- AtGames Legends Pinball Guide – Product information for the AtGames Legends Pinball.
- AtGames Legends Ultimate Mini Guide – Product information for the AtGames Legends Ultimate Mini, a machine which can display content both horizontally and vertically (portrait).
Prepare USB Drive
The following will assist you with the steps for setting up CoinOpsX WOPR saUCE Edition to a USB drive :
- Download & copy the following files to a subdirectory on your PC (Example: [drive:]\CoinOpsX )
- CoinopsX_Vertical WOPR saUCE edition.zip (12.2GB)
- CoinOpsX Vertical WOPR With Cheese Update Pack 1.zip (4.2GB)
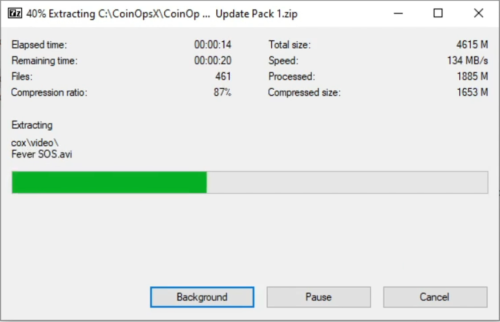
- Unzip the two archives under your [drive:]:\CoinOpsX subfolder. If you need an unzipping tool, 7-zip is one I prefer:
- CoinOpsX Vertical WOPR With Cheese Update Pack 1.zip
- CoinopsX_Vertical WOPR saUCE edition.zip
- Insert your USB stick / flash drive into an available USB port on your PC (3.x port if you have one).
- Click the Windows 10 Start button and type Disk Management and then click the result for Create and format hard disk partitions.
*NOTE: Be very careful and follow these steps exactly. If you format the wrong drive, you can lose everything on your PC!
- Locate your USB drive, it should state Removable … GB, the size will depend on the size USB drive you’ve attached to your PC. NOTE: I recommend not having any other USB storage devices connected to your computer during this step to avoid any confusion/mistakes.
- Right-click on the drive, and select Delete Volume… and click Yes (again, triple-check it’s the correct drive!)

*NOTE: If you will be using a Legends Pinball 1.1, Legends Ultimate 1.2, Legends Ultimate Mini 1.1, Legends Pinball Micro 1.0 or Legends Core Max, you only need a single partition created for CoinOpsX. If you are not sure what version device you have, see here to identify the UUID (device id) of your machine. That is, skip the FAT32 partition creation mentioned below and only create a single exFat partition for those machines. The reason, these machines already have flash storage and the Flash Drive X application isn’t necessary.
- Next, we’ll create two separate partitions on this drive (see NOTE above, only one exFat partition is needed for more recent devices). The first will be for Flash Drive X, the other for the CoinOpsX (the games).
- Right-click in the Unallocated section of the USB drive and select New Simple Volume…
- Click Next.
- For the Simple volume size in MB, enter 16384 (to create a 16GB partition) or 32768 (to create a 32GB partition). I created a 32GB partition for use with a 256GB USB stick (32768). However, if you’re using a 64GB/128GB USB stick, to go with 16GB (16384). This partition will be re-formatted when we run Flash Drive X and used for running applications such as: CoinOpsX, PixelcadeX, Pinball Tables, etc.
- Then click Next (no need to change anything on the Assign Drive Letter or Path dialog).
- Now on the Format Partition dialog, select FAT32 for the File system.
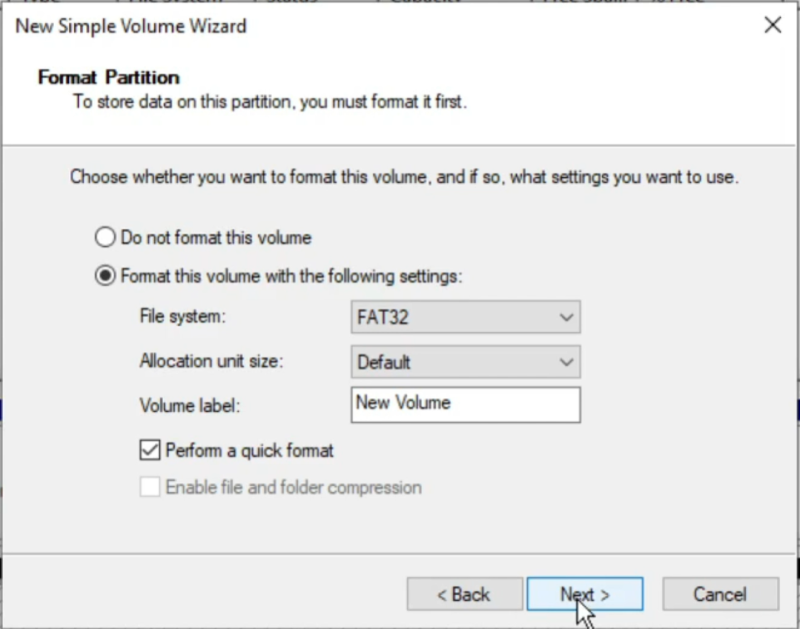
- Click Next.
- Double-check the settings are correct, click the Finish button to the Completing the New Simple Volume Wizard.

- For the remaining Unallocated space, right-click in that box and select New Simple Volume…
- Click Next (dialog states Specify Volume Size – no changes here).
- Click Next (Assign Drive Letter or Path – no changes here)
- Click the drop-down under File system and select exFat. You can assign a Volume label if you prefer, such as “CoinOpsX”, “ALP”, “ALUM” or leave it as “New Volume”. Doesn’t matter.
- Click Next.
- Double-check the settings are correct, click the Finish button.
- Take note as to which drive letter is the exFat partition (NOT the FAT32 partition). That is the drive letter you’ll want to use to copy the CoinOpsX files to.
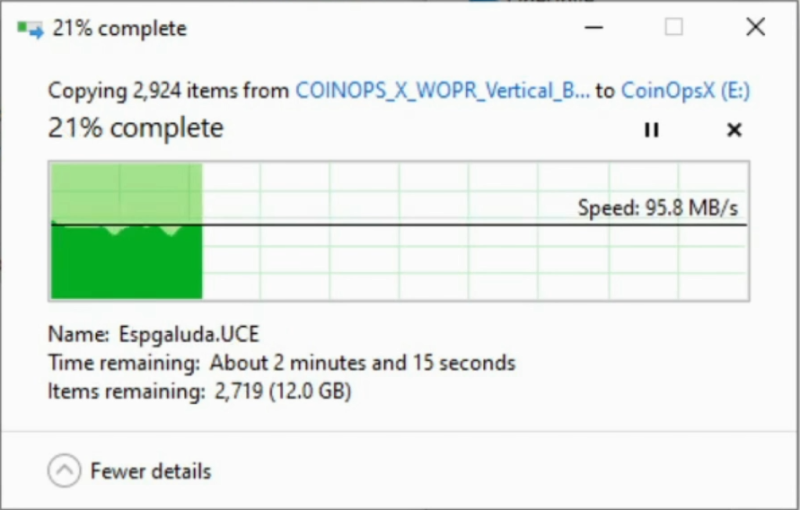
- Select all (CTL+A) of the files from the [drive:]\CoinOpsX\CoinopsX_Vertical WOPR saUCE edition\COINOPS_X_WOPR_Vertical_Build_1_0 folder and copy them (drag and drop) to the root of the exFat drive letter. This step may take ~3-4 minutes.
- Navigate to the root of the exFat drive (where you just copied the files) [drive:]\cox\video , select all (.avi) files (CTL+A) and delete them.
- Within the [drive:]\Arcade subfolder, delete the following files:
- Astro Fighter.UCE
- Block Carnival_Thunder and Lightning.UCE
- Thunder and Lightning.UCE
- Within the [drive:]\cox\logo subfolder, delete the following files:
- Astro Fighter.png
- Block Carnival_Thunder and Lightning.png
- Thunder and Lightning.png
- Within the [drive:]\cox\marquee subfolder, delete the following files:
- Astro Fighter.png
- Block Carnival_Thunder and Lightning.png
- Thunder and Lightning.png
There are two adult titles within the archive above, if you would like the build to be appropriate for all ages, you may consider deleting the following (optional):
- Within the [drive:]\Arcade subfolder, delete the following files:
- Gun Dealer.UCE
- Lady Killer.UCE
- Within the [drive:\cox\logo subfolder, delete the following files:
- Gun Dealer.png
- Lady Killer.png
- Within the [drive:]\cox\marquee subfolder, delete the following files:
- Gun Dealer.png
- Lady Killer.png
- Now, we’ll apply the WOPR With Cheese update pack to our USB stick. Navigate to the [drive]:\CoinOpsX\CoinOpsX Vertical WOPR With Cheese Update Pack 1 on your computer, select the Arcade and cox subfolder and copy/paste (or drag and drop) to the root of your exFat USB drive (your CoinOpsX drive). When prompted to Replace or Skip files, select the Replace the files in the destination option.
- That completes this section. You may delete or back up the source files from [drive:] \CoinOpsX which was used to prepare the USB drive, if you wish. At this point, you’re done with this step and may close out of any open explorer windows.
- See the next section, see Run the AddOnX tool.
Run the AddOnX Tool
Now that your USB stick has been prepared with the needed files, you’ll run the AddOnX tool against USB drive.
- If you already have an \addonx directory at the root of your USB drive, delete that folder.
- If you’ve not already done so, download the AddOnX Tool from here.
- Launch the AddOnX Tool.
- Click the Choose button and select the USB drive which contains the files you just copied (the exFat partition).
- Click the Build button.
- The build process will take a bit of time (~20-40 minutes).

- When complete, click the exit button in the upper-right.
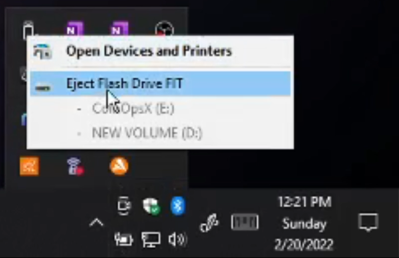
- You can now safely eject your USB drive from your computer. Click the eject icon in the lower-right of the taskbar and select Eject Flash Drive.
- Now, proceed to the Setup Flash Drive X Step below.
Setup Flash Drive X
*NOTE: If you will be using a Legends Pinball 1.1, Legends Ultimate 1.2, Legends Ultimate Mini 1.1, Legends Pinball Micro 1.0 or Legends Core Max, you only need a single partition created for CoinOpsX. If you are not sure what version device you have, see here to identify the UUID (device id) of your machine. That is, skip the FAT32 partition creation mentioned and only create a single exFat partition for those machines. The reason, these machines already have flash storage and the Flash Drive X application isn’t necessary.
The following will step you through the setup on your AtGames Legends product:
- Insert the USB drive into the USB 3.0 port on your machine (the USB port that is blue in color).
- Watch the upper-right of the main display and make sure the USB stick is a solid image (not flashing).
- Navigate to the Settings tab (top of the screen) and locate/launch the Flash Drive X tile.
- Once loaded, you’ll want to select the Format button. It will know to format the first partition you created (the 16/32GB FAT32 partition). The files that you copied and built using the AddOnX Tool will remain intact.
- After selecting Format, select Yes.
- When done, click on Dismiss.
- Now click the Mount button to activate the USB drive on the arcade platform.
- Click Yes to mount.
- When done, click on Dismiss.
- Back out of Flash Drive X.
AppStoreX
After performing all of the steps above, make sure you are logged in to your Arcadenet account. Then proceed with the following:
- Navigate to the AppStoreX tab at the top.
- At this point, you can download any applications such as pinball tables, pixelcade, etc.
- At this point, Select CoinOPSX and click on Install.
- Once installed, click Close.
- Now turn the power off to your machine and back on. *NOTE – If you skip this step, you will get an error.
- Once powered back on, return to the AppStoreX tab and launch CoinOpsX.
- Now, have fun playing CoinOpsX on your AtGames product!
Basic Operation
The following will assist you with navigating games once the USB stick has been installed in your ALP/ALUM or Legends Core/Max.
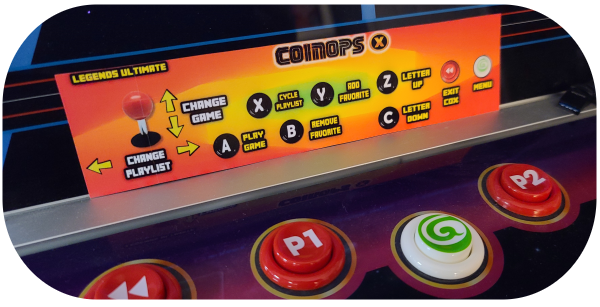
CoinOpsX Reference Card
Click the image below to download a PDF file to allow printing a CoinOpsX Reference Card. Cards included: Legends Pinball (with Arcade Control Panel), Legends Ultimate and Legends Ultimate Mini (vertical). I recommend printing on thick card-stock for best results.
Tips:
- Use thicker high-gloss paper stock for best results (standard paper may curl).
- For the Legends Ultimate Mini, you may be able to slide the reference card between the Marquee and the cabinet (fits well here).

*NOTE: I would like to credit skyler on this thread for the awesome idea of creating reference cards for each device.
ALUM (Legends Ultimate Mini)
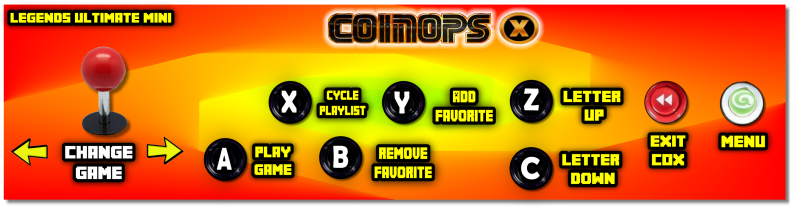
- Exit CoinOpsX – From the game list, press the REWIND button.
- Exit a Game – Press the Menu (or AtGames) button and select Quit Game.
- Page a letter at a time – Up = Z / Down = C
- Start a 1 Player Game – Press the P1 (Select) button twice (insert a credit and start the 1P game).
- Scroll through game list – Press (or hold) the Joystick ↔ (left/right). *NOTE: the Up/Down directions on the joystick do not perform any function.
- Toggle Game Categories – Press the X to toggle categories.
- Add Favorites – Select a game to add as a favorite and press the Y button.
- Remove Favorite – While in the favorites, select a game to remove and press the B button to remove it.
ALP (with Arcade Control Panel)
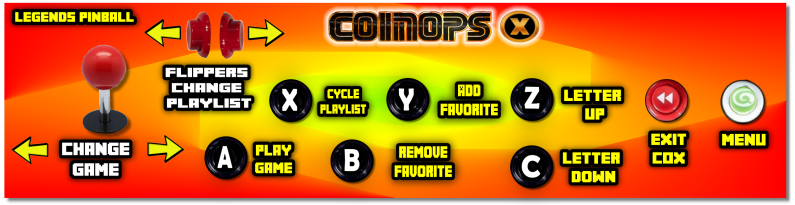
*NOTE: For some games such as Donkey Kong, Donkey Kong Jr. you’ll need to hold the Joystick in the down position and press Play to start the game (at the same time) on the ALP.
- Exit CoinOpsX – From the game list, press the REWIND button.
- Exit a Game – Press the Menu (or AtGames) button and select Quit Game.
- Page a letter at a time – Up = Right Flipper / Down = Right Nudge or Up = Z / Down = C
- Start a 1 Player Game – Press the Play (Select) button twice (insert a credit and start the 1P game).
- Scroll through game list – Press (or hold) the Joystick ↔ (left/right)
- Toggle Game Categories – Press the X to toggle categories.
ALP (no Arcade Control Panel)
My control panel is installed, please let me know if any of the following is incorrect here. I’ll update this section with your findings. I am making an assumption below:
- Exit CoinOpsX – From the game list, press the REWIND button.
- Exit a Game – Press the Menu (or AtGames) button and select Quit Game.
- Page a letter at a time – Up = Right Flipper / Down = Right Nudge
- Start a 1 Player Game – Press the Play (Select) button twice (insert a credit and start the 1P game).
- Scroll through game list – Press (or hold) the d-pad ↔ (left/right)
- Toggle Game Categories – Unknown.
Game Categories
The table below includes all categories in the WOPR CoinOpsX build (arranged left-right in the table).
| All Games | Favorites | Last Played | Ball & Paddle |
| Arcade Classics | Old School | Co-Op | 3-Player |
| Beat ‘Em Up | Maze | Pinball | Platform |
| Puzzle | Racing | Run ‘N Gun | Shoot ‘Em Up |
| Sports | Trackball |
Clone an Existing USB Stick
If you want to clone an existing USB drive used on the ALP for use on the ALUM, below are the steps I used to accomplish this. It was a bit easier than going through all the steps above a 2nd time. While it may not appear that way given the sub-steps shown, it actually is less effort and faster.
- Unmount the USB stick/thumb drive from your ALU/ALP, etc.
- Remove the USB stick from the machine and insert it into your PC.
- Now Create the Backup image of the USB drive.
- Once the backup is complete, you may then Restore the Backup image to the new USB stick.
- If the new USB stick is a larger capacity than the original, you can Expand the CoinOpsX partition to make use of the additional capacity.
- Remove the new USB drive from your PC and insert it into your new ALP/ALU/Gamer Series device, etc.
- Setup Flash Drive X (FDX) as described here.
- Power off the machine and power it back on.
- Now, simply re-install any additional pinball tables, applications (CoinOpsX), etc. to your USB drive as normal.
Troubleshooting
This section will cover issues that are identified and how to resolve them.
- Is there a Fix for strong haptics on ALP a with CoinOpsX? One thing that has worked for me (and one other viewer) is go into Settings → Pinball Settings and toggle Force Haptic to Off (or toggle it On/Off). After doing this, the haptics stopped buzzing like crazy with the Arcade Control Panel.
- Are AtGames Flash Drive X drives interchangeable? In short, No. The Flash Drive X partition is tied specifically to each machine, the games partition isn’t. To move the games from machine-to-machine you could re-run Flash Drive X, re-install CoinOpsX anytime you want to swap machines. However, that may be a bit of a pain. It would be ideal to have a dedicated USB drive for each machine.
- When running CoinOpsX I don’t see any artwork, why? Make sure when you extracted the archive that there are no sub-folder names repeated. If you see duplicated folders within folders such as: \cox\cox … [files]. Move the duplicated sub folders up to the root and re-run AddonX Tool.
- AddonX Tool terminates before completing, why? I ran into this issue as well. In my case, disabling my Antivirus and re-running took care of the issue. Just remember to re-enable virus scanning once complete.
Change Log
- 2023-01-05 – Added another Troubleshooting item to the list.
- 2022-09-20 – Updated guide to reflect newer devices with built-in flash storage.
- 2022-09-13 – Added CoinOpsX no artwork issue to the Troubleshooting section.
- 2022-03-15 – Some were having difficulty downloading the CoinOpsX Reference cards, updated links.
- 2022-03-12 – Added printable CoinOpsX Reference cards here.
- 2022-03-05 – Added additional Troubleshooting item that may be helpful.
- 2022-02-25 – Added differences between the WOPR w/Cheese update from the previous release.
- 2022-02-24 – Misc. updates; Added the Helpful Tips section.
- 2022-02-21 – Continuation.
- 2022-02-17 – Start to this guide.