AtGames Legends Gamer Mini
Last Update: 9/15/2022
In the sections below, I’ll share exactly what I’ve learned about the AtGames Legends Gamer Mini (ALGM, for short), any issues that I encounter and my personal experiences to help you along the way. I hope you find this guide educational and helpful as you learn more about the capabilities of the Legends Gamer Mini! -Jon
How-To link to a specific section on this page: go to the Table of Contents (below) and click a section to reference. Copy the URL from the address-bar of your browser and paste in your video description/post/blog. This will direct a viewer to a specific section in any of the guides you find here.
Table of Contents
What is the Legends Gamer Mini?
The Legends Gamer Mini (ALGM) was an impulse buy. I found a great price for it on-line and jumped on it. Ever since opening the box, I’ve been nothing but impressed with this little arcade console. Originally, I had not planned on creating a guide for this product. However, that would have been a dis-service as this product is well worth having it’s own guide.
Before we talk about what it does, let’s talk about a few things that are missing on this unit. If you compare it to the AtGames Legends Ultimate, there is no 2nd player controller, Trackball or Spinner. So, if you’re looking for a machine with those control options you may want to look at the Legends Ultimate.
Now, let’s talk about what the Legends Gamer Mini is. There are two main parts to this device, the Arcade Control panel itself which is essentially a wireless connection to the Legends Gamer Console (hockey puck-looking device). The Legends Gamer console (puck) is the brains of the machine, it’s the device that connects to your HD TV, has x1 USB 3.0 port (for expansion/storage), includes 100 licensed games, allows connectivity to ArcadeNet and more. It’s also the unit where you can easily add a USB thumb drive to install additional games, both Arcade and Pinball. More on this later on.
The Arcade Control Panel connects to the Legends Gamer Console, but can also connect to other AtGames products or even a PC! That is, you can connect the USB 2.0 port on the back of the Arcade Control Panel and the computer will recognize it as a joystick. This makes it a great option for playing joystick-aware PC games!
Now, let’s talk about the games themselves. This machine includes 100 built-in and licensed arcade and console games. Some you may know others you may not. You can play far more games beyond the included 100 games in various ways. For example, you can connect to ArcadeNet and stream games from the AtGames servers. Under AppStoreX, you can purchase and install well over 100 Pinball tables. Additionally, you can install thousands more games using CoinOpsX and a USB thumb drive. Below, we’ll cover all of this -and more.
Resources
The following are a collection of resources that may be helpful to you :
- AtGames Legends Gamer Mini – AtGames website product page.
- Official AtGames Legends Arcade Family Support Page – Receive direct customer support using this page. There is also a purple chat icon (lower-right) which will get you in touch with a customer service representative during normal business hours (see link for details).
- AtGames official YouTube Channel – Many helpful videos and updates.
- Official Global Arcade Fan Page (Facebook)
- List of Controllers – Special thank you to Dudemo who provided a list of controllers which may work with the Legends series of devices.
Manuals
- Legends Gamer Mini Instruction Manual – This is the manual included with the ALGM.
- Full licensed (included) Game List – List of all games included and shipped with the ALGM.
Why the ALGM?
As mentioned above, the ALGM was an impulse buy and one of the few I don’t regret. Below are reasons why I like this little unit and how I justified the purchase:
- Gaming Anywhere – in the past, I’ve designed and built my own arcade gaming control decks (3D Printed / OpenCADE). While I do enjoy playing on that machine and the various controls you can connect to it, it’s not wireless. The ALGM is wireless (or wired), depending on how you want to play. I can also run my portable monitor, ALGM and the Legends Gamer console all off a single battery pack. I could see taking this over to a friends house, my kids room, etc. very easily and playing games there. There is a built-in battery in the Arcade Control Panel which should provide hours of game play.
- Multiple Ways to Play – The machine has a number of ways it can be played. You can play the 100 included licensed arcade+console games on the machine, connect the Arcade Control Panel to a PC or other device, connect the ALGM to another AtGames product for 3-4 player game-play, install additional games on BYOG/CoinOpsX! Lots of ways you can enjoy this machine.
- Ease of Use / Setup – Getting the ALGM setup and playing took about 5 min. Once paired with the Legends Gamer Console, it remembers the device and every time you power it up it will automatically re-connect. The UI is very familiar to me as it’s the same on the ALU and ALP. There will be a slight learning curve for new owners. We’ll touch on some of that below.
- On-line Leaderboards – The ALGM has the ability to play the included games on-line and submit high scores to the AtGames leaderboards. AtGames also has frequent weekend-long leaderboard game events. This allows you to compete against other players to get the high-score and win prizes. This option works well, I have a few scores uploaded at this point (none particularly close to the top scores).
- Pinball -The ALP was my first AtGames product purchase and really enjoy playing all the awesome Zaccaria and Taito volumes that AtGames has released. The ALGM can also play pinball games, in fact using my portable monitor I can flip the display sideways and the vertical game-play is awesome! It takes up the full screen and the game play is great. Not as great as the ALP, but this machine also costs considerably less.
- Lobby – The lobby is another reason for picking up the ALGM. While I’ve not tried this feature out (yet), I understand how it works and look forward to playing someone on-line very soon.
- HDMI Output – I’ve created a few guides for various AtGames products and it is a big plus having HDMI Output. This allows me to capture the video signal and use it for documenting this (and other) similar products. Most won’t care about this aspect, but was part of my decision to place the order as it will simplify my ability to document features shared across several products.
Connectivity Options
There are a number of ways you can use the Legends Gamer Mini. In the following sections, we’ll describe each and how to begin using them.
Connect to Legends Gamer Console
Perhaps the most common way to use the ALGM is to connect the arcade controls wirelessly to the Legends Gamer Console(LGC). The LGC is the brains of the machine, includes the 100 built-in games and pretty much does all the work.
- Power on the Legends Gamer Console/puck.
- Power on the ALGM Arcade Control Deck.
- Press and hold the AtGames/Menu button on the Arcade Control Panel for 3 seconds until the blue LED begins to flash quickly.
- Press the wireless pairing button on the Legends Gamer Console, the pairing window will show on the screen.
- Press the wireless pairing button until the Control Deck is selected. Then, press and hold the wireless pairing button until the pairing is confirmed.
- You should see the blue blinking LED turn to a solid blue once connected. Give it a few more seconds and try to navigate the menu.
- That’s it!
Connect to a PC (USB)
You can use your ALGM as a joystick + buttons to your PC. Connecting to a PC is very easy. See below for a few simple steps.
- Connect the USB (2.0) cable from the back of the Legends Gamer Mini to an available USB port on your computer.
- Turn on your Legends Gamer Mini.
- Press and Hold the P1 button for about 8 seconds to disconnect the wireless connection to the Legends Gamer Console (or power it off).
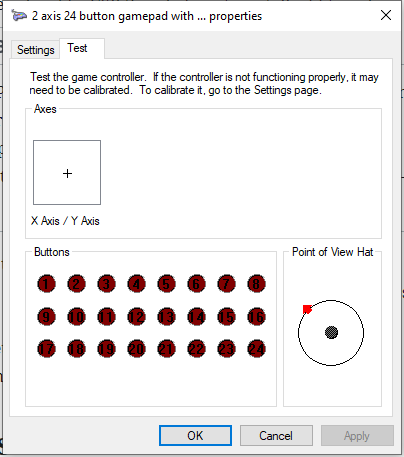
- The LGM will now show as a 2 axis 24 button gamepad in Windows.
- Load up the PC game you want to play (i.e. in Steam), map any buttons necessary and play!
Connect to ALU or other Legends Product
You can use your ALGM connected to another AtGames product, such as the ALU to play 3-player arcade games. If you’re using CoinOpsX, there are a number of multiplayer arcade games available under the 4-Player category. You can wirelessly connect the ALGM to the ALU to add even more players to the game. Here’s how:
- Disconnect Power going to the Legends Gamer Console/puck (don’t want it to interfere with the next step).
- Power on the ALGM & ALU.
- On the ALU, go to Settings → Wireless Pairing.
- On the ALGM Arcade Control Panel, press and hold the AtGames/Menu button for about 3-5 seconds until the blue light is blinking fast.
- On the ALU, look for Control deck in the list of devices, select it and press the A button. Give it some time to connect, ~15-20 seconds.
- Press the A button on the Dismiss dialog.
- After a few more seconds, you’ll now be able to use all three joysticks and buttons on P1/P2 on the ALU and P1 on the ALGM Arcade Control Panel (player 3).
- Load up 3-4 player game in CoinOpsX (i.e. Bomberman, The Simpsons, etc.) and now you can play a 3-Player game!
Disconnect ALGM from ALU
To disconnect the ALGM from the ALU, please see the following:
- On the ALU, go to Settings – Wireless Pairing.
- Select Control deck and press the A button.
- Select the Disconnect button and press A.
- Press B on the ALU to back out, once disconnected.
- That’s it!
Game Play
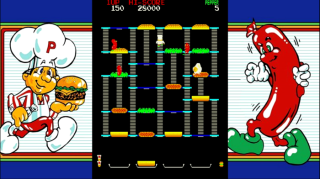
There are 100 included arcade and console games which ship with the AGLM. These games include many popular titles such as: Bad Dudes, Burger Time, Elevator Action, Space Invaders, Tetris and many others. It is a nice selection of games, though not as many games are available compared to the ALU. For a full game list, see here.
Vertical Game Play
Yes, this screams pinball and you can play Pinball on the ALGM! However, to do so I highly recommend getting the Legends Pinball Kit (more on that here). Without the kit, the default button layout is less than ideal. However, with the kit you can then play well over 100 pinball tables (each volume sold separately) directly on the ALGM. The pinball kit can also be installed to most AtGames Legends Ultimate/Gamer family of products.
The buttons attach easily to the left/right side of the console, you use the joystick (down) to launch the ball and the side flippers/nudge for the game-play. While the game-play is not as smooth as the ALP, it is still impressive to be able to play these tables on a machine that retails for less than $130.
Upload High Scores
Many of the included games support the ability to upload your high-score to the on-line leaderboards. Here’s how:
- Once your game is finished, click the AtGames/Menu button and select Save High Score.
- You’ll then see the results of your game with your score highlighted, press A to Proceed.
- Use the Joystick to enter your initials (left/right and up/down).
- Press A to submit your score. When you exit the game, your score will be uploaded to the AtGames servers.
- That’s it!
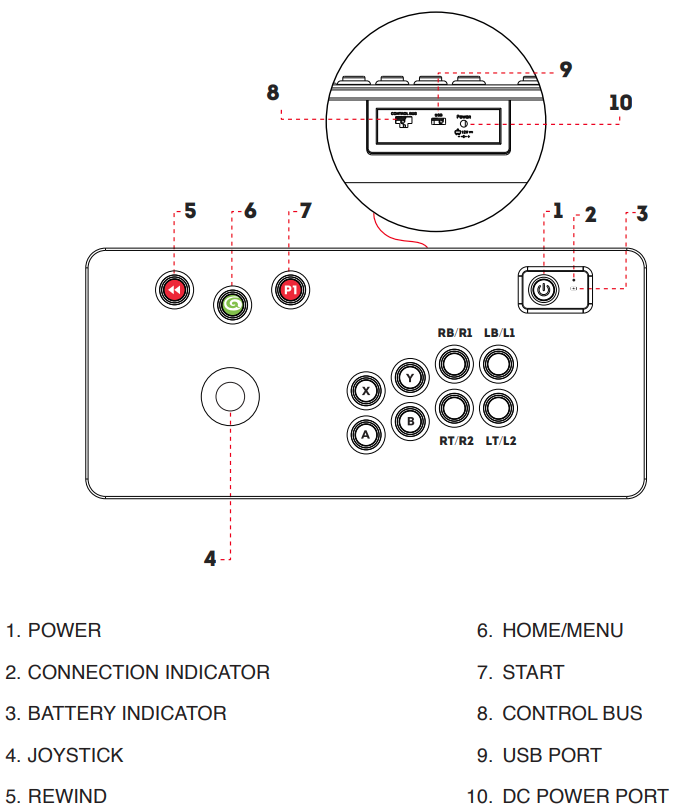
Control Panel
The diagram below represents the joystick and button layout found on the AtGames Legends Gamer Mini.
Specifications
The following are the specifications and features of the AtGames Legends Gamer Mini:
- 100 licensed arcade and console games
- Arcade-style joystick and eight action buttons
- Arcade-style pinball buttons, light guns, and more available as optional accessories
- Pause, Rewind, Save, and Load functionality
- Track your high scores
- Change aspect ratios and display parameters on a per-game basis for a custom look
- Fun screensaver options to leave your Legends device in attract mode
- Parental controls
- Add gamepads to play top PC titles or enable multiplayer gaming
- Bluetooth and USB connectivity to use the Legends Gamer Mini as a controller for PCs, streaming dongles, consoles, and more
- Legends Gamer Mini Size: 19.99 x 3.82 x 8.50 inches
Legends Gaming
For details on all the latest available Gaming Packs (Arcade and Pinball), Flash Drive X Setup, Code Redemption, Installing/Uninstalling games, check out the Legends Gaming Guide.

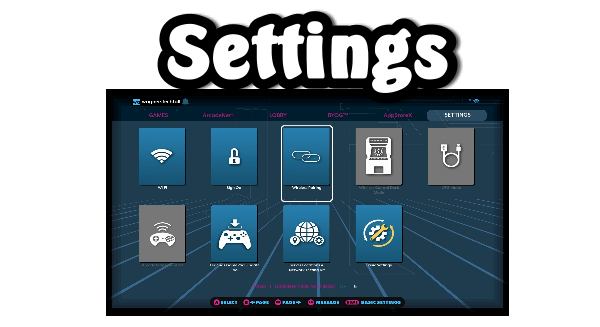
Settings
For an explanation of each of the options that are available in the Settings tab, please see the Settings Guide.
AtGames News Updates
For the latest AtGames News, visit the AtGames News Updates page.

Purchase Locations
The AtGames Legends Gamer Mini may be found at the following locations:


CoinOpsX
Detailed CoinOpsX Guide
CoinOpsX allows you to play those classic Arcade Games that may not be available from AtGames. There are over 7.5k games that may be downloaded to a USB drive and installed to your ALGM and run using the CoinOpsX application. The good news is, a single USB stick can be used for both pinball tables (or other game packs/volumes available from AtGames) and your CoinOpsX games. For a full guide on how to setup CoinOpsX, visit theAtGames CoinOpsX Guide.

Operation
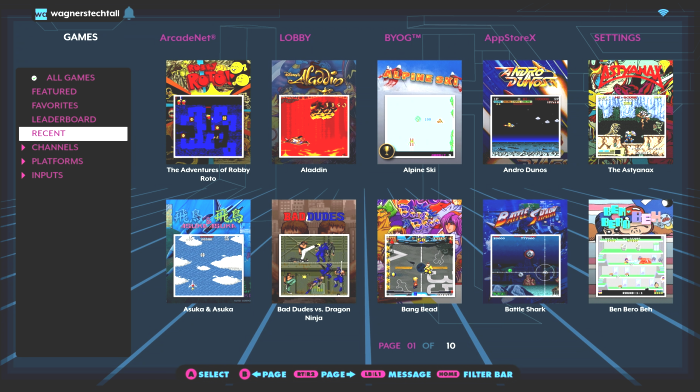
Mastering the settings on the ALGM isn’t difficult. Though, when you’re first getting started knowing how to navigate the UI may be a little challenging. Below we’ll cover some basics to get you going.
- Navigating the Menus – Use the joystick to move up/down/left right to select the tiles or the menu/tabs at the top. You will typically press A to select an option or B to go back. However, check the bottom of each screen as it will provide more tips on other options/buttons that are available.
- Favorites List – You can create a favorites list of all your favorite games using the following:
- Select the game from the list and press A (don’t launch it, just browse to the game menu).
- Then press the C button to toggle the Favorite selection.
- Press B to go back to the Game selection.
- Press the AtGames/home button.
- Using the Joystick move down into to the Favorites option and press the A button.
- Now you’ll only see your favorite games (if nothing is there, you didn’t add a game to the Favorites list).
- Return to All Games (from Favorites) – To return to seeing All Games:
- Highlight one of the games in the list.
- Press the AtGames/Menu button.
- Select All Games and press A.
- Now you should see All Games.
- Filtering Game List – Using the same technique shown above for Return to All Games, you can also filter by other categories: All Games, Featured, Favorites, Leaderboard, Recent, Channels (Atari, Data East, Disney, etc.), Platforms (Arcade, Atari 2600, Genesis, etc.)
- Updating the Firmware – Login using your ArcadeNet account first, then: On the top tab bar, go to Settings → Version (x.y.z) and press the A button. If no update exists, press the B Button to exit. Otherwise, select the Download option. Once complete, select the Update option (this may take ~10+ min. to apply the firmware update). The machine will restart and display the status on the display while updating, then it will reboot once more when the firmware update has completed.
- Factory Reset the ALGM– Power off the device. Press and hold the recovery button with a pin. Power on, then press and hold the P1 START + MENU buttons while you continue to hold the recovery button. Once you see the factory reset prompt, release all buttons. Follow the on-screen instructions.
ArcadeNet
ArcadeNet is a service provided by AtGames for your ALGM which provides a number of features which consist of both free (basic) and paid for (standard) services. For details about the creation of your ArcadeNet account, please see the AtGames ArcadeNet page here (scroll towards the bottom).
In addition to leaderboards, ArcadeNet also lets you stream games from a virtual server in the cloud to your machine. There is no need to install anything. For the best results, you’ll want to connect an Ethernet cable to the Legends Gamer Console instead of WiFi. While both will work, you’ll get much better performance with an Ethernet cable attached. When you play a multi-player game from the Lobby, you’re accessing a remote server to play your opponent.
1st Party Expansion
Below are expansion options provided by AtGames that will allow you to get more out of your AtGames Legends Gamer Mini. Including:
Pinball Kit
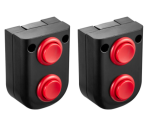
The Legends Pinball Kit makes playing pinball games on the ALGM much more enjoyable. The top buttons control the left/right flippers, the bottom buttons are your left/right nudge buttons. To launch a ball, press/hold either joystick in the down position -then release.
Installation of this kit is extremely easy, just four simple screws to install. However, before installing it to your machine you’ll want to power-off the ALGM first. On each side of the control panel, you can see 3 conductive pads which are used to attach this accessory. Each button assembly has 3 spring-loaded prongs which make contact to the control panel. Simply insert the button assembly, using the x2 included screws secure the assembly on both sides of the control deck. Then power-on the machine, have fun!
3rd Party Expansion
This section will discuss 3rd Party expansion options that you may be interested in trying.
Accessories
The following are some accessories that you may find interesting or to enhance your experience with the ALGM:
- Samsung MUF-256AB/AM FIT Plus 256GB – USB 3.1 Flash Drive for adding additional applications (CoinOpsX, Pinball Tables, etc.)
- LQM 20000mAh Dual USB External Battery – Shown in the Legends Gamer video review.
- 8Bitdo Sn30 Pro+ Bluetooth Controller – Used this in the above video to allow a 2-player game on the ALGM.
Troubleshooting
This section will provide answers to common issues.
- Gamer Mini won’t connect, any recommendations? Try unplugging power to the Core and turn off the control panel for about 15 seconds. Then, power it all back on and follow these steps. Should get you going.
- I’m experiencing severe latency (lag) from the time I press a button on the arcade controller and the on-screen interaction. How can I fix this? If your TV/Monitor has a Game Mode, enable this option. Also, connect the Gamer Mini to the core directly using the USB cable to rule out the wireless connection. To turn off the Bluetooth connection to the core, press and hold the P1 button until the blue led turns off. Check to see if this corrects the issue.
- Rewind Button doesn’t exit CoinOpsX (in Bluetooth mode) – It appears to be an issue with CoinOpsX. To exit, unplug/re-connect the Legends Gamer Console. Hopefully an application update will correct this issue. Using a wired controller doesn’t experience this issue. Additionally, if you go into Controller Settings and re-map the buttons and save your configuration, the next time you attempt to exit CoinOpsX with the Rewind button, it will exit fine.
- Can’t navigate up/down in CoinOpsX while in Portrait Mode – This issue has been corrected with the most recent CoinOpsX Update.
If the above Troubleshooting information did not help resolve the issue, you can also contact AtGames for assistance by clicking the image below.
Quick Tips
More tips are coming, this is just a start. If you have your own, please share them by adding a comment in any of my AtGames YouTube videos.
- How to Pause a Game – A quick and easy way to pause a game is to simply press the AtGames/Menu button. Just press it again to resume.
- Firmware Updates – AtGames typically releases new firmware every Thursday. It’s a good idea to download the updates frequently. They often include new features, fixes and overall improvements to the system.
- Can I add More Games? – Yes you can! If you want to play thousands of classic Arcade Games (in addition to the included 150 games) check out the CoinOpsX guide here. It will step you through how to partition your USB drive, copy the files and run the AddOnX tool. Once done, several thousand games can be easily played and you only need a USB drive (128GB or larger recommended).
Change Log
- 2022-09-15 – Added the new Legends Gaming guide to replace duplicated sections in this guide.
- 2022-07-05 – Update broken links.
- 2022-06-11 – Updated Resources with CS information.
- 2022-06-02 – Updated News heading.
- 2022-04-09 – Minor updates.
- 2022-04-05 – Added AtGames support graphic and link.
- 2022-03-23 – Added a few more Troubleshooting options.
- 2022-01-31 – Minor updates/corrections; Added Settings guide.
- 2021-09-22 – 2021-09-28 – Building this guide and release of the ALGM Review.