
← All AtGames Guides
← Main Legends Pinball Guide
Last Update: 5/31/2023
This guide will assist you in setting up PinUP Popper (PUP) Baller Installer on your PC connected to the AtGames Legends Pinball (ALP). While not required, it’s highly recommended that you have also installed the VIBS Board to utilize the backglass on your ALP to display the artwork for the selected tables and scoreboard/DMD content. This guide will assume that you have a VIBS board already installed, if not please see here. You may have a better experience as well if using the AtGames Arcade Control Panel as there is a custom JoyToKey mapping (below), which will take advantage of the additional buttons the Control Panel provides.
I want to make this guide as easy as possible but keep it focused for use with the AtGames Legends Pinball machine. This guide is meant to assist with the initial ALP setup, not an exhaustive guide for each of the included components nor extensive customization options. The content here will grow over time as I learn and experiment more and receive feedback from you.
It’s important to highlight, many people have contributed to PinUP Popper Baller Installer and the included software components. This package makes it much easier to get setup today, compared to just a few short years ago. Back in 2018 I attempted a manual installation of VPX, it took days to get it working and a few times I almost just gave up. Today, it’s much easier -though not exactly simple but easier. We owe it to the team of developers/hobbyists that created all the software components included in this package. As well as the VP community and table developers. Your hard work is greatly appreciated!
PinUP Popper Baller Installer does make installation easier, but it’s not just a simple process of running an installer and everything is 100% ready to go. There will be some customizations that will need to be made, depending on what tables you will be installing, recording/importing artwork, etc. If you will be running FX3, you’ll also want that media to appear during table selection and more. However, I’ll do my best to get you started.
It is a lot of work creating and maintaining the guides on this site. I appreciate any support from the community by subscribing to the YouTube channel. commenting on/and liking the videos all help tremendously in growing the content you’ll find here. –Jon
Special Thanks to the following individuals for reviewing and recommending improvements to this guide. Your help is greatly appreciated! Bee Kong (Kongs-R-Us YouTube channel), Nathan Foster, Bee Gee and Dave Krampitz.
How-To link to a specific section on this page: go to the Table of Contents (below) and click a section to reference. Copy the URL from the address-bar of your browser and paste in your video description/post/blog. This will direct a viewer to a specific section in any of the guides you find here.
Table of Contents
Why this Guide?
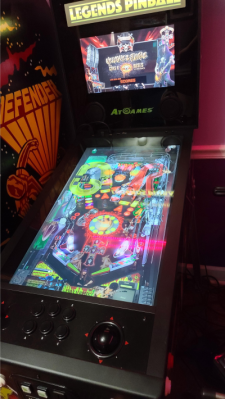
When you purchased your AtGames Legends Pinball (ALP), you knew you could play games right off the machine. You don’t need to connect a PC to enjoy well over a 100 tables natively running on the ALP hardware and with very little hassle/setup. This list of tables is growing as well with new volumes being released every few months.
What you may/may not have known is that you can also connect a PC to the HDMI input and an OTG cable to the USB 2.0 port on the ALP and run hundreds, if not thousands of additional pinball tables! If you want to know more about how to connect a PC to the ALP, please see this guide. The way it works is that after connecting the PC to the ALP, the games/tables are projected on to the ALP displays (Playfield and/or the backglass using the VIBS board). The flippers/nudge buttons acts as your controller to the PC over OTG (USB-A to USB-A male-to-male cable). What this guide covers are the basics of installing a very powerful combination of pinball software components to your PC to make all of the above possible. This package is called PinUP Popper Baller Installer.
At this point, you may be wondering a bit about the software that gets installed. Let’s go over a very brief overview of the main components included:
- Visual Pinball X (VPX) is a pinball game engine composed of an editor and simulator, we’ll of course focus more on the simulator aspect here. There is a huge variety of user-created Visual Pinball X tables available on the internet (vpforums.org lists 1,340). Players can find faithful recreations of existing pinball machines that may/may not include ROM emulation (i.e. vPinMAME). ROM emulation means that the table itself is not only simulating the playfield, but running the actual code from the real-life physical Pinball machine. Of course, when downloading tables that require ROMs, not all do, and you don’t know what a rom is you can read more about them here.
- Future Pinball (FP) is a real-time Pinball Development system which allows you to not only play hundreds of tables that you can download for free off the internet, but design new ones as well. Many of these tables look and play just like their physical counterparts. Table developers have spent exhaustive hours re-creating original and completely unique tables in a virtual form which include 3D models/physics, lights, music, sound, etc.
- PinUP Popper Front End (PPFE) is the front-end or user interface(UI) that you’ll use to select the pinball tables you’ve installed. You can select tables from the previously mentioned engines, as well as Pinball FX3 (please see this for a detailed guide on FX3). Regardless of the type of Pinball tables you want to play, you can likely run them within this front end.
- PinUP Popper Config (PPC) allows you to add/configure/remove tables for any of the pinball engines. In addition, it contains tools for importing media (backglass artwork, playfield artwork, Wheel Images and much more). We will use this tool in various sections below, it’s a tool you will get familiar with if you decide to continue on this journey.
I hope the above has been a good overview of the software components being discussed in this guide. There are many other components included that are not even mentioned above or only briefly mentioned. Some will be explored further below. Just know that this entire suite of applications will allow you incredible flexibility to begin playing Virtual Pinball tables from your PC connected to your AtGames Legends Pinball machine. Let’s get started!
Own a Steam Deck?
See: Steam Deck with Legends Pinball Guide

Ever since receiving my Steam Deck, I’ve been interested in finding out if it can be used with the AtGames Legends Pinball with two monitors connected. Here you’ll find a guide and video have been developed to show you how you can use your Steam Deck with Pinball FX3, Future Pinball and Visual Pinball X (VPX) running Windows from the microSD on the Steam Deck.
Common Questions
Below are some common questions you may have, along with some answers. If you have a question not mentioned below, please comment in one of my Virtual Pinball YouTube videos and let me know. I’ll do what I can to answer your question or point you in the right direction.
- Q: Should I download a bunch of tables?
- A: I would recommend adding one table at a time. Check the location where you downloaded the table for any additional scripts, roms, media (video/music), etc. that are required for the table to run. Read the developer’s table description/guide beforehand on what is needed. Take your time, set the one table up exactly how you want it, make sure it works, etc. before moving on to the next. Otherwise, it can get overwhelming and frustrating pretty quick.
- Q: What hardware will be needed for this setup?
- A: For assistance with this question, please see this guide.
- Q: Do I need Pinball FX3 to use this guide?
- A: Only if you want to play Pinball FX3 games from within the PinUP Popper Front End. If you don’t, then no it’s not required.
- Q: Can I run Pinball FX3 within the PinUP Popper Front End?
- A: Yes you can. Once PinUP Popper Baller Installer is installed, these steps will assist with getting FX3 running within the PinUP Popper Front End.
- Q: Do you have any information on how to setup Pinball FX3?
- A: Yes, you can find a detailed guide and video here. After installing PUPBI, here’s how to add those tables to the Front End.
- Q: Is it possible to run the BitPixel HV and Pixelcade DMD with PinUp Popper?
- A: Yes, please see here.
Resources
Below are links and resources related to the Installation and Setup of PC-based Pinball that may be of interested to you.
- PinUP Virtual Pinball System – Official documentation for Baller Installer.
- AtGames Pinball page – Official AtGames Pinball page
- Legends Ultimate – Subreddit (including Pinball).
- More ALP-Specific Resources – Link to the main page ALP Resources.
- Virtual Pinball – Subreddit/discussions about all-things VP.

Installation
We’ll use PinUP Popper Baller Installer to install the following components to our PC connected to the ALP. Running this will install the following software components to your computer (just for reference):
- Visual Pinball X (VPX)
- VPinMAME
- PinUP Player
- PinUP Popper FrontEnd
- DMDExt (feezy / 32-bit)
- FlexDMD-B2S-PuP-PuPSSF
- Future Pinball w/BAM
- TerryReds PinEvent FP System
- Two original tables: ScottyWics “Leprechaun King” and TerryRed’s “Retro Flair BAM Edition” – Both Excellent games!
There are no commercial pinball tables included, only the two original tables mentioned above included in this installation. You will need to source any additional games, vPinMAME Roms, etc. to add them to your PinUP Popper installation. You will not find any links to any roms within this guide (read why here).
Prerequisites
- If you plan on using the PinUP Popper Front End with Pinball FX3, it’s a good idea to install FX3 prior to running this installer. For assistance installing Pinball FX3, click here for a guide on how to do that.
- Install to a clean installation of Windows 10.
- You’ll want to temporarily disable your Antivirus before running PinUP Popper Baller Installer.
- Be sure your PC is connected to the internet via WiFi / Ethernet before starting the installation.
- Be sure you have all hardware connected before running the installer. Including the VIBS button being switched on and both PC display visible (playfield and backglass/VIBS).
- You should also reboot a few times to make sure everything starts up consistently.
Download
The Download for Baller Installer is available one of two ways:
Do not download from any sources other than those mentioned above. Also, you’ll want to read/review the PinUP Popper Baller installer documentation on their official Wiki located here. There you will find more detailed information regarding specific issues you may encounter. To access the installer, you will need to join the above Facebook group and be accepted by an admin to access the installer (the authors don’t allow direct links, I respect their request). You will find the installer in the Announcements section in the Facebook group once you join and are approved.
JoyToKey Setup
I used JoyToKey to handle the mapping of buttons from the ALP over OTG to keystrokes used by the PinUP Popper Front End. To setup JoyToKey, please see this. There are two JoyToKey profiles available below. The first is one I’ve modified to make the use of the additional buttons available with the ALP Arcade Control Panel. If you have the Arcade Control Panel installed on your ALP, this is the JoyToKey profile you’ll want to use. I’ve also linked to another profile that resides on the Official AtGames Pinball Fan Page for use with the standard control panel.
Arcade Control Panel Profile
Use the JoyToKey profile (below) for PinUP Popper if you have an Arcade Control Panel.
- Install and setup JoyToKey as mentioned here (though, use the profile in the next step).
- Download the LegendsPB-WTT-PUP.zip (JoyToKey profile). This is needed to map the ALP+Arcade Control Panel to functions supported by PUP. *NOTE – If you make any significant improvements and think it should be added here, feel free to e-mail your updated profile (.zipped) to here but please let me know what mappings have changed. I’ll test it and add you as a contributor on this guide, if used.
- After downloading the above file, exit JoyToKey completely.
- Unzip and copy LegendsPB-WTT-PUP.cfg to the \Documents\JoyToKey directory.
- Restart JoyToKey and you should see the profile in the list.
- At this point, you can minimize JoyToKey.
- You are done with the JoyToKey setup, however please see below for a few mapping changes needed for Pinball FX3 (if you plan on using Pinball FX3 from within the PinUP Popper Front End).
If you plan on using FX3 within the Front End, you’ll want to re-map the left/right nudge buttons within Pinball FX3 for JoyToKey/VPX/FX3 to consistently utilize the same keys for nudging the ball.
- Launch Pinball FX3.
- Select Options.
- Press the Left/Right Shift keys to select the Controls tab.
- Move down to the option for Nudge to the left and press ENTER. Then, press “Z”.
- Move down to the option for Nudge to the right and press ENTER. Then, press “/”.
- Exit Pinball FX3.
The button mapping will now be consistent within JoyToKey/VPX/FP/FX3. Below is the basic button mapping used by this JoyToKey Profile:
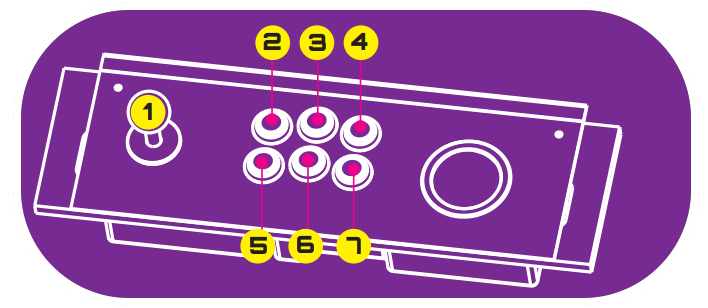
- Joystick – navigates left/right To select a different table, press the ← or → key on the keyboard or the left/right direction on the Joystick.
- 1-Player Start – Starts a 1 player game.
- 2-Player Start – Starts a 2 player game.
- 3-Player Start – Starts a 3 player game.
- Left Mouse click – Emulates the left mouse button being clicked, use trackball as a mouse.
- Right Mouse click – Emulates the left mouse button being clicked, use trackball as a mouse
- Insert a Credit – inserts a credit for those tables that need them, some may require more than one.
- Forward Nudge (not shown) – Selects a table. Press this button on a selected table (or ENTER) to start it. You’ll hear “Please wait, I’m now loading up the game. Have fun!”. The game will then start within the PinUP Popper Front End.
- Rewind (not shown) – goes back or exits a table, game or selection.
Standard ALP Profile
Use this JoyToKey profile for PinUP Popper if you are not using the Arcade Control Panel. Please see this thread (Facebook), download the .cfg file (profile).
- Close JoyToKey.
- Copy the .cfg file to the \Documents\JoyToKey directory.
- Restart JoyToKey.
*NOTE: I have not personally verified this works since my setup only includes the Arcade Control Panel. Be sure to thank the author by giving the post a like!
Install PinUP Popper Baller Installer
The following instructions will walk you through the installation of PinUP Popper Baller Installer.
- First, switch the HDMI input to your PC. If you’re not sure how, please see this.
- Connect a keyboard & mouse (or combo) to your PC, you’ll need it for the initial setup. I used a Remote connection (Team Viewer) for much of the configuration below. It was easier to me for the initial setup.
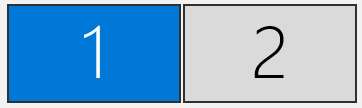
- Right-click on the Desktop and select Display Settings. Position the VIBS display (the backglass) to the right of the playfield display within Windows Display Settings. Make sure display 1 & 2 are lined up perfectly (as shown above), playfield on the left/backglass on the right. Playfield should be set as the Primary display by checking Make this my main display. Both displays should be set to 1920×1080, scaled at 100% and Display orientation in Landscape Mode. Keep in mind, Windows may scale one (or both displays) to 150%. If so, you’ll need to change this setting to 100% for the following settings to work properly. Simply click each display and verify any needed changes, both should be set identically.
- Using the one of the download locations mentioned above, copy the PinUP_Popper_Baller_Installer_2xxx.exe to your desktop or other location you prefer.
- Temporarily disable any Antivirus software while running the installer. There are some VBScript files (Visual Basic Script) that could potentially get blocked, depending on the antivirus software you use. As a precaution, disabling it during installation will avoid any files not getting installed. You can re-enable the Antivirus software once the installation is complete (an exception may be needed for your [drive]:\vPinball subfolder, however).
- Right-click the PinUP_Popper_Baller_Installer_2xxx.exe and select Run as administrator to launch the installer. Select the I accept the agreement checkbox and click the Next button.
- The default installation folder will show as C:\vPinball. If you prefer to install to a different drive, replace “C:” with the drive letter you wish to use. Then, click Next.
- Verify the installation folder is correct and click the Install button.
- Towards the end of the installation, you’ll see a dialog for the Microsoft Direct X installation. Click the I accept the agreement checkbox and click the Next button to update Direct X. Then, click Next on the DirectX Runtime Install prompt.
- Once Direct X has been updated, click the Finish button.
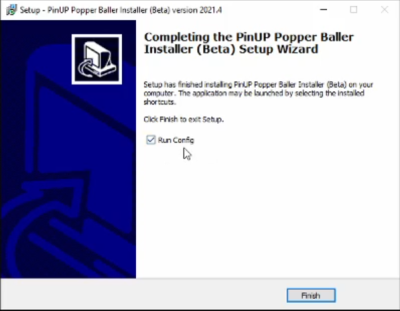
- The installation will then complete and a checkbox will be defaulted to Run Config. Leave that as-is and click the Finish button to configure PinUP Popper Baller Installer.
Initial Configuration
The following section will describe the basic configuration steps. These steps will assume you have a a Windows 10 PC connected to your AtGames Legends Pinball and a VIBS board setup as your backglass. We won’t currently discuss any optional DMD or topper configurations. Those options may be covered in future updates to this guide. Check the Change Log for the latest additions.
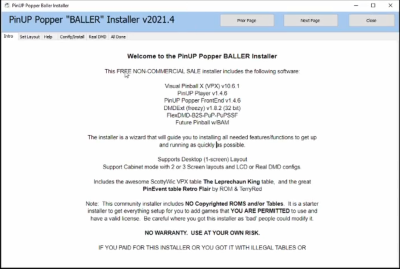
- Read the Welcome screen, it provides some additional information regarding the software components that were installed and the included (x2) tables. There are NO copyrighted ROMs or tables that are included with this installer.
- Click the Next Page button in the upper-right.
- Assuming you will be using the Main Playfield and VIBS for your backglass (with no DMD), you’ll select option “A” and a Playfield Resolution of HD 1080p. Then, click the Apply Layout button.
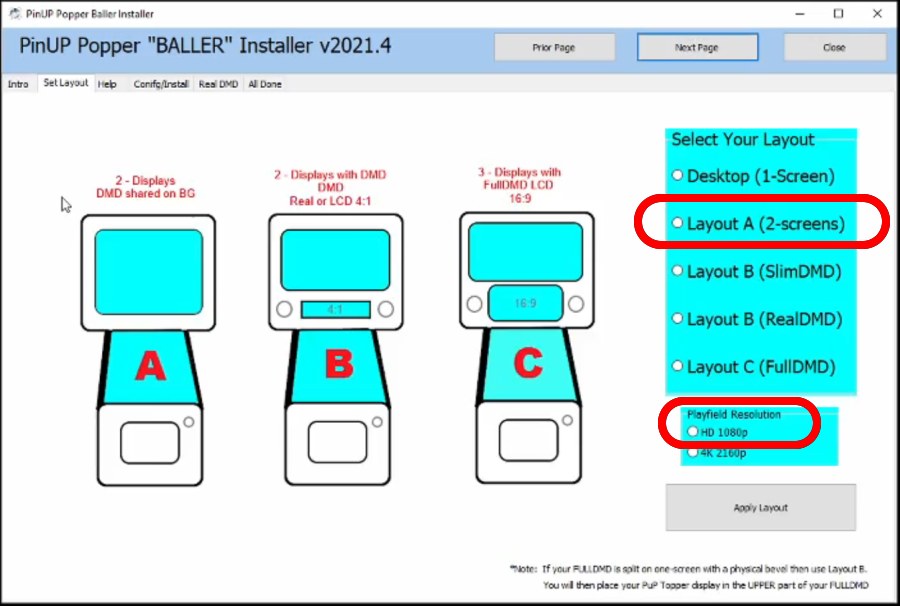
- After applying the layout, you’ll see a screen that checks to make sure that you’ve arranged your displays as mentioned in the Installation Procedure here. Everything should be set correctly, simply press the Next Page button at this point.

- You’ll now see 4 Steps with buttons above each step (1-4). Click Step #1 to Test Display Layout. You should see a Status of All Monitor Settings seem correct! If not, return to the Prior Page(s) and correct any mistakes made.
- Click the button above Step 2 which states Install Apps.
- You should see a response that Everything is fine, the ‘B25 backglass server’ is registered. Click the OK button. You may see a dialog briefly appear stating Microsoft Visual C++ 2015-2019 Redistributable (x86). This is normal.
- The Status will then indicate Registering FP as admin. Future Pinball will then launch and exit, automatically. You’ll then see ..installing apps finished in the Status display window.
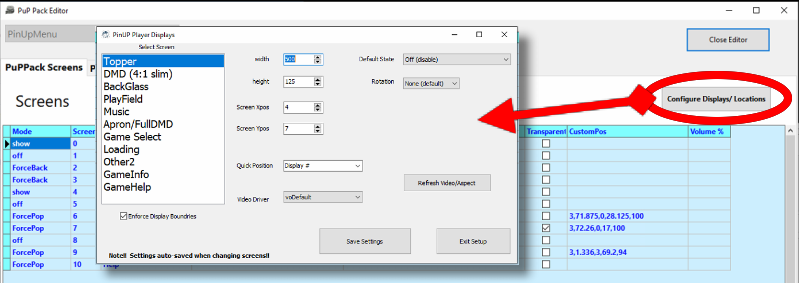
- Now, click the Setup Display Positions button, to assign the positions of each key window element (i.e. the playfield and backglass).
- Under the Select Screen heading, select BackGlass. Click anywhere in the window area and drag the backglass window to the backglass monitor. Click the Full Screen button to automatically size to the full-size of the display.
- In the PinUP Player Displays dialog, make sure BackGlass is set to a Default State of Show Always(On). Then click the Save Settings button.
- Now select PlayField, in the PinUP Player Displays dialog. Click anywhere in the window area and drag the PlayField window to the PlayField monitor. Click the Full Screen button to automatically size to the full-size of the display.
- In the PinUP Player Displays dialog, make sure PlayField is set to a Default State of Show Always(On). Then click the Save Settings button.
- Under the Select Screen heading, select DMD (4:1 slim). Click anywhere in the window area and drag the DMD window to the backglass monitor. Position the window to the lower-middle of the backglass display (you can change it’s location later).
- In the PinUP Player Displays dialog, make sure DMD (4:1 slim) is set to a Default State of Show Always(On). Then click the Save Settings button.
- Now click the button above Step 4, Apply Display Settings to All Apps. The status window will indicate Step four is all done!! …enjoy.
- Click the button in the lower-right that states Next Step – DMD Page.
- At this point, we’ll assume no DMD is being used, at some point in the future I will add more to this section. However, I don’t currently have a DMD to test with so we’ll skip this aspect by clicking the Quit button.
- Congratulations, installation is now complete! Next, you may want to try out the two included tables. See PinUP Popper Front End on how to start it up.
- When you’re ready to add more tables, see this section for installing your tables for either VPX or Future Pinball. At this time, you may click the Close button in the upper-right.
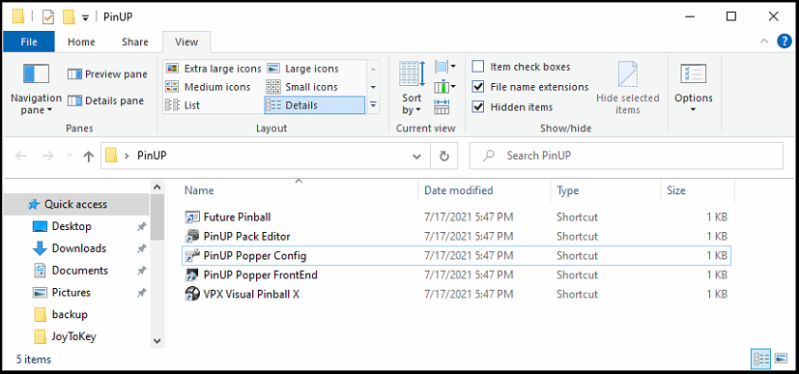
- On your Desktop, you should see a shortcut to the PinUP group. Double-click that and you will see the following shortcuts that have been created for you.
Updating Configuration
This section will discuss how you can access various configuration settings, post-install. That is, after you’ve gone through the installation steps above and need to make any tweaks/modifications, the information below will assist with that.
Configure Displays/Locations
To re-configure the screen positions/locations, follow along below:
- Open your PinUP Group or Desktop shortcut.
- Double-click the PinUP Popper Config icon.
- Select the 2nd tab, Popper Setup.
- Click the Screens / Theme button.
- You’ll now see the PinUP Player Displays Dialog where you may re-configure the BackGlass, PlayField, DMD displays and more (see image below).
- Once configured, click the Close Editor button and Yes to close out of the Screens / Theme dialog.
Backup Database
The following will describe how to make a backup of your PinUP Popper Database (or DB). This is useful, should any critical errors/mistakes occur, the backup could be restored. Each backup file includes a timestamp, so you can easily make a backup as often as you want (or before any significant changes).
- Launch PinUP Popper Config and select the Popper Setup tab.
- Click the Backup DB button to backup the database.
- You’ll be prompted to confirm if you want to make a backup of the DB, click Yes.
- The database will be backed up, then click the OK button.
- For reference, the database backup files may be found here: [drive]:\vPinball\PinUPSystem\PUPBackup
Setup FX3
You can launch FX3 games from within the the PinUP Popper Front End (PPFE). Some setup is required, by default FX3 is not enabled within the Popper Setup. It is recommended, before proceeding, that you make a backup of your existing Database.
Please see NailBusters’ Wiki page and video on this aspect of the setup. It will be very helpful to watch his video and review his guide before continuing. He will cover some aspects that may not be discussed below. That said, below are some basic steps that will be needed to associate FX3 within the PUPFE.
FX3 Setup for PinUP Popper Front End
- Setup FX3 according to the ALP FX3 Setup Guide, if you haven’t already done so.
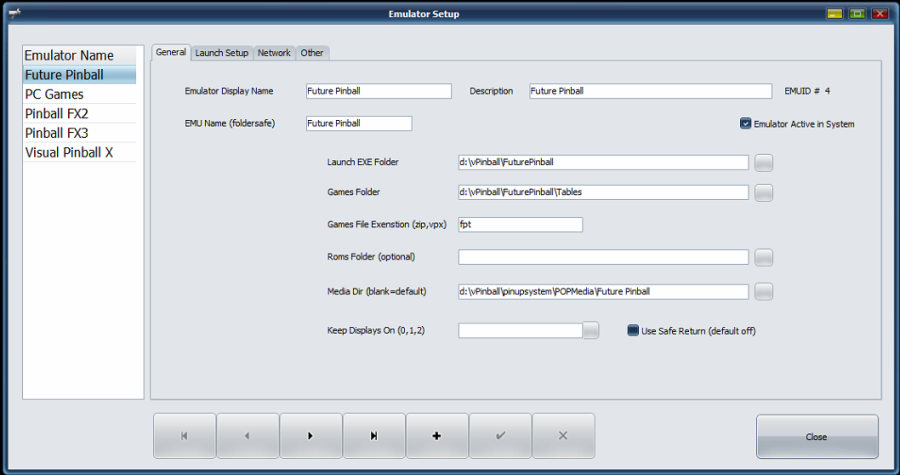
- Launch PinUP Popper Config and select the Popper Setup tab. Then, click the Emulators button.
- Select Pinball FX (under Emulator Name), make sure the Launch EXE Folder is set to your Steam folder (a different drive letter is fine) but should be [drive]:\Program Files (x86)\Steam . The Games Folder should be set to [drive]:\program files (x86)\steam\steamapps\common\Pinball FX3\data\steam
- Check the Emulator Active in System checkbox, if you omit this step you won’t see FX3 listed in the next step for importing the tables.
- Click the Check icon to save your configuration and click close. An example of my configuration may be seen in the image below.
Add FX3 Games
The following will provide the basic steps for adding FX3 games to your setup. Please see NailBusters’ Wiki page and video on this aspect. You’ll want to use his .pupgames (json file) linked on the Wiki page above for importing the FX3 tables with the already configured metadata for the tables. His video will also be extremely helpful and I highly recommend watching it. The following are some basic guidelines for this process.
- Launch PinUP Popper Config and click the Games Manager button on the Game Manager tab.
- Download the NB2_Export_PinballFX3.zip file from NailBuster’s Wiki.
- In the Filter Emulator drop-down, select Pinball FX3.
- Right-click the game list and select Import New Games from file (it skips if the game already exists)
- Select the location of the .pupgames file and click Open.
- When prompted, click Yes to import the new game list.
- All games and their associated metadata will appear in the list. For any tables that you don’t want shown in the list (or haven’t purchased), select the status drop-down for each and select InActive.
- Click the Save button at the bottom and then the Close button to exit.
PinUP Popper Front End
This section will cover the PinUP Popper Front End in a bit more detail, some common uses and how to get the most out of it.
How to Launch
To launch the PinUP Popper Front End , please see the following steps:
- From the PinUP Shortcut (or group), double click the PinUP Popper FrontEnd icon.
- From here, you’ll see a table appear. If you haven’t yet installed any custom tables, it will most-likely be Leprechaun King (fun table).
- That’s it on how to launch the PinUP Popper Front End . See the Basic Operation section for more on how to navigate the Front End .
Basic Operation
If you are not using JoyToKey as mentioned here, the following will allow you to use your PC keyboard to perform the main functions when connected to your PC. This may be helpful when testing out your configuration without being in front of the ALP itself (for example, using TeamViewer to remote control your PC/ALP).
- Select Tables – To select a different table, press the ← or → key on the keyboard.
- Start a Table – After selecting a table, press ENTER to select the game and ENTER one more time to start it. You’ll hear “Please wait, I’m now loading up the game. Have fun!”. The game will now start.
- Insert Credits – Press the number 5 key to enter credits within the front end.
- Start 1 Player Game – Press the 1 key to start a 1 -Player game.
- Launch a Ball – Press ENTER.
- Exit Game – Press the ESC key.
- Exit Front End – ESC key, ← or → to select an option and ENTER to perform the selection.
Installing new Tables
This section will describe how to add new tables to your PinUP Popper setup. These tables may exist as either Visual Pinball X (VPX) or Future Pinball (FP) tables.
Add VPX Tables

This section will describe those steps needed to add new VPX tables. It is recommended that you add tables one-at-a-time. This way, you can more easily verify each table is working, isn’t missing any key components (roms, media, PinUP-Packs, etc.) It can become quite complicated if you attempt to perform these steps in bulk.
- From the PinUP Shortcut (or group), double-click the PinUP Popper Config icon.
- Within the Game Manager tab, click the Games Manager button.
- Select the 2nd tab, Add New Games.
- Within the Scan Filter Emulator, click the drop-down and select Visual Pinball X (VPX).

- Click the Open Game Folder button to open the folder which contains the VPX tables.
- For each table you want to install, there may be one or two files you’ll need to copy here (dependent on the table itself). Those files will end with a file extension of .vpx (the table file) or .directb2s (the backglass file). Copy those file(s) to this sub-directory.
- Some, but not all, tables may also require a rom. A Rom is a dump of the original code from a physical pinball machine. If a rom file is needed to play the table, click the Open Rom Folder button and copy the file there. Typically, the rom files will be a .zip (compressed archive) file. Check with the table you downloaded to determine if a rom is needed and locate it, if so.
- Additionally, some tables will utilize a PuP-Pack. PuP-Packs are a combination of videos, media and config files to work with tables such that the media will play during gameplay. If a table contains a PuP-Pack, copy it into this directory. Typically, the PuP-Pack will have it’s own folder, example: \bcats_l5, \gnr_300, etc. Be sure to keep the original directory and structure for the game scripts and content to be found by the table.
- Once all table content has been added, click the Scan For New Games button in the upper-right.

- Place a check mark under the Add Game beside all games you wish to add. Once done, click the Add Games to System button in the lower-right.
- You’ll see a dialog appear that states x new games added! Simply click the OK button.
- Click the All Games tab (1st tab) and you should see the table(s) you just added in the list.
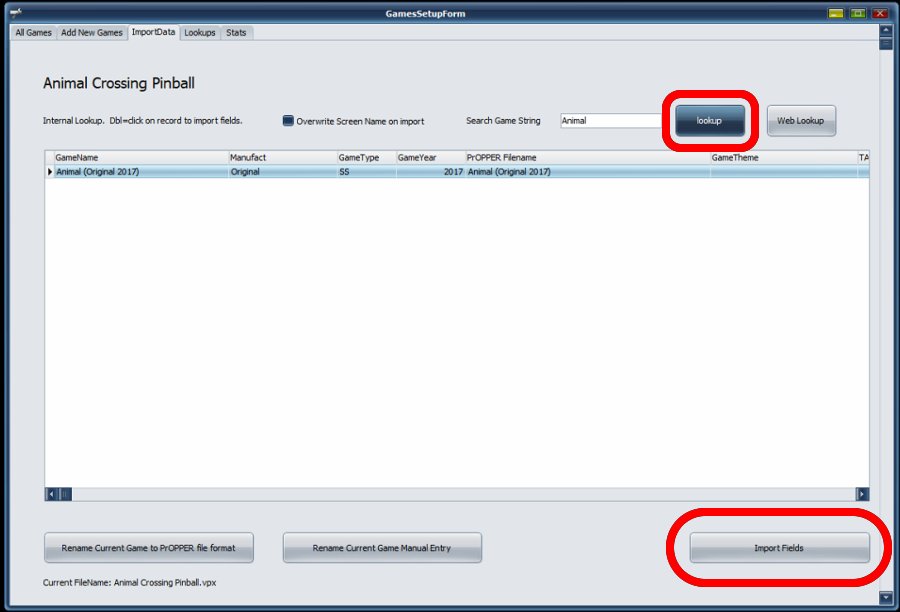
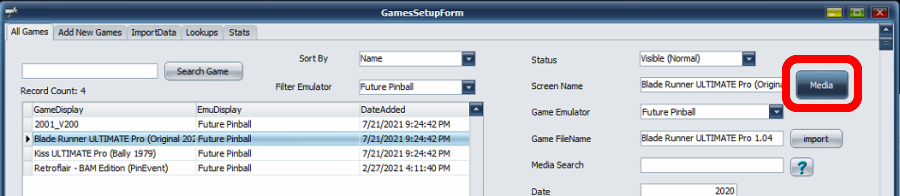
- Select the newly added table and on the right-side click the import button.
- Now click the lookup button to locate the metadata for the table. If no metadata exists for the table you’re adding, try the Web Lookup. If neither find the table, you can can A) Try entering a different search term for the game or B) Cancel the import by closing the dialog. This is primarily used to populate the game information.
- Click the Import Fields button, if media is found.
- You can also click the Media button to import PlayField, Backglass, Wheel/Images, etc. More on that here. Once done importing media, click the Close button.
- Click the Save button in the lower-right.
- Now click the Close button.
- That completes the procedure for adding a new VPX table. Return to this procedure in the future for any additional tables you wish to add. You may also want to add media such as the Wheel Image, Playfield Video or Backglass Video for the newly added table. To do that, please see the Customizing Table Media section.
Adjust DMD Position (VPX)
This will discuss how to customize the location of the backglass image in VPX. Not all tables will allow DMD position changes, however if the backglass animation doesn’t look correct you can use these instructions to change it’s position on the backglass.
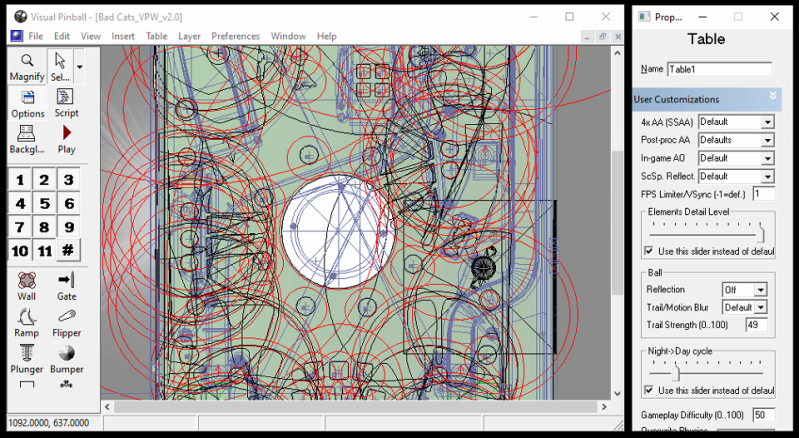
- Launch VPX Visual Pinball X from the Group/Shortcut.
- Click Cancel on the dialog.
- Select the menu File/Open and select the Visual Pinball Table (i.e. ends in .vpx)
- Click the Open button.
- After the table loads, press the Play button.
- Click and drag the DMD to the position where you want it. You can also click the right-bottom-corner to resize the DMD.
- Right-click the DMD, you can then save the position globally or the position for the selected table. Recommendation: save for the selected table as to not impact any other table configurations.
- Press Q to bring up the menu and click Quit to Editor.
- Then close out of Visual Pinball.
Add Future Pinball Tables

Future Pinball (FP) is a real-time Pinball Development system. Not only can you play games using this simulator in real-time 3D, but you can design tables too. Pretty cool, but we’re not going to design any new tables in this guide. We’re only interested in playing them!
Future Pinball Hanging
This section almost didn’t get documented. After I loaded a FP table from the Future Pinball icon (within the PinUP Group on the Desktop) and clicked the Play Table button the table would just hang consistently. The table would never fully load, clicking on the table would eventually show the not responding dialog and then I terminated the application. That was, until I was informed of a fix for it. You don’t have to perform this fix unless you’re having an issue (I don’t know how common of a problem it is). I’m letting you know about this up-front, so if you encounter this same issue either when running from the PinUP Front End or from the Future Pinball icon, you’re aware of a solution that worked.
Possible Future Pinball Hang Fix
- Right-click on the Start button and select Run (or press the Windows Key + R).
- Type services.msc in the Run box and press ENTER.
- The Services window will appear.
- Click in the list of services and press “N” on the keyboard.
- Look for the service named Nahimic Service.
- Right-click and select Properties.
- If the service is running, click the Stop button.
- In my case, I set the Startup type to Disabled so I wouldn’t face this issue again.
- Try to load a FP table, and click the Play Table button. If it works for you now, you can leave it disabled. All indications that I’ve read so far is that it’s not an important service to have running. Why it was installed on my Dell machine to begin with, I have no idea.
- Hopefully this will help a few others out! Now, back to Adding a Table…
Future Pinball tables may consist of several different files within the archive. Here are some basic installation steps for Future Pinball tables:
- From the PinUP Shortcut (or group), double-click the PinUP Popper Config icon.
- Within the Game Manager tab, click the Games Manager button. Select the 2nd tab, Add New Games.
- Within the Scan Filter Emulator, click the drop-down and select Future Pinball.
- Click the Open Game Folder button to open the folder.
- Copy any Future Pinball tables which end in a .fpt file extension to the Tables subfolder.
- Move up a level in the folder list to the Scripts subfolder. Copy any .vbs files in this subfolder.
- Ball textures are typically .zip files and will go in the \BAM\Balls subfolder.
- Once all files are copied to their respective sub folders, click the Scan For New Games button.
- Click the Checkbox beside the game to add and click the Add Games To System button.
- Click the OK button on the dialog indicating the new game was added.
- The newly added game will then show up in the All Games tab. Here you can change the Filter Emulator drop-down to Future Pinball to just see Future Pinball games.
- Select the newly added table and click the import button locate the table. If you don’t get the correct results there, try the Web Lookup button. If neither return anything, simply close out of the dialog. Otherwise, select the game from the list and click the Import Fields button.
- You can also click the Media button to import PlayField, Backglass, Wheel/Images, etc. More on that here. Once done importing media, click the Close button.
- Click the Save button to Save the table configuration.
- Click Close to close the Games Manager dialog.
- You may also want to add media such as the Wheel Image, Playfield Video or Backglass Video for the newly added table. To do that, please see the Customizing Table Media section.
Customizing Table Media
Setting up your table artwork to make it your own is the most time consuming and rewarding aspect of the process. Below we’ll cover some of the methods.
Importing Media
As with most things, there are a number of different ways to do it. Perhaps the easiest way to import existing media is below:
- From the PinUP Shortcut (or group), double-click the PinUP Popper Config icon.
- Within the Game Manager tab, click the Games Manager button.
- Under the Filter Emulator section, click the drop-down for the emulator you wish to import media for (i.e. Future Pinball, Visual Pinball X, Pinball FX3, etc.)
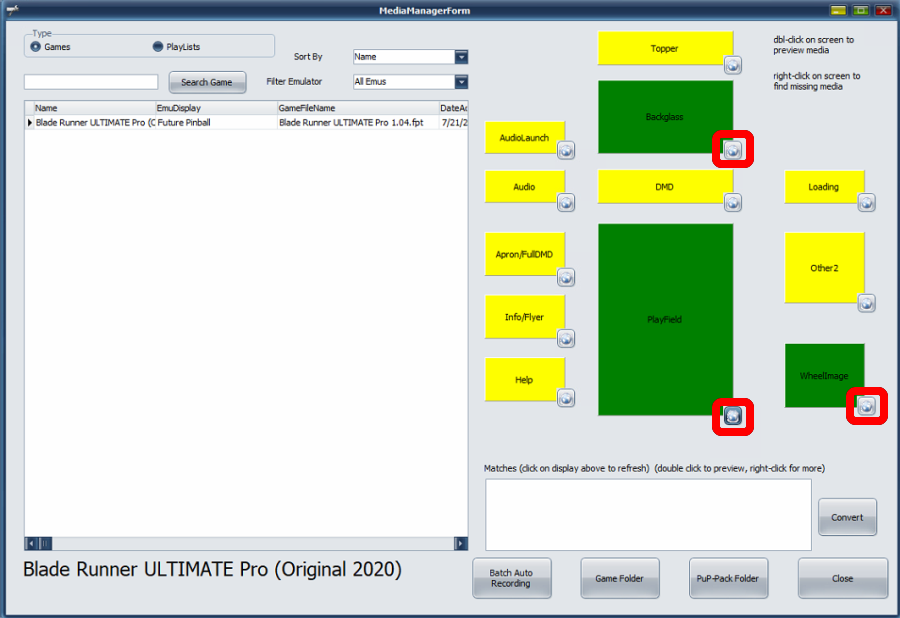
- Select a table from the list and click the Media button on the right.
- Click the small icon beside in the lower-right of each of the media types you’re wanting to load (i.e. Playfield, Backglass, Wheel Image, etc.)

- If existing artwork appears, you can select/Preview it. If it’s what you’re looking for click the Download & Use button. Otherwise, you can type in a different Search String or click the Cancel button if there is nothing you want to use.
- After all Media types have been downloaded, click the Close button.
- Repeat the above for any additional tables
- When done, click the Close button.
Record Media
You can also record media, in the event you aren’t able to locate any existing media for a table. Please see below:
- Launch the PinUP Popper FrontEnd.
- Load up the table you want to record in PinUP Popper FrontEnd.
- Press ‘O‘ on the keyboard to bring up the Operator Menu.
- Select the option Record Displays (arrow ← or → and ENTER)
- Select Playfield Record, you will then hear “I am now recording you playing with your ball”.
- Wait 10-20 seconds to capture some video.
- Press ‘O‘ to stop the recording, wait until the voice lets you know “Conversion is now done, enjoy!”
- Press ‘O‘ on the keyboard to bring up the Operator Menu.
- Select the option Record Displays (arrow ← or → and ENTER)
- Select Backglass Record, you will then hear “I am now recording you playing with your ball”.
- Wait 10-20 seconds to capture some video.
- Press ‘O‘ to stop the recording, wait until the voice lets you know “Conversion is now done, enjoy!”
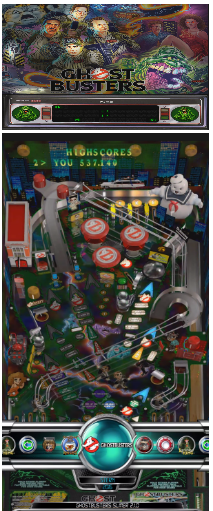
- Escape out of the table, you’ll now see the playfield and backglass artwork when the table is selected.
BitPixel HV Setup
You can find more information on how to setup the BitPixel HV with PinUp Popper at the links below. It includes an automated installer and pixel-perfect marquee Artwork:
- How to Setup Pixelcade DMD or BitPixel for PinUp Popper [ Pixelcade Arcade Marquees ] – YouTube video explaining the setup process.
- Pixelcade Art Pack for PinUp Popper [ Pixelcade Arcade Marquees ] – YouTube video demonstrating the artwork pack.
*NOTE: AtGames is no longer selling the BitPixel HV, however you can find an alternative product here that operates the same.
What Next?
Congratulations, you have reached the end of this setup guide! Hopefully you’re all up and running and have added a few tables and having fun playing by now. Before I go, I wanted to share some links with you that will help you get even more out of your installation:
- VPForums.org – great resource for all things Virtual Pinball.
- VPUniverse.com – more great Virtual Pinball resources.
- NailBuster.com – excellent resource for diving deeper into the software components.
- VPWiki – excellent resources for modding and much more.
Guides
There are a number of excellent guides from Terry Red and NailBuster which covers how to customize the media and/or import media for the tables you’ve installed. Below I will link to a few of those guides / videos that you may be interested in for further detailed exploration. More will be added here as I come across them. There are numerous resources that will allow you to take your experience even further, such as:
- TerryRed: PinupPopper “Baller Installer” – Future Pinball Tips – More detailed information regarding the components may be found on his guide.
- Future Pinball and BAM Mega Guide by TerryRed – Great tutorial / details on Future Pinball and the BAM Mega Guide. The Mega Guide is 82.03MB and is a zip file with a PDF and supporting files for the guide.
- Using Media Manager (NailBuster)- See Section C for the Media Manager guide.
Video Recording (NailBuster) – This guide will assist with creating recordings of your playfield and backglass to be used as artwork for your installed tables.
Videos
- TerryRed YouTube channel – TerryRed is also creating two new awesome Future Pinball tables: Silent Hill and RetroFlair 2. Definitely check out and subscribe to his channel to get updates, they look Amazing!
- NailBuster YouTube channel – NailBuster has created some excellent video guides that will take you deeper into PinUP Popper. Check out his videos, I think you’ll find them very helpful.
- PinUP Popper (adding new tables) – This video from NailBuster also demonstrates how to record custom playfield and backglass videos that will show during table selection.
Troubleshooting
This section will identify some possible issues and solutions, should you encounter them. More will be added as they are identified.
- Already have Pinball Emporium (PE) installed, can I install this? – I personally have never installed PE, however I was informed of the following: Since they’ll install VPX and FP in different places you’ll get invalid registry information. In addition, the front-end media for the tables is not in the same location. You’ll need to rebuild all that too.
- ALP Buttons not working with FX3 (OTG) – ALP Buttons not working with FX3 (OTG)- Launch JoyToKey and select the menu option Settings → Configure Joysticks. Then click the Configure Game Controller Property button. At this point, you should see ATG Control Deck, if you don’t make sure you’ve plugged the OTG Cable (USB-A to type A) in the far-right USB (2.0) port on the ALP and the other end into your PC or Powered USB Hub. If this doesn’t correct the issue, you may need this Powered USB Hub (for more on this hub and my experiences, please see this).
- Button Latency – Solution #1: First, right-click on your taskbar and select Task Manager. Examine the Startup and Services tabs for any unnecessary tasks/services that can be disabled or stopped. Then reboot to see if that improved the latency. Solution #2: I encountered this during filming/testing, the reason for the latency I was experiencing was caused by having TeamViewer actively connected to the ALP PC while playing a game (forgot I had connected, it was streaming the displays back to my PC). Disconnecting TeamViewer/Remote Desktop Connection resolved the latency issue.
- Sticky Keys – If you get a popup or Sticky Keys dialog (may occur when holding down the flipper buttons), here’s how to stop it from popping up:
- Click the link for Disable this keyboard shortcut… in the dialog. You’ll then see a new window appear.
- Under Use Sticky Keys, uncheck the option to Allow the shortcut key to start Sticky Keys.
- Under Use Toggle Keys, uncheck the option Allow the shortcut key to start Toggle Keys.
- Close out of the dialog and return to your game. You should now be able to hold down the flipper buttons without any further distractions.
- ALP Buttons not working with FX3 (OTG)- Launch JoyToKey and select the menu option Settings → Configure Joysticks. Then click the Configure Game Controller Property button. At this point, you should see ATG Control Deck, if you don’t make sure you’ve plugged the OTG Cable (USB-A to type A) in the far-right USB (2.0) port on the ALP and the other end into your PC or Powered USB Hub. If this doesn’t correct the issue, you may need this Powered USB Hub (for more on this hub and my experiences, please see this).
- Future Pinball hangs when starting a table – I encountered this as well, please see here.
- How to hide the backglass Taskbar – please see here.
- How to keep the PC from going into sleep/suspend mode – please see here.
- Any way to do all this setup remotely? The 90 degree monitor is driving me nuts! – I highly recommend Team Viewer, it’s great and you can see both displays at the same time or each individually using this tool More about it here. However, disconnect the session before doing anything other than the setup/configuration. That is, before you go to “really” play a game, disconnect the session for the best game-play experience.
Change Log
- 2023-05-31 – Added information on setting up the BitPixel HV with PinUp Popper here.
- 2022-08-08 – Added Steam Deck Guide Reference.
- 2022-05-10 – Minor edits/corrections.
- 2022-04-09 – Added mod series reference.
- 2022-02-13 – Minor edits.
- 2021-07-30 – Added a new video guide, Setup PinUP Popper Baller Installer on your AtGames Legends Pinball.
- 2021-07-24 – Minor edits.
- 2021-07-23 – Initial public release of this guide.
- 2021-07-16 – 2021-07-22 – Continued work on this guide. I’ll consider this the first usable draft. More refinement and testing to be done, however there is enough information now to setup PinUP Popper Baller Installer/VPX with FX3. Added Troubleshooting section. Added Customizing Table Media. Further edits based on feedback received. Documented FP, Importing Media and much more.
- 2021-07-15 – Start to this guide.