
AtGames Legends Pinball Micro
Last Update: 5/29/2023

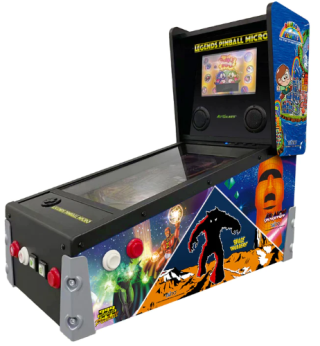
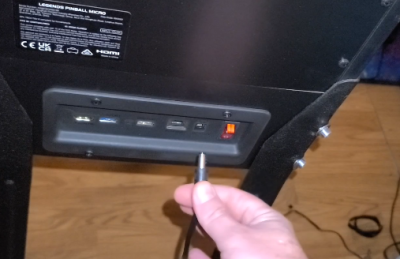
AtGames latest product is the Legends Pinball Micro (ALPu – official shorthand for the micro). This machine maintains all of the main features of it’s larger sibling, the Legends Pinball though in a much smaller form-factor. AtGames has listened to the community and moved all the ports (HDMI, USB 2.0/3.0) to the back of the machine. On the top-right panel, you have the channel button (for switching inputs) and the volume up/down.
The size of the ALP Micro is substantially smaller than that of the Legends Pinball Machine. The dimensions are approximately 24″ long, 22.5″ tall and 12″ wide.
The ALP Micro is a great solution for those looking for a small pinball machine for another room in the house or don’t have room for the larger Legends Pinball machine. It maintains all of the same great features of it’s larger sibling, it’s just smaller. There are no legs included, so you’ll need to have a small table or desk to set it on. See the Accessories section for some ideas. There are 50 licensed Pinball Tables pre-installed, including some of the most popular titles including: Space Invaders, Front Line, Arkanoid, Deluxe tables and much more!
The guide below will provide additional information on the Legends Pinball Micro. As new information is available, this guide will be updated.
How-To link to a specific section on this page: go to the Table of Contents (below) and click a section to reference. Copy the URL from the address-bar of your browser and paste in your video description/post/blog. This will direct a viewer to a specific section in any of the guides you find here.
Table of Contents
Q&A
- What’s the difference between the ALP Micro and the ALP in terms of software? Not much of a difference, the user interface and options are the same as what you may be familiar with on the larger Legends Pinball machine.
- What are the differences between the ALP Micro and the ALP in terms of hardware? Below are some of the primary differences between the two:
- Size is the largest difference. The ALP Micro is roughly a quarter the size of the ALP.
- The pinball plunger (used to launch the ball) on the ALP has been replaced with a push-button to launch the ball on the ALP Micro.
- All ports for HDMI and USB (2.0/3.0) have been moved to the back of the ALP Micro.
- Due to the size difference, the Arcade Control Panel will not fit in the Micro.
- The BitLCD and PixelCadeX applications are pre-installed in the firmware, though mounting directly to the ALP Micro isn’t possible due to the size. However, you could mount them on a nearby wall or possibly via 3rd-party options.
- When will the ALP Micro’s ship? They are expected to ship in Dec. 2022.
- Can I use the VIBS board from the ALP in the ALP Micro? No, it uses a different sized VIBS board designed to fit inside the smaller ALP Micro backbox. I hope to be able to show this soon.
- Can I connect the ALP Micro to a PC or Steam Deck to play Pinball FX3, Visual Pinball X (VPX) and Future Pinball? With the ALP Micro VIBS Board, you’ll be able to utilize the backbox as well as the playfield. There is an HDMI port for the playfield input on the back of the unit. Once the VIBS board is available for the Pinball Micro, you’ll be able to play all those games utilizing the playfield and the backbox.
- Will there be an Arcade Control Panel (ACP) for the ALPu? [AtGames] It’s a possibility, but we have no further information at this time. [WTT] If it’s something you want, definitely let AtGames know!
- How can the button plunger be used for skill shots? The plunger moves down as soon as you start pushing and it’s launched when released. So, you can use it for skill shots. Just that you have to time it just right during ball launch.
AtGames News Updates
For the latest AtGames News, visit the AtGames News Updates page.

Purchase Locations
The AtGames Legends Pinball Micro may be found at the following locations:


Specifications
Below are the product specifications for the ALP Micro:
- 15.6″ playfield for full 1080p 60fps virtual pinball gaming
- 8″ backglass LCD
- 50 built-in pinball tables
- Built-in WiFi, Bluetooth and Ethernet connectivity
- Flippers & Nudge buttons and a built-in accelerometer (you can shake the table during game play to move the ball)
- ArcadeNet streaming service which is optional (1 month free)
- 16GB built-in flash storage for adding pinball tables, CoinOpsX, BYOG, etc.
- Ability to connect a PC/Steam Deck or other devices via HDMI+OTG. *NOTE: A new VIBS board will be needed to utilize the backglass on the ALP Micro.

Resources
- AtGames Legends Pinball Micro – AtGames website where you can pre-order/purchase the Legends Pinball Micro.
- Legends Pinball Micro Instruction Manual – The manual included with the Legends Pinball Micro. Useful if you’ve misplaced yours, want to read it before purchasing, etc.
- Game List – Full list of all pinball tables included on the Legends Pinball Micro.
More ALP Micro Reviews
If you’re considering the Legends Pinball Micro, it’s always a good idea to get multiple opinions. Below are some videos from fellow content creators :
- AtGames Pinball Micro : Small table – Big fun [ Techmoan ]
- AtGames Legends Pinball Micro Review [ MichaelBtheGameGenie ]
- Legends Pinball Micro Inside and Out Review [ TampaTec ]
Accessories
Below are a few accessories that you may find helpful for use with your Legends Pinball Micro (ALPu):
- Stern/Sega Black Legs (Set of 4) – A fellow content creator, Matthew recommend this set of legs for the Micro. Price was much better here than other options I was looking at. I’ll report back with pictures once it arrives.
- Heavy Duty Leg Leveler – You’ll want feet for the above legs, this is what was ordered. I’ll likely go by my local hardware store and find some rubber stick-on pads to keep it from scratching my hardwood floors. I’ll report back with pictures once it arrives.
- Personal Folding Table – In the video above, I was simply using the cardboard box that the ALPu shipped in with a blanket over it. Long-term, this isn’t a good solution so I just ordered this table instead. Update: so the table arrived, I do have the ALPu sitting on top of it and it fits ok. The only thing I don’t like about it is that it looks like a wide-body ironing board. While I’ll be using it (temporarily), I don’t recommend this. Actual pinball legs would work out better, ordered a set above.
- XBox 360 Clone Controller – I’ve used this thing for a few years now, it’s been through some hard times and keeps working. I do recommend it if you’ll be using your ALPu with CoinOpsX. It works well and there is no hassle using it. However, keep in mind it is a wired controller.
Assembly
The assembly of the Legends Pinball Micro is very easy, below are some quick steps :
- Remove the 4 screws on the back of the backbox and set the panel to the side.
- Insert two dowels into the locations on the base of the ALP Micro.
- Feed the video and audio cables through the slot at the bottom of the backglass and over the two pegs.
- Insert/install the two screws at the bottom of the backbox into the ALP Micro main unit/base.
- Connect the video and audio cable inside the backbox.
- Re-install the back cover using the 4 screws that were removed previously.
- Plug in the power cable and flip the switch to turn on the ALP Micro.
- That’s it!
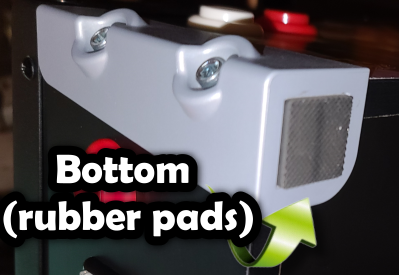
*NOTE: There are rubber pads under each edge of the ALPu to protect furniture from scratches.
Show Me
If you’re interested in seeing certain aspects of the Legends Pinball Micro, the following will launch a video to demonstrate what you’re looking for at the associated time-stamp. This makes it quick and easy to see exactly what you’re wanting without having to watch an entire video :
- Features
- What’s in the box?
- How do I assemble the Legends Pinball Micro?
- How does it Compare to the Legends Pinball?
- Tour of the machine.
- Let’s see some Pinball Table Game Play on the ALPu.
- Does CoinOpsX work on the ALPu? If so, what can I expect?
Legends Gaming
For details on all the latest available Gaming Packs (Arcade and Pinball), Code Redemption, Installing/Uninstalling games, check out the Legends Gaming Guide.

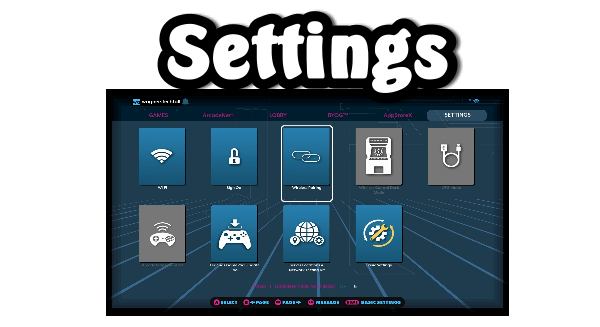
Settings
For an explanation of each of the options that are available in the Settings tab, please see the Settings Guide.
Operation
Getting into the settings and making changes to the machine isn’t difficult. The menu system makes it pretty easy to navigate. Below are some tips to help you get started.
- Exiting a Game / Viewing Leaderboards – When in-game, press the Menu button if you want to Quit the game or check the leader boards. Use the D-Pad to navigate to your selection and always press the Play button to select an option.
- Getting Around – Use the D-Pad (4 way controller) on the bottom top panel to navigate the user interface. There are options at the very top as well as in the main display area. When you find the option/table/game/setting you want, press the Play (green) button to select the option.
- Multiplayer Games – After loading a table and prior to starting the game, you can toggle the number of players by pressing the red Rewind button on the front of the machine to toggle between 1-4 players. Once the number of players has been selected, press the green Play/Select button to start the game.
- Favorites List – You can create a favorites list of all your favorite pinball tables by first selecting the table (don’t launch it, just browse to the table and press the Play/Select button). On the bottom, you’ll see Favorites – press the Forward nudge (white up-arrow button) to toggle Add/Remove of the table to your favorites list. Go back to the main table selection and press the menu button. Using the D-Pad/Joystick move down to the Favorites option and press the Play/Select button. Now you’ll only see your favorite tables (if nothing is there, you didn’t add a table to the Favorites list). This will not work with BYOG/AddOn tables, but great for pinball tables.
- Return to All Games (from Favorites) – To return to the All Games list, press the menu, move the d-pad up one to All Games and press the Play/Select button. You’ll then see all tables again.
ArcadeNet
ArcadeNet is a service provided by AtGames for your ALPu which lets you stream games from a virtual server in the cloud to your machine. There is no need to install anything, it’s all streamed to your machine. For the best results, you’ll want to connect an Ethernet cable to the back of your ALPu instead of WiFi. While both will work, you’ll get much better performance with an Ethernet cable attached. When you play a multi-player game from the Lobby, you’re accessing a remote server to play your opponent.
ArcadeNet and the Lobby has been implemented on the ALPu and consists of primarily pinball tables and a few arcade games. At the time of this writing, there is a very limited list of ArcadeNet games available on the ALPu.
CoinOpsX
Detailed CoinOpsX Guide
CoinOpsX allows you to play those classic Arcade Games that may not be available from AtGames. For a full guide on how to setup CoinOpsX, visit the AtGames CoinOpsX Vertical (WOPR w/Cheese) Guide. *NOTE: Arcade gaming using the included d-pad on the ALP Micro may not be ideal for arcade gaming. You may prefer a wired/wireless controller instead. One GamePad that I used for testing is this inexpensive Xbox 360 (clone) controller.

1st Party Accessories
The following accessories are provided by AtGames and may be used with your Legends Pinball Micro:
- Legends BitPixel [Video] – While this video focuses primarily on using the Legends BitPixel on the Legends Ultimate, it also works with the Legends Pinball Micro! Therefore, you can mount the BitPixel near the ALPu on the wall. The BitPixel cannot be mounted directly to the ALPu.
- Legends BitLCD [Guide] – While this guide focuses most on using the Legends BitLCD with the Legends Ultimate, the BitLCD application also comes pre-installed on the ALPu! Therefore, you can mount the BitLCD near the ALPu on the wall. The BitLCD cannot be mounted directly to the ALPu.
- ALPu VIBS Board [Coming Soon] – A new smaller version of the VIBS board is needed to make use of the backglass on the ALPu. This accessory allows utilizing the backglass and the playfield on the ALPu when connected to a PC, Steam Deck or other device.
VIBS Board Installation
Official AtGames ALP Micro VIBS installation manual: here
If you want to be able to utilize the backglass display with a PC or Steam Deck, you’ll need the AtGames Legends Pinball Micro VIBS board. The VIBS board for the Legends Pinball will not work with the Legends Pinball Micro (ALPu). In the sections below, we’ll cover some of the items you’ll need and how to install the VIBS board into the Legends Pinball Micro.
Prerequisites
Below are some additional items you may need to use the VIBS board with the ALPu:
- Legends Pinball Micro VIBS – You’ll need this specific board as it was designed for the Legends Pinball Micro and cannot be used on the (larger) ALP.
- PC or Steam Deck – Can be running Pinball FX3, Visual Pinball X or Future Pinball. For details on the software setup for the Steam Deck, see here. For Pinball FX3 on a PC, see here. For VPX/FP via Baller Installer, see here.
- x2 HDMI Cables (~6ft. in length should be fine) – You’ll need one to the VIBS board for the Legends Pinball Micro and one for the playfield.
- USB-A to USB-A cable (OTG) – This cable has worked perfectly for me. Other cables may work just as well. However, some have told me they bought an Insignia brand (from Best Buy) that did not work with the ALP (not the Micro). So, do keep that in mind.
Legends Pinball Micro VIBS Installation
Below, we’ll discuss the installation of the VIBS board into the Legends Pinball Micro.
*Warning – When handling the VIBS board (or any electronics), please try to hold the board from it’s edges to reduce the possibility of electro-static discharge (ESD).
- Power off the Legends Pinball Micro (power switch at the back).
- Unplug the power cable going to the Legends Pinball Micro.
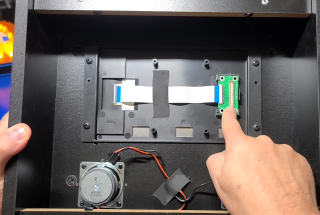
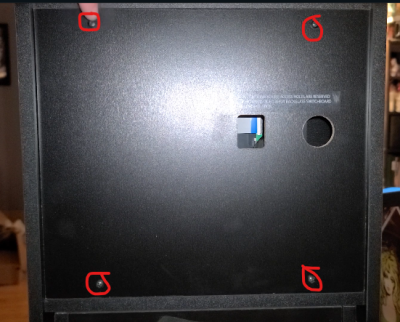
- Remove the four screws from the backglass on the back of the Legends Pinball Micro and place the screws somewhere that you won’t lose them.
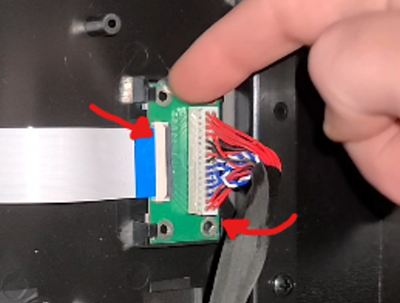
- Carefully disconnect the FPC cable, the cable from the small board (gently lift the black tab upward using two fingers top+bottom, then slide out the cable). Again using two fingers along the top/bottom, disconnect the LVDS cable. A gentle top-to-bottom motion should make removal easier (NOTE: Don’t pull from the group of wires, it’s possible one of them could come loose or break).
- Install the VIBS board using to the included four screws into the screw holes at the back, in the orientation shown below.
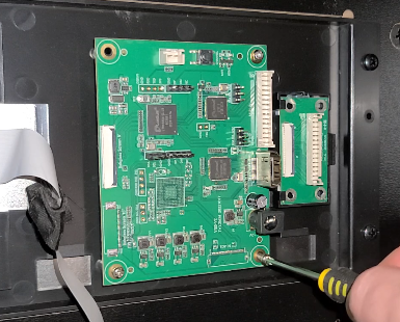
- Connect the FPC and LVDS cable to the VIBS board as shown below. Push the blue side of the FPC cable into the connector and gently press-in the black connector to lock it down. Insert the LVDS cable fully into the connector, take care to observe the orientation of the notches (exposed pins of the connector should be to your left).
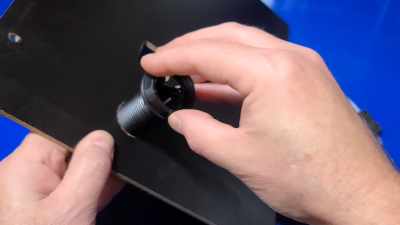
- Remove the nut pre-installed into the VIBS switch. Then, install the VIBS Switch button on the side of the panel that has writing above the cutouts. On the opposite side, screw the nut tightly to secure the button to the panel.
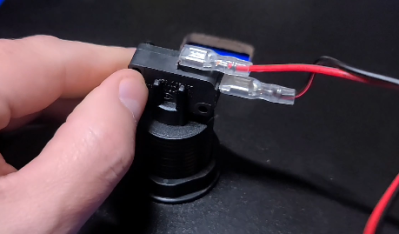
- Install the microswitch to the two pegs on the back of the Switch button (insert bottom first, then gently insert the top of the switch into the peg at the top). Then, attach the red and black terminals to the microswitch. It doesn’t matter which wire goes to which terminal.
- Connect the power cable included with the VIBS kit to the connector on the VIBS board.
- Connect the HDMI cable (not included) to the VIBS HDMI connector on the VIBS board.
- Connect the small two-pin (red+black connector), going to the VIBS Switch button, to the small mate on the top of the VIBS board.

- Route the power and HDMI cable through the opening on the back panel.
- Install the back panel to the back of the backbox, using the four screws that were removed earlier.
- Plug the power cable from the VIBS board into the splitter as well as the main power input. Plug the splitter into the back of the Legends Pinball Micro.
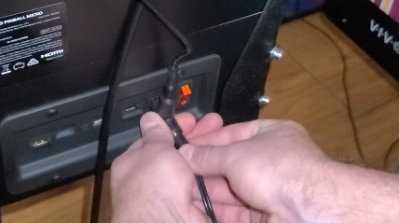
- You can now turn on the power to the Legends Pinball Micro! If you don’t see the backglass display appear, press the VIBS switch button at the back once.
Switch to External Source
To switch to an external source, such as a PC or Steam Deck, please see the following:
- Connect the HDMI cable from the back of the Legends Pinball Micro to the playfield HDMI Output on your device.
- Connect the HDMI cable from the VIBS board to the backglass HDMI Output on your device.
- Connect a USB (OTG) male-to-male cable to the USB 2.0 (white) port on the back of the Legends Pinball Micro to the USB port on your device (or attached dock).
- Exit any pinball table or application that may be running. Then, press the CHANNEL button in the upper-right of the playfield.

- From the following screen, make sure the following are set:
- Control Mode: OTG
- Display: Main display
- Degree: 90
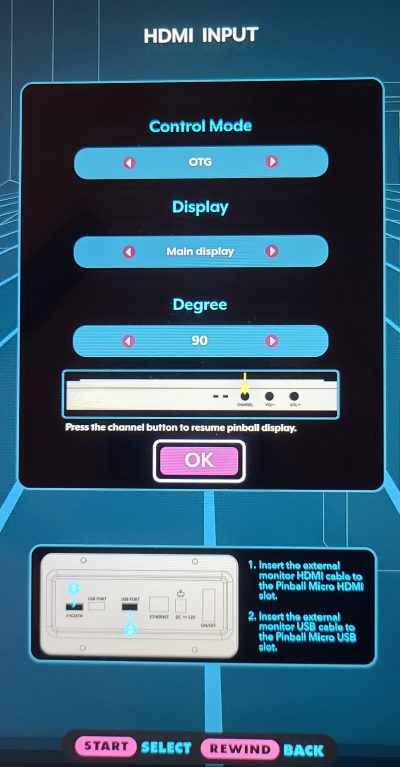
- Once set, press the Play/Start button on the front of the ALPu.
- Press the VIBS Switch button (back of the backglass) once.
- That’s it, you’ve now switched the displays to the externally connected device!
Where to go from here
Need more assistance? If you’re new to the Legends Pinball Micro, start from the top of this guide. If you’re already familiar but need more information on setting up a PC or Steam Deck, please see the following guides:
- FX3 Setup
- Visual Pinball X (VPX) and Future Pinball (FP)
- Steam Deck for use on the Legends Pinball (and Micro)
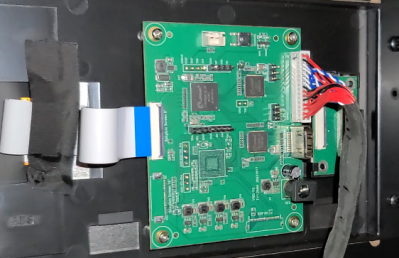
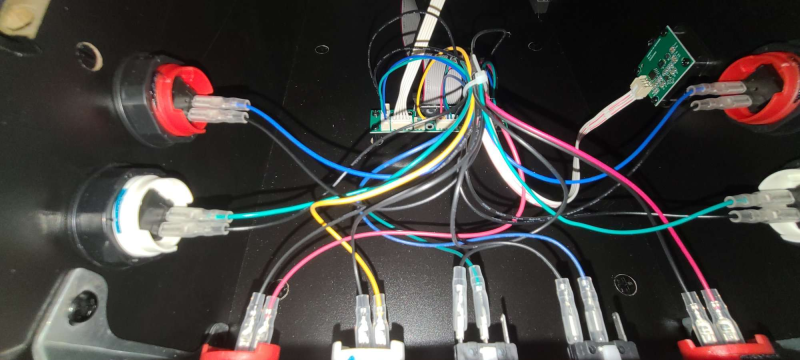
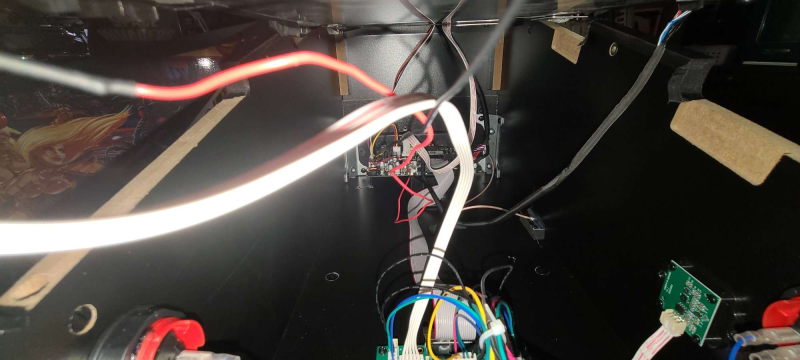
Internal Images
Here are a few pictures of the internals of the ALPu, just incase you’re curious:
Troubleshooting
If you are having issues with your ALP Micro, see below for some possible solutions. If you don’t see your particular issue listed, please comment in the above video and I’ll try to find a solution.
- How to Perform a Factory Reset – If you have severe audio issues or firmware that is not updating you can perform a Factory Reset. This will reset your machine to the state it was when you received it. That is, you’ll need to re-install any purchased tables, apps., etc. This may also be useful if you sell the unit. Here’s how to perform the Factory Reset:
- Power the ALP Micro on while holding the left flipper and the left nudge buttons.
- Then, follow the on-screen prompts to update the device.
- Why are my ArcadeNet Pinball tables upside down? This is an issue that was noticed with the included firmware. It will most likely be corrected before public release.
If the above Troubleshooting information did not help resolve the issue, you can also contact AtGames for assistance here.
Change Log
- 2023-05-29 – Minor updates.
- 2023-01-16 – Added Techmoan’s excellent review here.
- 2022-12-23 – Add the new VIBS for Legends Pinball Micro Install and Setup video.
- 2022-12-21 – Add the ALP Micro VIBS installation.
- 2022-12-06 – Minor updates.
- 2022-11-11 – Added MichaelBtheGameGenie’s review.
- 2022-11-08 – Added some pinball legs to the accessories section that may work with the Micro.
- 2022-11-06 – Added a few internal pics. of the Micro here.
- 2022-10-27 – Added TampaTec’s review of the Legends Pinball Micro.
- 2022-10-21 – Added the Game List in the Resources section.
- 2022-10-19 – Minor edits.
- 2022-10-18 – Added the “Show Me” section linking to the new video.
- 2022-10-17 – Additional edits and added the Accessories section.
- 2022-10-16 – Start to this guide.