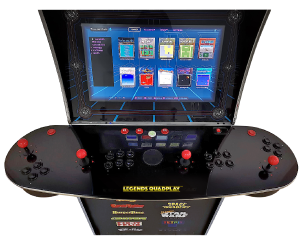
Legends QuadPlay Control Panel
Last Update: 1/2/2023

(4-Player Control Panel)
The QuadPlay is a drop-in replacement for the stock Legends Ultimate control panel (or core/max) to allow 4-player simultaneous arcade gaming (NOTE: A new universal firmware will be released which will allow the QuadPlay to be used on all Legends devices). The unit includes four joysticks, 4 action buttons for players 3&4, 6 action buttons for players 1&2, P1-P4 start buttons as well as Rewind, AtGames/Menu button and a power button. No spinners are on this panel nor is a trackball included. However, there is a cover plate where a trackball can be installed. Trackball installation instructions may be found here.
The new Legends QuadPlay arrived on a Saturday (9/17/2022). The box that arrived was obviously large, 46″ long. There is only one game that ships with the Legends Ultimate that is a 4-player game is, The Ninja Kids. For 4-player gaming, you’ll want to consider CoinOpsX to take advantage of the 4-player gaming aspect of this panel. If you’re not familiar with CoinOpsX nor know how to set it up, please see the CoinOpsX Guide.
In the sections below, we’ll cover many aspects of the QuadPlay. Please check back often (See Change log for recent updates). This guide will receive updates as new information is known.
How-To link to a specific section on this page: go to the Table of Contents (below) and click a section to reference. Copy the URL from the address-bar of your browser and paste in your video description/post/blog. This will direct a viewer to a specific section in any of the guides you find here.
Table of Contents
Resources
- Where to find a QuadPlay [ AtGames E-Store | Amazon ]
- QuadPlay User’s Manual – the official QuadPlay User’s Manual from AtGames.
More QuadPlay Reviews
If you’re considering the Legends QuadPlay, it’s always a good idea to get multiple opinions. Below are some videos from fellow content creators :
Q&A
Below are some common questions and answers.
- Will the QuadPlay install on a Legends Ultimate 1.0 cabinet? No, it was designed to install into the Legends Ultimate 1.1 (or higher) cabinets.
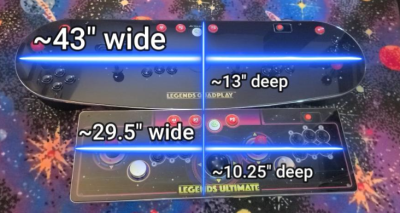
- How much larger is the QuadPlay vs. the Panel installed in the ALU? The QuadPlay is roughly 43″ wide vs. 29.5″ on the stock ALU panel. From the back to the front of the panel, the QuadPlay is 13″ deep vs. 10.25″ deep on the stock ALU panel. Both panels are ~3″ tall. See the image below for a visual comparison:
- How do I add more games? Please see this guide.
- I want a trackball for my QuadPlay, where can I find one? See here.
- Can I use the Trackball from the stock ALU in the QuadPlay? Yes, while I didn’t in this video, you certainly can. In fact, the trackball I installed is a replacement for the stock ALU 1.1 trackball.
- How do I start a 3 or 4 player game? See here.
- How do I install the Trackball? See here.
- Does the trackball kit include all hardware needed to install it into the QuadPlay? AtGames is going to add instructions as well as the 4 mounting screws which were missing from my kit. Yours should have everything needed. If not, you’ll need four M5x10 screws. Remember: use the red+grey cable when installing the trackball kit for use with the ALU 1.1.
Supported Legends Devices
The following Legends Devices can be used with the Legends QuadPlay.
- Legends Ultimate 1.1/1.2
- Legends Core – Also used by the Gamer Mini / Gamer Pro.
- Legends Core MAX
Features
The following are the features of the QuadPlay Arcade Control Panel:
- Drop-in arcade replacement control panel for Legends Ultimate 1.1/1.2
- USB and Bluetooth support for use with all Legends Arcade Family and other devices (i.e. Steam Deck, PC, etc.)
- Four eight-way digital joysticks
- Arcade-quality action buttons
- P1 and P2 feature six action buttons each
- P3 and P4 feature four action buttons each
- Optional center-mounted arcade-quality trackball (not included)
AtGames News Updates
For the latest AtGames News, visit the AtGames News Updates page.

Show Me How
Instead of watching a complete video to find exactly what you’re looking for, use the Show-Me-How links below that will jump to the relevant section of the video for you.
- What’s in the box?
- How do I remove the stock ALU Panel?
- Size-wise, how does the QuadPlay compare to the stock ALU Panel?
- How do I install the QuadPlay?
- How do I update the firmware in the QuadPlay?
- What do the viewing angles look like from each stick?
- How do I enable Bluetooth to connect to another device?
- How can I play more 4-player games with the QuadPlay?
- How do I start a 3 or 4 player game?
- What does it look like with multiple players?
- How do I fix a game that won’t play?
- How do I install the trackball?
- What does Wagner say about the QuadPlay?
QuadPlay Installation
Below we’ll step through the installation process. While very easy, still good to have a reference if you’re unsure. If you will be using a device other than the Legends Ultimate, you can simply plug the included USB 3.0 cable between the USB port on the Legends device and the QuadPlay (or use Bluetooth). To begin the ALU installation, please see below:
Remove ALU Control Panel
- Power off the Legends Ultimate.
- If you have installed the Legends Pinball Kit, remove the two screws holding them in place on both sides of the cabinet (repeat for both sides of the cabinet). TIP: Place all screws and pinball buttons in a large zip-lock bag to keep from losing them.
- Remove the top two screws on the Control Panel on the top-left/right of the panel.
- If you’ve installed the Arcade Cabinet Art kit, remove the two clear screws on the front and back directly below the control panel (repeat for both sides). This will allow you to get access to the side screws holding in the control panel.
- Remove the side screws holding in the control panel (one on each side).
- Gently slide the control panel out a few inches, keep in mind there are 3 cables attached that we will need to disconnect.
- Pinch the grey bus connector and remove it. Repeat for the USB and Power cable going into the control panel.
- Remove the control panel from the Legends Ultimate and set it aside.
QuadPlay Install in ALU
- Slide the two grooved edges of the QuadPlay over the side panels on the Legends Ultimate.
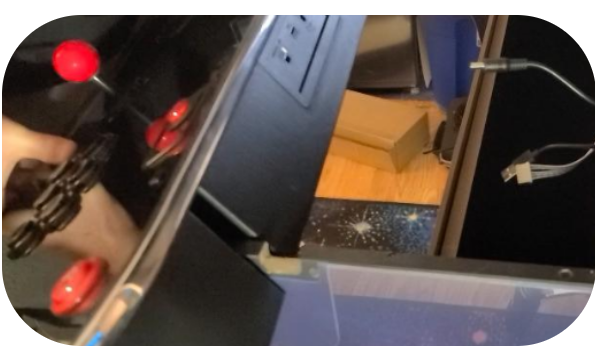
- Re-connect the Power, USB and grey Bus cable to the back of the QuadPlay panel.
- Slide the QuadPlay such that it’s flush against the back of the cabinet.
- Re-install the top 2 screws.
- That’s it, your QuadPlay has been installed!
Update Legends Device Firmware
In the following sections, we’ll update the Legends device with the latest firmware.
*NOTE: You will need to be on firmware version 5.68 (or higher) for the following setup. If you’re unsure how to update the firmware, please see below. If you’re already running 5.68 (or higher), you can skip this section.
- Login using your ArcadeNet account using your Legends Id and password.
- On the top tab bar, go to Settings †’ Version (x.y.z) and press the A button.
- If no update exists, press the B Button to exit. Otherwise, select the Download option. Once complete, select the Update option (this may take ~10+ min. to apply the firmware update).
- The machine will restart and display the status while updating, then reboot once more when the firmware update has completed.
- That’s it!
Update QuadPlay Firmware
*NOTE: You will need to be on firmware version 5.68 (or higher) for the following options to be available. If you’re unsure how to update the firmware, please see the section above. If you’re already running 5.68 (or higher), please continue below.
The QuadPlay also has it’s own firmware that we’ll want to update. To do that, see the following:
- Navigate to the Settings tab.
- Select the tile QuadPlay Control Deck Update Tool.
- Select YES when prompted “Do you want to update your quadplay control deck?”
- The update will be downloaded and installed to the QuadPlay.
- Wait about 30 seconds, then press the B button (to go back).
- Now select the tile QuadPlay Settings.
- Press A on the YES button when prompted “Do you want to update your QuadPlay control deck’s keymapping setting?”
- Then select REBOOT to reboot your device.
- Once rebooted, you’re all set!
Pair over Bluetooth
You can also use the QuadPlay to connect to another device via Bluetooth. To enter pairing, press and hold the P2 button for 7-8 seconds. Once the blue LEDs begin flashing, you can then follow the instructions for your device to pair over Bluetooth. Those instructions will vary depending on whether you’re paring to a Legends core/MAX, PC, Steam Deck, etc.
Multi-Player Gaming
How you start a game will vary depending on the game itself. As mentioned previously, there is only one 4-player game on the Legends Ultimate. Though, there are several available for CoinOpsX. Inserting credits can often be accomplished by pressing the P1/P2 buttons or pressing the AtGames/Home button and inserting them from the first option.
Once enough credits have been added, the following chart will provide guidance on the most common variations for starting a game:
| Press to Start | Example(s) |
| B | Rampage 1 |
| P1-3 | Rampage World Tour (3-player game) |
| P1-4 | WWF Wrestle Fest, NBA JAM/Hangtime, etc. |
| Move Joystick down, then press Player 3/4 button for players 3&4. | X-Men, The Main Event, etc. |
Trackball Installation
Adding a trackball to the QuadPlay control panel is an optional accessory. However, if you enjoy the many trackball games that require it (Centipede, Millipede, etc.) it may be an accessory that you’ll want to add to your panel. For me, it was a necessity for a great gaming experience. Many games that require a spinner can also be played with a trackball, such as one of my other favorites Tempest. My kit didn’t include the mounting screws for the trackball housing, yours should but just incase you may need four M5x10 screws.
In the section below, you’ll find some basic instructions to assist with the Trackball installation:
- You will need a decently long philips head screwdriver for these steps. Preferably, the head of the driver would be magnetized. This will make the process a bit easier.
- You can transfer the trackball from the stock ALU control panel to the QuadPlay. Additionally, if you want to keep the stock panel… stock, you can also purchase the trackball separately (as shown in this video). You can find it here (part # HAA310), if needed.
- Unbox the trackball replacement kit and remove the ALU Control Panel (if you’ll be installing to the ALU), if you haven’t already (here’s how).
- Set the QuadPlay on a flat surface, upside down (a carpet or rug should work well).
- Remove the 8 rubber feet from the rectangular portion of the QuadPlay (middle section). See below for an image.
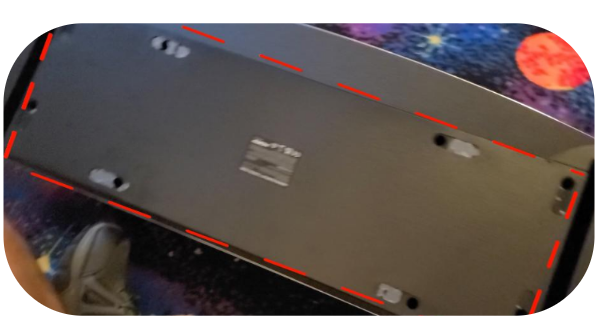
- Using a long philips head screwdriver, remove all 8 of the screws that were behind the rubber feet.
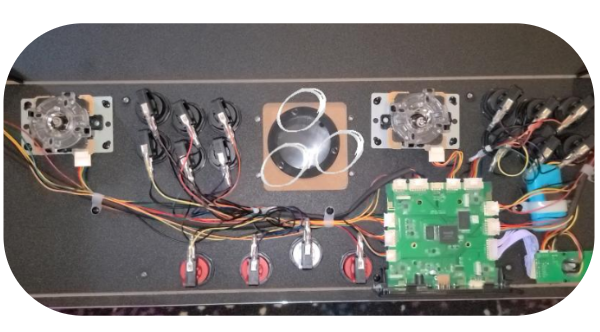
- Gently slide the rectangular portion of the panel up and set it aside.
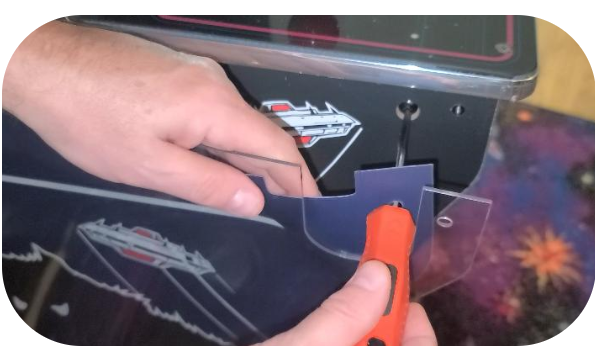
- Remove the 3 small screws holding in the cover plate to the QuadPlay. Set aside the two pieces for the cover, we won’t be re-using them. See below for an image.
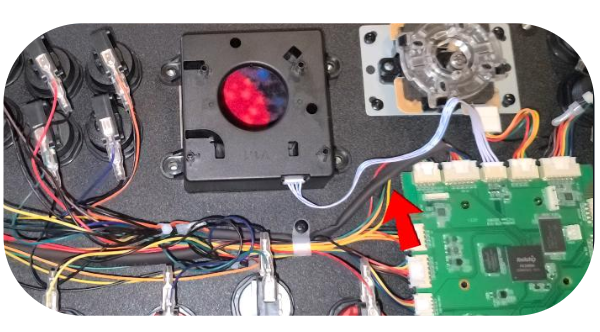
- Connect the 4-pin wire (*NOTE: use the reddish-pin cable, NOT the blue one. The blue cable is for the ALU 1.0 and the QuadPlay won’t fit the ALU 1.0) to the empty trackball connector on the large board, the other end to the trackball and position the trackball housing over the screw holes (connector on the housing will be facing down towards the white+green AtGames button). See below for an image.
- Install the 4 screws into the Trackball housing to mount it securely to the QuadPlay.
- Flip the panel over, insert the ball and cover plate over the ball. While holding the plate and ball with one hand flip the panel on it’s side and install the 3 small screws to secure the plate to the trackball housing.
- Slide the large rectangular plastic cover over the grooves.
- Reinstall the 8 screws to the cover, re-apply the 8 rubber covers.
- That’s it, the trackball is assembled! You can now install the QuadPlay into the ALU.
Fix Games that aren’t working
There are going to be a few 4-player games from the CoinOpsX build that don’t immediately work with the QuadPlay. A few that I’ve tried that didn’t work were The Simpsons_4p.UCE and Teenage Mutant Ninja Turtles 2 – Turtles in Time (Arcade)_4p.UCE . In the steps below, I’ll describe how to get them working on the QuadPlay:
NOTE: The following assumes you already have CoinOpsX on a USB stick as setup and described here.
- Download and install 7-zip from here.
- Download the AddOn Tool from here (from FalkensMaze / used to re-build a .UCE file)
- Download and install the latest AddonX Tool from here (from AtGames).
- Copy your non-working .uce file(s) to a new subfolder on your PC (i.e. c:\coinopsx\test in my case).
- Download this mame2003_plus_libretro.so file (mame 2003 emulation core) and copy to the same sub folder as the non-working .uce files.
- Using 7-zip, right click and select 7-zip †’ Extract to “Game name here”…
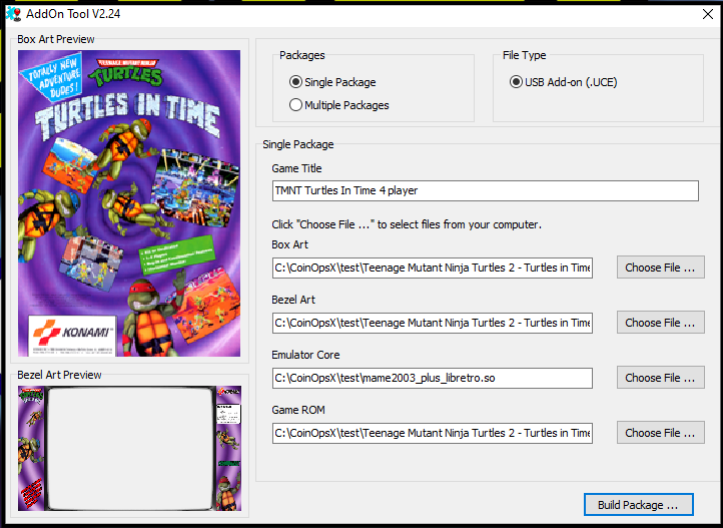
- Launch the AddOn Tool (not the AddOnXTool). Follow the instructions for each Choose File… button listed:
- For Box Art, browse to the folder where your .uce was extracted, then in the [game name subfolder\boxart, select the boxart.png and click the Open button.
- For the Bezel Art, repeat the same but select addonz.png (or similar for the bezel artwork) and click the Open button.
- For the Emulator Core, use the one you downloaded above (i.e. mame2003_plus_libretro.so) and click the Open button.
- For the Game ROM, browse to the folder where your .uce was extracted, then in the [game name subfolder\roms. Click the drop-down for (*.zip) and select the yourgamename.zip and click the Open button.
- Give the Game Title a name, such as TMNT Turtles In Time 4 player.
- Your settings should look similar to the following, though using the game you’re wanting to re-package.
- Click the Build Package … button and browse to the sub folder that you created earlier (i.e. c:\coinopsx\test in my case). Then, click the Save button.
- The .uce will now be repackaged and saved to your folder.
- Now Copy the .uce file(s) you repackaged with the above MAME emulation core to the AddonX USB stick. I created a ‘test’ sub folder off the root of the USB stick. Alternatively, you can overwrite the existing .uce files in your 4 Player Build / 3 Player Build subfolders on your CoinOpsX stick.
- Now, using the AddOnX Tool, click the Choose button and select the root of your CoinOpsX USB stick. Then click the Build button. Once done, it should look something like this (though, I’m using a slimmed down USB stick with just 3/4 player games):
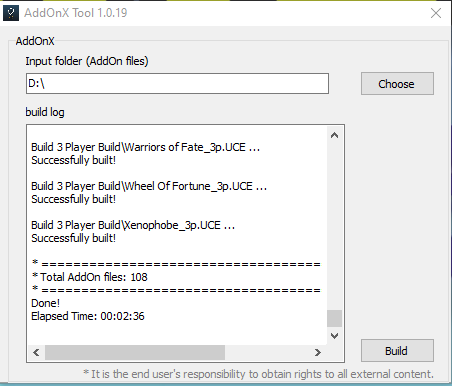
- The AddOnX Tool will then scan all the .uce files on the USB stick. Once done, safely eject the USB stick from your PC.
- Re-insert the USB stick into your ALU, navigate to the BYOG tab.
- Select AddOnX, press the AtGames/Home button and select the folder that contains your newly converted .uce files.
- Have fun!
Troubleshooting
Here are some troubleshooting steps that may be helpful to you:
- Game [insert name] hangs after launching – I’ve had this happen as well. In this case, you’ll need to re-package the .uce file yourself to correct the issue. I’ve documented that process here.
- I tried to re-package my AddOnX game, but the AddOnX Tool exits before completing. How do I fix this? In my case, disabling my AntiVirus for 1 hour fixed the issue.
If the above Troubleshooting information did not help resolve the issue, you can also contact AtGames for assistance here.
Change Log
- 2023-01-02 – Add notation during assembly to use a long philips head screwdriver that is magnetized for easier assembly.
- 2022-11-12 – Added trackball screw sizes (thanks Tom!)
- 2022-11-11 – Added the Supported Legends Devices section.
- 2022-10-04 – 2022-10-23 – Continuation.
- 2022-09-29 €“ Start to this guide.