GRS Build-A-Cade
Last Update: 07/11/2023

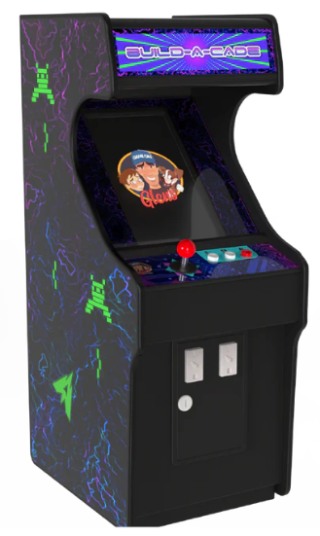
A good friend and popular content creator of the retro gaming community, Glen Planamento (YouTube channel Glen’s Retro Show) and his partner Arcade Workshop have created an amazing new product called Build-A-Cade!
Build-A-Cade is a 1:6th mini MultiCade! That is, it allows adding your own classic arcade games to the machine. This is a project that you’ll assemble yourself and includes everything you’ll need to build it, with the exception of a Raspberry Pi (see here for supported options), USB-C power supply and a philips head screwdriver.
Glen sent one of the early units for review and guide development. The product is Amazing! I absolutely love this device, not just saying it because he’s a friend. It’s the type of quality product you’ve come to expect from GRS. I honestly don’t see how he can sell it for this price and make a profit (pre-order price is $89.99). Not only is the price exceptional, but the build quality is just as impressive. It feels very solid, well-designed and with the ability to swap control panels – you can build it the way you want.
The included manual will step you through the assembly process. The information below will be helpful if you’re new to the Build-A-Cade and RetroPie. The video above will step you through the entire process from unboxing, assembly, OS setup, copying your games, Game Play and much more. This guide will continue to be updated as new information and modding options are available for the Build-A-Cade. I hope you find it helpful, please comment in the above video if there is anything specific you’d like to see added here.
How-To link to a specific section on this Guide: go to the Table of Contents (below) and click a section to reference. Copy the URL from the address-bar of your browser and paste in your video description/post/blog. This will direct a viewer to a specific section in any of the guides you find on this site.

Table of Contents
Q&A
The following are some common Questions and Answers that you may have about the Build-A-Cade:
- When will the Build-A-Cade ship? They are available now on Amazon or tsticks.
- What are the dimensions of the Build-A-Cade after assembly? Approximate dimensions are: Height 11″, Width 4.25″ and Depth 5.75″.
- What’s the battery life from the built-in battery? About 3-4 hours, depending on the Pi model used. I personally tested a Pi4, it lasted 4h 30m.
- How can I add my own games? Please see here.
- What version of MAME Roms should I use? Version 0.78 rom-set.
- Is there a list of games that can be played with each control panel? See here for the .cfg file collections. They list the ROMs for each.
- Can I download the image for Build-A-Cade without buying one? Yes, please see here.
- How do I shutdown the Raspberry Pi safely? Please see here.
- Can the unit be modded? Certainly, the ease in which you can get access to the internals, the fact that it’s using a Pi and with the ability to 3D print accessories all lend itself well to modding.
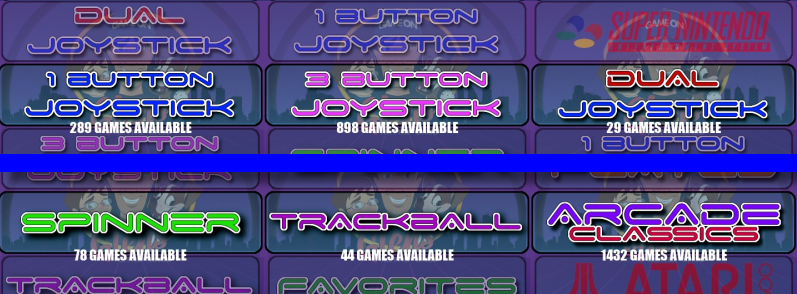
- How many games are supported for each of the control panel controls? Please see the image below to get an idea.
Resources

- Where to buy one? – You can find one at Amazon here or direct from thunderstickstudio.com.
- GRS Build-A-Cade Instruction Manual – Excellent manual which covers all aspects of the GRS Build-A-Cade.
- Glen’s Retro Show Build-A-Cade [Playlist] -All GRS Build-A-Cade videos currently available!
- The “Official” GRS Build-A-Cade Users Group [Facebook] – Community of Build-A-Cade owner’s and Enthusiasts.
Articles
- coolthings.com – Great article about the new Build-A-Cade!
- trendhunter.com – Excellent post about the GRS Build-A-Cade with ratings.
Features
The following are some of the key features of the Build-A-Cade:
- 1:6 scale arcade machine
- Add your own games
- 4.3″ vertical IPS screen
- Control panel with joystick and 3 buttons (one action and P1/P2)
- Joystick and two buttons on the back panel
- Coin door with 2 buttons and a 3.5mm headphone jack
- Illuminated marquee
- HDMI video output (Pi 3 only)
- x2 USB ports
- Stereo speakers
- Volume control dial
- Safe Shutdown button
- Rechargeable battery
- Vinyl artwork
- 32GB microSD card with OS installer
- Licensed “The Adventures of Robby Roto!” arcade game
- Additional control panel options available
Modding Options
This is why we love this hobby, modding! Below are some options that are currently or will soon be available for the Build-A-Cade. As new options are identified, they will be added below.
- GRS Build-A-Base 1:6 Scale Adjustable Arcade Cabinet Riser [3D Printed] – This stand will position your GRS Build-A-Cade (or other 1:6 scale cabinets) to the perfect viewing angle.
- GRS Build-A-Cade 1:6 scale Joystick bat Top [3D Printed] – Bat top for GRS Build-A-Cade 1:6 scale arcade cabinet kit.
- GRS Build-A- Cade custom Artwork – Joe Szabo has options available now! I ordered the Ms. Pac-Man set.
- ArcadeGraphix.com (Custom Artwork) – Ordered the Defender set (I own an original ’81 Arcade machine). Can’t wait to receive it!
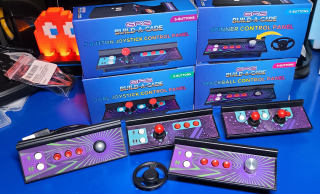
GRS Panel POD
The GRS Panel POD allows you to easily swap between a Trackball, Spinner, Dual-Stick and other GRS mini Arcade control panels! The Panel POD utilizes a USB connection which will work with the Build-A-Cade as well as many other devices such as the Steam Deck and the ROG Ally (shown in this video).
Items Shown
- GRS Panel POD [ Amazon | thunderstickstudio ]
- GRS Build-A-Cade [ Amazon | thunderstickstudio ]
- GRS 4 Panel Kit (can pick and choose also)
- USB-A to USB-C Adapter (x4 pack Mix)
- Dock for your Steam Deck or ROG Ally [Amazon]
Related Guides
RetroPie Button Mapping
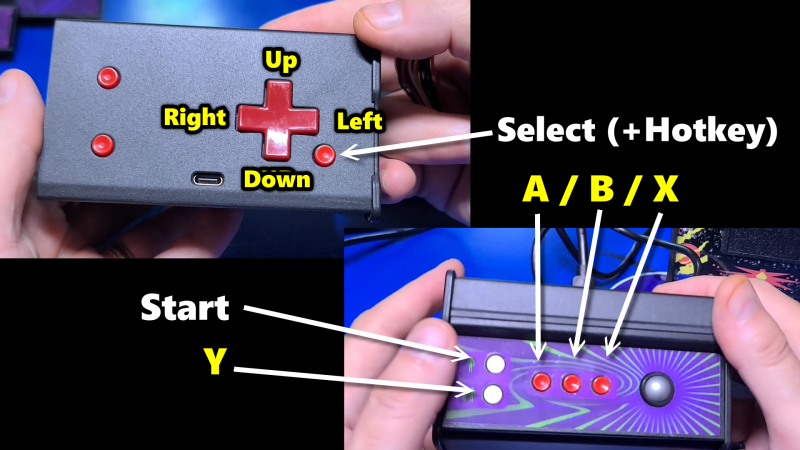
The diagram below should assist with the Panel POD button mapping. Configuration steps are also below.
Below are some steps to assist with the button mapping within Emulation Station:
- Assemble your control panel into the Panel POD.
- Connect the USB-C cable to the back of the Panel POD and the USB-A end into a port on the Build-A-Cade.
- Using the panel installed in the Build-A-Cade, press the P1 (Start) button.
- Select Configure Input and press the A button. A again on the YES prompt.
- On the connected Panel POD controller, press and hold a button for about 3-4 seconds until the controller is identified by RetroPie.
- Press each of the buttons as identified in the image above. For any buttons not on the panel, press and hold any button for a few seconds to skip over it.
- Repeat until you see HOTKEY ENABLE, for this button press the Select button (see diagram above).
- Select a game that utilizes the panel you just configured and Have Fun!
Adjust Analog Controls
If you want to adjust the sensitivity of the Analog Controls or re-map any buttons on a per-game basis, see the following:
- Load up a MAME Game.
- Press the Joystick in the down position while holding the right coin door button for about 4 seconds.
- Move down to Analog Controls or Input (this game) if you want to remap any buttons for the game.
- Make any adjustments needed for the game.
- Select the Return to Main Menu option.
- Select Return to Game to close the menu.
Show Me
If you’re interested in seeing certain aspects of the Build-A-Cade, the following will launch a video to demonstrate what you’re looking for at the associated time-stamp. This makes it quick and easy to “see” exactly what you’re wanting without having to watch an entire video :
- Features
- What’s in the Box?
- How do I assemble the Build-A-Cade?
- How do I setup the Operating System?
- How do I add games from a USB Stick?
- How do I add games across the network?
- What do the Control Panels Look Like?
- Show Me some Game Play Examples.
- What does the Trackball Panel look like during game play?
- What does the Spinner Panel look like during Game Play?
- How do I swap Control Panels?
- What does Wagner think of the Build-A-Cade?
Supported Pi’s
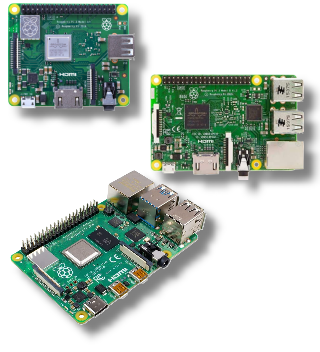
Locating a Raspberry Pi, lately, has been quite difficult. Fortunately, you can use a Pi you may already own or any one of the following:
- Raspberry Pi 3B
- Raspberry Pi 3B Plus
- Raspberry Pi 3A Plus
- Raspberry Pi 4 Model B
If you don’t already have a Pi for the Build-A-Cade, check out RPiLocator. This tool searches all the sites that have Pi’s and can alert you when one is found.
Adding Games
There are a number of ways you can add your own games to the Build-A-Cade. Below are a few methods that may be helpful.
USB Stick
You can easily copy your games to the GRS Build-A-Cade using only a USB stick. I recommend using a USB stick that has an activity LED so you know once the copy has completed. Below are some instructions to help with that.
- Insert your USB stick into your computer and format it as a FAT32 stick. If you’re not sure how, please see this.
- Create a subfolder off the root of the USB stick called retropie.
- Boot up the Build-A-Cade running RetroPie.
- Insert the USB stick into one of the USB ports on the back of the Build-A-Cade.
- The LED on the USB stick should blink for a bit, then stop and can be removed once the LED goes off. If your USB stick doesn’t have an LED indicator, leave it plugged in for at least two minutes.
- Remove the USB stick from the back of the Build-A-Cade and insert it back into your computer. You should now see several folders under the /retropie subfolder that RetroPie created for you.
- Copy your games into the /retropie/roms/arcade subfolder. Keep in mind, those that are vertical games will look best on the BaC.
- After copying your games, insert the USB stick back into the BaC. Wait for the LED to stop blinking or leave it in the machine for at least 10 minutes to make sure the games copied.
- Remove the USB stick.
- Restart Emulation station (Press P1 button at the main menu), your games should now appear in the list. That’s it!
Network Copy
Another method of copying games to your Build-A-Cade is using the Network copy method. The following will assist you with how to do it:
- Connect a keyboard to the Build-A-Cade and power it on.
- Select Options.
- Scroll to the bottom until you see WiFi and select it.
- You’ll be prompted to set your WiFi Country. Select Yes and press Enter on the keyboard.
- Move down until you see Localization Options and press Enter.
- Select the WLAN Country option.
- Select your country (you can press page up/down to move faster through the list). Then, press Enter and Enter again on the dialog.
- Press the Tab key and select Finish and press Enter, then Yes to reboot now.
- From your PC, open File Explorer and at the top bar enter \\retropie or \\[ip address of the Build-A-Cade] and press Enter.
- Navigate into the roms share, then the arcade sub folder. You should see the included/licensed game, robby.zip.
- Copy your own arcade game roms into this subfolder by dragging and dropping them into the arcade sub folder. *NOTE: some classic arcade games may need samples to play correctly, copy any samples to the \bios\mame2003\samples sub folder.
- Once all games have been copied, on the Build-A-Cade press the P1 button from the main menu, select Quit → Restart Emulation Station.
- Once Restarted, you can now play the games on your Build-A-Cade!
Operation
The following are some helpful operational tips while using the included 3-button 1-joystick control panel, all of which have been mapped automatically for you :
| Function | Button(s) |
| Exit a Game | Left Coin button + P1 |
| Insert a credit | Left/Right Coin Button |
| Start a 1 Player Game | Press the 1 Player button |
| Start a 2 Player Game | Press the 2 Player button |
| Shutdown the Pi (Safely) | From the main menu, press the 1 Player button. Move down to the Quit option and press A. Select Shutdown System. You may now safely power-off the unit from the switch at the back. *Note: Press the Player 2 button to go back if you selected the menu by accident. |
Wagner’s Favorites
Below are some game ideas for the control panels. This list is a work-in-progress 🙂
3 Button 1 Stick (Included with the Build-A-Cade)
For the control panel that is included with the Build-A-Cade, it has one action button and a P1, P2 and a single joystick. For this panel, I recommend the following games to start off with.
| Game Title | MAME 0.78 file name |
| Burger Time | btime.zip |
| Congo Bongo | congo.zip |
| Dig Dug | digdug.zip |
| Donkey Kong | dkong.zip |
| Donkey Kong Jr. | dkongjr.zip |
| Frogger | frogger.zip |
| Galaga ’88 | galaga88.zip |
| Galaga | galagamw.zip |
| Galaxian | galaxian.zip |
| Gorf | gorf.zip |
| Gyruss | gyruss.zip |
| Jr. Pac-Man | jrpacman.zip |
| Make Trax | maketrax.zip |
| Mappy | mappy.zip |
| Moon Cresta | mooncrst.zip |
| Ms. Pac-Man | mspacman.zip |
| Nibbler | nibbler.zip |
| Pac-Man | pacman.zip |
| Pleiads | pleiads.zip |
| Qix | qix.zip |
| Space Invaders | invaders.zip |
| Time Pilot | timeplt.zip |
Troubleshooting
The following are some troubleshooting points that you may find helpful:
- I completed the assembly, but don’t see anything on the display. Why? Try removing the microSD card from the extender and inserting it directly into the Pi, then power-on the BaC. If the display comes on, power off the BaC and re-insert the microSD extender cable and make sure it’s fully seated. Then re-install the microSD into the extender and power on the BaC. If everything works, you’ve fixed the issue. If this didn’t fix the issue, it could be a defective display or bad microSD extension cable. Contact support here.
Change Log
- 2023-07-11 – Added GRS Panel POD Section.
- 2023-06-05 – Minor updates.
- 2022-10-28 – Added Amazon purchase link under resources.
- 2022-10-20 – Updated link to the latest GRS image.
- 2022-10-12 – Added a new section, Wagner’s Favorites.
- 2022-10-08 – 2022-10-11 – Continuation, many new sections added. Video added and released.
- 2022-10-07 – Start to this guide.